Export and import patch sets
The QNX Software Center lets you export and import patch sets.
A patch set is like a recipe for installing packages. It tells the QNX Software Center not only which packages to install, but also which version of each package to install.
Patch sets enable all members of a team to standardize on the same software base. They also make it easier to reproduce issues across systems.
You can export a patch set from one installation and import it into a different installation, either on the same development host or on a different host. When importing a patch set, you can choose whether the patch set creates a new installation or modifies an existing one.
A patch set doesn't contain a payload of files; it contains only a list of required packages and their versions. So, to import a patch set, you must have access to the packages that the patch set specifies, either from the myQNX server (if you use the QNX Software Center online) or through packages you have imported from your local filesystem.
You must also be entitled to use the packages specified in the patch set, or the QNX Software Center won't complete the installation. If this issue occurs, contact your license administrator to determine if they can deploy the appropriate licenses.
Export a patch set
To create and export a patch set:
-
From the Welcome screen, select Manage Installation, click the installation selector, and then select the installation that will form the basis of your patch set.
For example, if you select the installation named qnx700, the selector will look like this:

-
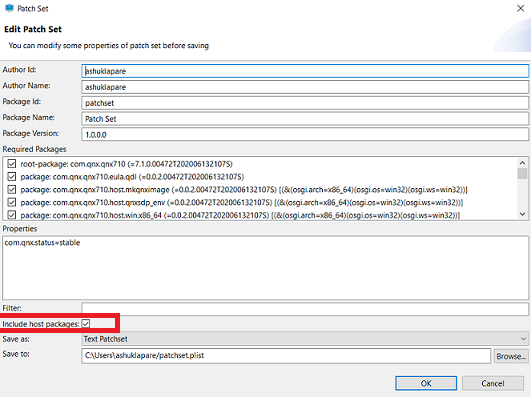
Select . You'll see the Edit Patch Set dialog.
-
Use the following
guidelines to set the patch set properties:
Field Description Author Id The reverse DNS address of your organization. For example: com.mycompany
Author Name Typically, the name of your organization. Package Id An alphanumeric ID, prefixed by the Author ID. For example: com.mycompany.projectA.patchset
Package Name A meaningful description of the patch set. Can contain spaces. Package Version The version of the patch set.
This field must contain four segments, separated by periods. The first three segments are numeric; the last segment is a string and typically specifies a date.
CAUTION:The QNX Software Center uses the first three segments for numeric comparison. For instance, it sees 1.0.2 as greater than 1.0.100. However, it uses the last segment for alphanumeric comparison. Thus, it sees 1.0.0.2 as later than 1.0.0.10 because 2 as a string is greater than 10. - Review the contents of the Required Packages field if you wish to see which packages the patch set requires.
-
Look at the Properties field to see whether the patch set specifies experimental packages.
A stable status indicates that no experimental packages are specified, while an experimental status indicates that one or more experimental packages are specified.
- Ignore the Filter field, as it used primarily for internal purposes.
- Enable the option Include host packages which allows you to include host
packages in the patchset. QSC automatically exports the patchset with
conditional dependencies on host packages. (That is, it depends on the Linux
package only if you are installing on Linux).
 Note:To create a universal patchset which can be installed on all the hosts (with package IDs locked), you need to install all host packages first (e.g., Linux and Windows on Linux host).
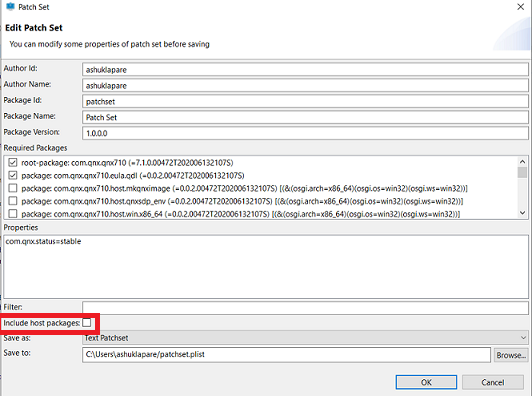
 - Disable the option Include host packages to exclude the host packages
from the patchset (i.e., Linux host packages are not in the patchset, only the
target packages are).
-
Click the Save as field and choose one of the following options:
- Text Patchset — Exports an editable, text-based patch set that can install all packages specified in the patch set, without installing itself. We recommend this option for most cases.
- Unsigned Package Patchset — Exports a non-editable patch set in the form of a QNX Software Center package. This option is for more advanced scenarios, where, for example, you may wish to version the patch set, add metadata to the patch set, or create a locked patch set.
- In the Save to field, assign a name to the patch set.
- Click OK to complete the export.
Note that, when you export a patch set, you export all items in the installation.
Import a patch set to add an installation
To add an installation:
- Go to the Welcome screen and select Install Patchset.
- Click Browse to locate and select the patch set.
- If you wish to lock the packages specified by the patch set (i.e. prevent them from being updated), uncheck the box labeled Install patchset contents, do not lock installation. Otherwise, leave the box checked.
- Click Create new installation, then click Next.
-
Choose a license key for the product being installed, then click Next.
Note the following:- If you need help with choosing the appropriate license, consult with your license administrator or visit the licensing information page.
- If you have to add a license key manually (for instance, you use the QNX Software Center offline), click Add License Key and enter the key listed in your license certificate or myQNX account.
- If your product requires activation, you can activate it now or
later. See
Perform manual product activation
if you need to activate offline.
- Specify the installation folder, name, and other properties of your installation, then click
Next. For help, see
Edit installation properties.
- Make sure that the baseline package (for example, QNX Software Development Platform) you want to install is checked, then click Next.
-
Review the list of packages that the QNX Software Center will install, then click Finish to start the installation process. The process may take a few minutes to complete.
Too little disk space?
If the Review Packages dialog warns that you have too little disk space, don't click Finish. Instead, click Back, free up some disk space, and then click Next to return to the Review Packages dialog. If necessary, repeat this procedure until the dialog no longer issues the warning.
Upon completion, the new installation becomes your current installation and appears in the Installed tab.
Import a patch set to modify an installation
To modify an existing installation:
- Click the installation selector in the top-right area of the main window, then select the installation you wish to modify.
- Go to the Welcome screen and select Install Patchset.
- Click Browse to locate and select the patch set.
- If you wish to lock the packages specified by the patch set (i.e. prevent them from being updated), uncheck the box labeled Install patchset contents, do not lock installation. Otherwise, leave the box checked.
- Select Use current installation, then click Next.
- Makes sure that all the packages you wish to install are checked, then click Next.
- Review the list of packages that the QNX Software Center will install, then click Finish.
Upon completion of the import, the packages specified in the patch set appear in the Installed tab.
Updating packages specified in a patch set
Patch sets help ensure that developers use specific versions of packages. Thus, when you import a patch set, the QNX Software Center gives you the option of locking all of the packages that the patch set specifies. This locking prevents the packages from being updated. (The locking applies only to packages specified by the patch set. You can still add new packages to an installation based on, or modified by, a patch set.)
- Import a new patch set that specifies the updated versions of the packages.
The new patch set should have the same Package Id but a higher Package
Version than the original patch set.
or
- Uninstall the patch set and install the desired package versions manually.
If a patch set isn't locked, you can simply use the standard procedure for updating its
packages. See Install updates
for details.
Access your installation from the IDE
As with any other installation, an installation based on, or modified by, a patch set will appear in the QNX Momentics IDE as an SDK. To select the SDK, launch the IDE and click . (You may need to restart the IDE to see the SDK.)