Boot using U-Boot
QNX Board Support Packages8.0BSP User's GuideHoneyComb LX2KSolidRunNXPARM
You must first boot the board with U-Boot from the microSD. After U-Boot launches, you can load the QNX IFS.
- For information about how to boot U-Boot and then load the QNX IFS using an microSD, see the
Load the QNX IFS from the microSD card section in this chapter.
Load the QNX IFS from the microSD
The followings steps describe how to boot board using U-Boot and then load the QNX IFS from your microSD. Before you can complete these steps, you must prepare the microSD. For more information, see thePreparing the microSD card to boot the boardsection in this chapter for more information.
- Connect your Honeycomb LX2 target board to your host system.
- On your host machine, start your favorite terminal program with these settings:
- Baud rate: 115200
- Data: 8 bit
- Parity: none
- Stop: 1 bit
- Flow control: none
- Serial Device: /dev/ttyUSB0
- To turn on the board, short the two red ON/OFF pins (pin 6 and pin 8) of the Front Panel header pins to simulate a power button press and turn on the board. It is recommended to use
jumper wires to short the connectors but the user can use alternative methods.
Figure 1ON/OFF pins on Front Panel connectors 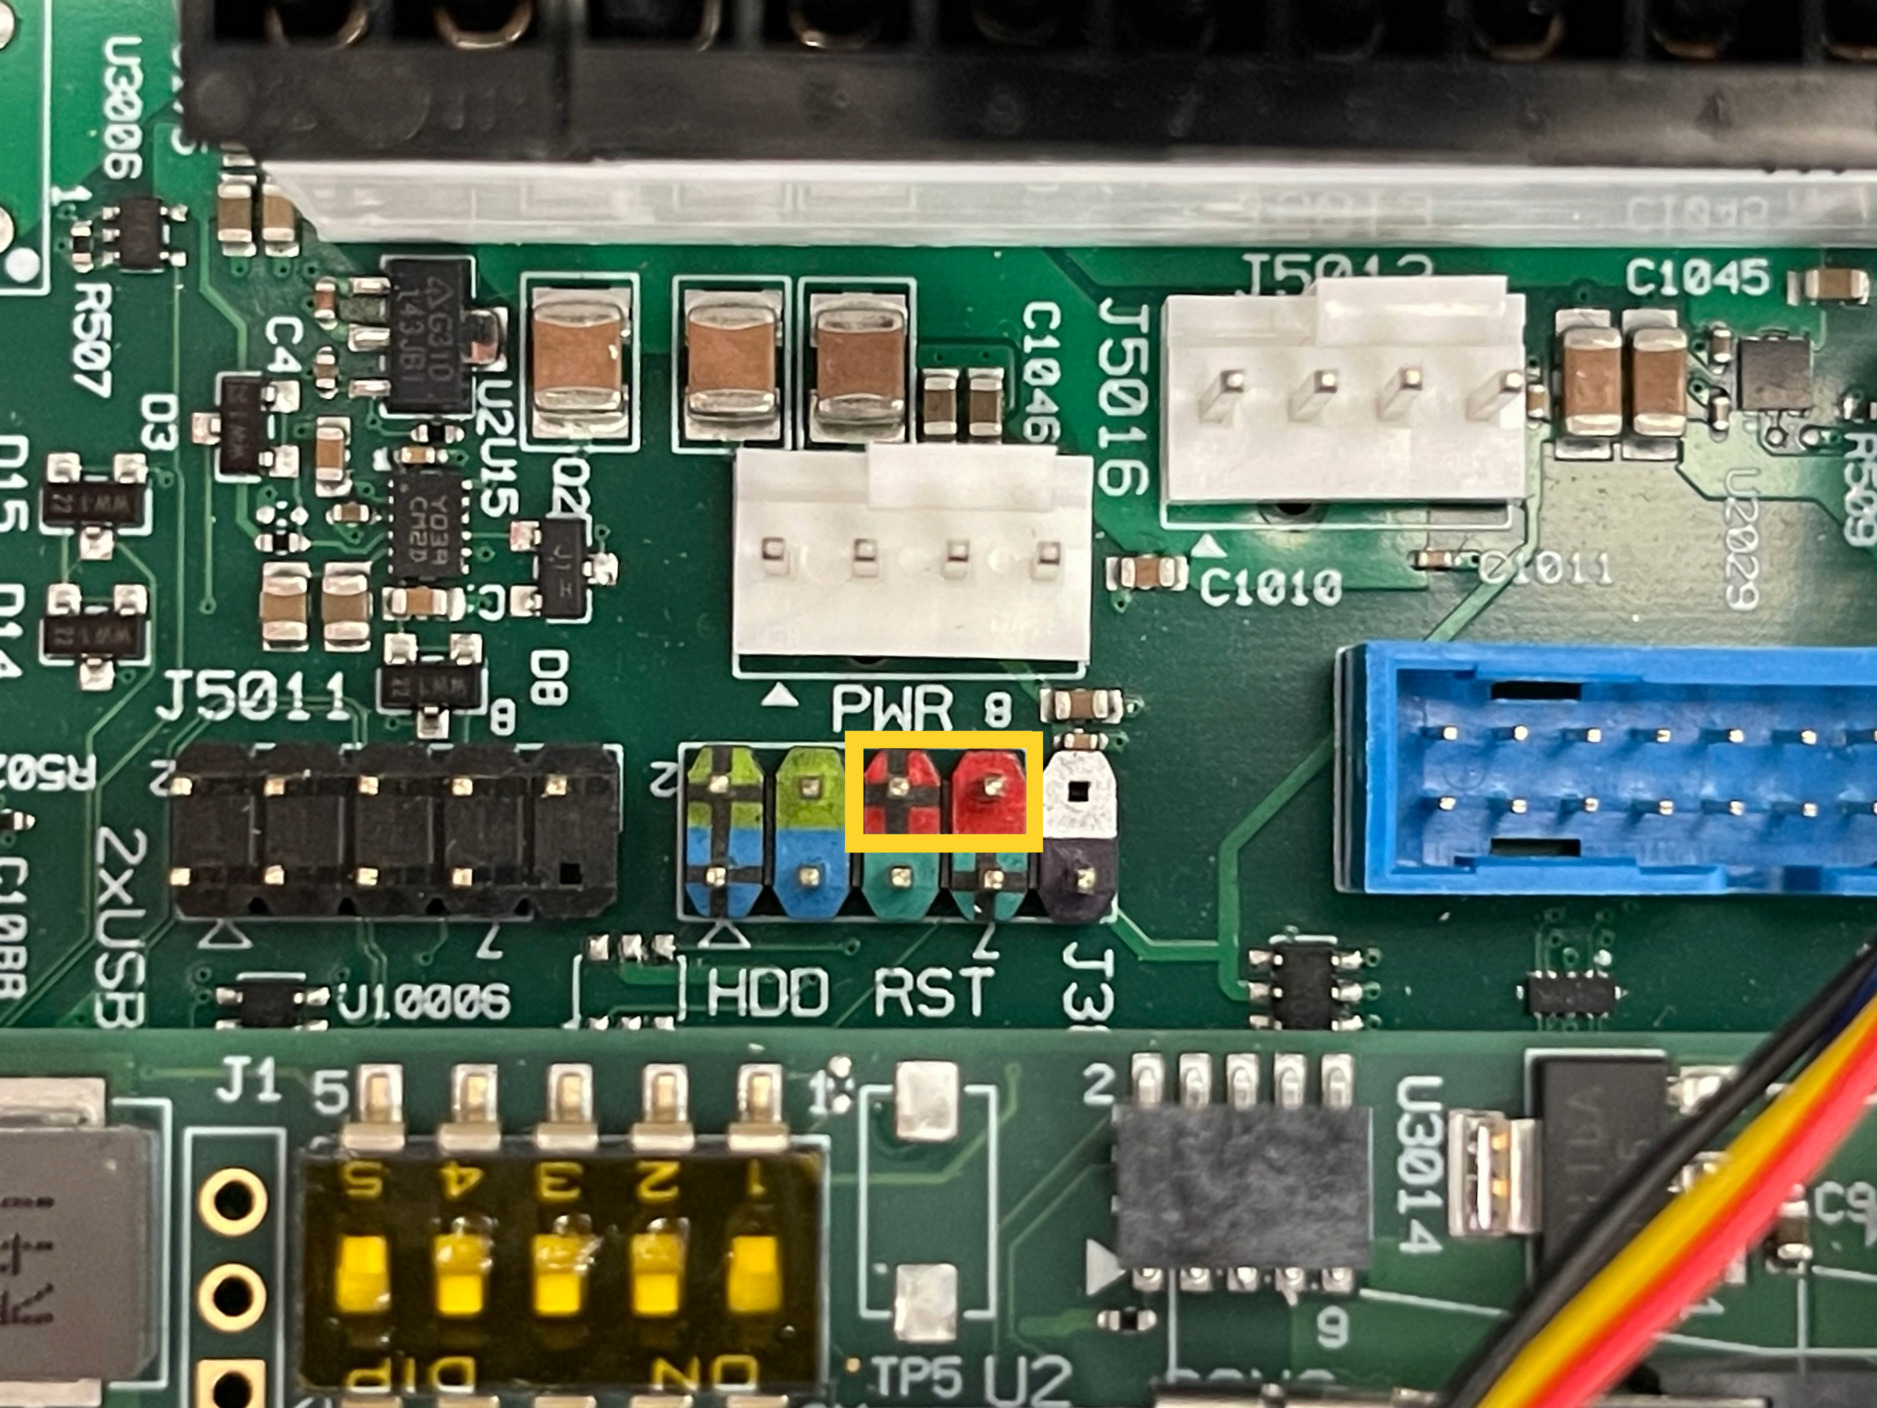
- After the power is turned on, output from U-Boot appears terminal console. When you see the prompt
Hit any key to stop autoboot
, press any key on your keyboard to interrupt the boot process as follows:NOTICE: BL2: v2.4(release):LSDK-21.08-10-gfb8c3ba01 NOTICE: BL2: Built : 09:29:58, Jul 31 2024 NOTICE: UDIMM KF3200C20S4/32GX NOTICE: DDR PMU Hardware version-0x1210 NOTICE: DDR PMU Firmware vision-0x1001 (vA-2019.04) NOTICE: DDR4 UDIMM with 2-rank 64-bit bus (x8) NOTICE: 64 GB DDR4, 64-bit, CL=20, ECC off, 256B, CS0+CS1 NOTICE: BL2: Booting BL31 NOTICE: BL31: v2.4(release):LSDK-21.08-10-gfb8c3ba01 NOTICE: BL31: Built : 09:29:58, Jul 31 2024 NOTICE: Welcome to lx2160acex7 BL31 Phase SEC0: RNG instantiated fsl_board_late_init Net: eth0: DPMAC3@xgmii, eth1: DPMAC4@xgmii, eth2: DPMAC5@xgmii, eth3: DPMAC6@xgmii, eth4: DPMAC7@xgmii, eth5: DPMAC8@xgmii, eth6: DPMAC9@xgmii, eth7: DPMAC10@xgmii, eth8: DPMAC17@rgmii-id [PRIME] MMC read: dev # 0, block # 20480, count 4608 ... 4608 blocks read: OK MMC read: dev # 0, block # 28672, count 2048 ... 2048 blocks read: OK crc32+ fsl-mc: Booting Management Complex ... SUCCESS fsl-mc: Management Complex booted (version: 10.37.0, boot status: 0x1) Hit any key to stop autoboot: 0 => - On the U-Boot prompt, type the following U-Boot commands to load the QNX IFS from the microSD:
- mmc read 0x80d00000 0x6800 0x800; fsl_mc apply dpl 0x80d00000; fatload mmc 0:2 0x80200000 ifs-honeycomb.ui; fatload mmc 0:2 0x80100000 fsl-lx2160a-clearfog-cx.dtb; bootm 0x80200000 - 0x80100000
=> mmc read 0x80d00000 0x6800 0x800; fsl_mc apply dpl 0x80d00000; fatload mmc 0:2 0x80200000 ifs-honeycomb.ui; fatload mmc 0:2 0x80100000 fsl-lx2160a-clearfog-cx.dtb; bootm 0x80200000 - 0x80100000

MMC read: dev # 0, block # 26624, count 2048 ... 2048 blocks read: OK
fsl-mc: Deploying data path layout ... SUCCESS
14502832 bytes read in 639 ms (21.6 MiB/s)
45111 bytes read in 16 ms (2.7 MiB/s)
## Booting kernel from Legacy Image at 80200000 ...
   Image Name:
   Created:      2025-04-23  17:51:43 UTC
   Image Type:   AArch64 Linux Kernel Image (uncompressed)
   Data Size:    14502768 Bytes = 13.8 MiB
   Load Address: 80200000
   Entry Point:  80200000
   Verifying Checksum ... OK
## Flattened Device Tree blob at 80100000
   Booting using the fdt blob at 0x80100000
   Loading Kernel Image
   Loading Device Tree to 000000009fff1000, end 000000009ffff036 ... OK
found ar8035 ethernet phy at emdio1 address 1
Releasing fan controller full speed gpio

Starting kernel ...

syspage::hypinfo::flags=0x00000000

Welcome to QNX 8.0.0 on SolidRun_HoneyComb-LX2 !

Starting I2C driver ...
Starting Serial driver...
Starting SDMMC driver for SD card...
Starting SDMMC driver for eMMC ...
Path=0 - ls10xx
 target=0 lun=0     Direct-Access(0) - SDMMC: DG4064 Rev: 0.1
Starting devf-ram filesystem ...
Starting networking ...
Starting DHCP client ...
Starting SSH daemon ...
Starting thermal...
Starting shell ...
#
You should now be able to test the OS by executing any shell command, or any command residing within the QNX IFS image. For example: ls or uname -a.
Note:
Addresses are interpreted as hexadecimal, therefore entering 0x80200000 and 80200000 are considered to be the same.
Page updated: