Building a QNX SDP 8 BSP for Raspberry Pi
You can use the QNX Toolkit to build Board Support Packages (BSPs); this guide features an example using the Raspberry Pi 4 board.
Prerequisites
This tutorial assumes you've installed QNX SDP 8 using the QNX Software Center and that you're using the QNX Toolkit extension for Microsoft VS Code. For more information, refer to "Installing QNX SDP" in the QNX SDP 8.0.x Release Notes.
- Raspberry Pi 4 - 2GB model or higher
- Micro SD card - 8GB or more
Overview
To complete the steps, you need to install the BSP, open the extracted BSP folder in VS Code, and then build the BSP using VS Code tasks.
Download the BSP
To download the BSP, you need to install it from QNX Software Center (QSC).
To install the BSP:
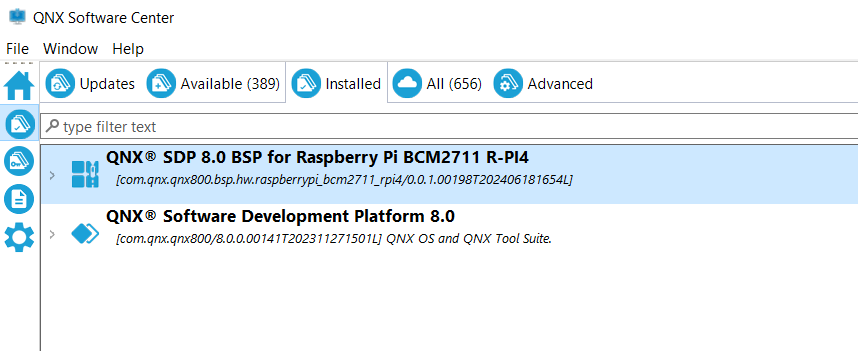
- From the Welcome page in QSC, click Install New Packages from the list of tasks in the middle.
- Use the search box to filter using the search term "Raspberry Pi". The version used in this example is "QNX SDP 8.0 BSP for Raspberry Pi BCM2711 R-P14".
- Click Install and follow the installation steps. For more information, go to "Add an installation" in Using the QNX Software Center.
Open the BSP folder in VS Code
Once you install the BSP using QSC, you need to extract its contents into a folder, and then open this folder in VS Code.
To open the folder:
- Find the BSP zip file that was installed into the bsp folder of your QNX SDP 8 installation.
- Extract (unzip) the contents of the zip file into a folder.
- Inside VS Code, navigate to File > Add Folder to Workspace.
- Select the folder from the resulting navigation window.
- VS Code prompts you to configure build tasks, launch configurations, and IntelliSense. Click Yes to proceed.
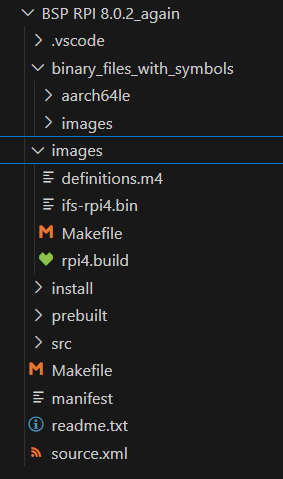
- From the VS Code dropdown that is displayed, select Executable.
QNX Toolkit builds the project and displays output in the terminal window. You should see the file ifs-rpi4.bin in the workspace folder of your project.
Customize the project
You can customize the buildfile and then run a task to re-generate the image.
To customize and build:
- Find the buildfile rpi4.build and modify it accordingly.
- Run the following task: "QNX: Build Active Project".
- The ifs-rpi4.bin project is built.
The terminal window displays something similar to the following when the BSP is built:
make[6]: Leaving directory 'C:/Users/user/qnx802/bsp/my_rpi_bsp/src/hardware/support/wdtkick/aarch64/le'
make[5]: Leaving directory 'C:/Users/user/qnx802/bsp/my_rpi_bsp/src/hardware/support/wdtkick/aarch64'
make[4]: Leaving directory 'C:/Users/user/qnx802/bsp/my_rpi_bsp/src/hardware/support/wdtkick'
make[3]: Leaving directory 'C:/Users/user/qnx802/bsp/my_rpi_bsp/src/hardware/support'
make[2]: Leaving directory 'C:/Users/user/qnx802/bsp/my_rpi_bsp/src/hardware'
make[1]: Leaving directory 'C:/Users/user/qnx802/bsp/my_rpi_bsp/src'
C:/Users/user/qnx802/host/win64/x86_64/usr/bin/make.exe make_links
make[1]: Entering directory 'C:/Users/user/qnx802/bsp/my_rpi_bsp'
make[1]: Nothing to be done for 'make_links'.
make[1]: Leaving directory 'C:/Users/user/qnx802/bsp/my_rpi_bsp'
C:/Users/user/qnx802/host/win64/x86_64/usr/bin/make.exe -Cimages
make[1]: Entering directory 'C:/Users/user/qnx802/bsp/my_rpi_bsp/images'
mkifs -v -r../install  rpi4.build ifs-rpi4.bin
Offset     Size    Entry   Ramoff     Target=Host
80000      fa0        0     ----     *.boot=C:/Users/user/qnx802/target/qnx/aarch64le/boot/sys\raw.boot
80fa0      100     ----     ----     Startup-header
810a0    29fe8    81800     ----     startup.*=startup-bcm2711-rpi4.sym
aa0e8       5c     ----     ----     Image-header
aa144     5acc     ----     ----     Image-directory
----     ----     ----     ----     Root-dirent
afc10      28c     ----     ----     etc/system/config/spi/spi.conf=C:\Users\user\AppData\Local\Temp\1/mkxfs.9lVK7d
afe9c      153     ----     ----     etc/shadow=C:\Users\user\AppData\Local\Temp\1/mkxfs.lzRhbI
----     ----     ----     ----     bin/sh -> /bin/ksh
----     ----     ----     ----     tmp -> /dev/shmem
----     ----     ----     ----     dev/console -> /dev/ser1
----     ----     ----     ----     var/log -> /tmp
----     ----     ----     ----     usr/tmp -> /tmp
----     ----     ----     ----     etc/ssh -> /dev/shmem
affef        0     ----     ----     etc/esh=C:\Users\user\AppData\Local\Temp\1/mkxfs.SS92c3
----     ----     ----     ----         etc
----     ----     ----     ----         etc/pam.d
----     ----     ----     ----         home
----     ----     ----     ----         home/qnxuser
----     ----     ----     ----         lib
----     ----     ----     ----         root
----     ----     ----     ----         usr
----     ----     ----     ----         usr/lib
----     ----     ----     ----         var
----     ----     ----     ----         var/chroot
----     ----     ----     ----         var/chroot/sshd

make[1]: Leaving directory 'C:/Users/user/qnx802/bsp/my_rpi_bsp/images'
done
*  Terminal will be reused by tasks, press any key to close it.
Next steps
Once you've built the BSP, you can flash it to an SD card. For more information, go to "QNX SDP 8.0: BSP User's Guide Raspberry Pi 4 Board": https://www.qnx.com/download/feature.html?programid=74217.