3. Creating a program project
QNX SDP8.0Quickstart GuideDeveloperSetup
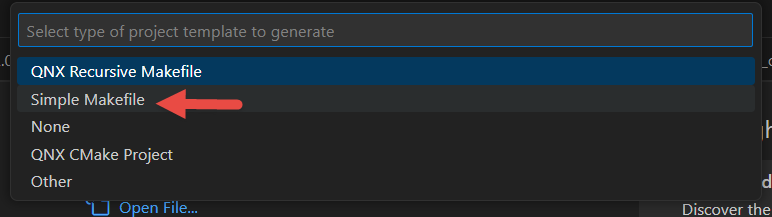
You can create several different types of projects. For the purpose of this guide, you'll create a Simple Makefile project for QNX.
The following project types are available:
| Project Type | Recommended usage |
|---|---|
| QNX Recursive Makefile | To create an application or library project which uses QNX's recursive make build system. |
| Simple Makefile | To build a QNX OS application or utility using a traditional makefile. |
| None | To create an empty QNX project. |
| QNX CMake Project | To create an application or library project which uses the CMake build system, in conjunction with the QNX compiler tool chain. |
| Other | To create a custom project. |
Create a simple makefile project
You can create a simple, GNU-style makefile.
To create a simple makefile project:
- From the command palette, click Create New QNX Project.
- Enter a name for the project.
- Select Simple Makefile.
- Select the project language.
- Select artifact type (Executable, Shared Library, or Shared Library and Test Executable). The project is created and you can view the directory structure in the Workspace.
Generate an example project
To generate an example project:
- From the command palette, click Generate QNX Example Projects.
- Select a project from the list of example projects in the drop-down menu. For this guide, select Hello World
to create a simple Hello World project in C.
The project is created and you can view the directory structure in the Workspace.
CAUTION:
The QNX Toolkit extension requires a trusted workspace.
Page updated: