The ADAS example application demonstrates how to read and visualize camera data using the ADAS library.
- -b: (Optional) Enable this option if starting the application from bootup (i.e., with SLM), to disable the interactive menu. This option along with -c is used in /base/etc/slm-config-platform-finger-count.xml, which is the startup script that you must copy to /base/etc/slm-config-platform.xml if you want to launch this application during bootup.
- -c path: (Required) Use the configuration file (specified by path) to configure and initialize the ADAS library. You must use this option whether you're launching the application from bootup or manually (see below).
Run the application manually
- Connect to your board using ssh.
- Use slay to stop the Camera MUX application, which runs at startup:
# slay camera_mux
The application should stop running and you should see a blank display. - Run the adas_example command with the -c option
set to select the adas_finger_count.conf configuration file:
# adas_example -c /base/etc/system/config/adas_finger_count.conf
This configuration file specifies to use the Native Camera viewer, which is the one viewer supported on this board type.
# adas_example -c /base/etc/system/config/adas_finger_count.conf

# Please select the view type or zoom factor:
        1 to 6) Scale factor from 1x to 32x (Point cloud or Radar only)
        f) Forward
        r) Start Record
        s) Stop Record
        x) Exit the application
For this demo, you would use the Start Record (r) and Stop Record (s) options only if you wanted to record the video. Otherwise, only Exit (x) applies. The number options (i.e., zoom factor settings) don't apply, and the only view available is Forward, so choosing the corresponding option (f) does nothing.
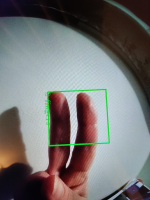
Figure 1. Finger-counting demo
When you run the application manually, you must enter x in the ssh session to exit. When you run it during bootup, you must use slay to terminate it, as no interactive menu is shown.
Build the ADAS example application
On your host computer, the source code is provided for the ADAS example application. You can build the source code and deploy the resulting binary onto your target.
- A ZIP file installed with the QNX SDP 7.1 Sensor Framework Base package is located at installation_directory/source/sf-adas-sensor-examples-version.zip. You must extract it to get the ZIP file for the ADAS examples.
- In the extraction_directory/source_package_adas_sensor directory, there's a README.txt that you can follow to build the application.
- Create a backup of the original adas_example file on your target. This file is found in the target's /usr/bin/ directory.
- Deploy your newly built version of the ADAS example application, by navigating to extraction_directory/source_package_adas_sensor/apps/adas/adas_example/nto/aarch64/so.le on your host and transferring the adas_example file to the /usr/bin/ directory on the target. You can use the QNX Momentics IDE to transfer the file.
- Connect to your target through a terminal connection and run the ADAS example application.