QNX Technical Articles
QNX® Momentics® Development Suite 6.3.0 SP2 to SP3 Upgrade Professional and Standard Editions Installation Note - Windows Hosts
Date of this edition: April 16, 2007
Target OS: QNX® Neutrino® 6.3.0 SP2
Host OS: Microsoft Windows XP SP2, 2000 SP4, or NT4 SP6a
 |
|
 |
|
Contents
- System requirements
- SP3 update paths
- Installing the SP2 to SP3 Upgrade
- Uninstalling the SP2 to SP3 Upgrade
- How can I tell if I've already installed the SP2 to SP3 Upgrade?
- Determining your base directory
- Getting started with the documentation
- Technical support
System requirements
Host OS:
- Windows XP SP2
- Windows 2000 SP4
- Windows NT4 SP6a
| Minimum | Recommended | |
|---|---|---|
| Processor | Pentium III, 700 MHz | Pentium 4, 2 GHz or more |
| RAM | 256 MB | 512 MB |
| Disk space | 2.1 GB | 2.1 GB |
| Monitor | 1024*768 | 1280*1024 |
In order to install the SP2 to SP3 Upgrade, you need 74 MB of disk space, including the space required for backups and temporary space used in installing the files. About half of this disk space must be where your temporary directory resides. The SP2 to SP3 Upgrade needs only 67 MB once it's installed, because it replaces some existing 6.3.0 files.
The System Profiler in the IDE requires a minimum color depth of 16 bits.
|
Windows NT doesn't include usp10.dll, the DLL for the Uniscribe Unicode script processor. You can download the Windows 98 version of usp10.dll from support.microsoft.com/kb/q249973. |
SP3 update paths
There are several ways that you incorporate QNX Momentics 6.3.0 Service Pack 3 in your system, depending on what you've already installed:
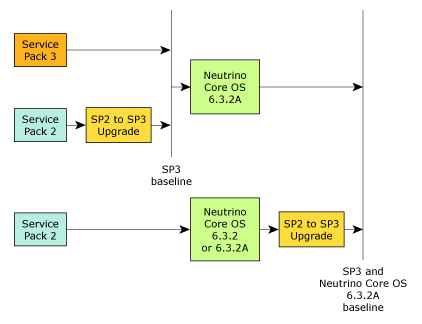
Here's a summary:
- To do a fresh installation, use QNX Momentics 6.3.0 Service Pack 3.
- If you've already installed 6.3.0 SP2, install the 6.3.0 SP2 to SP3 Upgrade.
- You can install the QNX Neutrino Core OS 6.3.2A on a system that has SP3, or SP2 plus the 6.3.0 SP2 to SP3 Upgrade.
- If you've installed the QNX Neutrino Core OS 6.3.2 or
the QNX Neutrino Core OS 6.3.2A on a system that has
6.3.0 SP2, and you want to upgrade to SP3, install the
6.3.0 SP2 to SP3 Upgrade.
Installing the 6.3.0 SP2 to SP3 Upgrade on a system with the QNX Neutrino Core OS 6.3.2 updates the core OS to 6.3.2A.
Installing the SP2 to SP3 Upgrade
The SP2 to SP3 Upgrade installer backs up the affected files, and it stores the backup in base_directory\install\backup\patches\6.3.0sp2tosp3\backup.jar (see "Determining your base directory," below).
If you interrupt the backup, or it fails, the installation is aborted. Before you can try again to install the SP2 to SP3 Upgrade, you must delete these directories:
- base_directory\install\backup\patches\6.3.0sp2tosp3
- base_directory\install\patches\6.3.0sp2tosp3
The SP2 to SP3 Upgrade doesn't change any user files. For a list of the affected files, see base_directory/install/patches/6.3.0sp2tosp3/shiplist after installing the SP2 to SP3 Upgrade. Use WordPad to view the shiplist file.
|
|
To install the SP2 to SP3 Upgrade, do the following:
|
If you installed 6.3.0 on a machine that already had 6.2.1,
and you selected "No" when
prompted about upgrading the environment variables, you won't be able to
install the SP2 to SP3 Upgrade.
(Ref# 19585)
Workaround: Do the following:
|
- Log in as a user who has system-administrator privileges.
- Log into your myQNX account on our website, and then go to the Download Center.
- Download the SP2 to SP3 Upgrade package,
momentics-6.3.0sp2tosp3-nnnnnnnnnnn-win32.exe,
where nnnnnnnnnnn is the 11-digit build number.
The package is an executable (.exe) file.
Windows might insert a number in square brackets before the first period in the filename (e.g. momentics-6[1].3.0sp2tosp3-nnnnnnnnnnn-win32.exe) These extra characters shouldn't cause any problems. - Double-click the file in Windows Explorer or run it at
the command line.
- Windows XP SP2 may display a security warning when you install the SP2 to SP3 Upgrade. You can verify the archive's checksum when you download the file from our website.
- If InstallShield complains that it can't find a JVM, make sure that you've successfully installed QNX Momentics 6.3.0 before you try to install the SP2 to SP3 Upgrade.
- Follow the instructions provided by InstallShield.
If you installed the QNX Neutrino Core OS 6.3.2 before installing SP3, InstallShield will warn you that the following files are older than the versions already installed:
- usr/photon/bin/ph.dll.3
- usr/photon/bin/PtWeb.dll.3
- usr/photon/bin/jpeg.dll.3
- usr/photon/bin/font/ttfFFcore.dll.1
- usr/photon/bin/font/PHFcore.dll.1
- usr/photon/bin/font/FCcore.dll.1
- usr/photon/bin/font/ttfFFcore.dll
- usr/photon/bin/font/PHFcore.dll
- usr/photon/bin/font/FCcore.dll
- usr/photon/bin/ph.dll
- usr/photon/bin/PtWeb.dll
- usr/photon/bin/jpeg.dll
When InstallShield asks you if you want to overwrite these files, choose Yes. These files were missing from 6.3.0 SP2; for more information, see the description of the Photon Patch for Windows (Patch ID 209) in the release notes. (Ref# 29640)
Uninstalling the SP2 to SP3 Upgrade
|
You should uninstall QNX products in the reverse order in which you
installed them.
To determine this order, open a bash shell and use a command
like this:
ls -lt `find base_directory -name "*uninstall*.exe"` where base_directory is where you installed QNX Momentics. |
|
If you delete or rename the backup that was made when you installed
the SP2 to SP3 Upgrade,
or if the backup has been corrupted, the uninstaller will warn you.
Continuing to uninstall the SP2 to SP3 Upgrade will leave your system with an
incomplete version of QNX Momentics 6.3.0, and you won't be able to
reinstall the SP2 to SP3 Upgrade;
you'll likely have to completely reinstall QNX Momentics 6.3.0.
Use our uninstaller to remove the SP2 to SP3 Upgrade; if you simply delete the directories, your machine might end up in an inconsistent state, and you might not be able to run the IDE. |
To uninstall the SP2 to SP3 Upgrade, do the following:
- Log in as a user who has system-administrator privileges.
- Open the Control Panel (e.g. on Windows 2000, choose ).
- Select Add or Remove Programs.
- Select "QNX Momentics Development Suite 6.3.0 Service Pack 2," then click the Remove button.
How can I tell if I've already installed the SP2 to SP3 Upgrade?
To determine whether or not you've installed the SP2 to SP3 Upgrade, either:
- Look for
"QNX Momentics Development Suite 6.3.0 Service Pack 3"
in the Add or Remove Programs control panel.
Or:
- Check for the existence of the base_directory\install\patches\6.3.0sp2tosp3 directory (see "Determining your base directory," below).
Determining your base directory
To determine the base directory for QNX Momentics, open a command shell and use the qconfig command. For example:
C:\>qconfig
QNX Installations

  Installation Name: QNX Momentics 6.3.0
            Version: 6.3.0
     Base Directory: C:/QNX630/
           QNX_HOST: C:/QNX630/host/qnx6/x86/
         QNX_TARGET: C:/QNX630/target/qnx6/
The base directory in this example is C:/QNX630/, but it could be different on your machine, depending on your host OS and where you installed QNX Momentics.
Getting started with the documentation
After you've installed your development suite, you'll find an extensive set of online documentation in HTML format. Go to the help menu item (e.g. in Windows XP: ) or look under the following directory:
${QNX_TARGET}/usr/help/product/momentics/bookset.html
This "roadmap" page contains links to the various HTML booksets that accompany the OS (e.g. System Architecture, Programmer's Guide, Library Reference, Utilities Reference, etc.).
You'll find the installation and release notes in the base_dir\install\patches\6.3.0sp2tosp3 directory, where base_dir is where you've installed QNX Momentics (see the output of the qconfig command).
|
For the most up-to-date version of these notes, go to our website, www.qnx.com, log into your myQNX account, and then go to the Download Center. |
You can install and work with multiple versions of QNX Neutrino. Whether you're using the command line or the IDE, you can choose which version of the OS to build programs for. For more information, see the IDE User's Guide or the QNX Neutrino Programmer's Guide.
Technical support
If you have any questions, comments, or problems with a QNX product, please contact Technical Support. For more information, see the How to Get Help chapter of the Welcome to QNX Momentics guide or visit our website, www.qnx.com.