QNX Technical Articles
QNX® Momentics® Development Suite 6.3.0 SP2 to SP3 Upgrade Professional and Standard Editions Installation Note - QNX Neutrino Hosts
Date of this edition: September 28, 2006
Target OS: QNX® Neutrino® 6.3.0 SP2
Host OS: QNX® Neutrino® 6.3.0 SP2
 |
If you installed a beta version of this software, uninstall it before installing the production version. |
 |
|
Contents
- System requirements
- SP3 update paths
- BIOS settings
- Installing the SP2 to SP3 Upgrade
- Updating disk drivers
- Uninstalling the SP2 to SP3 Upgrade
- How can I tell if I've already installed the SP2 to SP3 Upgrade?
- Determining your base directory
- Getting started with the documentation
- Technical support
System requirements
| Minimum | Recommended | |
|---|---|---|
| Processor | 2 GHz or more Intel Pentium 4 | 2 GHz or more Intel Pentium 4 |
| RAM | 256 MB | 512 MB |
| Disk space | 2.1 GB | 2.1 GB |
| Monitor | 1024×768 | 1280×1024 |
In order to install the SP2 to SP3 Upgrade, you need 49 MB of disk space, which includes the space required for backups and temporary space used in installing the files.
The System Profiler in the IDE requires a minimum color depth of 16 bits.
SP3 update paths
There are several ways that you incorporate QNX Momentics 6.3.0 Service Pack 3 in your system, depending on what you've already installed:
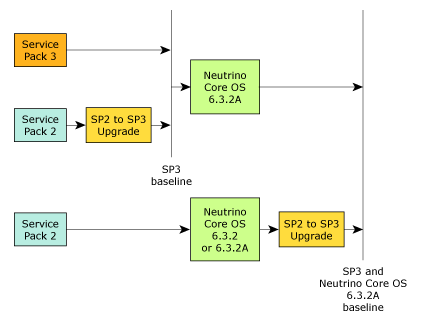
Here's a summary:
- To do a fresh installation, use QNX Momentics 6.3.0 Service Pack 3.
- If you've already installed 6.3.0 SP2, install the 6.3.0 SP2 to SP3 Upgrade.
- You can install the QNX Neutrino Core OS 6.3.2A on a system that has SP3, or SP2 plus the 6.3.0 SP2 to SP3 Upgrade.
- If you've installed the QNX Neutrino Core OS 6.3.2 or
the QNX Neutrino Core OS 6.3.2A on a system that has
6.3.0 SP2, and you want to upgrade to SP3, install the
6.3.0 SP2 to SP3 Upgrade.
Installing the 6.3.0 SP2 to SP3 Upgrade on a system with the QNX Neutrino Core OS 6.3.2 updates the core OS to 6.3.2A.
BIOS settings
We recommend you use the following BIOS settings:
- Disable Plug and Play OS.
- Set any parallel ports and onboard serial ports to specific addresses, if possible, instead of using an automatic setting.
- Enable SATA if your system includes a SATA drive.
- If your BIOS is has an option for booting from “Other USB devices,” enabling it could make the BIOS take a very long time to start.
Installing the SP2 to SP3 Upgrade
The SP2 to SP3 Upgrade installer backs up the affected files, and it stores the backup in base_directory/backup/patches/6.3.0sp2tosp3/backup.tgz (see “Determining your base directory,” below).
If you interrupt the backup, or it fails, the installation is aborted. Before you can try again to install the SP2 to SP3 Upgrade, you must delete these directories:
- base_directory/backup/patches/6.3.0sp2tosp3
- base_directory/install/patches/6.3.0sp2tosp3
The SP2 to SP3 Upgrade doesn't change any user files. For a list of the affected files, see base_directory/install/patches/6.3.0sp2tosp3/shiplist after installing the SP2 to SP3 Upgrade.
|
|
To install the SP2 to SP3 Upgrade, do the following:
- Log in as root.
- Log into your myQNX account on our website, and then go to the Download Center.
- Download the SP2 to SP3 Upgrade package, momentics-6.3.0sp2tosp3-nnnnnnnnnnn-nto.sh, where nnnnnnnnnnn is the 11-digit build number. The package is a shell script.
- Run chmod to make the script executable. For example:
chmod a+x momentics-6.3.0sp2tosp3-20061631018-nto.sh
- Run the script at the system prompt. For example:
./momentics-6.3.0sp2tosp3-20061631018-nto.sh
- Follow the instructions on your screen.
|
The installer rebuilds the boot image in /.boot, as follows:
mkifs /boot/build/qnxbasedma.build /.boot If the buildfile that you normally use isn't /boot/build/qnxbasedma.build, run the following before rebooting: mkifs your_build_file /.boot |
Updating disk drivers
The Neutrino boot process can now dynamically add block I/O (i.e. disk) drivers, letting you boot on systems with newer controllers. The mechanism is simple and not proprietary to QNX Software Systems, so third parties can offer enhanced block drivers without any intervention on our part.
The driver update consists of the drivers themselves (devb-* only) and a simple configuration file. The configuration file is in plain text (DOS or UNIX line endings accepted), with the following format:
drvr_name|type|timeout|add_args
The first three fields are mandatory. The fields are as follows:
- drvr_name
- The file name of the driver.
- type
- The string for the boot process to display when trying the driver.
- timeout
- The total time to wait for devices.
- add_args
- Any additional arguments to the driver (e.g. blk cache=512k).
The configuration file must be called drivers.cfg, and you must supply the update on a physical medium, currently a CD-ROM or a USB flash drive. The boot process looks in the root of the filesystem first, and then in a directory called qnxdrvr. This can help reduce clutter in the root of the filesystem.
The source filesystem can be any of the supported filesystems. These filesystems are known to work:
- standard ISO9660 filesystems on CD-ROM
- DOS (t7 partition) and QNX 4 (t79 partition) filesystems on a USB flash drive
If the update is distributed over the web in zip or tar format with the qnxdrvr structure preserved, an end user simply has to download the archive, unzip it to a USB drive, and insert the USB drive on booting.
You can apply a driver update by pressing Space during booting and selecting F2. The system then completes the startup of the standard block drivers, giving a source filesystem to apply the update from. You're then prompted to choose the filesystem and insert the update media.
|
If you need to rescan the partitions (for example, to find a USB drive that you inserted after booting), press F12. |
Once the files have been copied, you're prompted to reinsert the QNX Momentics installation CD if applicable. The block drivers are then restarted.
This mechanism also lets you update existing drivers or simply modify their arguments (e.g. PCI ID specification).
If you're installing, then the installation program copies the updated drivers to /sbin and the configuration file to /boot/sys. It then makes copies of the standard build files in /boot/build (except multicore ones) and calls them qnxbase-drvrup.build and qnxbasedma-drvrup.build. These files are then used to create new image files called qnxbase-drvrup.ifs and qnxbasedma-drvrup.ifs in /boot/fs. The DMA version of this new file is copied to /.boot, and the non-DMA version is copied to /.altboot.
|
Multicore (SMP) images aren't rebuilt because the multicore kernel isn't part of the standard distribution; it's part of the Symmetric Multiprocessing Technology Development Kit and the Multicore Technology Development Kit. |
Applying a driver update patch after you've installed QNX Neutrino
If you're updating or adding drivers to an already existing QNX Neutrino system using this mechanism, you must manually copy the drivers to the correct directory, and you must modify the boot image to use the new driver:
- Boot the machine and apply the driver updates.
- Once the machine has booted, copy the following from the driver update
disk used in step 1:
- Copy the new devb-* drivers to /sbin.
- Copy drivers.cfg to somewhere under /. If you put it in a directory that's in the mkifs search path (e.g. /sbin, /boot/sys), mkifs will find it automatically.
- Copy the build file (typically qnxbasedma.build) to driverupdate.build.
- Edit the build file and do the following:
- Add the names of the new block drivers (devb-*) after devb-eide.
- Add the drivers.cfg file at the end.
If the file is in the mkifs search path, then just add the
file name.
Otherwise add the full path:
drivers.cfg=/path/drivers.cfg
- As a safety precaution (so you'll be sure to have at least one image
that boots):
cp /.boot /.altboot
- mkifs driverupdate.build /.boot
Uninstalling the SP2 to SP3 Upgrade
|
You should uninstall QNX products in the reverse order in which you
installed them.
To determine this order, use a command like this:
ls -lt `find base_directory -name "*uninstall*.sh"` where base_directory is where you installed QNX Momentics. |
|
If you delete or rename the backup that was made when you installed
the SP2 to SP3 Upgrade,
or if the backup has been corrupted, the uninstaller will warn you.
Continuing to uninstall the SP2 to SP3 Upgrade will leave your system with an
incomplete version of QNX Momentics 6.3.0, and you won't be able to
reinstall the SP2 to SP3 Upgrade;
you'll likely have to completely reinstall QNX Momentics 6.3.0.
Use our uninstaller to remove the SP2 to SP3 Upgrade; if you simply delete the directories, your machine might end up in an inconsistent state, and you might not be able to run the IDE. |
To uninstall the SP2 to SP3 Upgrade, do the following:
- Log in as root.
- Go to the base_directory/install/patches/6.3.0sp2tosp3 directory (see “Determining your base directory,” below).
- Run the uninstaller script:
./uninstall.sh
|
The uninstaller rebuilds the boot image in /.boot and tells
you to rebuild the image manually if you use a custom image, but
mkifs will crash if you do so.
(Ref# 39806)
Workaround: After the uninstaller has rebuilt the boot image, do the following:
|
|
The 6.3.0 installer installed certain files under $QNX_TARGET,
but didn't also install them under /.
If you uninstall the SP2 to SP3 Upgrade, your system retains these files:
as well as the following under $QNX_TARGET/x86/boot/fs:
|
How can I tell if I've already installed the SP2 to SP3 Upgrade?
To determine whether or not you've installed the SP2 to SP3 Upgrade, use the qconfig command.
Determining your base directory
To determine the base directory for QNX Momentics, open a command shell and use the qconfig command. For example:
$ qconfig
QNX Installations

  Installation Name: QNX Momentics 6.3.0
            Version: 6.3.0
     Base Directory: /usr/qnx630/
           QNX_HOST: /usr/qnx630/host/qnx6/x86/
         QNX_TARGET: /usr/qnx630/target/qnx6/
The base directory in this example is /usr/qnx630/, but it could be different on your machine, depending on where you installed QNX Momentics.
Getting started with the documentation
After you've installed your development suite, you'll find an extensive set of online documentation in HTML format. Choose Help from the Launch menu or from the shelf on the right side of the screen, or look under the following directory:
${QNX_TARGET}/usr/help/product/momentics/bookset.html
This “roadmap” page contains links to the various HTML booksets that accompany the OS (e.g. System Architecture, Programmer's Guide, Library Reference, Utilities Reference, etc.).
You'll find the installation and release notes in the base_dir/install/patches/6.3.0sp2tosp3 directory, where base_dir is where you installed QNX Momentics (see the output of the qconfig command).
|
For the most up-to-date version of these notes, go to our website, www.qnx.com, log into your myQNX account, and then go to the Download Center. |
You can install and work with multiple versions of QNX Neutrino. Whether you're using the command line or the IDE, you can choose which version of the OS to build programs for. For more information, see the IDE User's Guide or the QNX Neutrino Programmer's Guide.
|
Coexistence of 6.3.0 and 6.2.1 is supported only on Windows and Solaris hosts. |
Technical support
If you have any questions, comments, or problems with a QNX product, please contact Technical Support. For more information, see the How to Get Help chapter of the Welcome to QNX Momentics guide or visit our website, www.qnx.com.