QNX Technical Articles
QNX® Momentics® Development Suite 6.3.0 Service Pack 3 Professional and Standard Editions Installation Note - Linux Hosts
Date of this edition: March 30, 2007
Target OS: QNX® Neutrino® 6.3.0 SP3
Host OS: Linux Red Hat 8 or 9, Red Hat Enterprise WS 3 or 4, Red Hat Fedora Core 3 or 4, Debian 3.1, or SUSE 10
 |
If you installed a beta version of this software, uninstall it before installing the production version. |
 |
|
Contents
- System requirements
- SP3 update paths
- Installing QNX Momentics
- Activating QNX Momentics
- Commercializing your evaluation software
- Uninstalling QNX Momentics
- Getting started with the docs
- Technical support
System requirements
| Minimum | Recommended | |
|---|---|---|
| Host OS | Linux Red Hat 8.0 or 9.0 | Linux Red Hat Enterprise WS 3 or 4 |
| Processor | Pentium III, 700 MHz | Pentium 4, 2 GHz or more |
| RAM | 256 MB | 512 MB |
| Disk space | 1.6 GB | 1.6 GB |
| Monitor | 1024*768 | 1280*1024 |
In order to install SP3, you need 1300 MB of disk space, including the space required for backups and temporary space used in installing the files. About half of this disk space must be where your temporary directory resides.
The System Profiler in the IDE requires a minimum color depth of 16 bits.
SP3 update paths
There are several ways that you incorporate QNX Momentics 6.3.0 Service Pack 3 in your system, depending on what you've already installed:
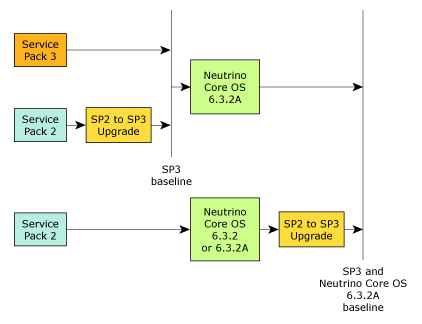
Here's a summary:
- To do a fresh installation, use QNX Momentics 6.3.0 Service Pack 3.
- If you've already installed 6.3.0 SP2, install the 6.3.0 SP2 to SP3 Upgrade.
- You can install the QNX Neutrino Core OS 6.3.2A on a system that has SP3, or SP2 plus the 6.3.0 SP2 to SP3 Upgrade.
- If you've installed the QNX Neutrino Core OS 6.3.2 or
the QNX Neutrino Core OS 6.3.2A on a system that has
6.3.0 SP2, and you want to upgrade to SP3, install the
6.3.0 SP2 to SP3 Upgrade.
Installing the 6.3.0 SP2 to SP3 Upgrade on a system with the QNX Neutrino Core OS 6.3.2 updates the core OS to 6.3.2A.
Installing QNX Momentics
|
If you're running selinux (secure Linux), disable it before
installing SP3.
Otherwise, after you've entered the license key and clicked Next, the
installation will fail with this error:
java.lang.UnsatisfiedLinkError: no qnxlic in java.library.path |
To install this software:
- Boot into Linux and log in as root.
- On Debian 3.1 hosts, set up your environment by typing:
source /etc/profile
- Insert the QNX Momentics 6.3.0 Service Pack 3 Installation CD in the CD drive.
- If the system offers to run autorun, choose Yes;
otherwise run qnxSetupLinux.bin, which you'll find in the root
directory of the CD.
If your system won't let you execute from a CD, unmount the CD and remount it by hand. - Follow the instructions on your screen.
- If InstallShield doesn't display the release notes, launch a browser and use it to display ${QNX_TARGET}/etc/readme/rel_6.3.0_SP3.html.
Congratulations -- you've completed the installation!
Activating QNX Momentics
The QNX Momentics 6.3 development suite and certain related products require activation. If you don't activate the product within the specified timeframe, the product will cease to function until you activate it. No personal data is transferred during the activation process.
If your development host is connected to the Internet, you can activate QNX Momentics automatically; if your machine isn't connected to the Internet, you must activate your software manually from a machine that is, by doing the following:
- In the QNX Momentics Activation dialog, click Activate Manually.
The Manual Activation dialog appears with an activate-prompt key. This dialog has a button that you can use to save the activate-prompt key in a file, /etc/qnx/license/activate_prompt_key.txt. This can eliminate the need to retype the key, which can be error-prone.
- Transfer the activate-prompt key to the machine that's connected to the Internet.
- Go to our website, www.qnx.com, log into your myQNX account, and choose Activate Products (6.3.x).
- Enter the activate-prompt key into the form that appears, and then click Generate Response Key. This will return an activate-response key.
- Copy the activate-response key and paste it in a file.
- Transfer the file into /etc/qnx/license/activate_response_key.txt on your QNX Momentics development host.
- If you closed the QNX Momentics Activation dialog, open it again
by selecting
from the Launch menu, or by entering the following at a terminal prompt:
/etc/qnx/bin/qnxactivate -a
- Choose Activate Manually, and use the Load Response from File button to load the activate-response key, and then click Activate.
If you choose not to activate at the time of installation, you can activate later by selecting from the Launch menu, or by entering the following at a terminal prompt:
/etc/qnx/bin/qnxactivate -a
Commercializing your evaluation software
If you installed an evaluation copy of QNX Momentics 6.3.0, and you've now received a commercial QNX License Certificate, do the following to add your commercial license:
- Choose
from the Start menu, or type the following at a terminal prompt:
/etc/qnx/bin/qnxactivate -l
- In the QNX Momentics License Key Entry dialog, fill in the field with the license-key information that's on your commercial QNX License Certificate.
- When you've finished entering the information, click Add to save the license-key information and configure your QNX Momentics tools to use this file.
Uninstalling QNX Momentics
|
You should uninstall QNX products in the reverse order in which you
installed them.
To determine this order, use a command like this:
ls -lt `find base_directory -name "*uninstall*.bin"` where base_directory is where you installed QNX Momentics. |
To uninstall QNX Momentics, do the following:
- Log in as root.
- Do one of the following:
- Choose
from the Start menu
Or:
- go to the directory where you installed QNX Momentics and run _uninstall/qnx630/uninstaller.bin.
- Choose
from the Start menu
When you uninstall QNX Momentics 6.3.0 SP3, InstallShield leaves the empty $QNX_HOST/usr/bin directory behind. (Ref# 39720)
Getting started with the docs
For information about QNX Momentics 6.3.0 Service Pack 3, see:
- the release notes in $QNX_TARGET/etc/readme/rel_6.3.0_SP3.html
- the online documentation at ${QNX_TARGET}/usr/help/product/momentics/bookset.html.
You can install and work with multiple versions of QNX Neutrino. Whether you're using the command line or the IDE, you can choose which version of the OS to build programs for. For more information, see the IDE User's Guide or the QNX Neutrino Programmer's Guide.
|
Coexistence of 6.3.0 and 6.2.1 is supported only on Windows and Solaris hosts (we didn't support Linux hosts in 6.2.1). |
Technical support
If you have any questions, comments, or problems with a QNX product, please contact Technical Support. For more information, see the How to Get Help chapter of the Welcome to QNX Momentics guide or visit our website, www.qnx.com.