Configuring proxy servers
The QNX Software Center usually picks up proxy settings automatically. However, some proxy-OS combinations can be problematic. In particular, on macOS, you need to configure the proxy settings manually.
HTTP proxy support
The following table shows the type of HTTP proxies supported for each host OS and when to perform manual configuration or use
the default native (OS) settings:
| OS | No proxy | Unauthenticated proxy | Basic proxy1 | Digest proxy1 2 | NTLM proxy1 2 | Kerberos, Negotiate proxy | SOCKS proxy |
|---|---|---|---|---|---|---|---|
| Windows | Native | Native | Native | Native | Native | Not supported | Not supported |
| Linux | Native | Native | Native | Native | Native | Not supported | Not supported |
| macOS | Native | Manual | Manual | Manual | Manual | Not supported | Not supported |
Manually configuring proxy settings
In general, you shouldn't attempt to manually configure the proxy settings, because usually the default settings picked up from the OS work. However, on macOS, you need to enter the settings manually. On any host OS, you may need to experiment with manual settings when troubleshooting proxy connection issues.
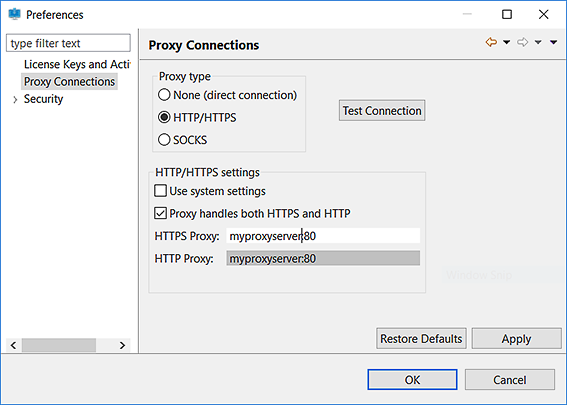
To configure proxy settings manually:
- Select , then click Proxy Connections on the left of the resulting window:
 Note:The SOCKS option is available but not supported.
 - Under HTTP/HTTPS settings, uncheck Use System Settings.
- In the HTTPS Proxy text field, enter your proxy address using the format proxyhost:proxyport.
- Click Test Connection to verify that you can connect to the myQNX server. You may be prompted for proxy credentials and may expect the check to take a few seconds. Information on providing these credentials is given in the next section.
- Click OK to apply your changes and exit the window.
Page updated:
1 The QNX Software Center can't detect your proxy server
credentials; it will prompt you to enter them each time it starts.
2 The QNX Software Center can't communicate with the
QNX license server over proxies that use Digest or NTLM; you must therefore activate products manually
(for details, see the QNX Software Center User's Guide).