![[Previous]](prev.gif) |
![[Contents]](contents.gif) |
![[Index]](keyword_index.gif) |
![[Next]](next.gif) |
|
|
|
|
 |
This version of this document is no longer maintained. For the latest documentation, see http://www.qnx.com/developers/docs. |
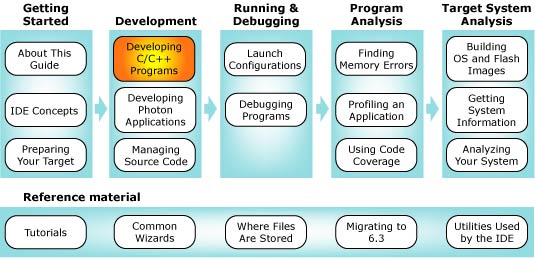
You can select a topic from this diagram:
This chapter shows you how to create and manage your C or C++ projects.
The C/C++ Development perspective is where you develop and build your projects. As mentioned in the Concepts chapter, a project is a container for organizing and storing your files.
Besides writing code and building your projects, you may also debug and analyze your programs from the C/C++ Development perspective.
 |
You'll find complete documentation on the C/C++ Development perspective, including several tutorials to help you get started, in the core Eclipse platform docset: Help-->Help Contents-->C/C++ Development User Guide. |
The views in the C/C++ Development perspective are driven primarily by selections you make in the C/C++ editor and the C/C++ Projects view, which is a specialized version of the Navigator view.
Since the Navigator view is part of the core Eclipse platform, you'll find full documentation on the Navigator in the Workbench User Guide:
| For information on the Navigator's: | See these sections in the Workbench User Guide: |
|---|---|
| toolbar and icons | Concepts-->Views-->Navigator view |
| right-click context menu | Reference-->User interface information-->Views and editors-->Navigator View |
To create and run your first program, you'll use two major facilities within the IDE:
Once you've used these parts of the IDE for the first time, you'll be able to create, build, and run your programs very quickly. For details, see the Common Wizards Reference and Launch Configurations Reference chapters in this guide.
The C/C++ Development perspective's C/C++ Projects view is perhaps the most important view in the IDE because you can control your projects with it. The selections you make in the C/C++ Projects view greatly affect what information the other views display.
The C/C++ Projects view gives a "virtual" or filtered presentation of all the executables, source, and shared objects that comprise your project. You can set filters for the types of files you want shown in this view.
The C/C++ Projects view has many of the same features as the Navigator view, but is configured specifically for C and C++ development. At first glance, the two may seem identical, but the C/C++ Projects view:
To open files and display them in the editor area:
 |
In the C/C++ Projects view, double-click the file to be opened. |
The file opens in the editor area.
Since the C/C++ Projects view hides closed projects, you must use the Navigator view to open them.
|
In the Navigator view, right-click your project, then select Open Project. |
The project opens -- you can see it in the C/C++ Projects view.
To hide certain files from the C/C++ Projects view:
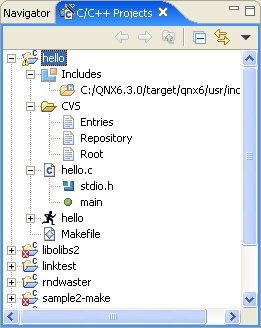
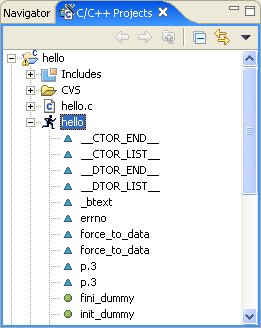
The C/C++ Projects view shows you an outline of the .c, .cc, and .h files in your project:
Note that you can also use the Outline view to see the structure of your projects. (For more on the Outline view, see the "Code synopsis" section in this chapter.)
The C/C++ Projects view shows you the outlines of executables as well. You can examine the structure of executables to see the functions that you declared and used in the file, as well as the elements that were called indirectly, such as malloc(), _init(), and errno:
If you're creating an application from scratch, you'll probably want to create a QNX C Project or QNX C++ Project, which relies on the QNX recursive makefile hierarchy to support multiple CPU targets. For more on the QNX recursive makefile hierarchy, see the Conventions for Makefiles and Directories appendix in the Programmer's Guide.
|
If you want to import an existing project, see the section "Importing existing source code into the IDE" in the Managing Source Code chapter in this guide. |
You use the New Project wizard whenever you create a new project in the IDE. Here are the steps to create a simple "hello world" type of program:

The New Project wizard appears.
|
There are actually several ways to open the New Project wizard. See the Common Wizards Reference chapter in this guide for details. |
Even though it allows it, don't use any of the following characters in your project name (they'll cause problems later): | ! $ ( " ) & ` : ; \ ' * ? [ ] # ~ = % < > { }
Also, check Build debug version and Build release version.
Once you've created your project, you'll want to build it. Note that the IDE uses the same make utility and makefiles that are used on the command line.
The IDE can build projects automatically (i.e. whenever you change your source) or let you build them manually. When you do manual builds, you can also decide on the scope of the build.
You can watch a build's progress and see output from the build command in the Console view. If a build generates any errors or warnings, you can see them in the Problems view.
The IDE uses a number of terms to describe the scope of the build:
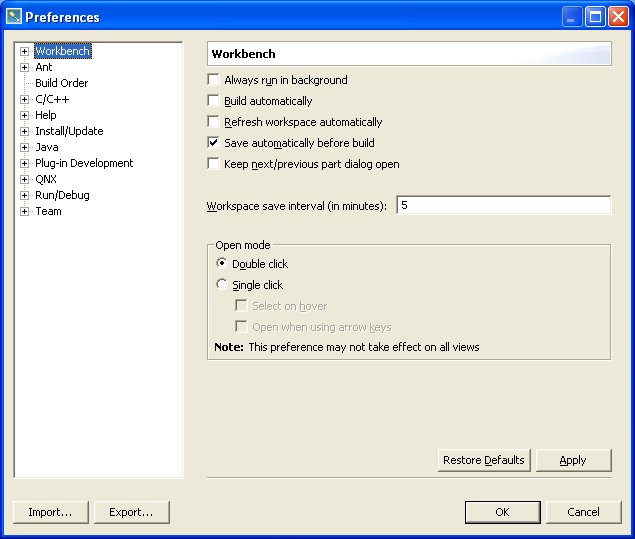
By default, the IDE automatically rebuilds your project every time you change a file or other resource in any way (e.g. delete, copy, save, etc.). This feature is handy if you have only a few open projects and if they're small. But for large projects, you might want to turn this feature off.
To turn off autobuilding:
The IDE now builds your projects only when you ask it to.
Existing C/C++ projects (not QNX C/C++ projects) have their own autobuild setting. To turn this off:
The IDE lets you manually choose to rebuild all your open projects. Depending on the number of projects, the size of the projects, and the number of target platforms, this could take a significant amount of time.
To rebuild all your open projects:
|
From the main menu, select Project-->Build All. |
To rebuild a single project:
|
In the C/C++ Projects view, right-click a project and select Rebuild Project. |
To have the IDE automatically save all your changed resources before you do a manual build:
The IDE will now save your resources before it builds your project.
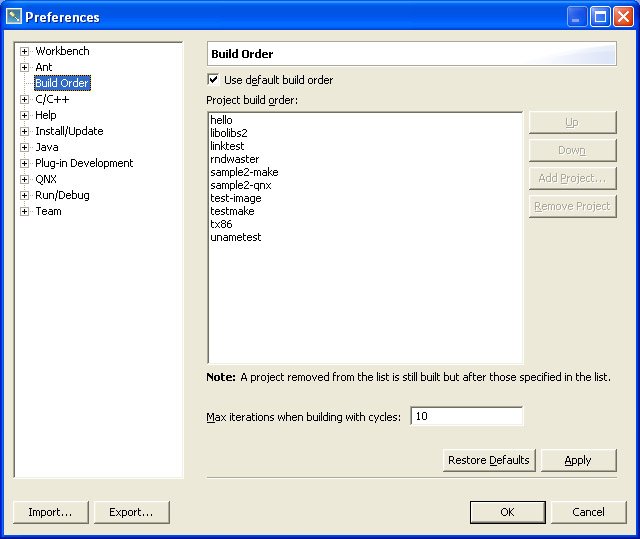
You can tell the IDE to build certain projects before others. And if a given project refers to another project, the IDE builds that project first.
|
Setting the build order doesn't necessarily cause the IDE to rebuild all projects that depend on a given project. You must rebuild all projects to ensure that all dependencies are resolved. |
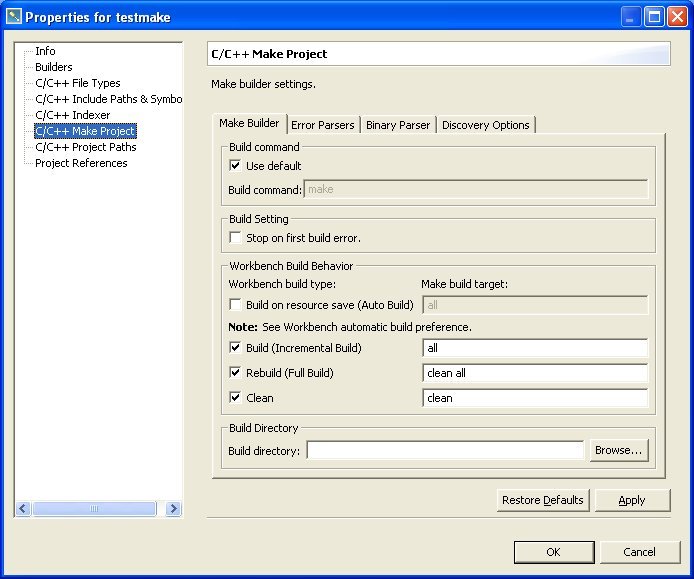
To manually configure the project build order:
|
In this section, the term "targets" refers to operations that the make command executes during a build, not to target machines. |
A make target is an action called by the make utility to perform a build-related task. For example, QNX makefiles support a target named clean, which gets called as make clean. The IDE lets you set up your own make targets (e.g. myMakeStuff). You can also use a make target to pass options such as CPULIST=x86, which causes the make utility to build only for x86. Of course, such an option would work only if it's already defined in the makefile.
To add your own custom make target to the C/C++ Project view's right-click menu:
You'll see your target option listed in the Build Targets dialog, which appears when you select the Build Make Target... item of the right-click menu of the C/C++ Projects view. Your targets also appear in the Make Targets view.
To build your project with a custom make target:
|
To remove a make target:
|
Adding a helpful "use" message to your application lets people get an instant online reminder for command-line arguments and basic usage simply by typing use app_name.
Usage messages are plain text files, typically named app_name.use, located in the root of your application's project directory. For example, if you had the nodetime project open, its usage message might be in nodetime.use. This convention lets the recursive Makefile system automatically find your usage message data.
For information about writing usage messages, please refer to the usemsg documentation.
To add a usage message to your application when using a QNX C/C++ Project:
If your usage message is in a file with a different name, or you want to explicitly specify your usage message's file name, change the USAGE line:
USAGE=$(PROJECT_ROOT)/usage_message.use
Where usage_message.use is the name of the file containing your usage message. This also assumes that your usage message file is in the root of the project directory. If the usage message file is located in another directory, include it instead of $(PROJECT_ROOT).
To add a usage message to your application when using a Standard C/C++ Project:
usemsg $@ usage_message.use
Where usage_message.use is the name of the file containing your usage message.
|
Before running an application, you must prepare your target. If it isn't already prepared, you must do so now. See the previous chapter (Preparing Your Target) in this guide. |
Once you've built your project, you're ready to run it. The IDE lets you run or debug your executables on either a local or a remote QNX Neutrino target machine. (For a description of local and remote targets, see the IDE Concepts chapter.)
To run or debug your program, you must create both of the following:
|
For a complete description of how to create a QNX Target
System Project, see the Common Wizards
Reference chapter in this guide.
For a complete description of the Launch Configurations dialog and its available options, see the Launch Configurations Reference chapter in this guide. |
To create a QNX Target System Project:

You'll see your new QNX Target System Project in the Navigator view.
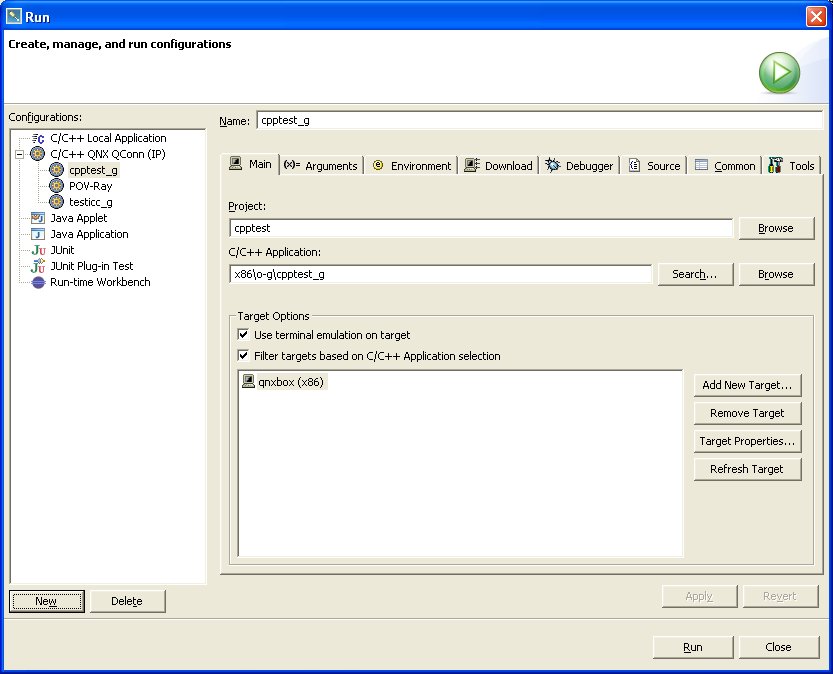
To create a launch configuration so you can run your "hello world" QNX C Application Project:
|
Make sure you build your project first before you create a launch configuration for it. See "Building projects" above. |
Your program runs -- you will see its output (if any) in the Console view.
To delete a project:

|
When you delete a project in the IDE, any launch
configurations for that project are not deleted.
This feature lets you delete and recreate a project without
also having to repeat that operation for any corresponding
launch configurations you may have created.
For more on launch configurations, see the Launch Configurations Reference chapter in this guide. |
In this section...
The C/C++ editor is where you write and modify your code. As you work in the editor, the IDE dynamically updates many of the other views (even if you haven't saved your file).
The C/C++ editor has a gray border on each side. The border on the left margin might contain icons that indicate errors or other problems detected by the IDE, as well as icons for any bookmarks, breakpoints, or tasks (from the Tasks view). The icons in the left margin correspond to the line of code.
The border on the right margin displays red and yellow bars that correspond to the errors and warnings from the Problems view. Unlike the left margin, the right margin displays the icons for the entire length of the file.
The C/C++ Editor
|
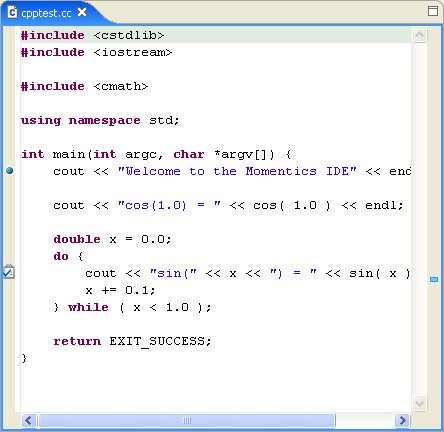
If you use that cpptest.cc sample, you must add the math library to your project, or you will get link errors. For more information on adding libraries to your build, see the Linker tab section of the Common Wizards Reference appendix. |
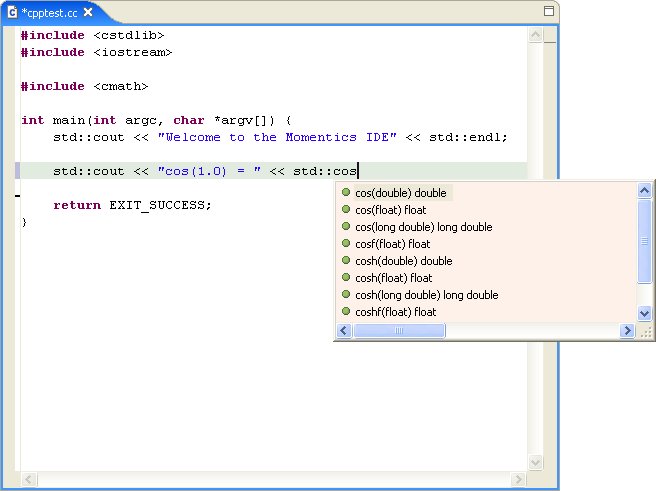
The Content Assist feature can help you finish the names of functions if they're long or if you can't remember the exact spelling.
To use Content Assist:
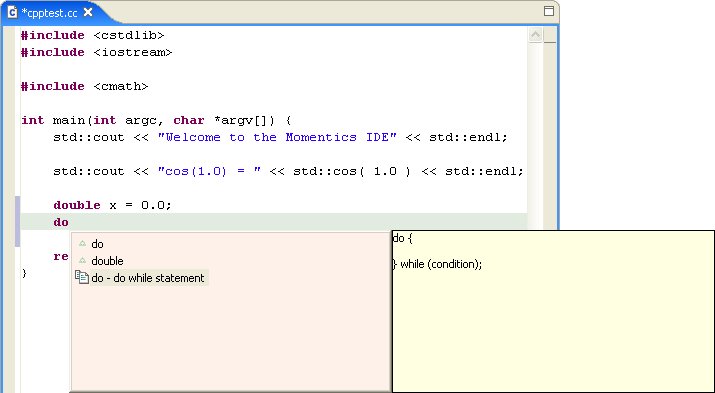
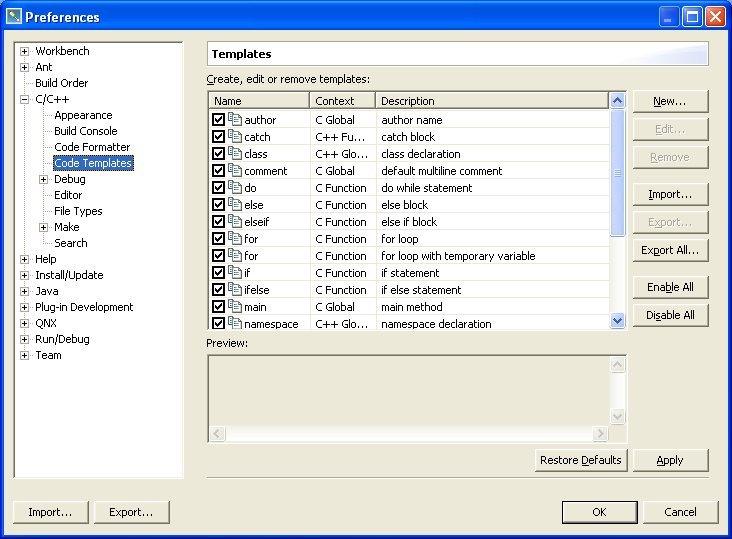
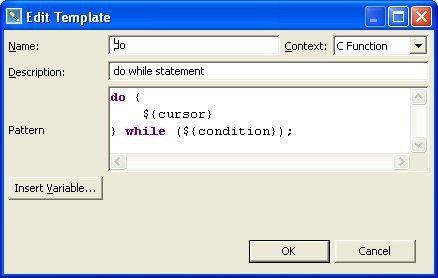
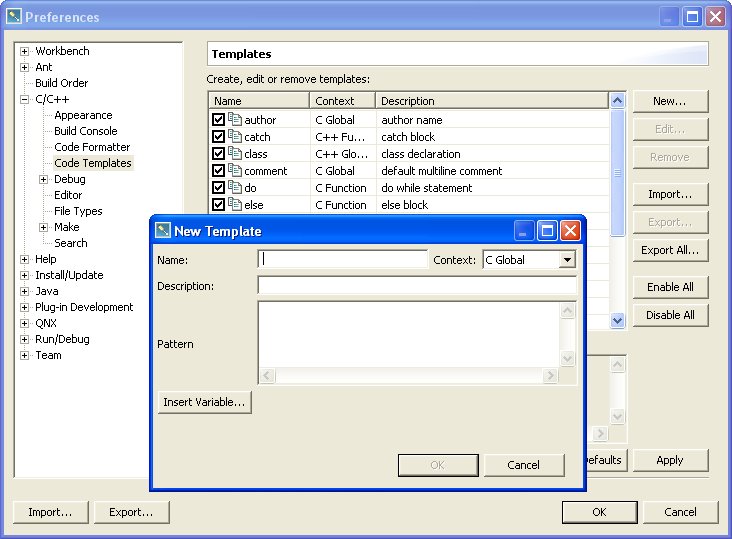
The IDE has another code-completion feature that can insert canned snippets of code such as an empty do-while structure. If you've already used the Content Assist feature, you may have already noticed the Code Templates feature; you access it the same way.
To use Code Templates:
The IDE lets you enable as many of these templates as you like, edit them as you see fit, create your own templates, and so on.
To edit a template or add one of your own:
To insert the appropriate #include directive for any documented QNX Neutrino function:
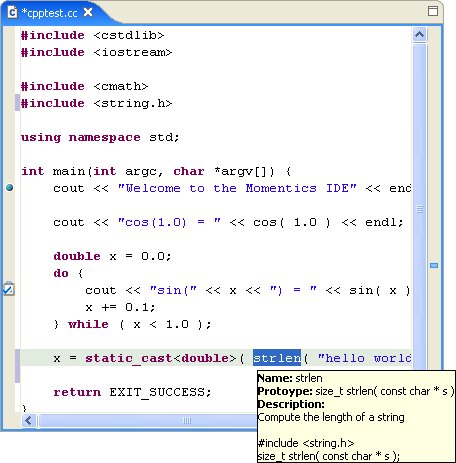
The IDE's hover help feature gives you the synopsis for a function while you're coding. To use hover help:
|
In the C/C++ editor, pause your pointer over a function.
You'll see a text box showing the function's summary and
synopsis:
|
You can easily add comments using either the C or C++ style, even to large sections of code. You can add // characters to the beginning of lines, letting you comment out large sections, even if they have /* */ comments.
When you uncomment lines, the editor removes the leading // characters from all lines that have them, so be careful not to accidentally uncomment sections. Also, the editor can comment or uncomment selected lines -- if you highlight a partial line, the editor comments out the entire line, not just the highlighted section.
To comment or uncomment a block of code:
You can change the font, set the background color, show line numbers, and control many other visual aspects of the C/C++ editor. You can also configure context highlighting and change how the Code Assist feature works. You do all this in the C/C++ editor preferences dialog:
To access the C/C++ editor preferences dialog:
If you wish to use a different text editor than the one that's built into the IDE, you can do so, but you'll lose the integration of the various views and perspectives. For example, within the C/C++ editor, you can set breakpoints and then see them in the Breakpoints view, or put "to-do" markers on particular lines and see them in the Tasks view, or get hover help as you pause your cursor over a function name in your code, and so on.
If you want to use other editors, you can do so either outside or inside the IDE.
You can edit your code with an editor started outside of the IDE (e.g. from the command line). When you're done editing, you'll have to synchronize the IDE with the changes.
To synchronize the IDE with changes you've made using an editor outside of the IDE:
|
In the C/C++ Projects view, right-click the tree pane and select Refresh. The IDE updates the display to reflect any changes you've made (such as creating new files). |
You can specify file associations that determine the editor you want to use for each file type. For example, you can tell the IDE to use an external program such as WordPad to edit all .h files. Once that preference is set, you can double-click a file in the C/C++ Projects view, and the IDE automatically opens the file in your selected program.
If the IDE doesn't have an association set for a certain file type, it uses the host OS defaults. For example, on a Windows host, if you double-click a .DOC file, Word or WordPad automatically launches and opens the file.
|
For more information about file associations, follow these links in the Eclipse Workbench User Guide: Reference-->Preferences-->File Associations. |
By default, the IDE creates a simple "hello world" C/C++ source file for you, which you may or may not want to use as a template for your own code.
To create a new C/C++ file:
You should now see an empty text editor window, ready for you to begin working on your new file. Notice your filename highlighted in blue in the title bar above the editor.
In this section...
Besides the features already described above, the IDE has several other helpful facilities worth exploring.
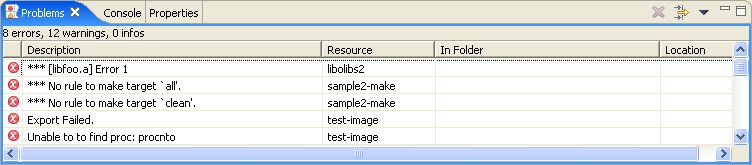
The Problems view gives you a list of errors and warnings related to your projects. These are typically syntax errors, typos, and other programming errors found by the compiler:
The IDE also shows corresponding markers in several other locations:
To quickly go to the source of an error (if the IDE can determine where it is):
|
In the Problems view, double-click the error marker ( |
To jump to errors sequentially:
|
Click the Jump to next error marker button ( |
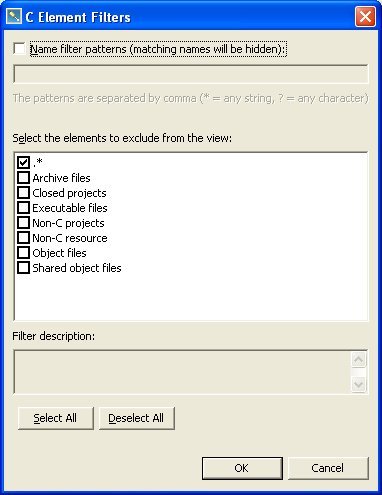
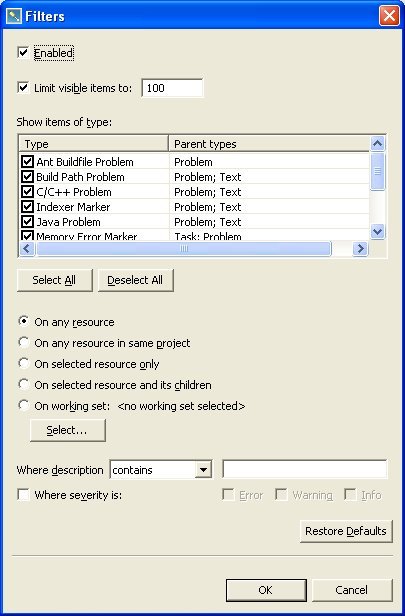
Depending on the complexity and stage of your program, the IDE can generate an overwhelming number of errors. But you can customize the Problems view so you'll see only the errors you want to see.
To access the error-filtering dialog:
|
In the Problems view, click the Filter icon ( |
The Filters dialog lets you adjust the scope of the errors shown in the Problems view. The more boxes checked, the more errors you'll see.
The Tasks view is part of the core Eclipse platform. For more information about this view, follow these links in the Workbench User Guide: Reference-->User interface information-->View and Editors-->Tasks view.
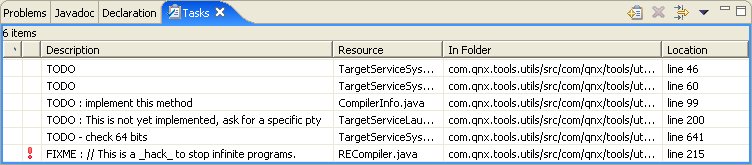
The Tasks view lets you track your tasks
The Tasks view lets you create your own tasks for the unfinished function you're writing, the error-handling routine you want to check, or whatever.
You use the New Tasks dialog to add a personal task:

|
To remove a personal task:
|
The Outline view gives you a structural view of your C/C++ source code:
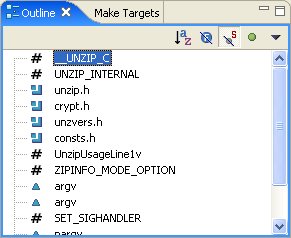
The view shows the elements in the source file in the order they occur, including functions, libraries, and variables. You may also sort the list alphabetically, or hide certain items (fields, static members, and nonpublic members).
If you click an entry in the Outline view, the editor's cursor moves to the start of the item selected.
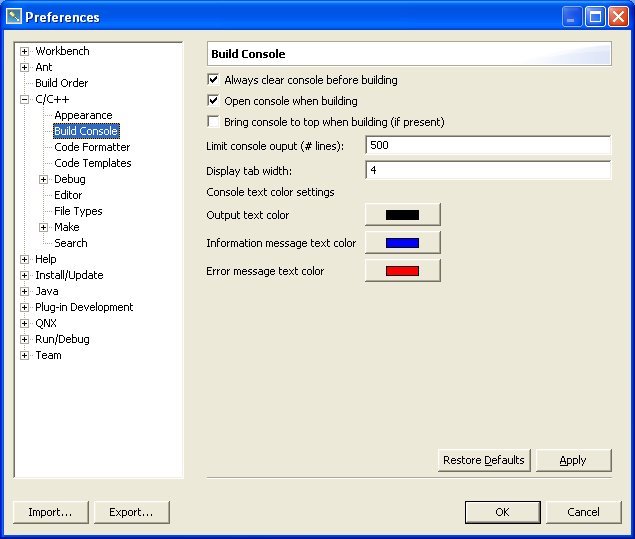
The Console view displays the output from the make utility:
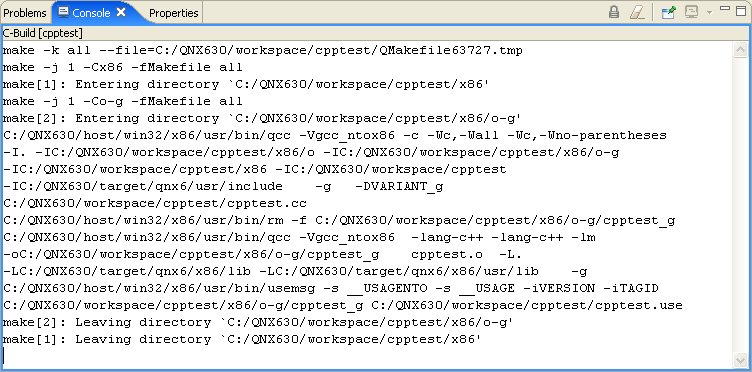
You can choose to clear the Console view before each new build or let the output of each subsequent build grow in the display. You can also have the Console view appear on top of the other stacked views whenever you build.
To set the preferences for the Console view:
While editing source code in the editor, you can select a function name, press F3, and the editor immediately jumps to the source file for that function (if the file is also in your project).
|
For more information on the C/C++ Development perspective, go to: Help-->Help Contents-->C/C++ Development User Guide. |
You can select a header (such as stdio.h) in the C/C++ editor and press Ctrl-Shift-o to open the header file in the editor. You can also right-click the header file's name in the Outline view, then choose Open.
Many of the enhanced source navigation and code development accelerators available in the C/C++ editor are extracted from the source code. To provide the most accurate data representation, the project must be properly configured with the include paths and defines used to compile the source.
For QNX projects the standard include paths and defines are set automatically based on the compiler and architecture. Additional values can be set using the project's properties.
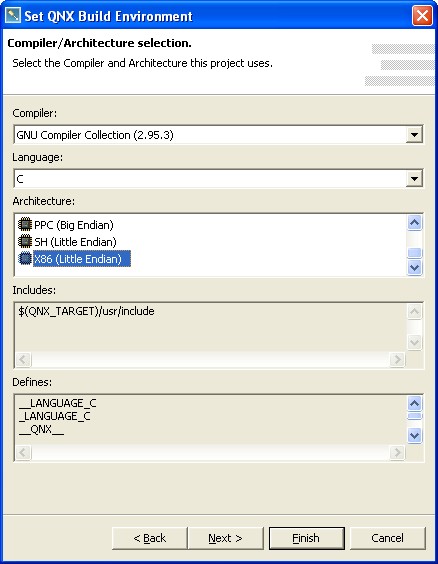
For Standard C/C++ Make projects, you must define the values yourself. These values can be set manually using the Paths and Symbols tab of the project's properties, or they can bet set automatically using the Set QNX Build Environment... item in the project's context menu.
Set the include paths and defines for a Standard C/C++ Make project:
The Set QNX Build Environment wizard appears.
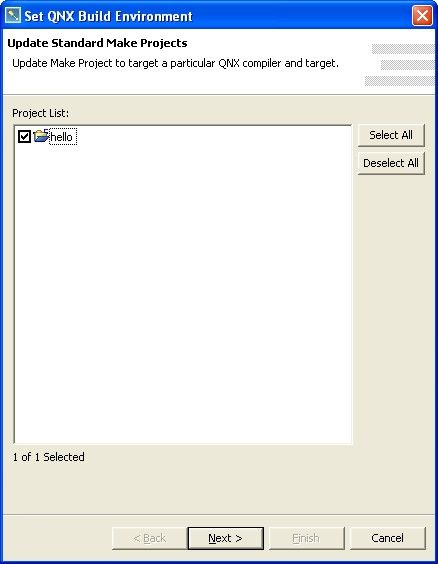
The Compiler/Architecture Selection panel appears.
|
|
|
|