![[Previous]](prev.gif) |
![[Contents]](contents.gif) |
![[Index]](keyword_index.gif) |
![[Next]](next.gif) |
|
|
|
|
 |
This version of this document is no longer maintained. For the latest documentation, see http://www.qnx.com/developers/docs. |
You can select a topic from this diagram:
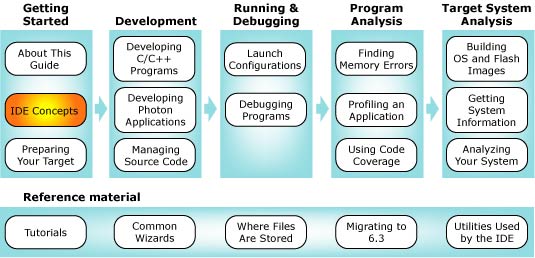
This chapter introduces key concepts used in the IDE.
Welcome to the Integrated Development Environment (IDE), a powerful set of tools in the QNX Momentics Professional Edition development suite. The IDE is based on the Eclipse Platform developed by Eclipse.org, an open consortium of tools vendors (including QNX Software Systems).
The IDE incorporates into the Eclipse framework several QNX-specific plugins designed for building projects for target systems running the QNX Neutrino RTOS. The tools suite provides a single, consistent, integrated environment, regardless of the host platform you're using (Windows, Linux, Solaris, or QNX Neutrino). Note that all plugins from any vendor work within the Eclipse framework in the same way.
The IDE provides a coherent, easy-to-use work environment for building your applications. If you've used an IDE before, then you already have a good idea of the convenience and power this kind of toolset can offer.
Through a set of related windows, the IDE presents various ways of viewing and working with all the pieces that comprise your system. In terms of the tasks you can perform, the toolset lets you:
 |
The IDE doesn't force you to abandon the standard QNX tools and makefile structure. On the contrary, it relies on those tools. And even if you continue to build your programs at the command line, you can also benefit from the IDE's unique and powerful tools, such as the QNX System Analysis tool and the QNX System Profiler, which can literally show you, in dynamic, graphical ways, exactly what your system is up to. |
After you install QNX Momentics, you'll see -- depending on which host you're using -- a desktop icon and/or a menu item labeled "Integrated Development Environment" in the start or launch menu. To start the IDE, simply click the icon or the menu item.
|
On Solaris, you must start the IDE from the command-line:
$QNXHOST/usr/qde/eclipse/qde -vmargs -Xms256m -Xmx512m |
|
On Neutrino, do not start the IDE from the command line if you've used the su command to switch to a different user. It will be unable to attach to your Photon session and will fail to start. |
The first time you start the IDE on Windows, the Workspace Launcher dialog will ask you where to store your workspace. All of your IDE projects will be stored in this directory.
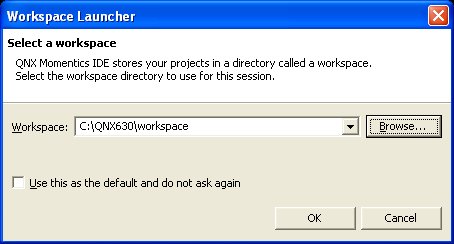
Selecting a workspace directory
By default, the IDE offers to put your workspace in your home directory ($HOME/workspace on QNX, Linux and Solaris), or the path specified in the QNX Momentics IDE shortcut (C:/QNX630/workspace) on Windows. To store your workspace in another location:
 |
Click the Browse... button and select a directory for your workspace. |
To continue loading the IDE, click the OK button.
|
Check the Use this as the default and do not ask again box to always use this workspace when launching the IDE. |
To change the default workspace location on QNX, Linux, and Solaris, launch qde with the -data workspace_path option.
After you choose a workspace location, the IDE displays a welcome screen with several options that help to introduce you to the IDE:
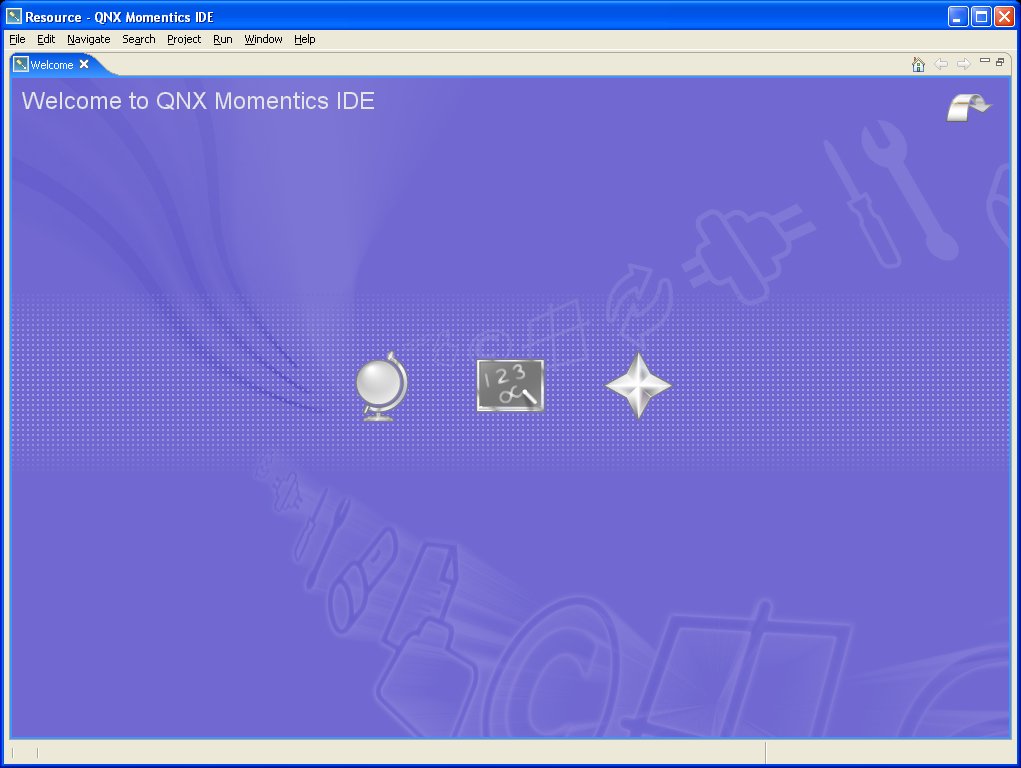
The IDE's welcome screen
The icons on the welcome screen give you access to:
| Icon | Description |
|---|---|
| The Workbench icon takes you to the workbench screen and your workspace. | |
| Provides links to overviews of the IDE: the Documentation Roadmap, Team Support (an important topic if you use CVS), Workbench Basics, and C/C++ Online Docs. | |
| Links to the Quick Start (10 Steps to Your First QNX Program), and the CDT's C/C++ tutorials. | |
| Links to documents describing new features: the new features in this release and information about migrating from a previous release. |
You can return to this welcome screen at any time by choosing Help-->Welcome.
After you've updated one or more IDE components, such as the CDT or an Eclipse add-on, you might be prompted to process these updates the next time you launch the IDE:
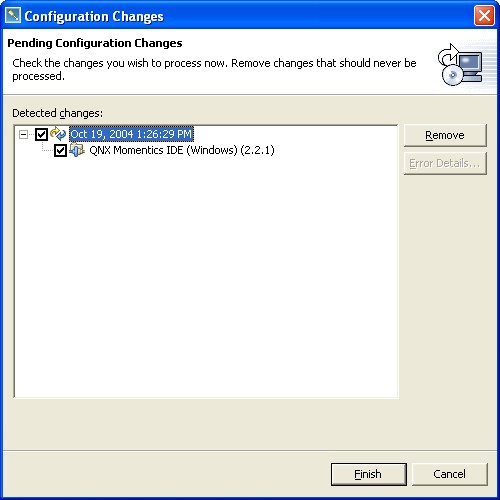
The Configuration Changes dialog
|
This doesn't apply to the QNX Momentics 6.3.0 Service Pack 2 update, although it does apply to the 6.3.0 Service Pack 1 update. |
To process IDE updates:
The IDE processes its updates.
The IDE displays the Install/Update dialog.

The Install/Update dialog tells you to reboot.
You can also start the IDE by running the qde command:
qde
|
Don't run the eclipse command, even thought it may seem to work. Always use qde instead, because it sets up the proper QNX-specific environment. |
You can also direct the IDE at a particular workspace location. For details, see the section "Specifying a workspace location" in this chapter.
For more information on starting the IDE, including advanced execution options for developing or debugging parts of Eclipse itself, see Tasks-->Running Eclipse in the Workbench User Guide.
When you first run the IDE, you should see the workbench, which looks like this:
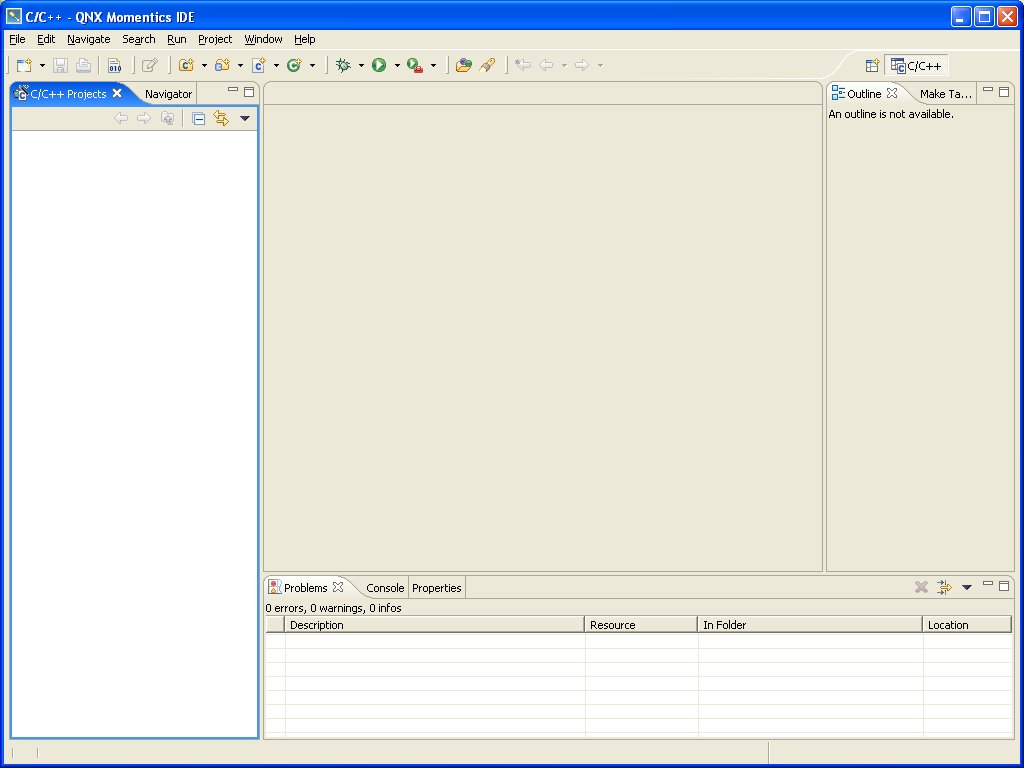
The first thing you see.
For details about the workbench's menu, see Reference-->User Interface Information-->Workbench menus in the Workbench User Guide. For a basic tutorial on using the workbench UI, see Getting Started-->Basic tutorial-->The Workbench in the Workbench User Guide.
The IDE contains its own help system, which is an HTML server that runs in its own window "above" the workbench (i.e. the help isn't a perspective or a view).
|
On Linux, the IDE tries to start the Mozilla web browser to display
the online help system. Red Hat Enterprise Linux 4 now ships with
Firefox instead of Mozilla, so you'll have to change the help browser
setting:
|
|
From the main menu, select Help-->Help Contents. |
The left pane of the Help window is the
bookshelf, which has links to the various
documentation sets. Click one of the links to view
a document. Note that you can return to the bookshelf
at any time by clicking the Table of Contents button (![]() ).
).
The Contents pane includes at least the following titles:
|
Some title pages have content on them, some don't. If you click a title, and the right side of the window remains blank, you've hit a "placeholder" title page. Simply expand the title entry to see its contents. |
You can create a bookmark for any help page:
 ).
).
 ) tab at the bottom of the contents pane.
To learn more about the IDE's Help system, follow these links in the Eclipse Workbench User Guide: Concepts-->Help system.
When you select the Tips and tricks item from the Help menu, you'll see a list of tips and tricks pages. Select the page for the Eclipse platform, which covers several topics:
A perspective is a task-oriented arrangement of the workbench window.
For example, if you're debugging, you can use the preconfigured Debug perspective, which sets up the IDE to show all the tools related to debugging. If you wanted to work with the elements and tools related to profiling, you'd open the QNX Application Profiler perspective.
You can customize a perspective by adding or removing elements. For example, if you wanted to have certain profiling tools available whenever you're debugging, you could add those elements to the Debug perspective.
Perspectives generally consist of these components:
Perspectives govern which views appear on your workbench. For example, when you're in the Debug perspective, the following main views are available (in the default configuration):
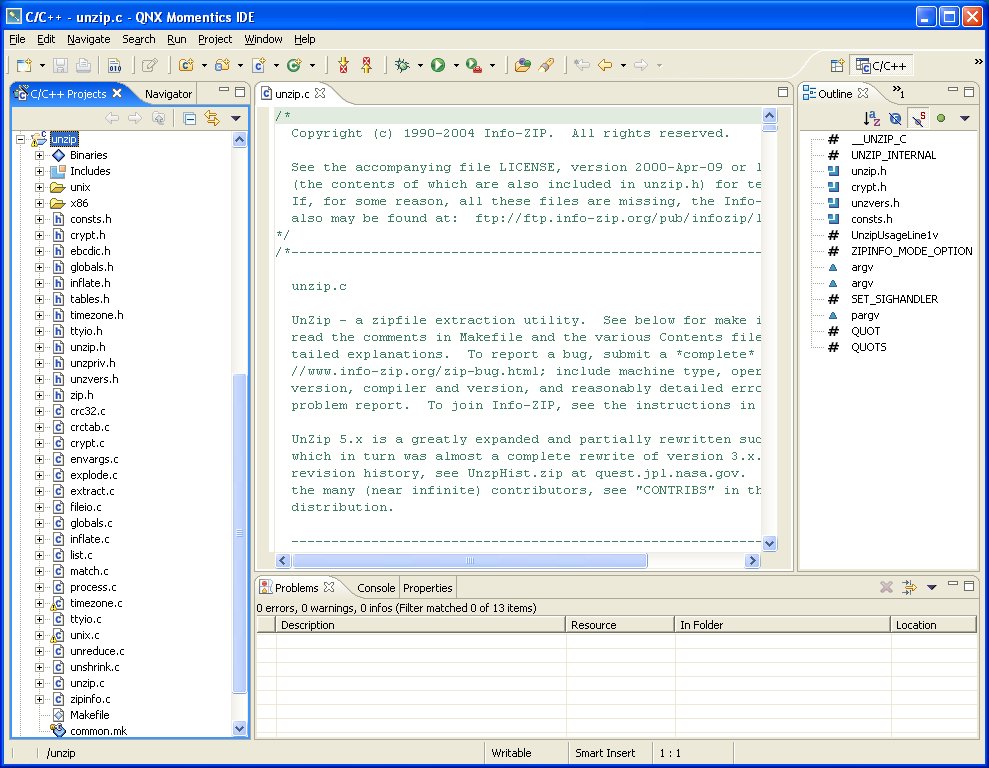
Views organize information in various convenient ways. For example, the Outline view shows you a list of all the function names when you're editing a C file in the C/C++ editor. The Outline view is dynamic; if you declare a function called mynewfunc(), the Outline view immediately lists it.
Views give you different presentations of your resources. For example, the Navigator view shows the resources (projects, folders, files) you're working on. Like individual panes in a large window, views let you see different aspects of your entire set of resources.
Views provide:
You use editors to browse or change the content of your files. Each editor in the IDE is designed for working with a specific type of file. The editor that you'll likely use the most is the C/C++ editor.
The editor area is a section of the workbench window reserved for editors. Note that views can be anywhere on the workbench except in the editor area.
The IDE lets you rearrange views and editors so they're beside each other (tiled) or stacked on top of each other (tabbed).
|
If you wish to use a different text editor than the one
that's built into the IDE, you can do so, but you'll
lose the integration of the various views and
perspectives. For example, within the IDE's text editor,
you can set breakpoints and then see them in the Breakpoints
view, or put "to-do" markers on particular
lines and see them in the Tasks view, or get
context-sensitive help as you pause your cursor over a
function name in your code, and much, much more.
But if you want to use your own editor, we recommend that you:
|
Projects are generic containers for your source code, makefiles, and binaries. Before you do any work in the IDE, you must first create projects to store your work. One of the more common projects is a QNX C/C++ Project.
|
Throughout this guide, we use the term "C/C++" as shorthand to cover both C and C++ projects. The titles of elements within the IDE itself are often explicit (e.g. "QNX C Project," "QNX C++ Project," etc.). |
When you create a file within a project, the IDE also creates a record (local history) of every time you changed that file and how you changed it.
Your workspace is a folder where you keep your projects. For the exact location of your workspace folder on your particular host, see the appendix Where Files Are Stored in this guide.
You can redirect the IDE to point at different workspaces:
|
From the directory where the qde.exe executable
(Windows) or the qde script (all other hosts)
resides, run this command:
qde -data path_to_workspace |
This command launches the IDE and specifies where you want the IDE to create (or look for) the workspace folder.
|
Don't use spaces when naming a project or file -- they
can cause problems with some tools, such as the
make utility.
Also, don't use case alone to distinguish files and projects. On Unix-style hosts (i.e. Solaris, Linux, QNX Neutrino), filenames are case-sensitive, but in Windows they're not. For example, Hello.c and hello.c would refer to the same file in Windows, but would be separate filenames in Unix-style systems. |
The IDE associates projects with natures that define the characteristics of a given project. For example, a Standard Make C Project will have a "C nature," whereas a QNX C Project will have a C nature as well as a QNX C nature, and so on. Note that QNX C or C++ projects assume the QNX recursive makefile hierarchy to support multiple target architectures; standard make projects don't.
|
For more on the QNX recursive makefile hierarchy, see the Conventions for Makefiles and Directories appendix in the Programmer's Guide. |
The natures tell the IDE what can and can't be done with each project. The IDE also uses the natures to filter out projects that would be irrelevant in certain contexts (e.g. a list of QNX System Builder projects won't contain any C++ library projects).
Here are the most common projects and their associated natures:
| Project | Associated natures |
|---|---|
| Simple Project | n/a |
| Standard Make C Project | C |
| Standard Make C++ Project | C, C++ |
| QNX C Project | C, QNX C |
| QNX C Library Project | C, QNX C |
| QNX C++ Project | C, C++, QNX C |
| QNX C++ Library Project | C, C++, QNX C |
| QNX System Builder Project | QNX System Builder |
The IDE saves these natures and other information in .project and .cdtproject files in each project. To ensure that these natures persist in CVS, include these files when you commit your project.
|
The IDE doesn't directly support nested projects; each project must be organized as a discrete entity. However, the IDE does support project dependencies by allowing a project to reference other projects that reside in your workspace. Container projects also let you logically nest projects by collecting several projects together. |
The host is the machine where the IDE resides (e.g. Windows). The target is the machine where QNX Neutrino and your program actually run.
The qconn daemon is the target agent written specifically to support the IDE. It facilitates communication between the host and target machines.
If you're running the IDE on a QNX Neutrino PC (self-hosted), your target machine may also be the host machine. In this case, you must still run qconn, even though your host machine is "connecting to itself."
For more information about connection methods, see the Launch Configurations Reference chapter in this guide.
Before you can run a program, you must tell the IDE's launcher what program to run, what target to run it on, what arguments to pass to the program, and so on.
If you want to run the program on another target or run with different options (e.g. with profiling enabled), you must create a new launch configuration or copy a previous one and modify it.
Resources is a collective term for your projects, folders, and files.
Wizards guide you through a sequence of tasks. For example, to create a QNX C Project, you run a wizard that takes you through all the steps and gathers all the necessary information before creating the project. For more information, see the Common Wizards Reference chapter in this guide.
You'll find many keyboard shortcuts for various UI tasks throughout the IDE. You can easily create your own shortcuts. For instructions, follow these links in the Workbench User Guide:
Reference-->Preferences-->Keys
|
Some existing shortcuts and some commands that can be assigned to shortcuts only apply to Java code and projects. For example, the "Search for Declaration in Workspace" command, which is bound to Ctrl-G only works with Java code. |
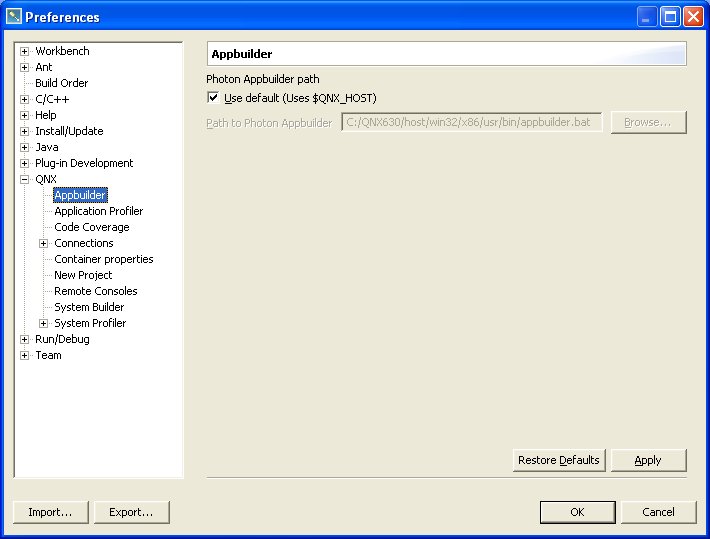
The Preferences dialog (under the Window menu) lets you customize the behavior of your environment -- when to build your projects, how to open new perspectives, which target processors to build for, etc.

|
Besides global preferences, you can also set preferences on a per-project basis via the Properties item in right-click menus. |
The QNX Momentics 6.3.0 development suite lets you install and work with multiple versions of Neutrino (from 6.2.1 and later) -- you can choose which version of the OS to build programs for.
When you install QNX Momentics, you get a set of configuration files that indicate where you've installed the software. The QNX_CONFIGURATION environment variable stores the location of the configuration files for the installed versions of Neutrino; on a self-hosted Neutrino machine, the default is /etc/qnx.
On Windows hosts, you'll find a configuration program (QWinCfg) for switching between versions of QNX Momentics.
You launch QWinCfg via the start menu (e.g. All Programs-->QNX Momentics 6.3.0-->Configuration).
For details on using QWinCfg, see its entry in the Utilities Reference.
The qconfig utility lets you configure your machine to use a specific version of Neutrino:
eval `qconfig -n "QNX 6.3.0 Install" -e`
|
In the above command, you must use the "back tick" character (`), not the single quote character ('). |
When you start the IDE, it uses your current qconfig choice as the default version of the OS; if you haven't chosen a version, the IDE chooses an entry from the directory identified by QNX_CONFIGURATION. If you want to override the IDE's choice, you can choose the appropriate build target.
If you're going to create Photon applications for QNX 6.3.0 and 6.2.1 using PhAB, you will need to use the older version of PhAB to create your application resources.
To ensure that you're always using the older version of PhAB to create your resources:
To specify which version of Neutrino you want the IDE to build for:
Neutrino uses these environment variables to locate files on the host machine:
The qconfig utility sets these variables according to the version of QNX Momentics that you specified.
Each update to the Momentics IDE adds new abilities and features.
Here are some of the more interesting or significant changes made to the QNX Momentics IDE since the release of QNX Momentics 6.3.0:
Here are some of the more interesting or significant changes made to the QNX Momentics IDE since the release of QNX Momentics 6.3.0 SP1:
The QNX Momentics 6.3.0 SP2 IDE sports many useful new features:
The look and feel of the workbench has evolved. Here are some of the things you will notice:
A number of changes have occurred in the UI to support a higher level of responsiveness. This includes support for running jobs in the background instead of tying up the UI and having to wait.
The IDE now features a:
The new Progress view showing the progress of a CVS checkout and a Workspace build background operation. Many user operations can now be run in the background. When you see the progress dialog with the Run In Background button you can select it to get back to work.
This dialog also shows you the details of other currently running operations in the workspace and informs you when one operation is blocked waiting for another to complete.
A number of changes and enhancements have gone into the editor management in the QNX Momentics IDE.
The IDE now provides:
The QNX Momentics IDE now contains basic support for themes. This currently goes as far as allowing customization of colors and fonts used in the workbench.
Changes made in the local file system can now be automatically refreshed in the workspace. This saves you from having to do a manual File > Refresh every time you modify files with an external editor or tool. This feature is currently disabled by default, but can be turned on from the Workbench preference page.
The Find/Replace dialog for text editors now supports searching and replacing using regular expressions. Press F1 to get an overview of the regular expression syntax, and press Ctrl+Space to get Content Assist for inserting regular expression constructs.
When the cursor is placed in a dialog field, that is supported by Content Assist, a small light-bulb above the upper-left corner of the field indicates its availability.
The displayed width of tabs and the text selection foreground and background colors are now customizable in the text editor. See the Workbench > Editors > Text Editor page:

All text editors based on the QNX Momentics IDE editor framework support new editing functions, including moving lines up or down (Alt+Arrow Up and Alt+Arrow Down), copying lines (Ctrl+Alt+Arrow Up and Ctrl+Alt+Arrow Down), inserting new a line above or below the current line (Ctrl+Shift+Enter and Shift+Enter), and converting to lowercase or uppercase (Ctrl+Shift+Y and Ctrl+Shift+X).
Double clicking on the line number in the status line is the same as Navigate > Go to Line... (Ctrl+L).
The File menu now includes an Open External File... option that lets you open any file in the workbench without having to import it into a project.
The new CDT in the QNX Momentics 6.3.0 SP2 IDE features:
The Outline view now offers users the ability to filter out certain elements such as defines and namespaces as well as the ability to group all include statements together.
Creating new C++ classes continues to get easier with a number of enhancements to the C++ class creation wizard.
A new toolbar has been created that facilitates the creation of a number of standard C/C++ objects:
The C/C++ editor supports code folding for functions, methods, classes, structures and macros.
The Makefile editor has a whole new set of preferences and now supports code folding.
Debugging support and application launching in the CDT has been improved:
The C/C++ Debugger now supports thread-specific breakpoints. After placing a breakpoint, look at its Breakpoint Properties to see which threads or processes it is active for.
The Breakpoints view now lets you filter out all of the non-relevant breakpoints based on the specific process that is being debugged.

C/C++ launch configurations now include support for workspace variables in the Environment, Argument and Working Directory tabs.
Gone are the days of toggling the C/C++ editor to show the assembly of a program. Instead use the Disassembly View to see both assembly code and source mixed:
Global variables can now be added to the Variables View instead of having to add them as separate expressions.
The Debug Console has moved to being a proper console selection of its own in the generic Console View

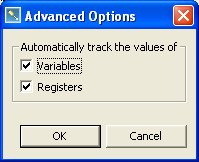
Configure the default behavior for the automatic retrieval of shared library and register information in the C/C++ debugger.
Register values can be set to refresh automatically or manually from the Launch configuration dialog with the Advanced button of the Debug tab.
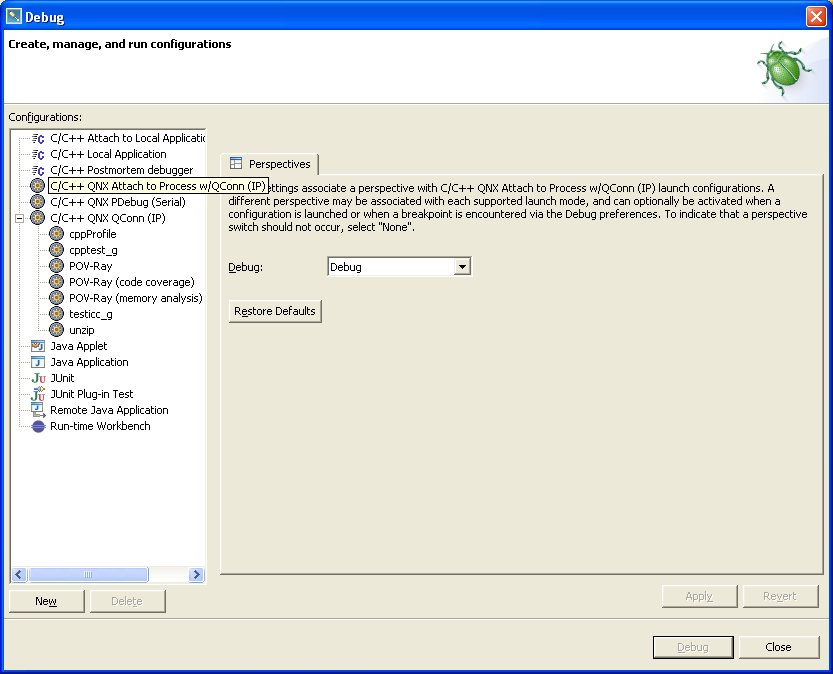
You can now maintain separate Run/Debug launch configurations for debugging core files, attaching to a running process, attaching to your target with pdebug (serial debugging), and attaching to your target with qconn (TCP/IP debugging).
Project configuration and building has been improved:
Automatically generate project defines and include path settings from the C/C++ Make Project > Discovery Options project settings.
Note that this is for projects being built with one of the platform-specific nto*-gcc drivers and a custom Makefile.
Use the C/C++ Include Paths and Symbols to set up the project settings appropriately for searching, indexing and other source navigation functionality.
Use the C/C++ Project Paths project properties to determine those files and directories that should be specifically considered as containing source, output or library content. Performance can be improved by limiting the directories and files of large projects.
Define the types of specific files, especially C++ headers without extensions, using the C/C++ File Types global preference or project property.
Working sets containing only C/C++ projects and resources can be created now by creating a C/C++ Working Set definition.
Editing and navigating your C/C++ source files is now easier with:
Code editing just got easier with a more full featured content assist. Completions are now provided in the C/C++ editor for:
Configure completion options in the global C/C++ Editor Preferences:
Use the Outline view or the C/C++ Editor's Refactor > Rename context menu to refactor class and type names, methods, functions and member names.
Use Navigate > Open type (Ctrl-Shift-T) to open up the declaration of C/C++ classes, structures, unions, typedefs, enumerations and namespaces.
Use the C/C++ Browsing Perspective to navigate the class and structure members of a particular project.
The Makefile Editor now provides syntax highlighting, code completion and content outlining capabilities.
The C/C++ Search Dialog provides context sensitive searches from the Outline view as well as resource selection restricted searches in the C/C++ Search Dialog
The C/C++ Editor supports hyperlink navigation if enabled via Window > Preferences > C/C++ > C/C++ Editor Preferences. Then you can use Ctrl - Click to jump to the declaration of an item directly in the C/C++ editor.
Enable C/C++ indexing and indexer error reporting in the C/C++ Indexer properties. This helps identify projects missing path configuration information.
Configure the indexer from the C/C++ Indexer project settings:
The exclusive QNX Momentics tools have also been updated and improved:
The following new features have been added to the Memory Analysis perspective:
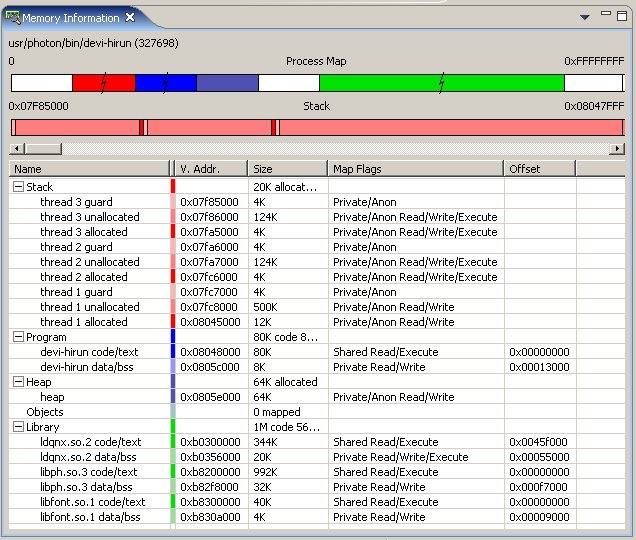
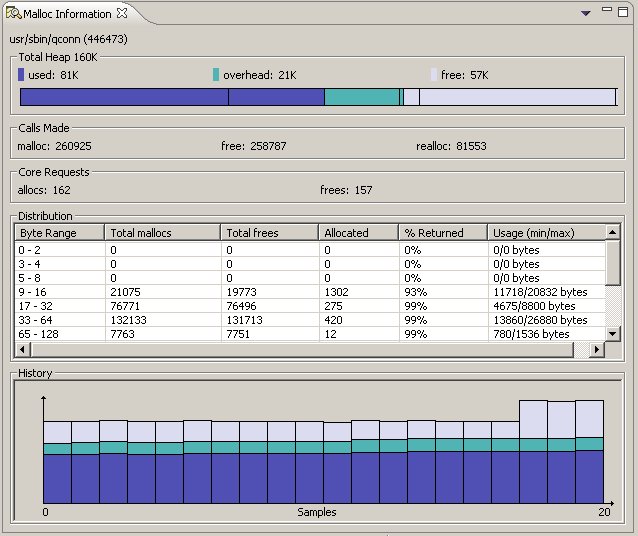
The Memory Information and Malloc Information views are now part of the System Information perspective.
New features added to the System Profiler in 6.3.0 SP1:
Additional Filters: state activity, IPC activity, CPU usage.
New features added to the System Profiler in 6.3.0 SP2:
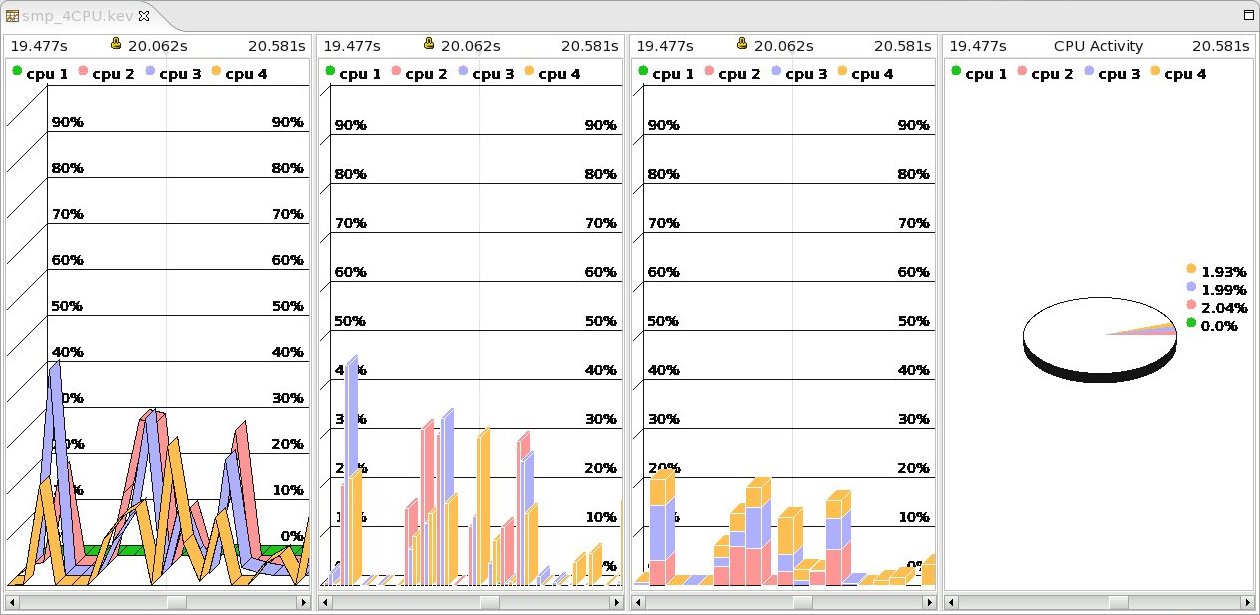
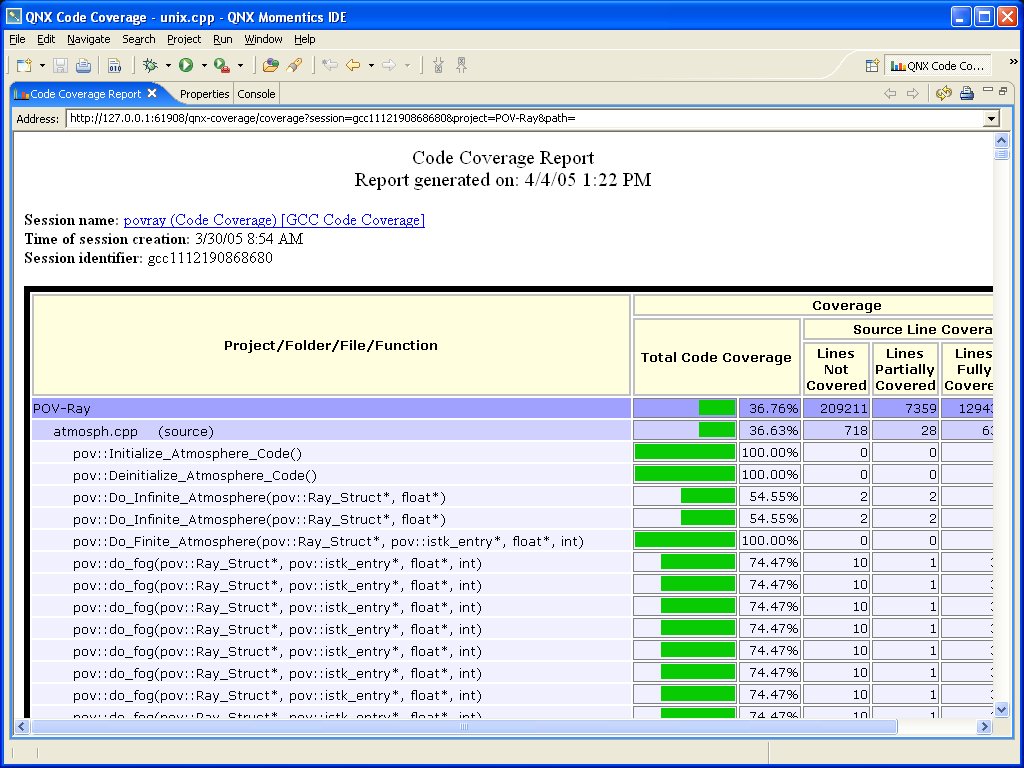
Improved reporting output and export capabilities.
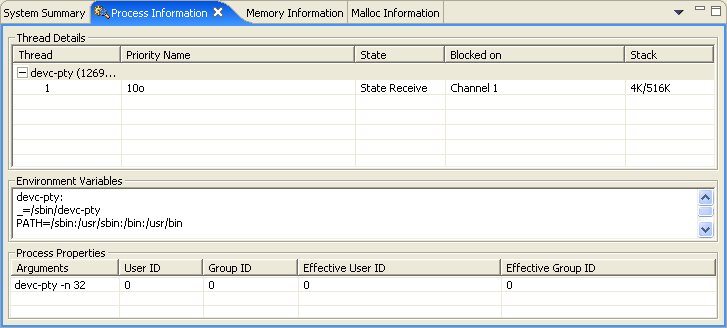
The System Information perspective has been rewritten with a new update control mechanism, and simplified Process Information and Signal Information views.
The new Process Information view:
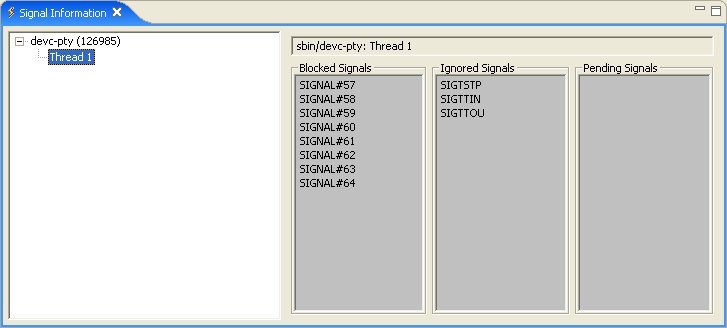
The new Signal Information view:
The Memory Information and Malloc Information views (formerly found in the Memory Analysis perspective) are now part of the System Information perspective.
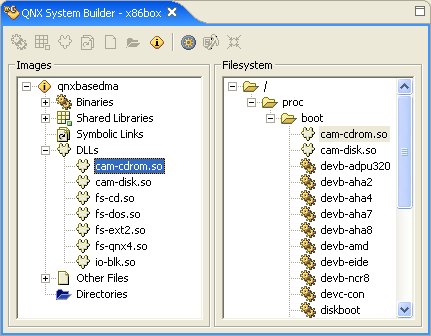
The following new features have been added to the System Builder perspective:
|
|
|
|