Interacting with the system
Keyboard, mouse, and display
To experience the quick start image's graphical samples, you will need a display, keyboard, and mouse. Connect the display to the HDMI 0 port to start (located next to the USB-C power port). You can adjust the display setting later to customize the port or resolution. You can connect your keyboard and mouse to any of the available USB ports.
Alternatively, connect a touchscreen to your Raspberry Pi, which replaces the need for a mouse.
First boot
On first boot, you should briefly see a colorful splash screen on the display, which indicates that the image successfully booted. If the image doesn't boot properly, you will get a Raspberry Pi boot message.
Next, you will be greeted by the QNX Welcome screen. This indicates that Screen started successfully and the Pi is ready to run graphical apps. When you're ready, click the icon in the center to launch the terminal application. (You can actually customize the icons shown on this launch screen!)
If you have a network connection, it will also be shown on this screen.
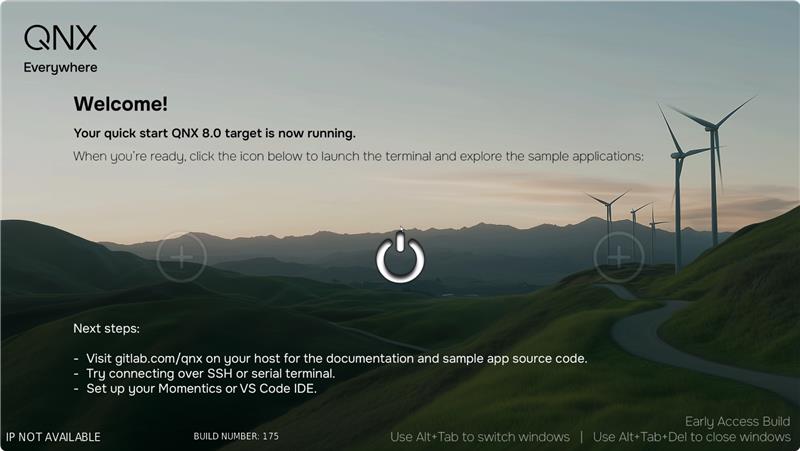
At the terminal, use qnxuser as the username and password. Once logged in, you'll be greeted with a welcome message and can start entering commands through the terminal. Update the password using the passwd shell command. Using root as the username and password is also possible when you need escalated privileges, but you should use qnxuser to start (more details below).
If you did not change it, the default password for root is root. We recommend changing the root password with passwd.
You can launch this welcome screen at any time with demolauncher -a /system/etc/desktop_files/ &. See the next wiki page for information about customizing this screen.
Managing multiple windows
If you launch multiple graphical applications, including multiple instances of the terminal, you can toggle between them with Alt+Tab. To close an open window and end its process, toggle to the window and press Del.
SSH
The system uses mDNS to advertise its IP address on the local network. As long as your computer is set up for mDNS, you can log in using the hostname specified in the /boot/network. By default, that name is qnxpi, and the advertised name is qnxpi.local.
To connect to your Raspberry Pi, perform the following steps according to your computer's operating system:
On Linux, enter:
user@host:~$ ssh qnxuser@qnxpi.localYou should see the system's shell prompt:
qnxuser@qnxpi:~$On Windows, enter:
user@host:~$ ssh -m hmac-sha2-256 qnxuser@qnxpi.local
To avoid having to specify the MACs=hmac-sha2-256 option each time you SSH into your target, create a config file under C:\Users\<username>\.ssh\ and add:
Host qnxpi
   User qnxuser
   MACs hmac-sha2-256
This also prevents the need to specify the option in the Adding binaries section
Alternatively, you can use PuTTY: https://www.putty.org/. Under Host Name (or IP address) enter your Raspberry Pi's IP address and set Port to 22.
By default, root login is disabled. To enable root login, first enter su to switch to root. Then, enter:
root@qnxpi:~# vim /system/etc/ssh/sshd_configSet PermitRootLogin to yes. For this change to take effect, from the display connected to your Raspberry Pi, restart sshd by entering:
root@qnxpi:~# slay -f sshd
root@qnxpi:~# /system/bin/sshd -f /system/etc/ssh/sshd_config
If you're connected via SSH, run shutdown or reboot your Pi.
Serial connection
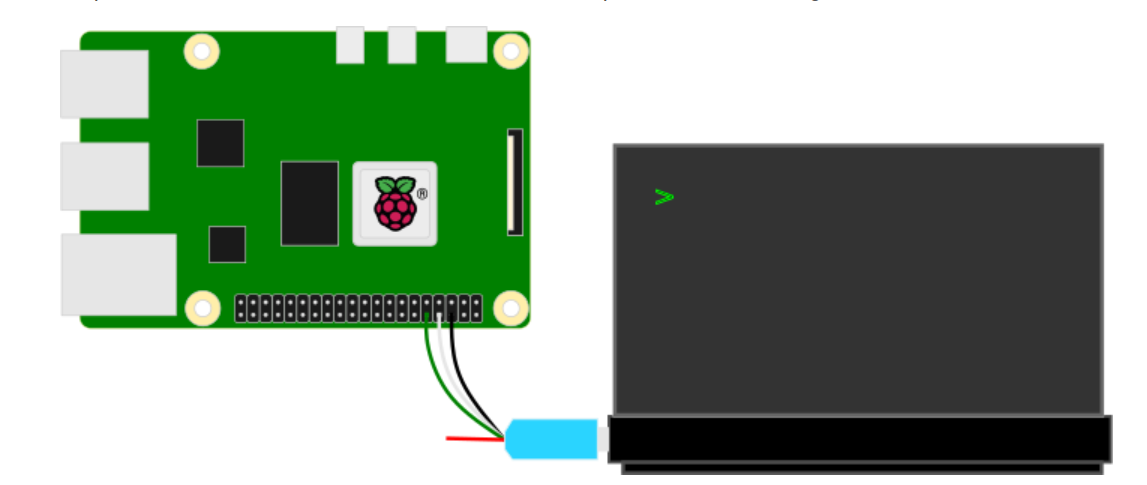
You can connect to the system with a USB-TTL converter, which provides a basic serial connection between the Raspberry Pi and your computer.
You must connect three pins on your Raspberry Pi 40-pin GPIO header (refer to the image below). The transmit pin is pin 8, the receive pin is pin 10, and the ground pin is usually either pin 6 or 14 due to their proximity to the transmit and receive pins. Never connect a USB-TTL converter to any of the power pins on the Raspberry Pi.
Once you've booted your Raspberry Pi and connected the USB-TTL converter to your computer, perform the following steps according to your computer's operating system:
On Linux, find the USB-serial port that corresponds to your Raspberry Pi:
user@host:~$ ls /dev/ttyUSB*Then, use the
screencommand line utility on Linux to connect to your Raspberry Pi, for example:user@host:~$ sudo screen /dev/ttyUSB0 115200On Windows, open Device Manager and find the corresponding USB-serial port under Ports (COM & LPT). Then, open PuTTY, enter the serial line, and set the speed to 115200.
When connected from any operating system, enter uname -a to confirm that you're connected to your Raspberry Pi.
Troubleshooting
Before diagnosing issues with the QNX OS image on the Raspberry Pi, ensure that the board is properly connected and powered on:
- Check that you're using the correct power supply. The official power supply for Raspberry Pi is 5.1V and 3A. The Raspberry Pi emits a red LED light when powered.
- Ensure that you properly inserted the micro SD card. If you didn't, the display outputs a message that no system image was found.
- Look for a sign that the firmware is starting - the screen should display a multi-colored rectangle before displaying one of the window manager views.
If you've checked these criteria, and your image still isn't displaying as expected, you may find the solution to your issue below. Otherwise, use the available resources listed under the support path.
- The edges of the image are cut off on my display
On Liliput displays, ensure that the Pixel-to-Pixel setting is off and the Underscan setting is on.
- Failure to mount file systems
Ensure that you're using a well-known micro SD card brand. Brands include but are not limited to Kingston, SanDisk, and Samsung.
- The system boots, but there's no network connection
Run
ifconfigand check that the bcm0 (Wi-Fi) or genet0 (ethernet) interface shows up and is associated with an IP address. If not, ensure that the network configuration in wpa_supplicant.conf is correct.- I don't see any output on my display
- Ensure that the HDMI cable connecting your Raspberry Pi to your display is connected to the correct port (HDMI 0). This port is located directly beside the USB-C power port.
- Verify that your Raspberry Pi works by flashing the Raspberry Pi OS image https://www.raspberrypi.com/software/operating-systems/ to your micro SD card instead. Ensure to enable its UART output option and that you connect the USB-TTL converter correctly. Connect the terminal program to the correct device (e.g., /dev/ttyUSB0 on Linux) with the following settings:
- a baud rate of 115200
- 8 bits
- no parity
- 1 stop bit
- no control flow
- On Windows, check the Device Manager to make sure that the driver for the converter is installed.