![[Previous]](prev.gif) |
![[Contents]](contents.gif) |
![[Index]](keyword_index.gif) |
![[Next]](next.gif) |
|
|
|
|
 |
This version of this document is no longer maintained. For the latest documentation, see http://www.qnx.com/developers/docs. |
You can select a topic from this diagram:
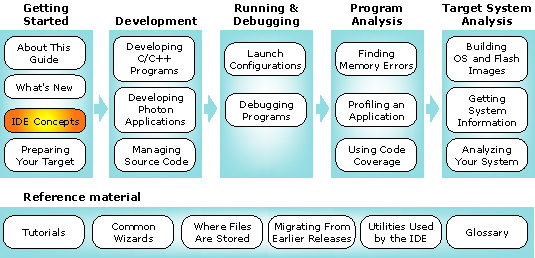
This chapter introduces key concepts used in the IDE.
In this chapter:
Welcome to the Integrated Development Environment (IDE), a powerful set of tools in the QNX Momentics development suite. The IDE is based on the Eclipse Platform developed by Eclipse.org, an open consortium of tools vendors (including QNX Software Systems).
The IDE incorporates into the Eclipse framework several QNX-specific plugins designed for building projects for target systems running the QNX Neutrino RTOS. The tools suite provides a single, consistent, integrated environment, regardless of the host platform you're using (Windows, Linux, Solaris, or QNX Neutrino). Plugins from most vendors should work within the Eclipse framework in the same way.
The IDE provides a coherent, easy-to-use work environment for building your applications. If you've used an IDE before, then you already have a good idea of the convenience and power this kind of toolset can offer.
Through a set of related windows, the IDE presents various ways of viewing and working with all the components that comprise your system. In terms of the tasks you can perform, the toolset lets you:
 |
The IDE doesn't require that you abandon the standard QNX tools and Makefile structure. On the contrary, it relies on those tools. If you continue to build programs at the command line, you can also benefit from the IDE's unique and powerful tools, such as the QNX System Analysis tool and the QNX System Profiler, which can literally show you, in dynamic, graphical ways, exactly what your system is doing. |
Depending on which host you're using, after you install QNX Momentics, you'll see a desktop icon and/or a menu item labeled "Integrated Development Environment" in the start or launch menu. To start the IDE, click the icon or select the menu item.
|
|
The first time you start the IDE on Windows, the Workspace Launcher dialog prompts you for a location to store your workspace. All of your IDE projects are stored in this directory.
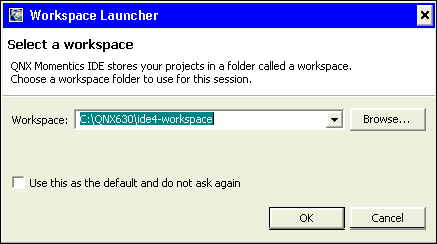
Selecting a workspace directory.
By default, the IDE offers to put your workspace in home_directory/ide4-workspace on Neutrino, Linux, and Solaris, and C:/QNX632/ide4-workspace on Windows.
To continue loading the IDE, click OK.
|
Check the Use this as the default and do not ask again box to always use the selected workspace when launching the IDE. |
To change the default workspace location on Neutrino, Linux, and Solaris, launch qde with the -data workspace_path option, where workspace_path is the location to your working directory.
After you choose a workspace location, the IDE displays a Welcome window with several options that help introduce you to the QNX Momentics IDE:
| Icon | Description |
|---|---|
| Information: Provides links to overviews within the IDE, including the Documentation Roadmap, Team Support (an important topic if you use CVS), Workbench Basics, and the C/C++ Online Documentation. | |
| Tutorials: Provides links to the tutorials for building your first QNX applications. | |
| Samples: Provides links to samples to help you explore QNX Momentics by installing various prefabricated samples. | |
| What's New: Provides links to documents describing the new features in this release, and information about migrating from a previous release. | |
| Open Workbench: Opens the workbench window and minimizes the Welcome page. |
You can return to this Welcome window at any time by choosing .
You can start the IDE by running the qde command:
qde
./qde
|
Don't run the eclipse command, even though it may seem to work. Always use qde instead, because it configures the proper QNX-specific environment. |
For details about directing the IDE at a particular workspace location, see the topic "Specifying a workspace location" in this chapter.
For more information about starting the IDE, including advanced execution options for developing or debugging parts of Eclipse itself, see in the Workbench User Guide.
When you first start the QNX Momentics IDE, it shows the Welcome window. To advance directly to the workbench, choose the workbench icon at the right.
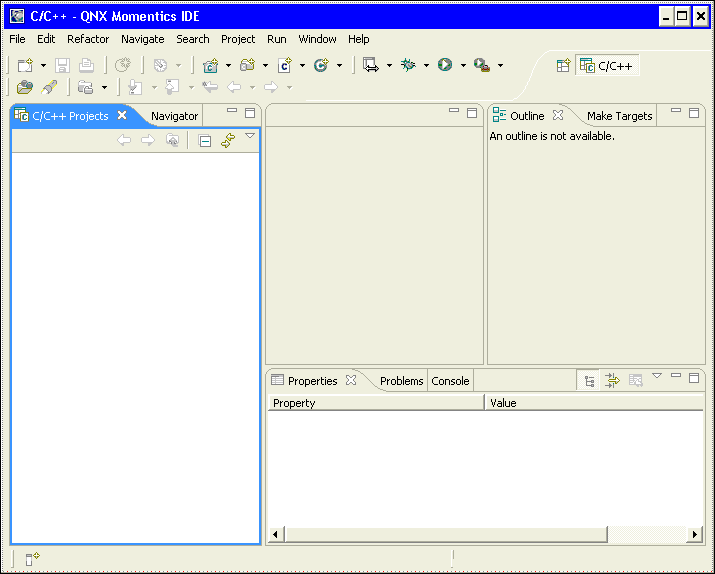
The Workbench window.
For details about the Workbench menu, see in the Workbench User Guide. For a basic tutorial about using the workbench UI, see in the Workbench User Guide.
The IDE includes a help system that is an HTML server which runs in its own window, separate from the workbench. This means that the help system isn't a perspective or a view.
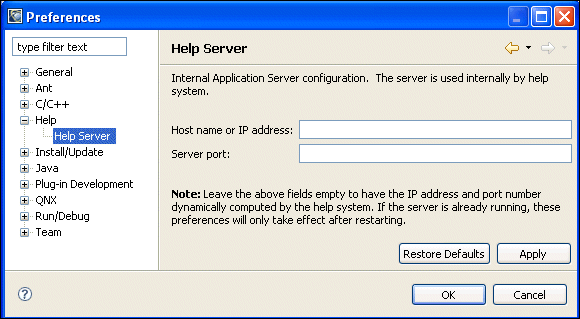
If you're using an external web browser, the IDE starts a web server running on a random port (alternatively, you can specify a port in the Preferences window using ). You can access the help system through this port using any web browser; you aren't limited to the browser launched by the IDE.
|
If your help system uses a random port, opening and closing the
help several times can confuse some anti-spyware programs, and they may conclude
that the help system is a malignant program trying to do nefarious
activities with your computer. At this point, the anti-spyware program will either block the
program from opening ports (which will disable the Online Help), or warn you
about the strange activity.
Unless you're extremely low on RAM, keep the Online Help system open until you're finished using the IDE. This prevents any anti-spyware programs from confusing the IDE with a virus, and also lets you refer to the online documentation quickly whenever you need to. |
The left pane of the Help window is the
bookshelf, which has links to the various
documentation sets. Click one of the links to view
a document. You can return to the bookshelf
at any time by clicking the Table of Contents button (![]() ).
).
The Contents pane includes at least the following titles:
|
Some title pages have content on them, some don't. If you click a title, and the right side of the window remains blank, you've selected a "placeholder" title page. Simply expand the title entry to see its contents. |
To create a bookmark for any help page:
To learn more about the IDE's Help system, follow these links in the Eclipse Workbench User Guide: .
When you select the Tips and Tricks item from the Help menu, you'll see a list of tips and tricks pages. Select the page for the Eclipse platform, which covers several topics:
A perspective is a task-oriented arrangement of the workbench window.
For example, if you're debugging, you can use the preconfigured Debug perspective, which sets up the IDE to show all the tools related to debugging. If you wanted to work with the elements and tools related to profiling, you'd open the QNX Application Profiler perspective.
You can customize a perspective by adding or removing elements. For example, if you wanted to have certain profiling tools available whenever you're debugging, you could add those elements to the Debug perspective.
Perspectives generally consist of these components:
Perspectives govern which views appear on your workbench. For example, when you're in the Debug perspective, the following main views are available (in the default configuration):
Views organize information in various convenient ways. For example, the Outline view shows you a list of all the function names when you're editing a C file in the C/C++ editor. The Outline view is dynamic; if you declare a function called mynewfunc(), the Outline view immediately lists the function.
Views give you different presentations of your resources. For example, the Navigator view shows the resources (projects, folders, files) you're working on. Like individual panes in a large window, views let you see different aspects of your entire set of resources.
Views provide:
You use editors to browse or change the content of your files. Each editor in the IDE is designed for working with a specific type of file. The editor that you'll likely use most often is the C/C++ editor.
The editor area is a section of the workbench window reserved for editors. Views can be anywhere on the workbench, except in the editor area.
The IDE lets you rearrange views and editors so they're beside each other (tiled), or stacked on top of each other (tabbed).
|
You can use a different text editor other than the one included with the IDE; however, you will lose the integration of the various views and perspectives. For example, within the text editor of the IDE, you can:
For more information about the features of the text editor included with the IDE, see and in the Workbench User's Guide. To use an alternate editor, we recommend that you:
|
Projects are generic containers for your source code, Makefiles, and binaries. Before you perform any work in the IDE, you must first create projects to store your work. One of the more common projects is a QNX C/C++ Project.
|
Throughout this guide, we use the term "C/C++" as shorthand to cover both C and C++ projects; however, the titles of elements within the IDE itself are often explicit (e.g. "QNX C Project," "QNX C++ Project," etc.). |
When you create a file within a project, the IDE also creates a record (local history) of every time you change that file, and how you change it.
Your workspace is a folder where you keep your projects. For the exact location of your workspace folder on your particular host, see "Where Files Are Stored" in the appendix in this guide.
./qde -data path_to_workspace
where path_to_workspace is the location of your working directory.
This command launches the IDE and specifies where you want the IDE to create (or look for) the workspace folder.
|
Don't use spaces when naming a project or file -- they might cause problems with some tools, such as the make utility. For Unix-type hosts (such as Solaris, Linux, and QNX Neutrino), filenames are case-sensitive, but for Windows they're not. For this reason, don't use case alone to distinguish files and projects. For example, Hello.c and hello.c refer to the same file in Windows, but they are two separate files for a Unix-type system. |
The IDE associates projects with natures that define the characteristics of a given project. For example, a Standard Make C Project has a "C nature," whereas a QNX C Project has a C nature as well as a QNX C nature, and so on.
|
QNX C or C++ projects assume the QNX recursive Makefile hierarchy to support multiple target architectures; Standard Make C/C++ projects do not. For more information about the QNX recursive Makefile hierarchy, see the Conventions for Makefiles and Directories chapter in the Neutrino Programmer's Guide. |
The natures inform the IDE what can and can't be done with each project. The IDE also uses the natures to filter out projects that would be irrelevant in certain contexts (for example, a list of QNX System Builder projects won't contain any C++ library projects).
The following table contains the most common projects and their associated natures:
| Project | Associated natures |
|---|---|
| Simple Project | n/a |
| Standard Make C Project | C |
| Standard Make C++ Project | C, C++ |
| QNX C Project | C, QNX C |
| QNX C Library Project | C, QNX C |
| QNX C++ Project | C, C++, QNX C |
| QNX C++ Library Project | C, C++, QNX C |
| QNX System Builder Project | QNX System Builder |
The IDE saves these natures and other information in the files called .project and .cdtproject in each project. To ensure that these natures persist in your source control system, such as CVS, include these files when you commit the project.
|
The IDE doesn't directly support nested projects; each project must be organized as a discrete entity. However, the IDE does support project dependencies by allowing a project to reference other projects that reside in your workspace. Container projects also let you logically nest projects by collecting several projects together. |
The host is the computer where the IDE resides (e.g. Windows). The target is the computer where QNX Neutrino and your program run.
The qconn daemon is the target agent written specifically to support the IDE. It facilitates communication between the host and target computers.
|
If you're running the IDE on a QNX Neutrino PC (self-hosted), your target computer may also be the host computer. In this case, you must continue to run qconn, even though your host computer is essentially connected to itself. |
For more information about connection methods, see the Launch Configurations Reference chapter in this guide.
Before you can run a program, you must tell the launcher of the IDE what program to run, the target to run it on, the arguments to pass to the program, and so on.
If you want to run the program on another target or run with different options (e.g. with profiling enabled), you must create a new launch configuration or copy a previous one and modify it, as required.
Resources is a collective term for your projects, folders, and files.
Wizards guide you through a sequence of tasks. For example, to create a QNX C Project, you run a wizard that guides you through all of the steps to gather required information before creating a project. For more information about wizards, see the Common Wizards Reference chapter in this guide.
You'll find many keyboard shortcuts for various UI tasks throughout the IDE. For instructions about creating your own shortcuts, follow these links in the Workbench User Guide:
|
Some existing shortcuts and some commands that can be assigned to shortcuts apply only to Java code and projects. For example, the "Search for Declaration in Workspace" command, which is bound to Ctrl-G, works only with Java code. |
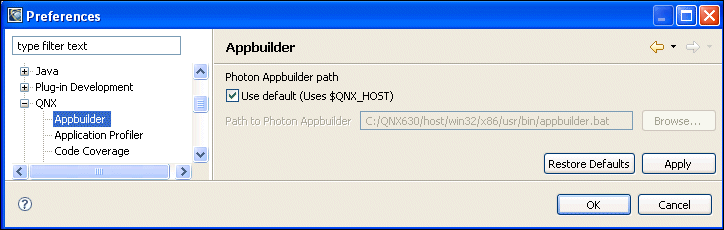
The Preferences dialog (in the Window menu) lets you customize the behavior of your environment, such as when to build your projects, which target processors to build for, and how to open new perspectives.

|
Besides global preferences, you can also set preferences on a per-project basis using the Properties item in right-click menus. |
The QNX Momentics 6.3 development suite lets you install and work with multiple versions of Neutrino (from 6.2.1 and later) -- you can choose the version of the OS from which you want to build programs.
When you install QNX Momentics, you receive a set of configuration files that indicate where you've installed the software. The QNX_CONFIGURATION environment variable stores the location of the configuration files for the installed versions of Neutrino. On a self-hosted Neutrino computer, the default location is /etc/qnx.
On Windows hosts, you'll find a configuration program (QWinCfg) for changing versions of QNX Momentics IDE.
Launch QWinCfg using the Start menu (e.g. ).
For details about using QWinCfg, see its entry in the Utilities Reference.
The qconfig utility lets you configure your computer to use a specific version of Neutrino:
eval `qconfig -n "QNX 6.3.2 Install" -e`
|
In the previous example, notice that you must use the "back tick" character (`), not the single quote character ('). |
When the IDE starts, it uses your current qconfig choice as the default version of the operating system. If you haven't specified a version, the IDE chooses an entry from the directory identified by QNX_CONFIGURATION environment variable. If you want to override the IDE, choose an appropriate build target.
If you're going to create Photon applications for QNX Neutrino 6.3.2 and 6.2.1 using PhAB, you need to use the older version of PhAB to create your application resources.
To ensure that you're always using the older version of PhAB to create your resources:
To specify which version of Neutrino you want the IDE to build for:
Neutrino uses these environment variables to locate files on the host computer:
The qconfig utility sets these variables according to the version of QNX Momentics that you specified.
|
|
|
|