![[Previous]](prev.gif) |
![[Contents]](contents.gif) |
![[Index]](keyword_index.gif) |
![[Next]](next.gif) |
|
|
|
|
 |
This version of this document is no longer maintained. For the latest documentation, see http://www.qnx.com/developers/docs. |
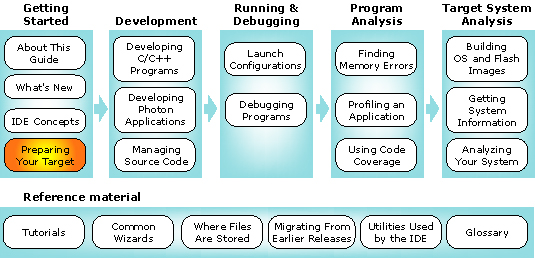
You can select a topic from this diagram:
This chapter explains how to set up host-target communications.
In this chapter:
Regardless of whether you're connecting to a remote or a local target, you have to prepare your target machine so that the IDE can interact with the QNX Neutrino image running on the target.
The IDE supports host-target communications using either an IP or a serial connection. We recommend both. If you have only a serial link, you'll be able to debug a program, but you'll need an IP link in order to use any of the advanced diagnostic tools in the IDE.
Target systems need to run the target agent (qconn). for more information about qconn, see "Target agent (the qconn daemon)" in the IDE Concepts chapter.
 |
Ensure that you occasionally check the Download Center on our website for updated versions of qconn, or you can use the IDE Software Updates manager (). |
Before you can configure your target for IP communications, you must connect the target and host machines to the same network. You must already have TCP/IP networking functioning between the host and target systems.
To configure your target for IP communications, you must launch qconn on the target, either from a command-line shell, or the target's boot script.
|
The version of QNX Momentics on your host must be the same or newer than the version of QNX Neutrino on your target, or unexpected behavior may occur. Newer features won't be supported by an older target. |
If your target's qconn is out of date, its listing in the Target Navigator view will notify you to check the target properties:
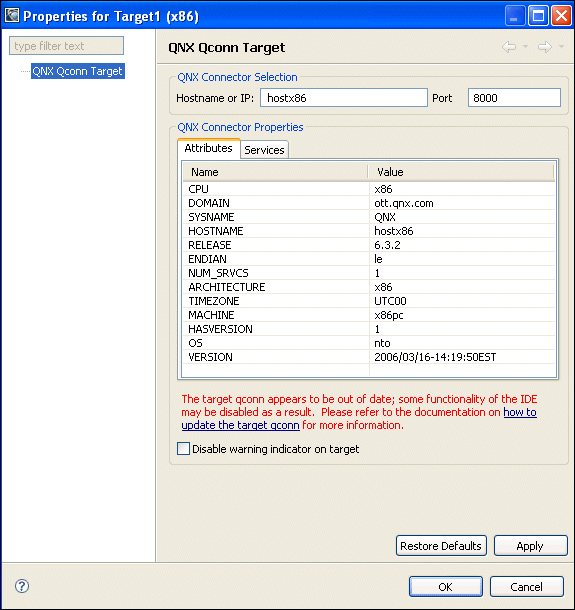
For more information, see "Installing the qconn update," later in this chapter.
When you set up a launch configuration, select C/C++ QNX QConn (IP). (See the Launch Configurations Reference chapter in this guide for more information.)
|
The pdebug command must be present on the target system in /usr/bin for all debugging sessions; qconn launches it, as required. The devc-pty manager must also be running on the target to support the Debug perspective's Terminal view. |
Before you can configure your target for serial communications, you must establish a working serial connection between your host and target machines.
|
On Linux, disable and stop mgetty before configuring your target for serial communications. |
To configure your target for serial communications:
ls /dev/ser*
You'll see an entry such as /dev/ser1 or /dev/ser2.
devc-pty &
pdebug /dev/ser1 &
The target is now fully configured.
stty </dev/ser1
This command produces a lot of output. Look for the baud=baudrate entry; you'll need this information to properly configure the host portion of the connection.
When you set up a launch configuration, select C/C++ QNX PDebug (Serial). For information about launch configurations, see the "Launch Configurations Reference" chapter in this guide.
Suppose you have two targets running Neutrino, such that:
To connect to the second target with the IDE, all you need to do is start qconn on the second target, and instruct it to use the IP stack of the first target, like this:
SOCK=/net/firstTargetName qconn
If you want to start qconn like this every time you boot the second target, add this command to the file named /etc/rc.d/rc.local. For more information about starting Neutrino, see the Controlling How Neutrino Starts chapter of the Neutrino User's Guide.
After you've installed the IDE, you may need to update qconn on your target systems to take advantage of some additional features. The IDE will work with older versions of qconn, but not all features will be available.
|
Only users with system administrator privileges can perform updates to qconn. |
To update qconn on your development system:
|
If you already have the latest version of qconn, or the next time you choose from the Help menu, the IDE offers to uninstall the qconn update. |
After you update qconn on your Development system, you then need to update the version of qconn on your target system. How you do this depends on your target system; you might have to build a new image, or you might simply have to copy the new version to your target.
For example, to copy a new version of qconn to a target system:
This example shows you how to prepare your target and host for debugging using a PPP connection.
Before you begin, make sure the serial ports on both the host and target systems are configured properly and can communicate with each other through a null-modem serial cable.
To configure your target for PPP:
debug
57600
/dev/ser1
10.0.0.1:10.0.0.0
|
The number 57600 refers to the baud rate. You may need to use a different value if you encounter problems using this value. |
io-net -ptcpip -ppppmgr
pppd
qconn
To configure your QNX Neutrino host for PPP:
debug
57600
/dev/ser1
10.0.0.1:10.0.0.0
|
The number 57600 refers to the baud rate. You may need to use a different value if you encounter problems using this value. |
io-net -ptcpip -ppppmgr
pppd passive
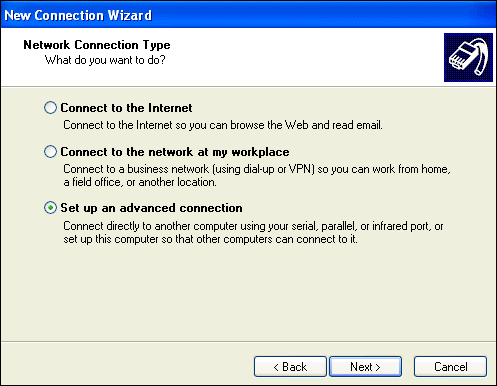
To configure your Windows XP host for serial communication using PPP:
|
The names of menu items and other details differ slightly on other supported versions of Windows. |
The IDE lets you connect to a Photon session on a target from a Windows host machine and interact with the remote Photon system as if you were sitting in front of the target machine.
To prepare your target for a Phindows connection:
phrelay stream tcp nowait root /usr/bin/phrelay phrelay -x
slay inetd
inetd
The inetd daemon starts and you can connect to your target using Phindows.
For details on using Phindows, see the Phindows Connectivity User's Guide in your QNX Momentics documentation set.
|
|
|
|