![[Previous]](prev.gif) |
![[Contents]](contents.gif) |
![[Index]](keyword_index.gif) |
![[Next]](next.gif) |
|
|
|
|
 |
This version of this document is no longer maintained. For the latest documentation, see http://www.qnx.com/developers/docs. |
In this chapter, we'll take a "high-level" look at the steps necessary to build a complete Neutrino-based embedded system, with pointers to the appropriate chapters for the lower-level details.
First we'll see what a Neutrino system needs to do in order to run. Then we'll look at the components and how they operate. Finally, we'll do an overview of the steps you may need to follow when customizing certain portions.
From the software perspective, the following steps occur when the system starts up:
After we look at the software aspects in some more detail, we'll consider the impact that the hardware has on this startup process.
The first step performed by the software is to load the OS image. This is done by a program called the Initial Program Loader (IPL).
The IPL's initial task is to minimally configure the hardware to create an environment that will allow the startup program, and consequently the Neutrino microkernel, to run. Specifically, this task includes at least the following steps:
The IPL is described in detail in the chapter on Writing an IPL Program.

An OS image loaded by the IPL.
There are two general types of IPL: warm-start and cold-start. Warm-start IPL is typically invoked by a ROM-monitor or BIOS; some aspects of the hardware and processor configuration will have already been set up.
With cold-start IPL, on the other hand, nothing has been configured or initialized -- the CPU and hardware have just been reset. Naturally, the work that needs to be done within a warm-start IPL will be a subset of the work required in a cold-start IPL.
We'll approach the discussion of the IPL's responsibilities starting at the end, describing the goal or final state that everything should be in just before the first component of the image is started. Then we'll take a look at the steps necessary to get us to that final state.
Depending on the design of your target, you may have to take a number of steps, ranging from none (e.g. you're running on a standard platform with a ROM monitor or BIOS, and have performed a warm-start IPL via disk or network boot; the boot ROM has done all the work described below for you) to many (e.g. you have a custom embedded system without firmware and the image is stored on a specialized piece of hardware).
The final state (just before the first component of the image is started) is characterized by the following:
Either the IPL or the BIOS/ROM monitor code is responsible for transferring the image to linearly addressable memory. The OS image must have been built in a format that the IPL or ROM monitor code understands so that it can know where to place the image in memory and to what address to pass control after the image has been loaded.
For example, an IBM PC BIOS system typically loads a raw binary and then jumps to the first address. Other systems may accept an image in ELF format, using the ELF header information to determine the location to place the image as well as the starting address. Refer to the documentation that came with your hardware to find out what image formats the IPL code can accept.
Once the IPL has located the image, and the entire image is now in linearly addressable memory, control is transferred to the startup program. At that point, the IPL is done and is out of the picture.
The second step performed by the software is to configure the processor and hardware, detect system resources, and start the OS. This is done by the startup program. (For details, see the chapter on Customizing Image Startup Programs.)
While the IPL did the bare minimum configuration necessary to get the system to a state where the startup program can run, the startup program's job is to "finish up" the configuration. If the IPL detected various resources, it would communicate this information to the startup program (so it wouldn't have to redetect the same resources.)
To keep Neutrino as configurable as possible, we've given the startup program the ability to program such things as the base timers, interrupt controllers, cache controllers, and so on. It can also provide kernel callouts, which are code fragments that the kernel can call to perform hardware-specific functions. For example, when a hardware interrupt is triggered, some piece of code must determine the source of the interrupt, while another piece of code must be able to clear the source of the interrupt.
Note that the startup program does not configure such things as the baud rate of serial ports. Nor does it initialize standard peripheral devices like an Ethernet controller or EIDE hard disk controller -- these are left for the drivers to do themselves when they start up later.
Once the startup code has initialized the system and has placed the information about the system in the system page area (a dedicated piece of memory that the kernel will look at later), the startup code is responsible for transferring control to the Neutrino kernel and process manager (procnto), which perform the final loading step.
Let's take a look at the overall responsibilities and flow of the startup code:
If the image isn't in its final destination in RAM, the startup code copies it there. If the image is compressed, the startup code automatically decompresses the image. Compression is optional; you can create an image file that isn't compressed, in which case the startup code won't bother trying to decompress it.
The main task here is to set up the minimum required to be able to determine the system configuration (and then perform the system configuration).
The details of what needs to be configured during the hardware configuration phase depend on your particular hardware.
Depending on the nature of the embedded system, you may wish to dynamically determine the configuration on startup or (in the case of a deeply embedded system) simply "hardcode" the configuration information.
Regardless of the source of the information, the configuration part of the startup code needs to store this information into a set of well-defined data structures that the OS will then look at when it starts. Collectively known as the system page area, these data structures contain information about:
To keep the Neutrino kernel as portable as possible (not only to different processors, but also to different hardware configurations of those processors), a number of callouts must be supplied by the startup code. Not all of the callouts require that you write code -- we have a library that provides many of these.
The following classes of callout functions can be provided for Neutrino:
The callouts are described in detail in the chapter on Customizing Image Startup Programs.
The final step that the startup code performs is to start the operating system.
If all of the above sounds like a lot of work, well, it is! Note, however, that we've provided source code for some common startup programs and have created a library that performs most of the above functions for you.
If you have one of the many platforms that we support, then you don't have to do any of this work -- we've already done it for you.
To find out what processors and boards we currently support, please refer to the following sources:
If you have a nonstandard embedded system, you can look at the source for the system that most closely resembles yours and "clone" the appropriate functionality from the examples provided.
This issue is discussed in detail in the chapter on Customizing Image Startup Programs.
The third step performed by the software is to start any executables that you want to be running. The OS does this by reading and processing information stored in the startup script -- a sequence of commands stored within the image. The format of the startup script, as well as the buildfile that it's part of, is documented in detail in a variety of places in this guide:
Basically, the OS processes the startup script file, which looks like a shell script. In the startup script file, you'd specify which executables should be started up (and their order), the command-line options that they should run with, and so on.
From the hardware point of view, the following components form the system:
We support the following processor families:
At the "altitude" of this high-level discussion, the choice of processor is irrelevant -- the same basic steps need to be performed regardless of the particular CPU.
When the processor (re)starts, it must be able to execute instructions. This is accomplished by having some kind of nonvolatile storage media placed at the processor's reset vector. There is, of course, a choice as to who supplies this particular piece of software:
Generally, the simplest development system is one in which you have to do the least amount of work. If we've already done the work, meaning that the board that you're using is a standard, supported hardware platform, there's very little work required from you in this regard; you can instead focus on your software that's going to run on that board.
If a 3rd party supplies just the BIOS or ROM monitor, then your responsibilities are increased by having to write the software that starts the operating system. As mentioned earlier, we call this a "warm-start," because the system is already "warmed-up" -- various devices are configured and initialized.
If you're supplying a custom IPL, then your responsibilities are further increased by also having to deal with configuration issues for the hardware. This we call a "cold-start," because you are responsible for everything to do with initialization and configuration.
Once you've sorted out how the system is going to boot, you may still have additional decisions to make regarding the system's storage capabilities:
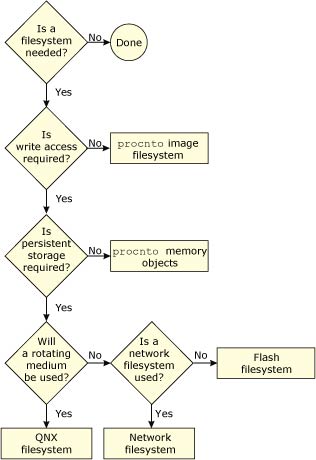
You may select as many storage options as you need.
If you don't require any additional storage (i.e. your system is entirely self-contained and doesn't need to access any other files once it's running), then your work in this regard is done.
The simplest filesystem scenario is one where read-only access is required. There's no work for you to do -- Neutrino provides this functionality as part of the OS itself. Simply place the files that you wish to access/execute directly into the image (see the chapter on Making an OS Image), and the OS will be able to access them.
If you require write access (perhaps for temporary files, logs, etc.), and the storage doesn't have to be persistent in nature (meaning that it doesn't need to survive a reset), then once again the work is done for you.
Neutrino allows the RAM in your system to be used as a RAM-disk, without any additional coding or device drivers. The RAM-disk is implemented via the Process Manager -- you simply set up a Process Manager link (using the ln command).
For example, to mount the /tmp directory as a RAM-disk, execute the following command:
ln -Ps /dev/shmem /tmp
Or place the following line in your buildfile (we'll talk about buildfiles over the next few chapters):
[type=link] /tmp=/dev/shmem
This instructs the Process Manager to take requests for any files under /tmp and resolve them to the shared memory subsystem. For example, /tmp/AAA4533.tmp becomes a request for /dev/shmem/AAA4533.tmp.
 |
In order to minimize the size of the RAM filesystem code
inside the Process Manager, the shared memory filesystem
specifically doesn't include "big filesystem"
features such as file locking and directory creation.
If you need a relatively full-featured, POSIX-style filesystem on a RAM disk, use devf-ram or the builtin RAM disk via io-blk instead. |
If you do require storage that must survive a power failure or processor reset, then you'll need to run an additional driver. We supply these classes of filesystems:
All of these filesystems require additional drivers. The Sample Buildfiles appendix in this guide gives detailed examples showing how to set up these filesystem drivers.
The flash driver can interface to the flash memory devices (boot block and regular) in all combinations of bus widths (8, 16, and 32 bits) and interleave factors (1, 2, and 4).
To find out what flash devices we currently support, please refer to the following sources:
Using the source code provided, you may be able to tailor one of our filesystems (e.g. devf-generic) to operate on your particular embedded system (if it isn't currently supported).
Neutrino currently supports several filesystems, including DOS, Linux, QNX 4, CD-ROM, and more. For details, see the fs-* entries in the Utilities Reference.
Drivers are available for many block-oriented devices. For up-to-date information, see the devb-* entries in the Utilities Reference as well as the Developer Support Center area of our website (www.qnx.com).
During development, or perhaps in a distributed data-gathering application, you may wish to have a filesystem located on one machine and to be able to access that filesystem from other machines. A network filesystem lets you do this.
In addition to its own transparent distributed processing system (Qnet), QNX Neutrino also supports network filesystems such as CIFS (SMB), NFS 2, and NFS 3.
Drivers are available for the several Ethernet controllers. For details, see the devn-* entries in the Utilities Reference as well as the Developer Support Center area of our website (www.qnx.com).
Ultimately, your Neutrino-based system will need to communicate with the outside world. Here are some of the more common ways to do this:
For standard serial ports, Neutrino supports several devices (8250 family, Signetics, etc.) For details, see the devc-* entries in the Utilities Reference as well as the Developer Support Center area of our website (www.qnx.com).
One design issue you face is whether you can get off-the-shelf drivers for the hardware or whether you'll have to write your own. If it turns out that you need to write your own, then the Writing a Resource Manager chapter in the Programmer's Guide can help you do that.
Depending on the ultimate system you'll be creating, you may have a ton of work to do or you may have very little. In any case, we recommend that you start with a supported evaluation board. This approach minimizes the amount of low-level work that you have to do initially, thereby allowing you to focus on your system rather than on implementation details.
Start with an evaluation platform that most closely resembles your target platform -- there are many supported evaluation platforms from various vendors.
Once you're comfortable with the development environment and have done a very rudimentary "proof of concept," you can move on to such development efforts as creating your own hardware, writing your own IPL and startup code, writing drivers for your hardware, and so on.
Your proof of concept should address such issues as:
Once these are addressed, you can then decide on your plan of attack.
There are a number of ways of designing your hardware. We've seen many boards come in from the field and have documented some of our experiences with them in the System Design Considerations appendix in this book. You may be able to realize certain savings (in both cost and time) by reading that appendix first.
Ideally, the system you're designing will look identical to a supported evaluation platform. In reality, this isn't always the case, so you'll need to customize some of the components in that system.
We've provided the source code to a large number of the "customizable" pieces of the OS. This diagram gives you the high-level view of the directory structure for the source tree we ship:
The three main branches of the Neutrino source tree.
As you can see, we've divided the source tree into three major branches: ipl, startup, and flash. Each branch consists of further subdirectories:
The complete Neutrino source tree.
The following table relates the source tree branches to the individual chapters in this book:
| Source tree branch | Relevant chapter |
|---|---|
| ipl | Customizing IPL Programs |
| startup | Customizing Image Startup Programs |
| flash | Customizing the Flash Filesystem |
For detailed information on the format of the Makefile present in these directories, please see Conventions for Makefiles and Directories in the Programmer's Guide.
|
|
|
|