QNX Technical Articles
QNX® Momentics® Development Suite 6.3.0 Service Pack 3 Professional and Standard Editions Installation Note - QNX Neutrino Hosts
Date of this edition: October 16, 2006
Target OS: QNX® Neutrino® 6.3.0 SP3
Host OS: QNX Neutrino 6.3.0
 |
If you installed a beta version of this software, uninstall it before installing the production version. |
 |
|
Contents
- System requirements
- SP3 update paths
- BIOS settings
- Keeping QNX Momentics 6.2
- Updating disk drivers
- Installing QNX Momentics
- Activating QNX Momentics
- Installing additional software or license keys
- Commercializing your evaluation software
- Creating a bootable floppy
- Uninstalling QNX Momentics
- Getting started with the docs
- Technical support
System requirements
| Minimum | Recommended | |
|---|---|---|
| Processor | 2 GHz or more Intel Pentium 4 | 2 GHz or more Intel Pentium 4 |
| RAM | 256 MB | 512 MB |
| Disk space | 2.1 GB | 2.1 GB |
| Monitor | 1024×768 | 1280×1024 |
In order to install SP3, you need 1200 MB of disk space, which includes the space required for backups and temporary space used in installing the files.
The System Profiler in the IDE requires a minimum color depth of 16 bits.
SP3 update paths
There are several ways that you incorporate QNX Momentics 6.3.0 Service Pack 3 in your system, depending on what you've already installed:
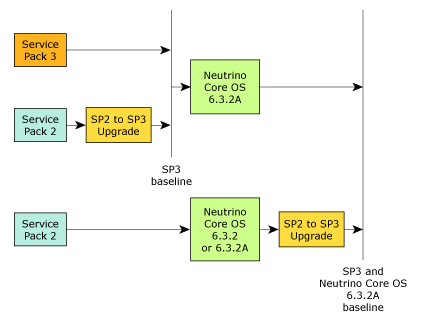
Here's a summary:
- To do a fresh installation, use QNX Momentics 6.3.0 Service Pack 3.
- If you've already installed 6.3.0 SP2, install the 6.3.0 SP2 to SP3 Upgrade.
- You can install the QNX Neutrino Core OS 6.3.2A on a system that has SP3, or SP2 plus the 6.3.0 SP2 to SP3 Upgrade.
- If you've installed the QNX Neutrino Core OS 6.3.2 or
the QNX Neutrino Core OS 6.3.2A on a system that has
6.3.0 SP2, and you want to upgrade to SP3, install the
6.3.0 SP2 to SP3 Upgrade.
Installing the 6.3.0 SP2 to SP3 Upgrade on a system with the QNX Neutrino Core OS 6.3.2 updates the core OS to 6.3.2A.
BIOS settings
We recommend you use the following BIOS settings:
- Disable Plug and Play OS.
- Set any parallel ports and onboard serial ports to specific addresses, if possible, instead of using an automatic setting.
- Enable SATA if your system includes a SATA drive.
- If you want to boot QNX Neutrino from the CD — either to try it without installing it, or for troubleshooting — make sure that the CD is the first boot device.
- If your BIOS is has an option for booting from “Other USB devices,” enabling it could make the BIOS take a very long time to start.
Keeping QNX Momentics 6.2
For QNX Neutrino self-hosted development, it's possible to have both QNX Momentics 6.2.x and 6.3.0 installed on your computer at the same time, by having them in separate partitions.
The QNX Neutrino installation has traditionally been limited to a partition type of 79. You now have the option of using type 77 or 78 instead. The t77 and t78 options are displayed only if the respective partition type isn't already in use.
When you boot, you're asked to choose the partition by its number. If you're then prompted to choose from multiple .diskroot files, choose the one that corresponds to the partition that you already chose.
Updating disk drivers
The Neutrino boot process can now dynamically add block I/O (i.e. disk) drivers, letting you boot on systems with newer controllers. The mechanism is simple and not proprietary to QNX Software Systems, so third parties can offer enhanced block drivers without any intervention on our part.
The driver update consists of the drivers themselves (devb-* only) and a simple configuration file. The configuration file is in plain text (DOS or UNIX line endings accepted), with the following format:
drvr_name|type|timeout|add_args
The first three fields are mandatory. The fields are as follows:
- drvr_name
- The file name of the driver.
- type
- The string for the boot process to display when trying the driver.
- timeout
- The total time to wait for devices.
- add_args
- Any additional arguments to the driver (e.g. blk cache=512k).
The configuration file must be called drivers.cfg, and you must supply the update on a physical medium, currently a CD-ROM or a USB flash drive. The boot process looks in the root of the filesystem first, and then in a directory called qnxdrvr. This can help reduce clutter in the root of the filesystem.
The source filesystem can be any of the supported filesystems. These filesystems are known to work:
- standard ISO9660 filesystems on CD-ROM
- DOS (t7 partition) and QNX 4 (t79 partition) filesystems on a USB flash drive
If the update is distributed over the web in zip or tar format with the qnxdrvr structure preserved, an end user simply has to download the archive, unzip it to a USB drive, and insert the USB drive on booting.
You can apply a driver update by pressing Space during booting and selecting F2. The system then completes the startup of the standard block drivers, giving a source filesystem to apply the update from. You're then prompted to choose the filesystem and insert the update media.
|
If you need to rescan the partitions (for example, to find a USB drive that you inserted after booting), press F12. |
Once the files have been copied, you're prompted to reinsert the QNX Momentics installation CD if applicable. The block drivers are then restarted.
This mechanism also lets you update existing drivers or simply modify their arguments (e.g. PCI ID specification).
If you're installing, then the installation program copies the updated drivers to /sbin and the configuration file to /boot/sys. It then makes copies of the standard build files in /boot/build (except multicore ones) and calls them qnxbase-drvrup.build and qnxbasedma-drvrup.build. These files are then used to create new image files called qnxbase-drvrup.ifs and qnxbasedma-drvrup.ifs in /boot/fs. The DMA version of this new file is copied to /.boot, and the non-DMA version is copied to /.altboot.
|
Multicore (SMP) images aren't rebuilt because the multicore kernel isn't part of the standard distribution; it's part of the Symmetric Multiprocessing Technology Development Kit and the Multicore Technology Development Kit. |
Applying a driver update patch after you've installed QNX Neutrino
If you're updating or adding drivers to an already existing QNX Neutrino system using this mechanism, you must manually copy the drivers to the correct directory, and you must modify the boot image to use the new driver:
- Boot the machine and apply the driver updates.
- Once the machine has booted, copy the following from the driver update
disk used in step 1:
- Copy the new devb-* drivers to /sbin.
- Copy drivers.cfg to somewhere under /. If you put it in a directory that's in the mkifs search path (e.g. /sbin, /boot/sys), mkifs will find it automatically.
- Copy the build file (typically qnxbasedma.build) to driverupdate.build.
- Edit the build file and do the following:
- Add the names of the new block drivers (devb-*) after devb-eide.
- Add the drivers.cfg file at the end.
If the file is in the mkifs search path, then just add the
file name.
Otherwise add the full path:
drivers.cfg=/path/drivers.cfg
- As a safety precaution (so you'll be sure to have at least one image
that boots):
cp /.boot /.altboot
- mkifs driverupdate.build /.boot
Installing QNX Momentics
|
|
This CD includes the runtime version of the QNX Neutrino RTOS, as well as development tools that you can optionally install.
To install this software:
- Insert the QNX Momentics 6.3.0 Service Pack 3 Installation CD in the CD drive.
- Boot from the CD and follow the instructions on your screen.
The installer asks you to do the following:
- Decide whether to run from the CD or install QNX Neutrino into a new disk partition. Press F3 to install, and then choose between normal and verbose modes.
- Enter your license key. It doesn't matter if you include or omit the hyphens.
- Read the license agreement. To accept its terms and continue with the installation, press F1.
- Choose which disk you'd like to install QNX Neutrino on.
- Choose which filesystem you'd like to install QNX Neutrino from; choose the appropriate CD device.
- Choose the type for the new partition: 77, 78, or 79 (the default). If there's already a partition of the type you chose, you're given the choice of deleting a partition or choosing another type.
- Choose the size of the new partition. You can also examine the partition table if you want to delete an existing partition.
- Choose a boot loader to use.
- Choose where to install the software. We recommend you use the default location, /usr/qnx630.
Depending on your license, the installer might also ask if you wish to install these additional components:
- QNX Neutrino SDK — command-line development tools
- Integrated Development Environment (IDE)
- GNU Public License programs, such as tar and sed.
For development machines, we recommend you install the QNX Neutrino SDK and the IDE. For runtime machines, use the QNX Neutrino x86 Runtime Kit, available separately.
If you encounter any I/O errors during the installation, disable DMA by restarting and pressing d when the system displays the “Hit space for options...” message. (Ref# 42044) - Remove the CD from the drive and then reboot.
If your EIDE doesn't support DMA, boot using .altboot; press Esc when prompted. If you have more than one partition on your disk, choose the one you installed QNX Neutrino in.
- The first time you boot, a dialog asks you to choose the video driver, resolution, color depth, and refresh rate that are appropriate for your system. You can also choose whether to boot into text or graphical (Photon) mode.
- Log in as root (or click Superuser in graphical mode). This account initially has no password; for instructions for setting the password and creating other accounts, see the Managing User Accounts chapter of the QNX Neutrino User's Guide. You'll find this manual in the online documentation, as well as on our website.
Congratulations — you've completed the installation!
Activating QNX Momentics
The QNX Momentics 6.3 development suite and certain related products require activation. If you don't activate the product within the specified timeframe, the product will cease to function until you activate it. No personal data is transferred during the activation process.
If your development host is connected to the Internet, you can activate QNX Momentics automatically; if your machine isn't connected to the Internet, you must activate your software manually from a machine that is, by doing the following:
- In the QNX Momentics Activation dialog, click Activate Manually.
The Manual Activation dialog appears with an activate-prompt key. This dialog has a button that you can use to save the activate-prompt key in a file, /etc/qnx/license/activate_prompt_key.txt. This can eliminate the need to retype the key, which can be error-prone.
- Transfer the activate-prompt key to the machine that's connected to the Internet.
- Go to our website, www.qnx.com, log into your myQNX account, and choose Activate Products (6.3.x).
- Enter the activate-prompt key into the form that appears, and then click Generate Response Key. This will return an activate-response key.
- Copy the activate-response key and paste it in a file.
- Transfer the file into /etc/qnx/license/activate_response_key.txt on your QNX Momentics development host.
- If you closed the QNX Momentics Activation dialog, open it again
by selecting
from the Launch menu, or by entering the following at a terminal prompt:
/etc/qnx/bin/qnxactivate -a
- Choose Activate Manually, and use the Load Response from File button to load the activate-response key, and then click Activate.
If you choose not to activate at the time of installation, you can activate later by selecting from the Launch menu, or by entering the following at a terminal prompt:
/etc/qnx/bin/qnxactivate -a
Installing additional software or license keys
If you didn't initially install all of the available features or if you've purchased an upgraded license, you can install new or remaining features as follows:
- Insert the CD and run the install script in the root of
the CD.
For example, at a command prompt, type:
/fs/cdn/install
where n is the number of the CD drive.
(There's also an install2 script on the CD, but you should ignore it.)
- Follow the instructions on the screen to select the features to install.
|
The system won't prompt you for a new license key when you do the above.
If you need to enter a new license key, choose
from the Launch menu,
or type:
/etc/qnx/bin/qnxactivate -l |
Commercializing your evaluation software
If you installed an evaluation copy of QNX Momentics 6.3.0, and you've now received a commercial QNX License Certificate, do the following to add your commercial license:
- Choose from the
Launch menu, or type the following at a terminal prompt:
/etc/qnx/bin/qnxactivate -l
- In the QNX Momentics License Key Entry dialog, fill in the field with the license-key information that's on your commercial QNX License Certificate.
- When you've finished entering the information, click Add to save the license-key information and configure your QNX Momentics tools to use this file.
Creating a bootable floppy
We recommend that you install QNX Momentics on a machine that can boot from a CD-ROM. If your machine can't do this, you can create a bootable floppy.
The root directory of the QNX Momentics installation CD contains an image of a bootable floppy, named instflop.dat. To copy this file to a boot disk:
- On UNIX-style machines (including QNX Neutrino),
use the dd utility to copy this image to a boot disk:
dd if=instflop.dat of=/dev/fd0
- On Windows, you need a raw-copy utility.
Although we don't support any such utilities, we recommend you use
rawwrite, which you can find at:
http://uranus.it.swin.edu.au/~jn/linux/rawwrite.htm
Download this utility and extract it to a folder.
To create a bootable floppy:
- Start rawwrite.
- Make sure the Floppy Drive combo box refers to your floppy drive.
- Under the Write tab, specify the location of instflop.dat in the Image File field, and click Write.
Uninstalling QNX Momentics
To uninstall QNX Momentics, simply erase or delete the partition you installed it in.
Getting started with the docs
For information about QNX Momentics 6.3.0 Service Pack 3:
- see the release notes in $QNX_TARGET/etc/readme/rel_6.3.0_SP3.html
- choose Help from the Launch menu to see the online documentation (or view ${QNX_TARGET}/usr/help/product/momentics/bookset.html).
You can install and work with multiple versions of QNX Neutrino. Whether you're using the command line or the IDE, you can choose which version of the OS to build programs for. For more information, see the IDE User's Guide or the QNX Neutrino Programmer's Guide.
|
Coexistence of 6.3.0 and 6.2.1 is supported only on Windows and Solaris hosts. |
Technical support
If you have any questions, comments, or problems with a QNX product, please contact Technical Support. For more information, see the How to Get Help chapter of the Welcome to QNX Momentics guide or visit our website, www.qnx.com.