This chapter shows you how to use the Photon File Manager to manage your files and directories. Topics include:
The File Manager provides a simple, graphical way to maintain and organize your files. For example, it lets you go to any directories or folders-no matter where they reside in the filesystem-with a single mouse click. You can also sort, copy, move, delete, rename, or modify files simply by pressing a key or popping up a menu. You can even run QNX or Photon applications by double-clicking on their data files.
To start the File Manager:

Or
pfm &
If the File Manager is running but hidden, you can find it by clicking on the File Manager icon in the Taskbar:

For information on using pterm, see "Opening a terminal window" in this chapter.
Here's a typical File Manager session:
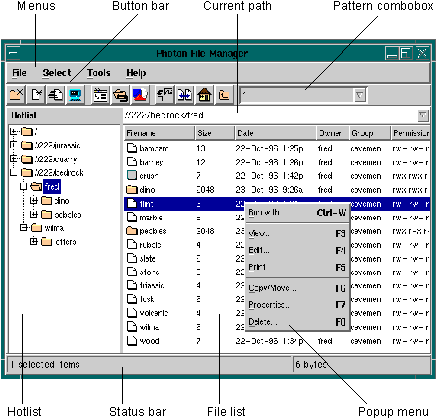
Here's what the main parts of the File Manager enable you to do:
 |
The Hotlist shows only the folders that you've added to it, not a hierarchy of all the directories on your system. |
The file icons let you identify the file type:

The File list includes such information as the filename, size, modification date, owner, group and permissions.
 |
Point anywhere in the Hotlist or File list and click the right mouse button. |
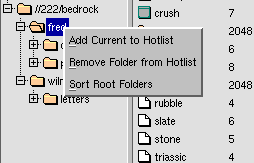
The Hotlist popup lets you add folders to or remove folders from the Hotlist:
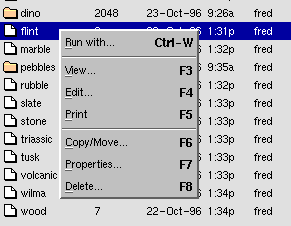
The File list popup gives you quick access to many of the functions in the File menu:
You can use the Hotlist to keep track of your "favorite" folders-the ones you use the most. They're kept in the order you added them in, but you can also sort them alphabetically.
To add a folder to the Hotlist:

Or
Point anywhere in the Hotlist, click the right mouse button, and choose Add Current to Hotlist.
The current folder is added to the bottom of the Hotlist.
To put the Hotlist in alphabetical order:
|
Click the right mouse button on one of the folders in the Hotlist, then choose Sort Root Folders. |
To remove a folder from the Hotlist:
|
Click the right mouse button on the folder you want to remove, then choose Remove Folder from Hotlist. |
The folder is removed from the Hotlist, but isn't deleted from your system.
You can open a folder from either the Hotlist or the File list, or by using the keyboard.
To open a folder displayed in the Hotlist, using the mouse:
To open a folder displayed in the Hotlist, using the keyboard:
| To select: | Press: |
|---|---|
| The previous or next folder in the list. | /\ or \/ |
| A child folder of current folder (if any exists). | --> |
| The parent folder of current folder. | <-- |
| The first or last folder in the list. | Home or End |
| The folder one page up or down in the list. | Pg Up or Pg Dn |
To open a folder displayed in the File list, using the mouse:
|
Double-click on the folder you want to open. Its contents will appear in the File list. |
To open a folder displayed in the File list, using the keyboard:
To open any folder, using the keyboard:
|
Type its pathname in the Current path field, and press Enter. |
To find a file or folder quickly:
Once you're finished typing, the File Manager waits a period of time-by default this is 1.5 seconds-then lets you type in another name.
|
This quick-search method searches for files
in the current directory only. For this method to work,
files must be sorted by filename and the Folders
First option must be disabled in the Configuration dialog.
For more info, see the discussion on sorting files in "Changing how files are displayed" and the section on "Configuring the File Manager." |
To work on any file or folder displayed in the File list, you must first select it. You can select using the mouse, the keyboard, or a menu.
| To select: | Do this: |
|---|---|
| A single file | Click on the file. |
| Two or more files in any order | Hold down Ctrl, click on the first file, then click on each remaining file. |
| A range of files (e.g. files from A to D) | Hold down Shift, click on the first file in the range, then click on the last file in the range. |
Selecting a single file:
| To select the: | Press: |
|---|---|
| Previous or next file in the list | /\ or \/ |
| First or last file in the list | Home or End |
| First file one page up or one page down | Pg Up or Pg Dn |
Selecting two or more files in any order:
Selecting a range of files:
| To select: | Press: |
|---|---|
| Additional files one at a time | /\ or \/ |
| All the files to the beginning or the end of the list | Home or End |
| All the files in the next or previous page | Pg Up or Pg Dn |
| To select: | Do this: |
|---|---|
| All files in the current folder | From the Select menu, choose Select, then choose All. |
| All the files that match a text pattern (e.g. all files ending with .c) | From the Select menu, choose Select, then choose By Pattern, or simply press Ctrl -S , and enter the desired pattern. |
|
For examples of how to use patterns, see the section on "Controlling which files are displayed." |
| To deselect: | Do this: |
|---|---|
| A single file using the mouse | Hold down Ctrl, then click on the file. |
| A single file using the keyboard | Hold down Ctrl, press a direction key (e.g. /\) to go to the file you wish to deselect, then press Space. |
| All files or all files that match a text pattern | From the Select menu, choose Deselect, then choose All or By Pattern. |
|
You can also deselect using other techniques similar to the techniques used for selecting files, such as pressing Shift and /\. Feel free to experiment! |
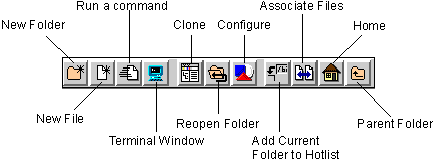
To create a new folder in the current folder:
Or
Click on the New Folder icon:

The new folder will appear in the File list, according to how you've sorted the list. If there are many files in the current folder, you may have to scroll to see your new folder.
You can also create a new folder within a folder that's not currently open. For example, let's say you're in /bedrock and you wish to create a dino folder under /bedrock/fred. In this case, you could type the following in the Create New Folder dialog:
fred/dino
Note that you don't have to type /bedrock, since you're already there!
If, however, you wish to create a new folder under another path, you must type the new folder's complete pathname. For example, if you're in /bedrock/fred and wish to create a letters folder under /quarry/slate, you'd type:
/quarry/slate/letters
To create a new file in the current folder:
Or
Click on the New File icon:

For info on using this editor or choosing a different editor, ask your system administrator or see the section on "Configuring the File Manager."
|
If you don't see the file, click on the Reopen Folder icon to refresh the File list. Remember that you can use the File Manager's quick-search method to locate your new file. |
You can also create a new file within a folder that's not currently open. For example, let's say you're in /bedrock and you wish to create a file called yabadaba under /bedrock/fred. In this case, you could simply type the following in the Create New File dialog:
fred/yabadaba
Note that you don't have to type /bedrock, since you're already there!
If, however, you wish to create a new file under another path, you must type the file's complete pathname. For example, if you're in /bedrock and wish to create yabadaba under /quarry/slate, you'd type:
/quarry/slate/yabadaba
To view a file, do one of the following:
To edit a file, do one of the following:
|
|
To copy or move a file:
Or
You'll see the Copy/Move dialog.
For example, if you wish to move a file currently in /bedrock/fred to /quarry/slate, you'd type /quarry/slate.
 |
If you try to copy or move a file from one folder to another folder, and a file with the same name exists in the target folder, the new file will overwrite the file in the target folder. |
If you're copying or moving to a folder under the current folder, you don't have to type the entire pathname. For example, let's say you're in /bedrock and you wish to copy a file to the /bedrock/fred/letters folder. Instead of typing /bedrock/fred/letters, you could simply type fred/letters.
If you copy or move a file to a path that doesn't yet exist, the File Manager will, by default, create any necessary folders. For example, if you copy a file to /quarry/slate, and slate doesn't yet exist, the File Manager will create slate, then copy the file. To disable this feature, click on the "Create folders..." box in the Copy/Move dialog.
To delete a file or a folder:
 |
|
You can change the properties of any file or folder, including its name, ownership, and permissions. Simply follow these steps:
|
If you've selected a folder, you'll be asked whether you wish to change the properties of both the folder and its contents. If you do, any changes you make will affect all folders and all files that reside under the selected folder. |
For info on QNX file attributes and permissions, ask your system administrator or see the QNX OS Installation & Configuration manual.
If you wish to run text-based QNX utilities and applications from a window on your Photon workspace, you can use the File Manager to load the pterm terminal window.
To open and use a pterm window, do one of the following:

You're now in the QNX Shell, where you can invoke text-based utilities and applications as you would from a QNX terminal or console.
To log off from your session and remove the pterm window:
Or
For more info on using and configuring pterm, see the chapter on pterm in this guide, and see the Photon Installation & Configuration guide.
You can use the File Manager to start a Photon application or other QNX-based applications and utilities.
If you choose "Close: Finish," the File Manager closes the terminal when the command is finished, regardless of errors. If you choose "Close: If no Error," the File Manager closes the terminal only if the command finishes without an error. If you use this option, you'll be able to read any error messages that the command displays.
Here's another way to start a Photon application:
|
Simply double-click on the application's executable file. |
|
The method works only with native Photon applications. If you don't know the name or location of a Photon executable, ask your system administrator or see the documentation that came with the application. |
Depending on how your system has been set up, you can start an application by double-clicking on one of its associated data files. Most data files have the following icon:

For example, you might be able to load a text editor by double-clicking on any data file that ends with .c-the editor would load, along with the selected file.
|
If double-clicking a data file won't bring up an application, see the discussion on Associating files with an application in "Configuring the File Manager." |
To print a file that's selected, do one of the following:
|
If a file doesn't print, ask your system administrator or check the Print command in the PFM Configuration dialog (see "Configuring the File Manager.") |
At the top of the File list you'll see the following buttons:

Using these buttons you can sort your files in any order (by name, date, etc.) or change which information is displayed for each file.
| To sort files: | Click on: |
|---|---|
| Alphabetically | Filename |
| By size | Size |
| By the date they were last modified | Date |
To reverse the sort order, click on Filename, Size, or Date again. For example, the first time you click on Filename, files are sorted from A to Z. The next time you click, they're sorted from Z to A.
|
The File Manager's quick-search method works only if files are sorted from A to Z. |
If you want folders to appear at the top of the File list:
|
If you display folders first, the File Manager's quick-search method will work only with folders. |
For more info on using the Configuration dialog, see "Configuring the File Manager."
By default, the File list shows you the name, size, date, and so on for each file. You can hide some of these details using the File list buttons.
For example, let's say you don't need to see the size of each file. To hide the Size field:

To uncover the Size field, simply drag the second line back to the right.
|
Using the above technique, you can also resize any field. |
The following table briefly explains the contents of each field in the File list.
| This field: | Indicates: |
|---|---|
| Filename | the name given to the file |
| Size | the size of the file in bytes |
| Date | the date the file was created or last modified |
| Links | if this file is a symbolic link, the name of the file that this file is linked to |
| Owner | the owner ID of the file's owner |
| Group | the group ID of the file's owner |
| Permissions | from left to right, the user, group, and other access permissions of the file (these permissions control what kinds of operations users can perform on the file and which users can perform those operations) |
For more info on symbolic links, owner IDs, and permissions, ask your system administrator or see the QNX OS Installation & Configuration guide.
To control which files are displayed in the File list, you can enter patterns in the Pattern combobox:

This box uses standard pattern-matching characters, including the asterisk (*), question mark (?), and brackets ([ ]). By default, the box contains *, which tells the File Manager to display all files in the current folder. The following table shows examples of using these characters.
Example patterns
| If you enter: | You'll see: |
|---|---|
| f* | all files starting with "f" (e.g. frd.c, flnt) |
| *.[ch] | all files ending with ".c" or ".h" (e.g. frd.c, barn.h) |
| fred? | all files beginning with "fred" and ending with one other character |
To configure the File Manager to your preferences, do one of the following:
Or

You'll see the PFM Configuration dialog:
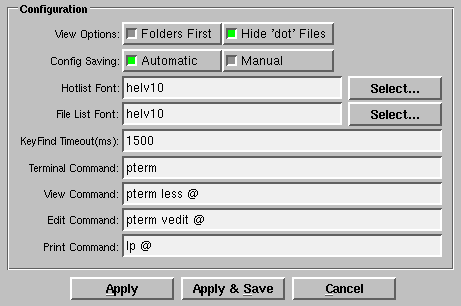
You can set the following preferences:
If you select Manual, the File Manager will save its current state only if you:
Or
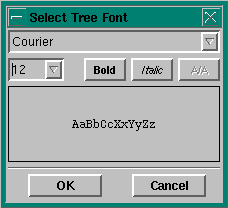
Click on the combobox at the top to select a typeface (e.g. Swiss 721, Courier, etc.), then use the other controls to change the size or style of the font.
The A/A (anti-aliasing) button makes scalable fonts draw a bit slower, but look smoother.
If you're familiar with the format used to specify Photon font names, you could type in the name, size, and style of the font directly into the Hotlist Font or File List Font field.
The KeyFind Timeout field lets you change the period of time the File Manager waits. Specify a new time in milliseconds (e.g. to change the wait time to 2 seconds, specify 2000).
To have an application start automatically when you double-click on any of its data files, you use the File Manager's Associate dialog. This dialog lets you specify file patterns and the commands they're associated with. For example, you can specify that files ending in .c will start your favorite text editor or viewer.
To use the Associate dialog, do one of the following:
Or

You'll see the Associate dialog.
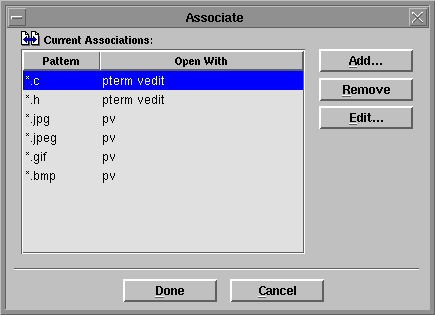
When you add or edit a pattern, you can use all the standard pattern-matching characters, including the asterisk (*), question mark (?), and brackets ([ ]).
Here are some examples:
| This pattern: | Would match: |
|---|---|
| * | all files |
| *.h | all files ending in .h |
| *.[ch] | all files ending in .c or .h |
| *.bmp | all files ending in .bmp |
If you wish to have a text-based application (e.g. an editor) load when you select a data file, you must tell the File Manager to first open a pterm window for that application. For example, if you'd like the text-based less utility to load when you double-click on any file ending in .c, you would specify pterm less.