This chapter describes working with an application as a whole in PhAB.
It includes:For information on running an application, see the Generating, Compiling, & Running Code chapter.
To create a new application, choose New from the File menu, or press Ctrl -N . If you're already working on an application, PhAB asks if you want to save any changes to that application before closing it. PhAB creates a new unnamed application that consists of a single main window, named base.
After creating an application, you should:
 |
A naming convention for all the widgets, modules, functions, and so on will make managing your application easier. |
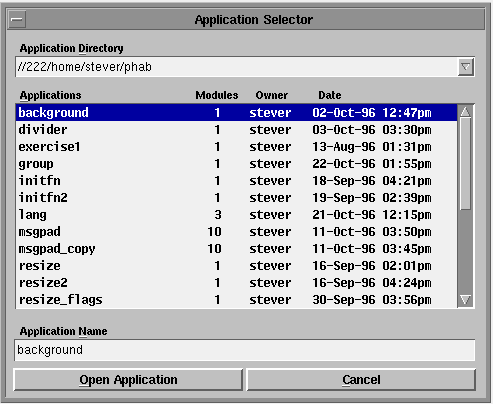
To open an existing application:

Application Selector dialog.
 |
If the application has already been opened (whether by you or someone else),
PhAB won't open it unless you started PhAB with the -n option.
If you're using NFS or SMB, you should start PhAB with the -n option because you can't lock files with either. |
You can save your application in several ways, as described in the sections below.
 |
To ensure the latest changes to your application are in effect, PhAB automatically saves your application whenever you regenerate or make your application code. |
For information on using version-control software with PhAB applications, see "Version control" in the Generating, Compiling, & Running Code chapter.
To save a new unnamed application or to save an application under another name or in a different directory:

 |
If you type a new directory name, it's saved. The next time you want to look in that directory, click on the button to the right of the directory field and select the directory from the list. |
 |
If you rename an application, you'll find that the name of the
executable isn't changed. This is because PhAB doesn't change the
Makefile. To change the name of the executable:
|
To save an existing application, choose Save from the File menu or press Ctrl -S .
To overwrite an existing application:
To close an application, choose Close from the File menu.
The Application Startup Information dialog lets you set up the typical operations that are performed when an application starts. You can:
To open this dialog:
Or
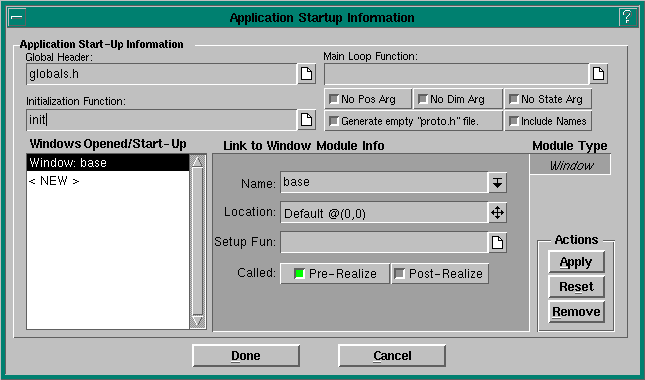
Here's the dialog, with some sample information filled in:

Application Startup Information dialog.
Once you've made your changes, click on Done.
Most applications have a global header that's included in all source code files. If you plan to use a global header in your application, you should set up the header before PhAB generates any code. This lets PhAB automatically include the header in each file it generates.
To set up a global header:
For example, to set up a globals.h header file, you can simply enter: globals
 |
If you specify the header after some code has been generated, you'll have to go back and manually add the header to the stub files that were previously generated. |
Your application can include an initialization function that's called before any modules or widgets are created. In it you could initialize data, open widget databases, set up signal handlers, and so on. To set up an initialization function:
When you specify a setup function, PhAB generates a stub function; for information on specifying the language (C or C++) and the filename, see "Function names and filenames" in the Working with Code chapter.
By default, all PhAB-generated applications have the following command-line options:
| If server_name is: | This server is used: |
|---|---|
| node_number | //node_number/dev/photon |
| fullpath | fullpath |
| relative_path | /dev/relative_path |
By default, all these options are enabled so that users can dynamically move or resize the application, or specify its initial state. For example, to start an application in console 4 (the center of the workspace), specify the command-line options:
-x100% -y100%
The PhAB API processes these options before it calls the initialization function; if you plan to add your own command-line options to an application, make sure you pick options that don't conflict with these. You should also code your option processing to handle and ignore these options. If you don't, you'll see errors on the console when you run the application. See the discussion on the initialization function in the Working with Code chapter.
If you don't want users to move or resize the application:
PhAB lets you take over the standard Photon mainloop function.
 |
This option is provided for very advanced Photon developers, and requires an excellent understanding of how Photon processes events. It can also make your application incompatible with future versions of Photon. Don't use it unless absolutely necessary. |
To specify an application-based mainloop function:
PhAB converts your widgets' instance names into ABN_... manifests that you can use in your code to refer to your widgets by name. You can optionally include the instance-name text string in the widgets' memory. To do this:
 |
Including instance names will increase the amount of memory required to run your application. |
Use the ApInstanceName() function to find this string for a widget-see the Photon Library Reference for more information.
When you first create an application, the mandatory base window is preset as the initial and only startup window. Using the Application Startup Information dialog, you can tell your application to:
The window that appears first in the Windows Opened/Startup list is the initial startup window:
Typically, the application's main window is the first created.
For each window in the startup list, you can specify information that's identical to the information used to create a module-type link callback, as described in the Editing Resources and Callbacks in PhAB chapter.
To add a new window to the startup window list:

To use these fields, see "Link to Window Module Info," below.
To modify an existing startup window:
To delete an existing startup window, select the window from the "Windows Opened/Startup" list and click on Remove.
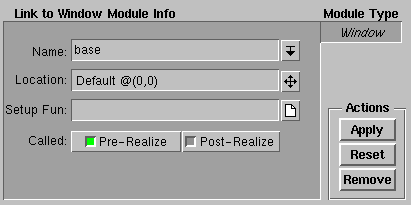
To add or modify a startup window, you use the following controls: