Updating the IDE
The IDE includes an auto-update feature that lets you check for and install updates to the IDE itself.
-
Select .
The IDE displays a message, Contacting Software Sites..., with a progress bar in the lower right corner while it contacts the server and asks it about available updates. Typically, this only last a few seconds and the update wizard then opens.
The first dialog shown in the wizard, Available Updates, lists the updates found: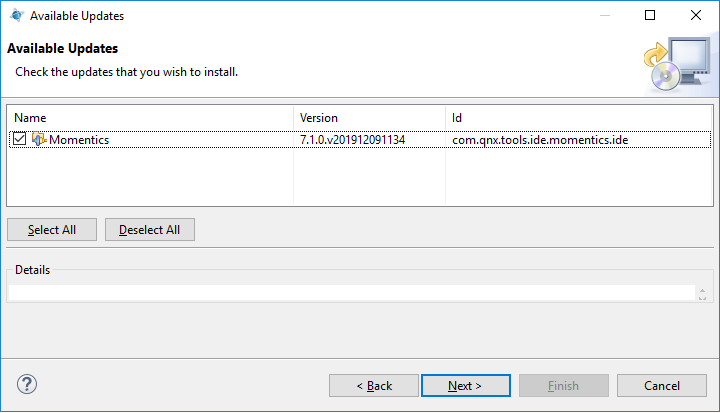 Note:If no updates are available, you won't see the wizard but instead a popup window advising you that no updates are available and providing a link to the Available Update Sites window in the QNX preferences, which lets you configure other sites from which to read content.
 -
In the list area, check the boxes for the updates you want to install.
Each row in the list provides the name, version (which is the build ID), and package ID of the update. Sometimes, a summary of the selected update is provided in the Details panel shown below the list area. There's also a link, entitled More, that appears when an update is selected, and when clicked, opens a window that lists various properties for it.
-
Click Next to advance to the Update Details dialog.
This dialog displays the contents of the updates you previously selected, in a tree-like display that lets you expand each plugin in the update package and see any other plugins within it. Below this display area is a Size field that lists the size of the selected plugin (if it's known), and a Details panel with a More link that serve the same purpose as in the first dialog.
-
Click Next to advance to the Review Licenses dialog.
This dialog displays information from the End User License Agreements (EULAs) that apply to the update package. In the left box, each entry lists the first line from a EULA, and you can expand the entry to see the plugins to which it applies. Clicking a particular EULA displays the first line of its text in the right box. You must click the I accept radio button below these boxes to continue.
-
Click Finish.
The IDE displays a message, Updating Software..., with a progress bar in the lower right corner while it downloads and tries to install the selected updates.
Page updated: