![[Previous]](prev.gif) |
![[Contents]](contents.gif) |
![[Index]](keyword_index.gif) |
![[Next]](next.gif) |
|
|
|
|
 |
This version of this document is no longer maintained. For the latest documentation, see http://www.qnx.com/developers/docs. |
This chapter includes:
The term TCP/IP implies two distinct protocols: TCP and IP. Since these protocols have been used so commonly together, TCP/IP has become a standard terminology in today's Internet. Essentially, TCP/IP refers to network communications where the TCP transport is used to deliver data across IP networks.
This chapter provides information on setting up TCP/IP networking on a Neutrino network. It also provides troubleshooting and other relevant details from a system-administration point of view. A Neutrino-based TCP/IP network can access resources located on any other system that supports TCP/IP.
There are two types of TCP/IP hosts: clients and servers. A client requests TCP/IP service; a server provides it. In planning your network, you must decide which hosts will be servers and which will be clients.
For example, if you want to telnet from a machine, you need to set it up as a client; if you want to telnet to a machine, it has to be a server.
In TCP/IP terminology, we always refer to network-accessible computers as hosts or gateways.
 |
In order to use TCP/IP, you need an IP address, and you also need the IP address of the host you wish to communicate with. You typically refer to the remote host by using a textual name that's resolved into an IP address by using a nameserver. |
A nameserver is a database that contains the names and IP addresses of hosts. You normally access a TCP/IP or Internet host with a textual name (e.g. www.qnx.com) and use some mechanism to translate the name into an IP address (e.g. 209.226.137.1).
The simplest way to do this mapping is to use a table in the /etc/hosts file. This works well for small to medium networks; if you have something a bit more complicated than a small internal network with a few hosts, you need a nameserver (e.g. for an ISP connection to the Internet).
When you use a name to connect to a TCP/IP host, the nameserver is asked for the corresponding IP address, and the connection is then made to that IP address. You can use either:
or:
nameserver 10.0.0.2
nameserver 10.0.0.3
You can use phlip, the Photon TCP/IP and dialup configuration tool, to configure the network and specify nameservers; phlip sets configuration string _CS_RESOLVE. You can also set _CS_RESOLVE manually. This string, if it exists, is always searched instead of /etc/resolv.conf.
For more information on finding TCP/IP hostnames and nameservers, see /etc/hosts and /etc/resolv.conf in the Utilities Reference.
Routing determines how to get a packet to its intended destination. The general categories of routing are:
This is a very common configuration. If a host has access to the Internet, it likely added one static route called a default route. This route directs all the TCP/IP packets from your host that aren't destined for a host on your local network to a gateway that provides access to the Internet.
There's often confusion between routing and routing protocols. The TCP/IP stack determines the routing by using routing tables; routing protocols let those tables change.
To use TCP/IP, you need the following software components:
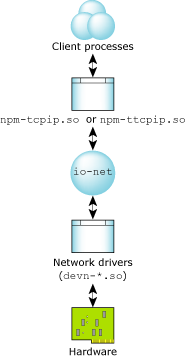
Components of TCP/IP in Neutrino.
Neutrino supports TCP/IP with two different stacks:
The tiny stack is meant for resource-constrained client applications where it isn't necessary to have all TCP/IP services present; for a list of the services not covered in the tiny stack, see the limitations listed in the Utilities Reference.
The way that you set configuration parameters depends on which stack you use:
These methods are described below. For either stack, if you're using the Dynamic Host Configuration Protocol (DHCP), you can use dhcp.client to set the configuration parameters for you as provided by the DHCP server.
|
The device enumerator starts io-net automatically when you boot, loads the full TCP/IP stack, and starts the appropriate drivers for the detected devices. If you want to use the tiny stack or specify any options (e.g. to enable IPSec) when you boot, you need to edit the device-enumeration files. For more information and an example, see "Device enumeration" in the Controlling How Neutrino Starts chapter in this guide. |
Use the tiny stack when you need to conserve resources. It supports many, but not all, of the functions found in the full TCP/IP stack; see npm-ttcpip.so in the Utilities Reference for a list of its limitations.
When you start the tiny stack, use the command-line options to set the configuration parameters. For example:
io-net -dne2000 -pttcpip if=en0:10.100,default=10.1
To see how you've configured your system or to view the current network connections when using the tiny stack, read the /proc/ipstats file, like this:
cat /proc/ipstats
You'll see something like this:
Ttcpip Jun 15 2000 22:36:01

verbosity level 0
ip checksum errors: 0
udp checksum errors: 0
tcp checksum errors: 0

packets sent: 0
packets received: 0

en0 : addr 10.0.0.100    netmask 255.0.0.0    down
lo0 : addr 127.0.0.1     netmask 255.0.0.0    up

DST: 10.0.0.0      NETMASK: 255.0.0.0     GATEWAY: en0
DST: 127.0.0.0     NETMASK: 255.0.0.0     GATEWAY: lo0
DST: 0.0.0.0       NETMASK: 0.0.0.0       GATEWAY: 10.0.0.1
Here you can see that the interface has been configured to 10.0.0.100 and the default route has been set to 10.0.0.1.
The full TCP/IP stack, npm-tcpip.so, is based on the BSD TCP/IP stack, and it supports similar features. If you aren't using phlip (the Photon TCP/IP and dialup configuration tool) to configure the full stack, you have to use the ifconfig and route utilities as described below -- you can't use command-line options as you would for the tiny stack.
|
The npm-tcpip.so file is actually a symbolic link that points to npm-tcpip-v4.so by default, but you can change it to point to npm-tcpip-v6.so, if you want to use TCP/IP for IPv6 packets.. |
To start the full stack, load the TCP/IP shared object into io-net. For example:
io-net -dne2000 -ptcpip
To configure an interface with an IP address, you must use the ifconfig utility. To configure your network interface with an IP address of 10.0.0.100, you would use the following command:
ifconfig en0 10.0.0.100
If you also want to specify your gateway, use the route command:
route add default 10.0.0.1
This configures the gateway host as 10.0.0.1.
If you then want to view your network configuration, use the netstat command (netstat -in displays information about the network interfaces):
Name Mtu    Network   Address           Ipkts Ierrs Opkts Oerrs Coll
lo0  32976  <Link>                       0    0     0     0     0
lo0  32976  127       127.0.0.1          0    0     0     0     0
en0  1500   <Link>    00:50:da:c8:61:92 21    0     2     0     0
en0  1500   10        10.0.0.100        21    0     2     0     0
To display information about the routing table in the full stack, use netstat -rn; the resulting display looks like this:
Routing tables

Internet:
Destination Gateway    Flags Refs Use Mtu Interface
default     10.0.0.1   UGS   0    0   -   en0
10          10.0.0.100 U     1    0   -   en0
10.0.0.100  10.0.0.100 UH    0    0   -   lo0
127.0.0.1   127.0.0.1  UH    0    0   -   lo0
The table shows that the default route to the gateway was configured (10.0.0.1).
If a host is a server, it invokes the appropriate daemon to satisfy a client's requests. A TCP/IP server typically runs the inetd daemon, also known as the Internet super-server. You can start inetd in your machine's rc.local file; see the description of /etc/rc.d/rc.sysinit in the Controlling How Neutrino Starts chapter in this guide.
|
Running inetd lets outside users try to connect to your machine and thus is a potential security issue if you don't configure it properly. |
The inetd daemon listens for connections on some well-known ports, as defined in /etc/inetd.conf, in the TCP/IP network. On receiving a request, it runs the corresponding server daemon. For example, if a client requests a remote login by invoking rlogin, then inetd starts rlogind (remote login daemon) to satisfy the request. In most instances, responses to client requests are handled this way.
You use the super-server configuration file /etc/inetd.conf to specify the daemons that inetd can start. As shipped in the Neutrino distribution, the file describes all currently shipped Neutrino TCP/IP daemons and some nonstandard pidin services. Unless you want to add or remove daemon definitions, you don't need to modify this file. When it starts, inetd reads its configuration information from this configuration file. It includes these commonly used daemons:
|
|
You may also find other resident daemons that can run independently of inetd -- see the Utilities Reference for descriptions:
These daemons listen on their own TCP ports and manage their own transactions. They usually start when the computer boots and then run continuously, although to conserve system resources, you can have inetd start bootpd only when a boot request arrives.
In some situations, you may need to run multiple instances of the TCP/IP stack.
io-net -del900 pci=0x0 -ptcpip
io-net -i1 -del900 pci=0x1 -ptcpip prefix=/sock2
You can get the PCI index of your NIC cards by using the pci -vvv command. If you're using different types of NIC cards, you don't have to specify the PCI index.
The -i option in the second instance of TCP/IP tells io-net to register itself as /dev/io-net1. The prefix option to npm-tcpip.so causes the second stack to be registered as /sock2/dev/socket instead of the default, /dev/socket. TCP/IP applications that wish to use the second stack must specify the environment variable SOCK. For example:
SOCK=/sock2 telnet 10.59
or:
SOCK=/sock2 netstat -in
or:
SOCK=/sock2 ifconfig en0 192.168.2.10
If you don't specify SOCK, the command uses the first TCP/IP stack.
When you add a host to the network or connect your host to the Internet, you need to assign an IP address to your host and set some other configuration parameters. There are a few common mechanisms for doing this:
Along with your IP address, the servers implementing these protocols can supply your gateway, netmask, nameservers, and even your printer in the case of a corporate network. Users don't need to manually configure their host to use the network.
Neutrino also implements another autoconfiguration protocol called AutoIP (zeroconf IETF draft). This autoconfiguration protocol is used to assign link-local IP addresses to hosts in a small network. It uses a peer-negotiation scheme to determine the link-local IP address to use instead of relying on a central server.
PPPoE stands for Point-to-Point Protocol over Ethernet. It's a method of encapsulating your data for transmission over a bridged Ethernet topology.
PPPoE is a specification for connecting users on an Ethernet network to the Internet through a broadband connection, such as a single DSL line, wireless device, or cable modem. Using PPPoE and a broadband modem, LAN users can gain individual authenticated access to high-speed data networks.
By combining Ethernet and the Point-to-Point Protocol (PPP), PPPoE provides an efficient way to create a separate connection to a remote server for each user. Access, billing, and choice of service are managed on a per-user basis, rather than a per-site basis. It has the advantage that neither the telephone company nor the Internet service provider (ISP) needs to provide any special support.
Unlike dialup connections, DSL and cable modem connections are always on. Since a number of different users are sharing the same physical connection to the remote service provider, a way is needed to keep track of which user traffic should go to where, and which user should be billed. PPPoE lets each user-remote site session learn each other's network addresses (during an initial exchange called discovery). Once a session is established between an individual user and the remote site (for example, an Internet service provider), the session can be monitored for billing purposes. Many apartment houses, hotels, and corporations are now providing shared Internet access over DSL lines using Ethernet and PPPoE.
A PPPoE connection is composed of a client and a server. Both the client and server work over any Ethernet-like interface. It's used to hand out IP addresses to the clients, based on the user (and workstation if desired), as opposed to workstation-only authentication. The PPPoE server creates a point-to-point connection for each client.
Use the pppoed daemon to negotiate a PPPoE session. The npm-pppoe.so shared object provides PPP-to-Ethernet services. Start io-net with this shared object. For example:
io-net -del900 -pttcpip -ppppmgr -ppppoe
Then, make a session to any server using the file /etc/ppp/pppoe-up to start pppd:
pppoed
Make a session to the server with a name of PPPOE_GATEWAY:
pppoed name=PPPOE_GATEWAY
Once the PPPoE session is established, pppoed uses pppd to create a point-to-point connection over the PPPoE session. The pppd daemon gets a local TCP/IP configuration from the server (ISP).
The pppoed daemon needs pppd to establish TCP/IP point-to-point links. When starting pppd, there are a few pppd options that are specific to running pppd over a pppoe session. Here's an example of /etc/ppp/pppoe-up:
#!/bin/sh
pppd debug /dev/io-net/ppp_en -ac -pc -detach defaultroute \
 require-ns mtu 1492 name username
The required pppd options for use with pppoed are:
|
If pppoed has problems connecting to certain sites on the Internet, see PPPOE and Path MTU Discovery in the Neutrino technotes. |
A TCP/IP host uses the DHCP (Dynamic Host Configuration Protocol) to obtain its configuration parameters (IP address, gateway, nameservers, and so on) from a DHCP server that contains the configuration parameters of all the hosts on the network.
The Neutrino DHCP client, dhcp.client, obtains these parameters and configures your host for you to use the Internet or local network.
If your DHCP server supplies options (configuration parameters) that dhcp.client doesn't know how to apply, dhcp.client passes them to a script that it executes. You can use this script to apply any options you want to use outside of those that dhcp.client sets for you. For more information, see the entry for dhcp.client in the Utilities Reference.
AutoIP is a module that you must mount into io-net. It is used for quick configuration of hosts on a small network. AutoIP assigns a link-local IP address from the 169.254/16 network to its interface if no other host is using this address. The advantage of using AutoIP is that you don't need a central configuration server. The hosts negotiate among themselves which IP addresses are free to use, and monitor for conflicts.
It's common to have a host employ both DHCP and AutoIP at the same time. When the host is first connected to the network, it doesn't know if a DHCP server is present or not. If you start dhcp.client with the -a option (apply IP address as an alias), then both a link-local IP address and DHCP IP address can be assigned to your interface at the same time. If the DHCP server isn't present, dhcp.client times out, leaving the link-local IP address active. If a DHCP server becomes available later, dhcp.client can be restarted and a DHCP IP address applied without interfering with any TCP/IP connections currently using the link-local IP address.
Having both a DHCP-assigned address and a link-local address active at the same time lets you communicate with hosts that have link-local IP addresses and those that have regular IP addresses. For more information, see nfm-autoip.so and dhcp.client in the Utilities Reference.
The Simple Network Management Protocol (SNMP) is an application-layer protocol that uses the TCP/IP protocol suite and facilitates the exchange of management information between network devices. SNMP enables network administrators to manage network performance, find and solve network problems, and plan for network growth.
The SRI SNMP Suite for Neutrino consists primarily of ports of the EMANATE and EMANATE/Lite technologies developed by SNMP Research International (SRI). EMANATE/Lite is a statically extensible agent; the EMANATE agent can be extended dynamically. Both agents support SNMP V1, V2, and V3, and include development kits for developers to extend the agents.
If you're having trouble with your TCP/IP network (i.e. you can't send packets over the network), you need to use several utilities for troubleshooting. These utilities query hosts, servers, and the gateways to fetch diagnostic information to locate faults. Some of the typical queries are:
As mentioned before, io-net is the framework used to connect drivers and protocols. In order to troubleshoot this, use the pidin command:
$ pidin -P io-net mem
Look for the TCP/IP shared object in the output:
  pid tid name               prio STATE           code  data         stack
77839   1 sbin/io-net         10o SIGWAITINFO       56K  384K  8192(516K)*
77839   2 sbin/io-net         10o RECEIVE           56K  384K   4096(68K)
77839   3 sbin/io-net         10o RECEIVE           56K  384K   4096(68K)
77839   4 sbin/io-net         10o RECEIVE           56K  384K   4096(68K)
77839   5 sbin/io-net         10o RECEIVE           56K  384K   4096(68K)
77839   6 sbin/io-net         20o RECEIVE           56K  384K  4096(132K)
77839   7 sbin/io-net         21r RECEIVE           56K  384K  4096(132K)
         ldqnx.so.2         @b0300000             300K   16K
         npm-tcpip-v4.so    @b8200000             584K  140K
         devn-el900.so      @b82b5000              56K  8192
You should see the npm-tcpip-v4.so or npm-tcpip-v6.so shared object and another for a network driver (in this case, devn-el900.so).
|
If you see npm-ttcpip.so instead of npm-tcpip-v4.so or npm-tcpip-v6.so in the above output, you're using the tiny TCP/IP stack. |
In order to ascertain the above, use the following command:
$ ls /dev/io-net
Ideally, you should see the following output:
en0 ip0 ip_en ipv6_en
The en0 entry represents the first (and only) Ethernet driver; ip_en and ipv6_en represent the TCP/IP protocol stack, which was started by mounting npm-tcpip.so, which is actually a shared object that io-net loads.
Use the following command to get the nameserver information:
getconf _CS_RESOLVE
If you aren't using the configuration string, type:
cat /etc/resolv.conf
The /etc/hosts file contains information regarding the known hosts on the network. For each host, a single line should be present with the following information:
internet_address official_host_name aliases
Display this file by using the following command:
cat /etc/hosts
If you're using the full TCP/IP stack, use the following netstat commands to get the network status:
For the tiny TCP/IP stack, you have to use the following command as it doesn't support netstat:
$ cat /proc/ipstats
For more information about netstat, see the Utilities Reference.
Use the ping utility to determine if you're connected to other hosts. For example:
ping isp.com
On success, ping displays something like this:
PING isp.com (10.0.0.1): 56 data bytes
64 bytes from 10.0.0.1: icmp_seq=0 ttl=255 time=0 ms
64 bytes from 10.0.0.1: icmp_seq=1 ttl=255 time=0 ms
64 bytes from 10.0.0.1: icmp_seq=2 ttl=255 time=0 ms
64 bytes from 10.0.0.1: icmp_seq=3 ttl=255 time=0 ms
64 bytes from 10.0.0.1: icmp_seq=4 ttl=255 time=0 ms
64 bytes from 10.0.0.1: icmp_seq=5 ttl=255 time=0 ms
64 bytes from 10.0.0.1: icmp_seq=6 ttl=255 time=0 ms
This report continues until you terminate ping, for example, by pressing Ctrl-C.
Use the nicinfo command:
/usr/sbin/nicinfo device
|
If you aren't logged in as root, you have to specify the full path to nicinfo. |
This utility displays information about the given network interface connection, or /dev/io-net/en0 if you don't specify one. The information includes the number of packets transmitted and received, collisions, and other errors, as follows:
3COM (90xC) 10BASE-T/100BASE-TX Ethernet Controller
  Physical Node ID ................. 000103 E8433F
  Current Physical Node ID ......... 000103 E8433F
  Media Rate ....................... 10.00 Mb/s half-duplex UTP
  MTU .............................. 1514
  Lan .............................. 0
  I/O Port Range ................... 0xA800 -> 0xA87F
  Hardware Interrupt ............... 0x7
  Promiscuous ...................... Disabled
  Multicast ........................ Enabled

  Total Packets Txd OK ............. 1585370
  Total Packets Txd Bad ............ 9
  Total Packets Rxd OK ............. 11492102
  Total Rx Errors .................. 0

  Total Bytes Txd .................. 102023380
  Total Bytes Rxd .................. 2252658488

  Tx Collision Errors .............. 39598
  Tx Collisions Errors (aborted) ... 0
  Carrier Sense Lost on Tx ......... 0
  FIFO Underruns During Tx ......... 0
  Tx deferred ...................... 99673
  Out of Window Collisions ......... 0
  FIFO Overruns During Rx .......... 0
  Alignment errors ................. 0
  CRC errors ....................... 0.
|
|
|
|