Embedded HW and BSPs for QNX
Each embedded system has unique components, such as processors, memory, I/O interfaces, and peripherals, and these components require specific software to interact with the operating system. The board support package (BSP) for an embedded hardware provides the necessary drivers, configurations, and initialization code to ensure that the operating system can communicate effectively with the hardware. Similarly, QNX BSPs provide an abstraction layer of hardware-specific software that facilitates implementing QNX software on your board. These BSPs are architecture-specific, board-specific, and may even be board revision-specific.
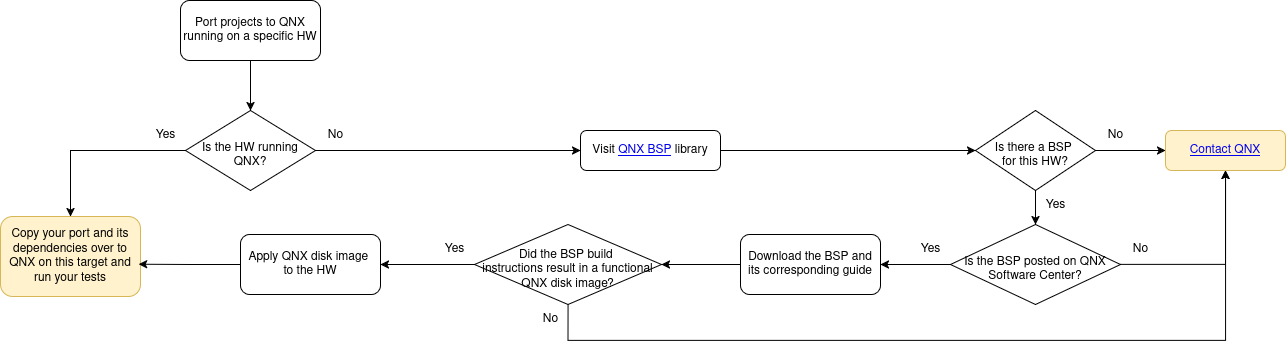
If you're interested in porting applications for a specific hardware, check to see if a QNX BSP for your platform is available. If it is, follow the setup instructions detailed in the corresponding BSP guide to build and apply it to your board. Once the BSP is successfully applied and your target hardware is booted with QNX, you can copy your port to the platform and run tests. The BSP guide should also tell you how to connect to the board.
Note that BSPs come with the minimal setup required to run QNX on the
board and may be missing libraries specific to your use case. You can
either copy them over manually post-boot, or alter the buildfiles to add
them directly into the OS image. You can also extend the BSP to be a
more usable image with persistent storage using tools like mkifs
, mkqnx6fs, etc. Before doing so, refer to a quick primer on QNX filesystems.
Every QNX system includes a read-only image filesystem (IFS) that is
loaded into RAM. The IFS contains essential components such as the
startup code, kernel, libraries, drivers, and tools necessary for
mounting other filesystems. To understand what's included in the IFS,
refer to the ifs.build (or an equivalent) file located within the BSP.
While it's theoretically possible to run a QNX system using only the
IFS, such a system would be functionally limited. For development
purposes, a writable and flexible filesystem is essential. Writable
filesystems can reside on various media, including SD cards, USB, MMC,
AHCI, and NVMe devices. To support these media types, the appropriate
device drivers must be included. These drivers, along with their
dependencies, are typically provided in the BSP. QNX supports multiple
filesystem types, including FAT, DOS, and QNX6FS,
and hence, filesystem-specific tools such as mkifs and mkqnx6fs are also
required. Whether the system partition is read-only or writable depends
on the intended use case. For development environments, a
writable system partition is preferable, allowing binaries and libraries
to be added without reflashing the image. But, production systems benefit
from a read-only system partition for stability and robustness. The data
partition, which contains user home directories, is typically
writable.
As a simple exercise, create usable persistent partitions on a USB stick and mount them on QNX. These general steps can also be applied to persistent storage media other than USB. For starters, plug in your USB stick into your hardware device running QNX. Use the mount utility to check its qnx-given mountpoint and name. /dev/umass0t12 is the device of our interest, and it's mounted at /fs/usb0 for now:
# mount
ifs on / type ifs
/dev/umass0t12 on /fs/usb0 type dos (fat32)
/dev/hd0t178 on /system type qnx6
/dev/hd0t12 on /boot type dos (fat16)
/dev/hd0t179 on /data type qnx6
/dev/shmem on /dev/shmem type shmem
A quick look at its partition table tells you exactly how it's currently partitioned:
# fdisk /dev/umass0 show

     _____OS_____     Start      End     ______Number______   Size    Boot
     name    type    Cylinder  Cylinder  Cylinders   Blocks

1.   FAT32     12          0      29339     29340    60088288  29339 MB
2.   ------   ---   --------   --------   -------  --------  -----
3.   ------   ---   --------   --------   -------  --------  -----
4.   ------   ---   --------   --------   -------  --------  -----
Since the plan is to use this USB only as secondary storage, get rid
of the FAT32 partition and bring in two QNX6 partitions. You can
directly edit the partition table using the fdisk utility. Check the
QNX partitions
docs
for more information about these types.
# fdisk /dev/umass0

FDISK
Ignore Next Prev Change Delete Boot Unboot Restore Loader Save Quit

        _____OS_____     Start      End     ______Number_____    Size    Boot
        name    type    Cylinder  Cylinder  Cylinders  Blocks

--> 1.  QNX6   (177)            0      5982    5983    12253152   5982 MB
    2.  QNX6   (178)         5983     29339   23357    47835136     22 GB
    3.  ______ (___)    _______   _______   _______   _________  _____
    4.  ______ (___)    _______   _______   _______   _________  _____


 Choose a partition by typing the partition number OR moving the pointer
 with the UP/DOWN arrows.
 Then, choose one of the actions on the top line of the screen.


Drive : /dev/umass0                 Config:    64 Heads
Size  : 29340 Mbytes                           32 Sectors/track
Loader: Unknown                             29340 Cylinders
Blocks: 60088320                              512 Block Size

                                    Last cylinder is 29339
You might have to reinsert the USB stick for QNX to pick up the updated partitions. QNX should now recognize that this USB device has two QNX6 type partitions:
# ls /dev/umass0
umass0       umass0t177   umass0t178
You can now create fresh, power-safe filesystems on these partitions
using the mkqnx6fs utility. Then, mount these fresh filesystems at
mountpoints of your choice:
# mkqnx6fs -i 100000 /dev/umass0t177
All files on /dev/umass0t177 will be lost!
Confirm filesystem re-format (y) or (n): y
Format fs-qnx6: 1531640 blocks, 100000 inodes, 8 groups
#
# mkqnx6fs -i 100000 /dev/umass0t178
All files on /dev/umass0t178 will be lost!
Confirm filesystem re-format (y) or (n): y
Format fs-qnx6: 5979388 blocks, 100000 inodes, 8 groups
#
# mount -t qnx6 -osync=optional /dev/umass0t177 /personal/system
# mount -t qnx6 -osync=optional /dev/umass0t178 /personal/data
#
# mount
ifs on / type ifs
/dev/umass0t178 on /personal/data type qnx6
/dev/umass0t177 on /personal/system type qnx6
/dev/hd0t178 on /system type qnx6
/dev/hd0t12 on /boot type dos (fat16)
/dev/hd0t179 on /data type qnx6
/dev/shmem on /dev/shmem type shmem
#
# cd /
# ls
bin   data  etc       proc  share  system  usb  var
boot  dev   personal  sbin  sys    tmp     usr