![[Previous]](prev.gif) |
![[Contents]](contents.gif) |
![[Index]](keyword_index.gif) |
![[Next]](next.gif) |
|
|
|
|
This chapter covers the following topics:
A QNX system will usually contain one or more character devices. All such devices are managed by the Dev process. This process must be started first (as root) before any device drivers are started:
/bin/Dev &
Once Dev has been started, one or more of the following device drivers may be started (as root):
Each of these drivers is described in more detail in the Utilities Reference.
 |
You may need to modify the Dev command in your
sysinit.node file to support a
larger number of devices than the default. For example, if
you specify:
Dev [any_other_options] -n 64 & then Dev will support 64 terminal devices (virtual consoles, serial terminals, and pseudo tty devices). For more information, see Dev in the QNX 4 Utilities Reference |
Parallel ports are normally used to communicate with parallel printers. Apart from starting up the driver, there's little work for you to do other than connect the printer to the machine. If your printer's on a network, see the Print Spooling chapter to set up the printer as a shared resource.
If only one parallel port is available on a machine, then no parameters are required:
Dev.par &
Started this way, the parallel driver will create a device called /dev/par1, which corresponds to the first parallel port found by the BIOS (LPT1).
If your machine has more than one parallel port, then you'll need to start an additional Dev.par for each extra port. You must provide a unique name for the extra devices. For example:
Dev.par &
Dev.par -b 2 -N laser &
These commands will create a device called /dev/par1 on LPT1, and a second device called /dev/laser on LPT2.
If you have the memory, you might find that specifying large output buffers significantly improves turnaround time when sending data to your printer. Here's an example of a parallel device created with a 30K output buffer:
Dev.par -O 30000 &
If you're having problems with your printer, you can test the basic operation of the driver using the cat utility. The cat utility writes the contents of a file to standard output. You can redirect the output to the printer to determine whether the parallel driver is working as expected:
cat myfile > /dev/par
For many printers, you'll need to send a formfeed (Ctrl-L) to cause the page to print.
In this section we'll look at serial hardware, the RS-232 protocol, and various configuration issues.
The Dev.ser driver can support one or more serial ports. The hardware interface to the computer consists of a Universal Asynchronous Receiver/Transmitter (UART) for each serial port. The driver supports the 8250, 16450, and 16550 families of serial controllers.
Each UART uses eight consecutive addresses in the I/O address space of the computer. The Dev.ser driver is informed of the I/O address range for each UART by command-line arguments when it is started.
Just as important as the I/O address is the hardware interrupt generated by each UART. Most PCs provide several hardware interrupt signals on the bus, labeled IRQ2 through IRQ15 (except for interrupts 8, 9, and 13, which are used internally by the system motherboard).
These interrupt signals are active-high TTL logic signals on ISA buses, which means that you can connect only one adapter card to any one interrupt signal.
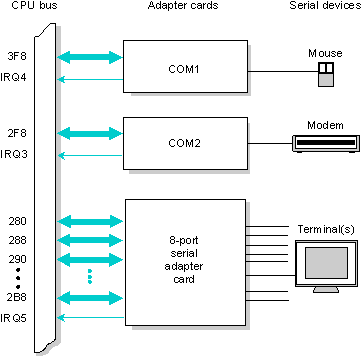
Serial adapter cards come in various configurations. Adapter cards with only one serial port typically offer only a limited set of choices for I/O address and hardware interrupt. The following table shows some commonly found combinations, but we recommend that you read the hardware documentation carefully to discover the choices available on a given manufacturer's adapter card:
| Name: | Address: | Interrupt: |
|---|---|---|
| COM1 | 3F8 | IRQ4 |
| COM2 | 2F8 | IRQ3 |
| COM3 | 3E8 | varies |
| COM4 | 2E8 | varies |
You can usually configure multiport serial adapters to respond to a wide range of I/O addresses. The adapters may also give you considerable flexibility in selecting hardware interrupts. A good choice for I/O addresses is often the 280-through-2BF range.
|
Note that this discussion applies only to "dumb" serial cards. "Smart" cards are typically supported by drivers supplied by the hardware manufacturer -- refer to the docs that came with the card. |
Because of the limited number of hardware interrupts available, these cards will often "OR" the interrupt lines from the individual UARTs into a single interrupt connected to the bus.
|
QNX allows for many serial ports to share the same interrupt, since Dev.ser will check every UART that shares an interrupt. |
The following diagram shows a sophisticated configuration of serial adapter cards in a QNX system.
|
For proper operation, each serial channel must have a unique I/O address, and each adapter card must use a unique hardware interrupt. |
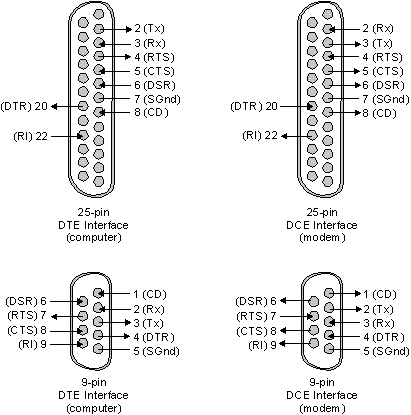
The RS-232C asynchronous communications protocol defines the electrical and physical interface between Data Terminal Equipment (DTE or terminals) and Data Communications Equipment (DCE or modems).
The following figure shows the cabling assignments of an RS-232 connection.
The host computer is usually configured as a DTE, acting as a terminal device. We assume that the computer will be connected to a modem.
The RS-232 signals have the following names:
| Signal: | Meaning: |
|---|---|
| Tx | transmit data |
| Rx | receive data |
| RTS | request to send |
| CTS | clear to send |
| DSR | data set ready |
| DTR | data terminal ready |
| CD | carrier detect |
| RI | ring indicator |
| SGnd | signal ground |
Data is transmitted asynchronously using a bit protocol as shown below:
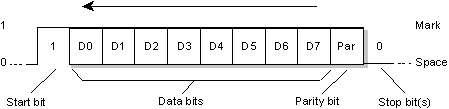
Normally, an RS-232 data line is in the SPACE (0) condition. A transmitted character consists of bits in the following order:
The duration of each bit is defined by the baud rate, which indicates the number of bits per second that can be transmitted.
If you use the parity bit, it can be one of:
RS-232 uses the DTR and DSR lines to control communication sessions. The terminal raises DTR when it is powered up and available. Similarly, the modem raises DSR when it is powered up and available (but not necessarily connected to a remote modem). No communication is expected to occur unless both DTR and DSR are raised.
A terminal indicates that it no longer wishes to communicate by dropping the DTR line, which causes most modems to hang up the telephone line, thus releasing the connection.
A modem indicates that it has established a connection by raising CD. Some modems will also indicate that they have detected (but not yet answered) an incoming call by raising RI.
The RTS and CTS lines control the flow of data between terminal and modem. The terminal raises RTS when it is capable of receiving data on the Rx line. Similarly, the modem raises CTS when it can accept data on the Tx line.
You use the stty utility to set the four major parameters that define an RS-232 link.
QNX supports four character sizes. You choose the size of data character with the following stty command:
stty bits=n
where n can be 5, 6, 7, or 8 (the default).
This parameter defines how many bits following the start bit will be used to form the character.
It's possible to transmit data that is followed by either one or two stop bits. Two stop bits are used only to slow down the overall transmission of data so that the remote end has a chance to keep up. Using stty, you specify one of these:
stty stopb=1 (the default)
OR
stty stopb=2
To disable the transmission of parity bits and suppress the checking (in hardware) of received parity bits, you specify:
stty par=none
Parity is disabled by default.
If parity is used, you specify one of the following values:
stty par=odd
stty par=even
stty par=mark
stty par=space
You can specify the baud rate with the baud=number option of the stty utility. For example:
stty baud=2400
The Dev.ser serial driver defaults to 9600 baud. Third-party drivers may have different defaults.
High-speed, error-correcting modems are becoming very sophisticated -- they work best when all hardware handshaking signals are respected. These modems often communicate with the host computer at a fixed high-speed baud rate (e.g. 115200 or 57600 baud) and use the RTS/CTS handshaking lines to regulate the actual flow of data over the communications link. QNX is ideally suited for communicating with such modems.
A straight-through cable is used to connect the modem to the computer.
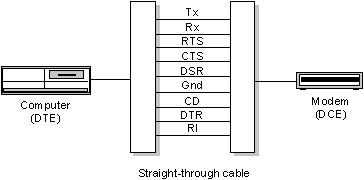
Serial printers are usually bidirectional devices. Data flows from computer to printer as expected, but since printers can't keep up with the host computer, serial printers often use software flow control to regulate the flow of data. In other words, they transmit XON and XOFF characters back to the computer. Some printers use the hardware handshaking lines for this purpose, some support both forms of flow control.
To be safe, you should connect all nine signals, although printers that support only software flow control may function just as well with a three-wire cable (Rx, Tx, and Gnd). Also, since printers are usually configured as Data Terminal Equipment (DTE) -- just like the host computer -- you may need to use a null-modem cable.
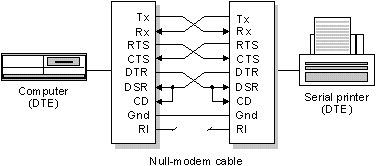
|
The actual wiring of the CD and RI pins may vary depending on the manufacturer's cable. |
| If the printer uses: | You use: |
|---|---|
| software flow control | stty +osflow </dev/ser1 |
| hardware flow control | stty +ohflow </dev/ser1 |
| both software and hardware flow control | both stty options |
|
If your printer's on a network, see the Print Spooling chapter to set up the printer as a shared resource. |
Terminals operate with or without flow control and at a fixed baud rate. Unlike printers, terminals can usually keep up with the host computer at a supported baud rate. A simple three-wire cable may be sufficient, but we recommend a nine-wire cable.
Like the host computer, terminals are normally configured as DTE devices, so a null-modem cable is usually required.
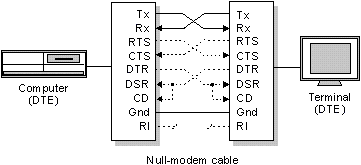
If your terminal supports software flow control (e.g. VT100), it's a good idea to enable output software flow control and lock it on:
stty +osflow +lksflow </dev/ser1
You could also use the -x option when starting Dev.ser.
QNX can be used as a full-function time-sharing system. Many users can be connected to some or all of the computers in a QNX network via hardwired terminals or through modem links to terminals at remote sites.
Assuming that the terminal/modem is properly configured, you'll also need to provide a mechanism for users to login.
Assume a terminal, properly connected and configured, on the serial port /dev/ser1. The simplest way of allowing a user sitting at that terminal to log in is to use this command:
on -t /dev/ser1 login
The user will be able to log in and execute commands. However, when the user logs off, the shell session is terminated and the user won't be able to log back in. To give users a way to log in again, specify the -t option to the tinit utility when the terminal is initialized:
tinit -t /dev/ser1 /dev/ser2 &
You can use the tinit utility to automate the login process. When you start tinit with the -T option, this utility waits for a character to be sent from the terminal. You can specify (via the -c option) a command for tinit to execute when a key is pressed. By default, tinit starts the login utility.
After the user logs off, tinit waits once again for a character to be sent. The following command starts login on two serial devices (/dev/ser1 and /dev/ser2) when a key is pressed:
tinit -T /dev/ser1 /dev/ser2 &
You can start up any program using the -c option to tinit. You can even specify a different program on each device. In some environments, a "canned" application is always expected on a given terminal.
For more information, see the documentation for tinit in the Utilities Reference.
The modem utility is provided to respond to modems. Used in conjunction with tinit, the modem utility can provide excellent dial-up capabilities. A typical dial-up system using QNX might have several serial ports (/dev/ser1, /dev/ser2, etc.) and might use the following command to permit dial-up access:
tinit -c "modem -b 38400 -L" -t /dev/ser1 &
The tinit utility can launch modem on each of the serial lines. When communication is established, modem will:
When the user either logs off or hangs up, tinit will once again launch a new modem, which will wait for another call. For more information, see modem in the Utilities Reference.
Multiple processes can open the same device; if they read from the device, their reads will be interleaved. This is generally undesirable. To keep this from happening, QNX maintains an "open count."
The open count, like locks, is advisory only. Programs that require exclusive use of a device should check the open count (through the dev_info() routine) before reading from the device. An open count of one would indicate that your program is the only one with the device open. The modem and qtalk utilities make use of this facility so that you don't have to dedicate a serial line for incoming calls.
The qtalk terminal emulator checks if the line is free, and if so, will connect underneath modem, allowing you to place an outgoing call. When the qtalk session in complete, modem will again be in control, waiting for incoming calls to arrive. For more information, see qtalk in the Utilities Reference.
If you're having problems with a serial line, you can use the qtalk utility to verify that the serial driver is working as expected. Running qtalk lets you communicate with a connected system through a serial line. With qtalk running, you can relay the characters you type through the serial link.
The following command would start a qtalk session with the system connected directly to a device:
qtalk -m device
Once in qtalk, your keystrokes will be sent through the serial line, and incoming data on the serial line will be displayed on your screen. If this doesn't happen, there could be a problem with the serial port configuration. To test for basic serial port functionality, connect a modem to the serial line and try to talk to the modem in its command mode.
The following table describes the actions you can take if you encounter some of the common problems involved in connecting serial devices.
| Problem: | Probable cause: | Remedy: |
|---|---|---|
| No data can be sent or received | Wrong cable | Check cables; use null-modem if necessary |
| Wrong I/O ports | Check hardware settings and verify correct parameters to Dev.ser | |
| Interrupt conflict | Change interrupt on adapter card | |
| Data is received and transmitted only when another serial port is in use | Interrupt conflict | Check hardware interrupts and Dev.ser startup parameters; make sure that two serial adapters are not using the same IRQ |
| Data is lost occasionally | Flow control supported, but not enabled | Determine the type of flow control supported by the device and enable with stty (ihflow, ohflow, isflow, and osflow) |
| Flow control not supported | Reduce baud rates and/or increase stop bits; if only received data is lost, specify larger input buffer to Dev.ser (-I option) | |
| Cabling problems | Make sure cable is well grounded and not too long; also, verify that all RS-232 wires in the cable are connected | |
| Data characters are unrecognizable | Wrong baud rate or parity | Use stty to set the correct baud rate and/or parity |
| Some characters are fine, some aren't | Wrong parity | Try different parity using stty |
The Dev manager is responsible for managing all terminal devices, including "pseudo" terminal devices or ptys. Pseudo devices are allocated in pairs; the members of each pair are internally connected to each other. Any data written to the master side (e.g. /dev/ptyp0) will be available for reading on the slave side (e.g. /dev/ttyp0).
You may run into the common problem where Dev hits its maximum number of devices and rejects Dev.pty's attempt to register. If this happens, increase the value of Dev's -n option.
For example, to create 16 device pairs called /dev/ptyq0 through /dev/ptyqf and /dev/ttyq0 through /dev/ttyqf:
Dev.pty -n 16 -l q &
The display adapter, the screen, and the system keyboard are collectively referred to as the console in QNX. To let you interact with several applications all at once, QNX permits multiple sessions to be run concurrently on consoles by means of virtual consoles. These virtual consoles are usually named /dev/con1, /dev/con2, etc.
Dev manages consoles via its associated console I/O drivers Dev.con or Dev.ansi. Again, Dev itself must be running before any of its drivers.
To set the number of consoles for a machine, you use the console driver's -n option. For example, the following command starts the Dev.con driver with a maximum of 6 virtual consoles:
Dev.con -n 6 &
You can switch from one console to the next by using this simple keychord:
Ctrl-Alt-Enter
For more information, see the appendix on "QNX Console & Keyboard Conventions."
|
|
|
|