This chapter shows you how to use the Photon DayMinder application
to organize your schedule. Topics include:
DayMinder provides a simple, graphical way to organize your daily schedule and
activities. With DayMinder, you can schedule appointments, plan meetings with your
coworkers, track your tasks, and maintain your address book.
DayMinder is designed to be a simple personal information manager application
to suit the needs of small embedded systems.
Note that some features described in this document may not work on your
particular system.
To start DayMinder:
- Click on the DayMinder icon in the appropriate Desktop Manager folder:

Or
- Click on the Taskbar if DayMinder is already running, but hidden from view:

Or
- Type the following in a pterm shell:
dayminder &
A typical DayMinder session may look like this:

Here's what the main parts of DayMinder let you do:
- Menu bar
- Lets you perform most major functions, from creating
appointments and tasks to setting application preferences.
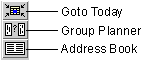
- DayMinder button bar
- Lets you quickly default to today's date or bring up the Group Planner or your Address Book:
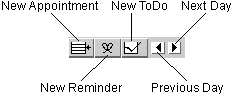
- Appointment button bar
- Lets you quickly add new appointments, reminders, tasks, or view a different day's activities:
- Monthly calendar
- Displays a month at a glance. You can move forwards or backwards by a
month or year by clicking on the "next" or "previous" scroll arrows
on either side of the month or year label. The current date is displayed in bold.
The selected date is highlighted.
- Weekly planner
- Displays your weeks activities at a glance. Black areas indicate
scheduled appointments; blue areas indicate repeating appointments.
A thick horizontal black line is displayed at the top of each date column that has a reminder.
- Appointments pane
- Shows your scheduled appointments for the day selected on the monthly calendar.
- Reminders pane
- Shows your reminders (or untimed events) for the day selected from the monthly calendar.
- ToDo pane
- Shows your ongoing tasks and their details: status, category, priority, and date due.
 |
Some of the fields in the DayMinder Preferences dialog may not be implemented at time of release. |
The Month and Weekly planner panes are fixed sizes, but you can adjust the pane sizes for the Appointment,
Reminders, and ToDo panes. For example, to resize the Reminders pane:
- Move the pointer to the horizontal line that separates the Appointments and Reminders panes.
The mouse pointer changes to a resize pointer.
- Click and drag the line upwards until the Reminders pane is the size you want.
Similarly, you can change the size of the fields in the ToDo pane. Grab the vertical bar that separates the
two fields and move it sideways until the field is the size you want.
You customize your DayMinder application preferences using the Preferences dialog. You invoke it in one of
the following ways:
- From the File menu, select the Preferences item.
Or
- Move the mouse pointer into the Appointments, Reminders, or ToDo pane, click the right mouse button,
and select the Properties... item.
- Appointments-scheduled events with a specified date and time. A meeting is a good example because
it's planned for a specified time on a specified day.
- Reminders-untimed events with a specified date but no associated time, such as a birthday or anniversary.
- ToDo-events or tasks that are defined over a period of time by a start and an end date.
An example of a task could be the writing and distributing of the minutes to a meeting because
the writing of the minutes occurs over a period of time and has a due date.
Adding an appointment to your DayMinder is easy:
- In the Monthly Calendar pane, click the next or previous month scroll arrows until the appropriate
calendar for the month and year is displayed. Click on the desired day. DayMinder highlights your selection
in the Weekly planner.
- In the Appointments pane, select the desired block of time for your appointment.
For example, if your appointment is scheduled from 2 pm to 3 pm on Friday, November 29,
you select the period by:
- clicking the 2 pm start time on Friday, November 29, and
- dragging to the 3 pm end time
The selected block of time is indicated on the left side of the Appointments pane beside the time and by
a box in the Weekly planner.
|
The Weekly planner pane can also be used to select appointment times. |
- Enter the details of the appointment in the Appointment dialog. To
display the Appointment dialog, do one of the following:
- Click the New Appointment button:

- Move the mouse pointer into the Appointments pane, click the right mouse button, and then
select the New Appt... item.
- From the Edit menu, select the New Appt... item.
The Appointment dialog looks like this:
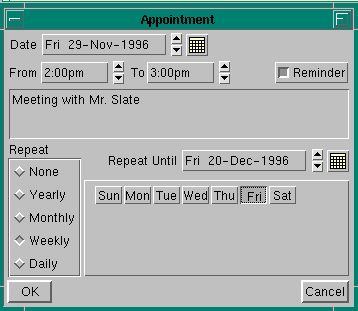
- Change or add the:
- Date- If you selected the wrong day, you can use the up/down arrows or the month icon
to select the desired date.
- Time- You can nudge the time in 5-minute intervals using the up/down arrows.
- Description- Enter the appropriate description and information about the appointment in this field.
- Repetition- If the appointment occurs on a repeated basis, DayMinder can keep track of this for you.
- To save your changes, click OK.
To leave the dialog without saving your changes, click Cancel.
Adding a Reminder to DayMinder is like adding an appointment, but in the case
of a reminder there's no specific time assigned.
- To create a Reminder, you can do one of the following:
- Select the New Reminder button:

- Move the mouse pointer into the Appointments or Reminders pane, click the right mouse button, and
select the New Reminder item.
- From the Edit menu, select the New Reminder item.
The Appointment dialog appears with the Reminder toggle "lit."
- Now enter the date and the description of the reminder.
|
You can change an appointment into a reminder (or a reminder into an appointment) by toggling the
Reminder button. |
To create a task:
- Do one of the following:
- Select the New ToDo button:

Or
- Move the mouse pointer into the Appointments, Reminders or ToDo pane,
click the right mouse button, and select the New ToDo item.
Or
- From the Edit menu, select the New ToDo... item.
The ToDo dialog appears:
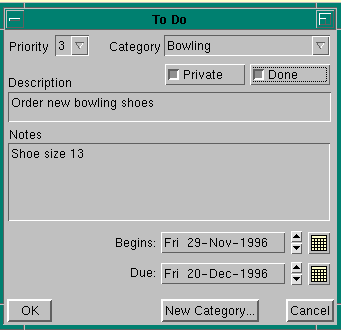
- Specify the following:
- Priority
- Choose a number between 1 and 5; priority 1 is the most
important. The default is 3.
- Category
- You can categorize your tasks by type. Use the up arrow to select the required task type.
The default is All.
You can create your own categories by selecting the New Category button.
- Description
- A description of the task.
- Notes
- A field for any other pertinent information. Notes are displayed only when you edit the task.
- Begin Date
- The start date of the task. Select the date by nudging the up/down arrows or by selecting the required
date when invoking the month icon.
- End Date
- The planned end date of the task.
- To save your changes, click OK.
To leave the dialog without saving your changes, click Cancel.
To modify a scheduled activity, select the activity or event, then do one of the following:
- Select Edit... from the Edit menu.
Or
- Click the right mouse button and select Edit... from the popup menu.
|
Some of the features in the Address Book may not be implemented at the time of release. |
You can keep track of all your friends and colleagues in the Address Book.
To bring up the Address Book, click on the Address Book icon in the
DayMinder button bar:

The Address Book looks like this:
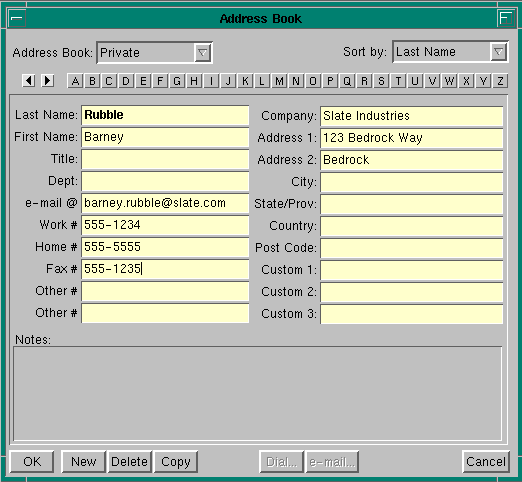
Here are the main parts of the Address Book:
- Address Book
- Lets you separate your private and business entries.
- Sort by
- Determines how to sort the entries in the Book. Default: Last Name
- Alphabet Buttons
- Let you quickly find entries by selecting the first letter.
If no entries exist for a specified tab, for example the letter Q,
the first entry under the letter R is displayed.
- OK
- Saves the current entry and exits the Address Book. By default, the Address Book always saves
the information on the screen when you move to another entry.
- New
- Brings up a blank address form.
- Delete
- Deletes the current screen entry.
- Copy
- Copies the information in the current screen entry to a new screen entry.
A plus sign (+) is appended to the last name of each copied entry to help you differentiate the entries.
- Dial
- Dials the selected number (if enabled on your system).
- e-mail
- Addresses your email message and invokes your email editor (if enabled on your system).
- Cancel
- Deletes the current entry and exits the Address Book.
|
Some of the features in the Group Planner may not be implemented at the time of release. |
You use the Group Planner to plan meetings with your colleagues.
To bring up the Group Planner, click on the Group Planner icon in the
DayMinder button bar:

Here's what your Group Planner might look like:
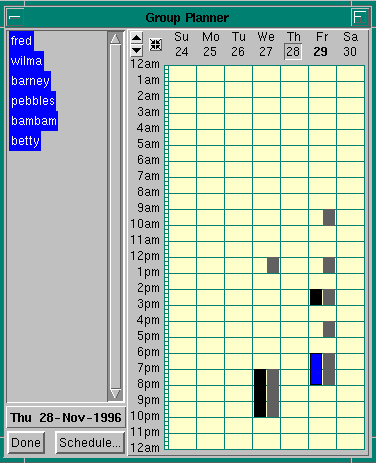
When you first bring up the Group Planner, only your activities are displayed. Black areas indicate your
scheduled appointments and blue areas indicate repeating appointments.
Empty slots are times when you are available for appointments.
When you select the name or names of the colleague(s) that you wish to plan a meeting with,
their appointments are displayed in gray.
To schedule an appointment:
- In the Group Planner week at a glance pane, select the desired block of time for your appointment.
For example, if no one has a previous appointment on Friday, November 29 at 1 pm to 2 pm,
you can schedule an appointment by:
- clicking the 1 pm start time on Friday, November 29, and
- dragging to the 2 pm end time.
- Click on the Schedule... button located on the bottom left side of the screen.
The Appointment dialog is displayed.
You use this dialog to enter the details of the appointment.
For more information on how to enter an appointment, see the section on
Adding appointments earlier in this chapter.
|
When you create an appointment using the Group Planner,
you create an appointment for yourself, not your colleagues.
|
- To exit from the Group Planner, click Done.