This chapter includes:
Printing and drawing are the same in Photon-the difference depends on the draw context, a data structure that defines where the draw stream flows:
To print in Photon:
or
A print context includes a number of members that control how printing is to be done.
 |
Don't use the members of a print context directly. Use PpPrintGetPC() to extract members, and PpPrintSetPC() to change them. |
The possible values and meanings for the members of a print context are defined in /usr/photon/print/printers - see "Setting up the printer definition file" in the Printing Support chapter of the Photon Installation and Configuration guide.
Here's an overview of what's in a print context:
If you're sending the print job directly to a printer (such as /dev/par1), set Pp_PC_FILENAME to the name of the printer (e.g. /dev/par1) and Pp_PC_DRIVER to the name of the Photon print driver that produces output the printer will recognize.
If both the device and filename members are set, the output goes to the destination identified by the filename.
If a driver is also specified, a temporary file is used to hold the raw Photon draw stream until PpPrintClose() is called, at which time the driver is launched to process the temporary file into printer-ready format in the file specified. The temporary file is removed.
If no driver is provided, the raw Photon draw stream is written to the specified file. This .phs (Photon Stream) file can be sent to any spooler that accepts the Photon draw stream, or can be given directly to any of the Photon print drivers to produce output in the proper format for a specific printer.
The page range is just a string. The application must parse it to determine which pages should be printed. For example:
| Page range | Meaning |
|---|---|
| NULL | Print all |
| "all" | Print all |
| "selection" | Print the selected items |
| "1,3-6,8,10-" | Print pages 1, 3 through 6, 8, and 10 to the end of data. |
|
If x and y scales are both 0, the source is scaled as large as possible to fit the page and still maintain its x and y aspect ratio. Most scaling can be done by adjusting the source size and leaving the scaling at 0, 0. |
The orientation of the page doesn't affect the margins.
|
The Pp_PC_CONTROL member can't be set with PpPrintSetPC(). |
The control structure has at least the following members:
Each entry indicates which context attributes were modified by that level of control. For example:
if( control->changed[PRINTER_GLOBAL] &
    (1<<Pp_PC_NAME) )
    printf( "Print name has been changed according\
 to global printer spec file\n");
if( control->emitted & (1<<Pp_PC_SOURCE_OFFSET) )
    printf( "source offset has been emitted\n");
The first step to printing in Photon is to create a print context by calling PpPrintCreatePC():
PpPrintContext_t *pc;

pc = PpPrintCreatePC();
 |
Never access the fields in a print context directly; use PpPrintGetPC() and PpPrintSetPC(). |
Once the print context is created, you must set it up properly for your printer and the options (orientation, paper size, etc.) you want to use. This can be done by any of the following:
PtPrintSelection() is a convenience function that makes it easy to choose a printer for the print context. It creates a modal dialog for printing that incorporates a PtPrintSel widget and 3 buttons:
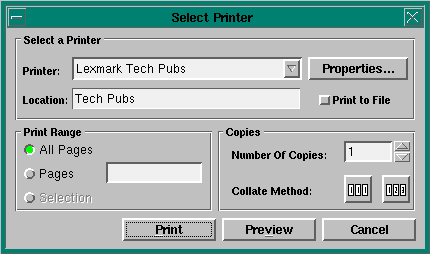
Dialog created by PtPrintSelection().
To create a print selection dialog, you can use the function:
PtPrintSelection( PtWidget_t *parent,
                  PhPoint_t *pos,
                  const char *title,
                  PpPrintContext_t *context,
                  unsigned flags );
The arguments are:
For example, if you wanted only the printer selection pane and a properties button, specify:
action = PtPrintSelection( window, NULL,
             "Demo Print Selector",
             pc, Pt_PRINTSEL_PROP_APP );
If you want all the panes but want to disable the copies pane:
action = PtPrintSelection( window, NULL,
             "Demo Print Selector", pc,
             Pt_PRINTSEL_PROP_APP |
             Pt_PRINTSEL_ALL_PANES |
             Pt_PRINTSEL_NO_COPIES );
The parent and pos parameters determine where the dialog is to appear:
| parent | pos | Position of dialog |
|---|---|---|
| NULL | NULL | Center of the screen |
| NULL | Non-NULL | pos relative to the screen |
| Non-NULL | NULL | Center of parent |
| Non-NULL | Non-NULL | pos relative to parent |
PtPrintSelection() takes a created print context and creates a dialog to allow the selection of a printer. The print context is modified depending on the options you've chosen from the dialog, such as the printer, or via the properties application. PtPrintSelection() returns a value indicating which button (Print, Preview or Cancel) was selected:
The print context that you passed is filled with the options selected from the dialog. If PtPrintSelection() returns Pt_PRINTSEL_PREVIEW or Pt_PRINTSEL_PRINT, you should begin the printing process-the print context will be set up for the selected printer:
action = PtPrintSelection(window, NULL,
             "Demo Print Selector",
             pc, Pt_PRINTSEL_DFLT_LOOK);
if (action != Pt_PRINTSEL_CANCEL)
{
       // start printing
}
The PtPrintSel widget lets you create a custom dialog for printing.
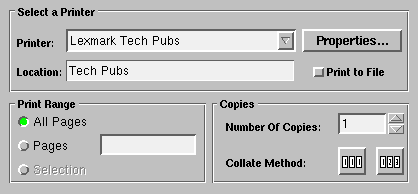
A PtPrintSel widget.
The widget has a resource for a print context, Pt_ARG_PRINT_CONTEXT, that you must set to one you've created with PpPrintCreatePC():
PtSetArg(&args[0], Pt_ARG_PRINT_CONTEXT, pc, 0);
// Set some other resources...
printsel = PtCreateWidget(PtPrintSel, window, nargs, args);
The widget automatically handles all aspects of selecting a printer and also runs the properties application to modify elements in the print context. When you're finished selecting the printer, you can get the modified print context by using PtGetResources() to get the widget's print-context resource:
// The user has finished configuring the print session.

PtSetArg(&args[0], Pt_ARG_PRINT_CONTEXT, &pc, 0);
PtGetResources(printsel, 1, args);
You can also use PpPrintSetPC() directly instead of, or in addition to, using the PtPrintSel widget or PtPrintSelection(). After creating a print context, you must select a printer:
err = PpPrintOpen(pc);
if (err == -1)
    // check errno
// succeeded
This loads the print context with the values found in your $HOME/.photon/print/config and /usr/photon/print/printers files for the default printer defined in your $HOME/.photon/print/default file.
PpPrintSetPC( pc, INITIAL_PC, 0, Pp_PC_NAME, "My printer" );
err = PpPrintOpen( pc );
if (err == -1)
    // check errno
// succeeded
This loads the print context with the values found in your $HOME/.photon/print/config and /usr/photon/print/printers files for the printer named My printer.
|
Don't set Pp_PC_DEVICE or Pp_PC_DRIVER for either method-they're set for you. |
To override any default options in the print context, set them with PpPrintSetPC() before calling PpPrintOpen(). Specify either INITIAL_PC or INTERACTIVE_PC as the mod_level argument to PpPrintSetPC(). These levels take precedence over local (PRINTER_LOCAL) and global (PRINTER_GLOBAL) options. For example:
// Create a print context before this:
short orientation = 1; // For landscape. Assume the default
                       // is 0 - portrait
int err;

...
// Set the name of the printer if you're using method 2.

// Now set the orientation.
PpPrintSetPC( pc, INITIAL_PC, 0, Pp_PC_ORIENTATION,
  &orientation );
err = PpPrintOpen( pc );
if (err == -1)
    // check errno

// Continue with printing. Your orientation option
// has been preserved
For more information, see PpPrintSetPC() in the Photon Library Reference.
If you're using an application that needs to know anything about the print context, you can use PpPrintGetPC() to get the appropriate information. For example, you may need to know the size of the margins, or the selected orientation (in order to orient your widgets properly). For an example, see the printing application prdemo.
Before printing, you must set the source size, which determines how the information is printed. For example:
72 points/inch * 8.5 inches = 612 points
When setting the source size, take the nonprintable area of the printer into account. All printers have a margin around the page that they won't print on, even if the page margins are set to 0. Therefore, the size set above is actually a bit larger than the size of a page, and the font will be scaled down to fit on the printable part of the page.
In the following example, the page size and nonprintable area are taken into account to give the proper source size and text height. Try this, and measure the output to prove the font is 1" high from ascender to descender:
#include <stdio.h>
#include <stdlib.h>
#include <Pt.h>

PtWidget_t *label, *window;
PpPrintContext_t *pc;

int quit_cb (PtWidget_t *widget, void *data,
             PtCallbackInfo_t *cbinfo )
{
    exit (EXIT_SUCCESS);
    return (Pt_CONTINUE);
}

int print_cb (PtWidget_t *widget, void *data,
              PtCallbackInfo_t *cbinfo )
{
    int action;
    PhDim_t size;
    PhRect_t const *rect;
    PhDim_t const *dim;

    action = PtPrintSelection(window, NULL,
                              "Demo Print Selector",
                              pc, Pt_PRINTSEL_DFLT_LOOK);
    if (action != Pt_PRINTSEL_CANCEL)
    {
        // Get the nonprintable area and page size.Both are in
        // 1/1000ths of an inch.
        PpPrintGetPC(pc, Pp_PC_NONPRINT_MARGINS, &rect);
        PpPrintGetPC(pc, Pp_PC_PAPER_SIZE, &dim);
        size.w = ((dim->w  -
                  (rect->ul.x + rect->lr.x)) * 72) / 1000;
        size.h = ((dim->h  -
                  (rect->ul.y + rect->lr.y)) * 72) / 1000;

        // Set the source size.
        PpPrintSetPC( pc, INITIAL_PC, 0, Pp_PC_SOURCE_SIZE,
                      &size);

        // Start printing the label.
        PpPrintOpen(pc);
        PpPrintStart(pc);

        // Damage the widget.
        PtDamageWidget(label);
        PtFlush();

        // Close the pc.
        PpPrintStop(pc);
        PpPrintClose(pc);
    }
    return (Pt_CONTINUE);
}

int main(int argc, char *argv[])
{
    PtArg_t args[10];
    PtWidget_t *print, *quit;
    PhDim_t   win_dim = { 400, 200 };
    PhPoint_t lbl_pos = {0, 0};
    PhArea_t print_area = { {130, 170}, {60, 20} };
    PhArea_t quit_area = { {210, 170}, {60, 20} };
    PtCallback_t callbacks[2] = { {print_cb, NULL},
                                  {quit_cb, NULL} };

    // Create the main window.
    PtSetArg (&args[0], Pt_ARG_DIM, &win_dim, 0);
    PtSetArg (&args[1], Pt_ARG_WINDOW_TITLE,
              "Print Example", 0);
    if ((window = PtAppInit( NULL, &argc,
                             argv, 1, args)) == NULL)
        exit (EXIT_FAILURE);

    // Create a print context.
    pc = PpPrintCreatePC();

    // Create a label to be printed.
    PtSetArg (&args[0], Pt_ARG_POS, &lbl_pos, 0);
    PtSetArg (&args[1], Pt_ARG_TEXT_STRING,
              "I am 1 inch high", 0);
    PtSetArg (&args[2], Pt_ARG_TEXT_FONT, "swiss72", 0);
    PtSetArg (&args[3], Pt_ARG_MARGIN_HEIGHT, 0, 0);
    PtSetArg (&args[4], Pt_ARG_MARGIN_WIDTH, 0, 0);
    PtSetArg (&args[5], Pt_ARG_BORDER_WIDTH, 0, 0);
    label = PtCreateWidget (PtLabel, window, 6, args);

    // Create the print button.
    PtSetArg(&args[0], Pt_ARG_AREA, &print_area, 0);
    PtSetArg(&args[1], Pt_ARG_TEXT_STRING, "Print", 0);
    PtSetArg(&args[2], Pt_CB_ACTIVATE, &callbacks[0], 0);
    print = PtCreateWidget (PtButton, window, 3, args);

    // Create the quit button.
    PtSetArg(&args[0], Pt_ARG_AREA, &quit_area, 0);
    PtSetArg(&args[1], Pt_ARG_TEXT_STRING, "Quit", 0);
    PtSetArg(&args[2], Pt_CB_ACTIVATE, &callbacks[1], 0);
    quit = PtCreateWidget (PtButton, window, 3, args);

    PtRealizeWidget(window);
    PtMainLoop();
    return (EXIT_SUCCESS);
}
You should also set the source offset, the upper left corner of what's to be printed. For example, if you have a button drawn at (20, 20) from the top left of a pane and you want it to be drawn at (0, 0) on the page, set the source offset to (20, 20). Any other widgets are drawn relative to their position from this widget's origin. A widget at (40, 40) will be drawn at (20, 20) on the page. The code is as follows:
PhPoint_t offset = {20, 20};
...
PpPrintSetPC( pc, INITIAL_PC, 0, Pp_PC_SOURCE_OFFSET,
              &offset );
Once the source size and offset have been set, you can start printing:
PpPrintOpen(pc);
PpPrintStart(pc);
PpPrintOpen() sets up the print context for printing and PpPrintStart() makes the print context active, causing all Photon draw commands to be redirected to the destination specified in the print context.
After you've made the print context active, you can start drawing widgets. This can be done by any combination of the following:
You can force a page break at any point by calling PpPrintNewPage(). Note that once you call PpPrintOpen(), any changes to the print context take effect after the next call to PpPrintNewPage().
|
If you want to print all the contents of a widget that scrolls, you'll need to do some special preparations. See "Printing scrolling widgets" below. |
For example, to print a widget B:
PtDamageWidget(B);
PtFlush();
Widget B redraws itself, and the draw commands are redirected to the destination in the print context.
Instead of damaging a widget to print it, you can call PpPrintWidget(), in which case you can specify some printing parameters:
int PpPrintWidget( PpPrintContext_t *pc,
                   PtWidget_t *widget,
                   PhPoint_t *trans,
                   PhRect_t *clip_rect,
                   ulong_t opt );
In addition to the print context and the widget, you can specify:
For example, to print a widget B (even if it hasn't been realized):
PpPrintWidget(pc, B, trans, NULL, opt);
PtFlush();
|
Be sure to call PtFlush() after calling PpPrintWidget(). |
If you want to start a new page, call
PpPrintNewPage(pc);
Any changes to the print context (such as the orientation) will go into effect for the new page.
If you want to print all the contents of a widget that scrolls, you need some special processing:
The only way to make a PtList print (or draw) all the items is by resizing it to be the total height of all the items. The easiest way is probably by using the resize policy:
|
This will work only if the total height is smaller than 65K pixels. |
Due to a bug in the resize flags of the multitext widget, the method used for PtList doesn't currently work on PtMultiText.
To print a PtMultiText widget's entire text:
Here's a callback that prints a PtMultiText widget:
int
print_multi_cb( PtWidget_t *widget, ApInfo_t *apinfo,
                PtCallbackInfo_t *cbinfo )

{
    int action;
    PhDim_t size = { 850, 1100 };
    long *num_lines;
    short *num_lines_visible;
    long  vis_lines;
    PtArg_t args[2];

    /* eliminate 'unreferenced' warnings */
    widget = widget, apinfo = apinfo, cbinfo = cbinfo;

    // These calls to PpPrintSetPC() could be done right
    // after creating the print context. Having it here lets
    // you reuse the print context.

    // Set the source resolution to be proportional to
    // the size of a page.
    PpPrintSetPC(pc, INITIAL_PC, 0,
                 Pp_PC_SOURCE_SIZE, &size);

    action = PtPrintSelection(ABW_base, NULL,
                 "Demo Print Selector", pc,
                 Pt_PRINTSEL_DFLT_LOOK);

    if (action != Pt_PRINTSEL_CANCEL)
    {
        // Start printing the pane. Note that we're using
        // the same print context for all print jobs.
        PpPrintOpen(pc);
        PpPrintStart(pc);

        // Get the number of lines and the number of visible lines.

        PtSetArg (&args[0], Pt_ARG_MULTITEXT_NUM_LINES,
                  &num_lines, 0);
        PtSetArg (&args[1], Pt_ARG_MULTITEXT_NUM_LINES_VISIBLE,
                  &num_lines_visible, 0);
        PtGetResources (ABW_multi, 2, args);

        // Save the number of visible lines ina local variable;
        // remember that num_lines_visible points into the widget's
        // internal memory.

        vis_lines = *num_lines_visible;

        // Set the number of rows to be the number of lines.

        PtSetArg (&args[0], Pt_ARG_MULTITEXT_ROWS,  *num_lines, 0);
        PtSetResources (ABW_multi, 1, args);

        // Damage the widget

        PtDamageWidget(ABW_multi);
        PtFlush();

        // Close the print context
        PpPrintStop(pc);
        PpPrintClose(pc);

        // Reset the number of rows to be the saved number of visible lines

        PtSetArg (&args[0], Pt_ARG_MULTITEXT_ROWS, vis_lines, 0);
        PtSetResources (ABW_multi, 1, args);
    }

    return( Pt_CONTINUE );
}
For a PtScrollArea, you need to print its virtual canvas, which is where all widgets created within or moved to a scroll area are placed:
PtValidParent( ABW_Scroll_area, PtWidget );
PtWidgetOffset( PtValidParent( ABW_Scroll_area,
                               PtWidget ));
PpPrintWidget( pc, PtValidParent( ABW_Scroll_area,
                                  PtWidget ),
               NULL, NULL, opt);
|
You can't print a scrollarea's virtual canvas by damaging it; you must use PpPrintWidget(). |
To suspend a print job and direct all draw events back to the graphics driver at any point after calling PpPrintStart(), call:
PpPrintStop( pc );
To resume a print job, reactivating the print context, causing draw events to be directed towards the destination specified in the print context, call:
PpPrintStart( pc );
When you're finished printing your widgets, the print context must be deactivated and closed. This is done by calling:
PpPrintStop(pc);
PpPrintClose(pc);
All draw events will be directed to the graphics driver.
|
You can reuse the print context for new print jobs, eliminating the need to create and initialize it again. |
You can have multiple print sessions and switch between them very easily. For example, to print some widgets on one printer and other widgets on a different printer:
// Create and set up pc1 and
// pc2 for separate printers

PpPrintStart(pc1);
// Print widget 1...
PpPrintStop(pc1);

PpPrintStart(pc2);
// Print widget 2...
PpPrintStop(pc2);
When printing is complete and you no longer need the print context, you can free it, which in turn frees any resources used by it.
If you want to remember any information from the print context for future use, save it by calling PpPrintGetPC() before freeing the print context. For example:
short const *orientation;
...
PpPrintGetPC( pc, Pp_PC_ORIENTATION, &orientation );
To free a print context, call:
PpPrintReleasePC( pc );
This example creates an application with a main window, and a pane with a few widgets on it. When you press the Print button, a Print Selection Dialog appears. When you select this dialog's Print or Preview button, the pane is damaged and the changes are flushed.
#include <stdio.h>
#include <stdlib.h>
#include <Pt.h>

PtWidget_t *pane, *window;
PpPrintContext_t *pc;

int quit_cb ( PtWidget_t *widget, void *data,
              PtCallbackInfo_t *cbinfo)
{
    PpPrintReleasePC (pc);
    exit (EXIT_SUCCESS);
    return (Pt_CONTINUE);
}

int print_cb ( PtWidget_t *widget, void *data,
               PtCallbackInfo_t *cbinfo)
{
    int action;

    // These calls to PpPrintSetPC() could be done right
    // after creating the print context. Having it here lets
    // you reuse the print context.
    PhDim_t size = { 850, 1100 };
    PhDim_t size2 = { 200, 150 };

    // Set the source resolution to be proportional to
    // the size of a page.
    PpPrintSetPC(pc, INITIAL_PC, 0,
                 Pp_PC_SOURCE_SIZE, &size);

    // Uncomment this to set the source size to be the size
    // of the widget. The widget will be scaled when printed.
    //PpPrintSetPC(pc, INITIAL_PC, 0,
    //             Pp_PC_SOURCE_SIZE, &size2);

    action = PtPrintSelection(window, NULL,
                 "Demo Print Selector", pc,
                 Pt_PRINTSEL_DFLT_LOOK);
    if (action != Pt_PRINTSEL_CANCEL)
    {
        // Start printing the pane. Note that we're using
        // the same print context for all print jobs.
        PpPrintOpen(pc);
        PpPrintStart(pc);

        // damage the widget
        PtDamageWidget(pane);
        PtFlush();

        // close the print context
        PpPrintStop(pc);
        PpPrintClose(pc);
    }

    return (Pt_CONTINUE);
}

int main(int argc, char *argv[])
{
    PtArg_t args[4];
    PtWidget_t *print, *quit;
    PhDim_t  win_dim = { 200, 200 };
    PhArea_t pane_area = { {0, 0}, {200, 150} };
    PhArea_t print_area = { {30, 170}, {60, 20} };
    PhArea_t quit_area = { {110, 170}, {60, 20} };
    PhArea_t cir_area = { {35, 20}, {130, 110} };
    PhArea_t cir2_area = { {67, 40}, {20, 20} };
    PhArea_t cir3_area = { {110, 40}, {20, 20} };
    PhArea_t cir4_area = { {85, 80}, {30, 30} };
    PtCallback_t callbacks[2] = { {print_cb, NULL},
                                  {quit_cb, NULL} };

    // create the main window
    PtSetArg (&args[0], Pt_ARG_DIM, &win_dim, 0);
    PtSetArg (&args[1], Pt_ARG_WINDOW_TITLE,
              "Print Example", 0);
    if ((window = PtAppInit(NULL, &argc,
                            argv, 2, args)) == NULL)
        exit (EXIT_FAILURE);

    // create a print context
    pc = PpPrintCreatePC();

    // create the pane to be printed
    PtSetArg (&args[0], Pt_ARG_AREA, &pane_area, 0);
    pane = PtCreateWidget (PtPane, window, 1, args);

    // put some stuff in the pane to be printed
    PtSetArg (&args[0], Pt_ARG_AREA, &cir_area, 0);
    PtCreateWidget (PtEllipse, pane, 1, args);

    PtSetArg (&args[0], Pt_ARG_AREA, &cir2_area, 0);
    PtSetArg (&args[1], Pt_ARG_FILL_COLOR, Pg_BLACK, 0);
    PtCreateWidget (PtEllipse, pane, 2, args);

    PtSetArg (&args[0], Pt_ARG_AREA, &cir3_area, 0);
    PtSetArg (&args[1], Pt_ARG_FILL_COLOR, Pg_BLACK, 0);
    PtCreateWidget (PtEllipse, pane, 2, args);

    PtSetArg (&args[0], Pt_ARG_AREA, &cir4_area, 0);
    PtCreateWidget (PtEllipse, pane, 1, args);

    // create the print button
    PtSetArg(&args[0], Pt_ARG_AREA, &print_area, 0);
    PtSetArg(&args[1], Pt_ARG_TEXT_STRING, "Print", 0);
    PtSetArg(&args[2], Pt_CB_ACTIVATE, &callbacks[0], 0);
    print = PtCreateWidget (PtButton, window, 3, args);

    // create the quit button
    PtSetArg(&args[0], Pt_ARG_AREA, &quit_area, 0);
    PtSetArg(&args[1], Pt_ARG_TEXT_STRING, "Quit", 0);
    PtSetArg(&args[2], Pt_CB_ACTIVATE, &callbacks[1], 0);
    quit = PtCreateWidget (PtButton, window, 3, args);

    PtRealizeWidget(window);
    PtMainLoop();
    return (EXIT_SUCCESS);
}