The Camera library provides applications with a consistent interface to interact with up to 64 cameras connected to a hardware platform—which is dependent on hardware platform limitations and resources. Each application can support up to 16 cameras. If you had 64 cameras on a system and wanted to use all 64, you could do so only if you had four applications running and each application used 16 cameras.
Architecture of the Camera library
The Camera library simplifies the process of interacting with cameras connected to your system. You can use this library to build various applications to:
- stream live video
- play prerecorded video
- record video
- encode video
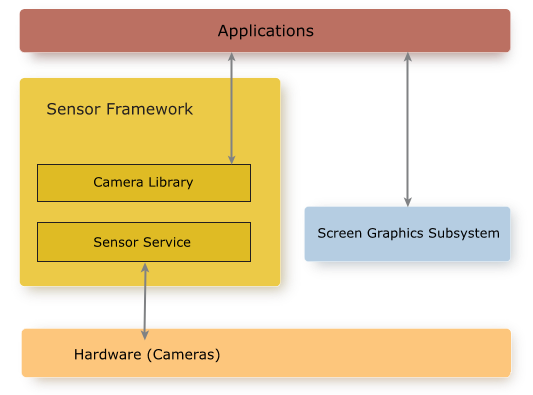
Figure 1. Camera library architecture
- Sensor service
- The Sensor service is a process that interacts
directly with the camera hardware. The service runs initially as root,
gets the required privileges, and then runs as non-root (UID/GID 521).
The camera hardware is configured in a separate configuration file. This file allows you to change settings on the camera and determines the identifiers to use when you work with the cameras using the Camera API.
The Sensor service does the following:- processes requests from applications that use the Camera library API
- tracks the permissions and access of applications to cameras in the system
- ensures that the client applications have the necessary permissions to access the camera
- manages the power to a camera based on the connections to it
- manages the camera configuration settings
The Sensor service also handles the main interactions with the framework, including interactions with the Screen service, and managing a viewfinder window and Stream object of the image buffers from a camera.
- Sensor configuration file
- A text-based file used to configure the cameras on the
target board. You can specify the name and additional metadata to
describe the position, direction, and settings of the camera.
Cameras must be configured based on the connection type.
In addition to the connection types, you can configure a file camera, which is a virtual camera that plays a video file to simulate a video stream, as if it came from a live camera. You'll find that file cameras are very useful for doing developer testing.
For more information about the configuration file, see “Sensor configuration file” in the Sensor chapter of the System Services guide for the Sensor Framework for QNX SDP.
- Camera library
- A C-based API to interface with the Camera. The library provides various high-level functions to
work with cameras, including starting/closing cameras, changing focus, zooming, etc.
The Camera library allows you to encode and decode H.264-formatted files. It also supports uncompressed video, both UCV and MOV files. The libraries required are included with your Sensor Framework installation and found in $QNX_TARGET/ARCH/libs. For example, for x86_64 targets, it would be $QNX_TARGET/x86_64/libs.
Capabilities of the Camera library
- connect and disconnect from a camera
- start and stop the viewfinder, which is our abstraction of an image buffer or a video stream
- use features on the camera, such as zoom, autofocus, auto white balance, and auto exposure
- adjust focus, exposure, and white balance algorithms by defining regions of interest, or applying manual controls
- access the stream of image buffers (framebuffers)
- encode video and save recordings to files
The Camera library doesn't automatically play audible sounds when it starts to record video. Applications must supply their own sound when a video recording starts or ends. While you can choose to not have an audible sound heard when you start or stop a recording, you are responsible to ensure that the application adheres to the local laws of the regions in which you wish to distribute it.
For example, it's illegal to mute or modify sound of a camera application in Japan and Korea, so you must comply with those laws if you distribute your software in those countries.
The Camera library lets application developers implement vision capabilities for their system. In particular, the library provides the camera input, video capture, video playback, and support for hardware-accelerated vision algorithms on supported target boards.
Interaction with other QNX components
To use the Camera library, you should have a basic understanding of how to work with the Screen Graphics Subsystem (Screen). Depending on what your application does, you may be need to have knowledge of the Screen concepts described in the sections that follow.
Camera library header files
- Screen
- This is the main interface to the Camera library. You must always include this header file to use the Camera library.
- camera_encoder.h
- This interface is used to get and set video-encoding properties.
- camera_h264avc.h
- This interface defines the encoding properties that are used with the camera_encoder.h interface.
- camera_3a.h
- This interface is used to work with various manual settings on the camera that include ISO, shutterspeeds, white balance, and aperture.
- external_camera_api.h
- This interface allows you to write your own camera driver.
Working with cameras
The Camera library supports many different cameras, such as ISPs, USB, CMOS sensors, and System on a Chip (SoC) systems. Because of this, the Camera library supports decoding and encoding on different hardware platforms and hardware platform variants. When the Sensor service runs, it knows which cameras are available based on what's specified in the sensor configuration file.
- query what cameras are available, as well as metadata (if available in the configuration file) regarding each camera
- connect to the camera
- configure the camera; that includes framerates, resolution, etc.
- perform operations with the camera, such as showing live video, recording, and encoding video
Working with image buffers
- Process the image buffers using third-party algorithms to get information about objects in the image buffers.
- Access process camera frames. You can do this using two mechanisms.
You can access them using either callbacks or events.
For more information, see
“Using callback mode” and
“Using event mode.”
In addition to accessing the camera frames, you can also access the image buffers using streams, which allows you process the image buffers using the GPU (if available on your target). This is done using streams from the Screen Graphics Subsystem. For more details, see “Using stream mode.”
- Display a live preview (unprocessed image buffers). In the context of the Camera library, we refer to this as a viewfinder. For more information, see “Viewfinder Mode.”
- Encode the image buffers to H.264-formatted frames that can be sent to another component on a network bus or saved to a file. In addition to being able to encode image buffers to a file, the Camera library allows you decode an H.264-formatted MP4 file.
- Record and play uncompressed video as both UCV and MOV files. MOV files are a standard format that can be played on a PC, however they support only RGB 32-bit and YCrYCb 4:2:2: packed formats. If the camera you use doesn't support one of those formats, you must use UCV. UCV is a proprietary format that can't be played on your PC, but you should be able to play any other video format supported by the Camera library.