The Camera example application shows you how to work with the Camera library API. The source code for this application is available.
The Camera example allows you to configure and use cameras connected to your board. You can run the Camera example using a configuration that has cameras that are specified. This application is useful to test whether cameras connected to your system work, understand camera settings, and understand how to use the various features for your cameras.
- Camera viewfinder
- This option allows you to show image buffers captured from a camera on to the display. If your camera is configured correctly, you should see at least one camera connected to your system.
- Record video to a file
- This option allows you to record the image buffers from a camera to a file
in H.264 format. You can record from only one of the cameras that's connected
to your system, even file cameras (simulated cameras).
If you record multiple times, there are multiple files
created. The files are recorded in the camera roll, which is the located at
the roll directory that's specified at the start of the Sensor service.
Note: The H.264 codec is not included in the reference image. Please contact NXP to obtain this codec.
- Camera stream
- Nothing is displayed, but you'll see the frames from the image buffers being sent and a printout indicating what the current frame rate is on the console. The code for this option demonstrates how to get buffers from a camera using the Screen Graphics Subsystem.
- Multiple camera video
- Show video from one or more cameras. You can choose which cameras to stream video from as well as encode or record the video to an H.264-encoded file (.MP4). This option synchronizes the start time so that all cameras start recording or encoding at the same time. In addition, this option stops the recording or encoding of all cameras at the same time.
- EGL viewfinder
- This option allows you to show image buffers captured from a camera on to the display, but the images are shown in a texture using the GPU.
- Event example
- Shows the video using event mode. The example sets up a pulse to be received
every time a buffer is received. The buffer is both readable and writable.
After the pulse is received, the buffer is acquired and processed by inverting only
the luma component. This makes the video show objects in their original color
with the brightness inverted. For example, a red light remains red in the video as
shown in the following illustration, however, it is dimmer than the surroundings
rather than brighter.
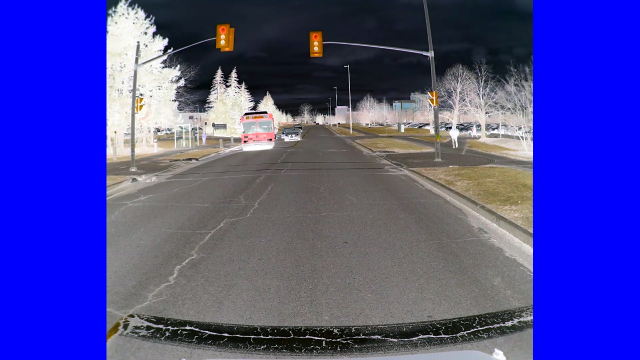 Figure 1. Inverted luma.
 - Exit the example
- Stop running the application.
Run the Camera example application
The following describes how to run the Camera example application (camera_example) that's available on the reference image.
- Connect to your board using ssh.
- If the ADAS example is running, type slay adas_example in your ssh session to stop it. The application should stop running (you see a blank display).
- Type the camera_example
to run the Camera example.
# camera_example
- 1 (Camera viewfinder)
- 1 (CAMERA_UNIT_1)
- 2 (CAMERA_VFMODE_VIDEO
- n
- n
Examples:
The following examples show how to accomplish certain tasks.
Show video from a single camera
imx8qm-mek# camera_example
Select which example you want to run:
    1) Camera viewfinder
    2) Record video to a file
    3) Camera stream
    4) Multiple camera video
    5) EGL viewfinder
    6) Event example
    x) Exit the example
1
Select which of the following 4 cameras you want to use:
    1) CAMERA_UNIT_1
    2) CAMERA_UNIT_2
    3) CAMERA_UNIT_3
    4) CAMERA_UNIT_4
Enter Choice:
1
Select which of the following VF modes you want to use:
    2) CAMERA_VFMODE_VIDEO
Enter Choice:
2
Do you want to modify the viewfinder configuration (y/n)?
n
Do you want to modify image attributes (y/n)?
n
Choose from the following options:
    i) Modify image attributes
    l) Lock 3A
    v) Modify viewfinder configuration
    x) Exit the example
x
Show video from multiple cameras
imx8qm-mek# camera_example
Select which example you want to run:
    1) Camera viewfinder
    2) Record video to a file
    3) Camera stream
    4) Multiple camera video
    5) EGL viewfinder
    6) Event example
    x) Exit the example
4
How many cameras do you want to run (1-4)?
2
Configuration for camera #1:
Select which of the following 4 cameras you want to use:
    1) CAMERA_UNIT_1
    2) CAMERA_UNIT_2
    3) CAMERA_UNIT_3
    4) CAMERA_UNIT_4
Enter Choice:
1
Do you want to modify viewfinder configuration (y/n)?
n
Configuration for camera #2:
Select which of the following 4 cameras you want to use:
    1) CAMERA_UNIT_1
    2) CAMERA_UNIT_2
    3) CAMERA_UNIT_3
    4) CAMERA_UNIT_4
Enter Choice:
2
Do you want to modify viewfinder configuration (y/n)?
n
Choose from the following options (where # is camera number):
    c#) Change video configuration of camera #
    e) Start/Stop synchronized encoding of video
    k#) Force a Key Frame on camera #
    m) Modify video group entries
    p#) Modify encoder parameters of camera #
    r) Start/Stop synchronized recording of video
    v#) Modify viewfinder configuration of camera #
    x) Exit the example
x
Example: Modify the white balance for one camera
imx8qm-mek# camera_example
Select which example you want to run:
        1) Camera viewfinder
        2) Record video to a file
        3) Camera stream
        4) Multiple camera video
        5) EGL viewfinder
        6) Event example
        x) Exit the example
1
Select which of the following 4 cameras you want to use:
        1) CAMERA_UNIT_1
        2) CAMERA_UNIT_2
        3) CAMERA_UNIT_3
        4) CAMERA_UNIT_4
1
Select which of the following VF modes you want to use:
        2) CAMERA_VFMODE_VIDEO
2
Do you want to modify the viewfinder configuration (y/n)?
n
Do you want to modify image attributes (y/n)?
n
Choose from the following options:
        i) Modify image attributes
        l) Lock 3A
        v) Modify viewfinder configuration
        w) Modify whitebalance
        x) Exit the example
w
Select the desired WB mode:
        1) Default
        2) Auto
        3) Manual (RB Gain)
3
Current value of WB red gain is 128. Do you want to change it (y/n)?
y
Select the desired WB red value within range of 1 to 1023
1023
Current value of WB blue gain is 128. Do you want to change it (y/n)?
y
Select the desired WB blue value within range of 1 to 1023
1
Choose from the following options:
        i) Modify image attributes
        l) Lock 3A
        v) Modify viewfinder configuration
        w) Modify whitebalance
        x) Exit the example
x
Select which example you want to run:
        1) Camera viewfinder
        2) Record video to a file
        3) Camera stream
        4) Multiple camera video
        5) EGL viewfinder
        6) Event example
        x) Exit the example
x
Build the Camera example application
On your host computer, the source code is provided for the Camera example application as part of a ZIP file. You can build the source and deploy the binary on to your target.
- A ZIP file installed with the QNX SDP 7.1 Sensor Framework Base is located at installation directory/source/sf-camera-examples-version.zip. You must extract it to get the ZIP file for the camera examples.
- In the extraction_directory/source_package_sf_camera directory, there's a README.txt that you can follow to build the application.
- Navigate to
extraction_directory/source_package_sf_camera/apps/sensor/camera_example/nto/aarch64/so.le
and transfer the camera_example file to the
/usr/bin/ directory on the target. For example, you
can use the QNX Momentics IDE to transfer the file. Note: Ensure that you can create a backup of the original camera_example file before you deploy your newly built version of the Camera example application.
- On your target, in a terminal connection, run the Camera example application.