This chapter tells you how to use Photon's connectivity facilities. Topics include:
In this chapter, we assume your Photon machine is a node on a QNX network. If not, then you won't be able to use the features discussed in this chapter. But feel free to continue reading to learn more about Photon's unique connectivity features for future reference.
Connectivity is a two-way street-the remote node you want to connect to must be running Photon. Also, you must have the appropriate filesystem permissions on the remote Photon device (i.e. /dev/photon). If you have only read (but not write) permission, then you can view but not interact with the remote Photon.
 |
For information about your filesystem permissions, see your system administrator. |
Photon includes a handy "sticky note" utility that lets you post a to-do list or free-form text message on your workspace. You can also pass the note to another Photon user.
To post a note on your workspace:

You'll see a bright yellow note, like this:
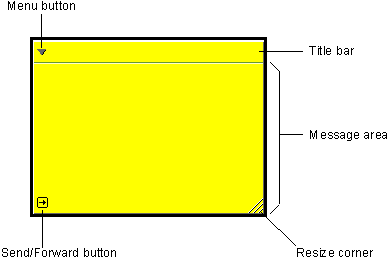
If you want to move the note on your workspace, put your pointer in the title bar and drag the note wherever you want-it will stick when you release the mouse button.
To resize the note, simply grab the resize corner (bottom right) and drag the note in the direction you want to shrink or stretch it.
|
The Message Pad facility doesn't save messages. As soon as you close the Message Pad, the contents of your messages disappear. |
The menu button also contains a convenient Tips item if you need help.
Suppose you were using the Message Pad to jot down some important design ideas, and you wanted your teammate to see what you just wrote. Instead of shouting "Hey Betty, come and see this!" (not very effective, especially if her office is on another floor), you could simply send your sticky note right to Betty's screen.
When Betty gets your note, she could forward it-along with her annotations-to Fred's screen. And so on.
|
Although you'll find Message Pad quite useful, it's not meant to be a substitute for email; it lacks (among other things) the record-keeping functions of a true email system. |
To send a message to another Photon user:
|
After you've entered a name/node pair, the Message Pad saves this information so that next time you can just type the person's name and the message will be transported immediately. |
If you try to send the message to a person who isn't running Photon, the note will stay on your screen and won't be transported.
You can also type a node number in the Name field if you're sending a one-time message and there's no need to save the person's name.
The recipient will see:

To reply to the sender's message:
To forward a message to another user, simply add your comments in the message area and then click on the Send/Forward button (bottom left). You'll be prompted to enter the user's name in the Fwd: box.
Sending messages back and forth from one user to another may seem somewhat simplistic. But imagine being able to send applications! Photon's unique Jump Gate connectivity is akin to the transport technology at work in the Message Pad utility, but on a much larger and more powerful scale.
A Jump Gate is a transport link (either LAN or modem) between computers. You can send a Photon application running on your workspace to another user's workspace, making Jump Gates ideal for worksharing or "groupware" applications.
Jump Gates are also the perfect tool for remote diagnostics and technical support. You can go though a Jump Gate in order to "be" at another user's workspace, so you can see and control the application that's running there.
To send an application to another user:

The icon becomes an animated image.
 |
Although the application window disappears from your workspace when you send an application, the application itself is still running on your machine and will die if you power down. |
For quick, convenient jumps, you can set up node-specific Jump Gates in order to bypass the Transport Node dialog.
When you set up a node-specific Jump Gate, you'll create a new icon in the Applications tab. Follow these steps:
|
To ensure speed, it's a good idea to enter a fully qualified path for the node number. For example: //250/dev/photon. |
If you've used QNX before, you may be familiar with the Ditto utility, which lets you view and interact with a remote user's text-based applications. Photon provides a graphical Ditto that lets you view and interact with another Photon user's display.
In Photon, sending an application to another user and dittoing another user are similar-both operations use Jump Gates as the transport link. But there's a difference: When you send, you're sending a single application to another user; when you ditto another user, you're interacting with the other user's entire screen, which may have several applications up and running!
To ditto another Photon user's display:
|
If you click twice on a node-specific Jump Gate, then you won't be prompted for a node number. |
You're now "at" the remote user's workspace. You can now share the remote workspace with the remote user (provided you have the appropriate permissions).
For more information see the phditto utility, and the section on "Viewing/Using remote Photon sessions" in the Configuring Photon chapter, in the Photon Installation & Configuration guide.
To end your ditto session, press Alt -F4 simultaneously.
Phindows, an optional Photon product, lets you run the Photon environment as an application on the MS-Windows desktop.
Phindows lets you interact with Photon from MS-Windows by means of a utility called phrelay.
The phrelay utility captures Photon draw events and relays them across a transport such as TCP/IP or a serial line. Phindows, which resides on the target system, takes the incoming phrelay protocol commands and then uses MS-Windows draw routines to display on the MS-Windows desktop.
If you're a Photon developer, your customers may be wedded to MS-Windows. That's okay, because if you have Phindows, they can keep Windows!
You can take advantage of Phindows yourself. For example, let's say you often use a word processor or spreadsheet package under MS-Windows. If you use NFS or SMB to cross-connect your MS-Windows and QNX filesystems, you could then use Phindows to edit, compile, and even test your Photon applications right from your MS-Windows machine!
PhinX, an optional Photon product, lets you run the Photon environment as an application on the X Window System. As a result, you can take full advantage of the rich variety of tools available under X as you develop or use your Photon applications.