This chapter covers the basics of using Photon. Topics include:
To start Photon, enter the following at the QNX system prompt:
ph
 |
If your Photon system has been set up to start automatically at power up, you won't need to enter the ph command. But you may need to enter your user ID and password in the Photon login dialog. |
When Photon starts for the first time, you'll see a dialog for selecting display preferences:
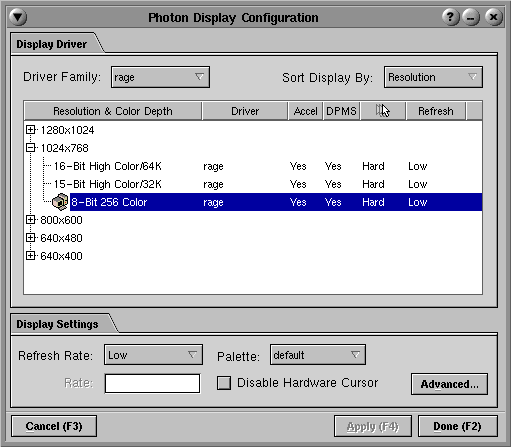
Choose a graphics setting that best suits your desired working environment. The default setting is a "safe" choice determined by Photon when scanning your hardware. Typically, you'll choose the highest resolution and color depth that your hardware supports. For detailed instructions, see "Changing the graphics resolution and color depth" in the Customizing Photon chapter.
After Photon has started, it displays a workspace, an area in which you can run applications and display windows. Here's a typical Photon workspace, with some sample applications:
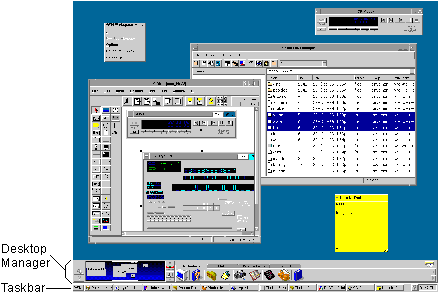
Photon actually works with a much larger area than your screen; your desktop consists of nine workspaces or consoles. This is somewhat like your physical desk-the entire desktop is usually bigger than the area you're currently using.
Near the bottom of the screen you see the Photon Desktop Manager (PDM), a convenient tool for launching applications, navigating around the Photon desktop, and more. For more info on using this tool, see the chapter on the Photon Desktop Manager.
At the very bottom of the screen, you see the Taskbar, which shows you at a glance all the applications running on your entire desktop and lets you quickly switch from one application to another. To learn how to use the Taskbar, see "Using the Taskbar" in this chapter.
Two common mouse operations are:
|
Whenever you see the word "click" or "drag" in Photon documentation, and no mouse button is specified, use the LEFT mouse button. When you're supposed to use the right button, you'll be explicitly instructed to do so. |
You use the left mouse button for most operations (such as clicking on a button or dragging an object).
You use the right mouse button to bring up a context-sensitive menu in most applications. For example, you use it to bring up:
When running the Photon Desktop Manager and Window Manager with a three-button mouse, use the far-left button as "left" and the far-right button as "right." Applications that make use of the middle button will tell you how to use it.
As you move the mouse, the pointer sometimes changes to give you feedback on your actions. Here are the pointers you'll see most often:


Here's a typical Photon application window:
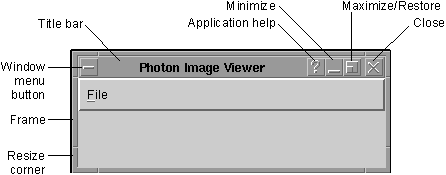
Most windows include these elements:
To bring up an application's Window menu:

Or
The Window menu lets you:
 |
Selecting the Close item may immediately terminate the application running in that window without prompting you to confirm. Always remember to save your work before you click on Close! |
The Taskbar provides a quick and easy way to switch from one application to another, to restore applications to their normal size on the workspace, to get help, and to tell the time.

The Taskbar includes the following:
As you run more and more applications, the Taskbar fills up. When there's no more room for a button, all the buttons get smaller, down to a set minimum width. Then they start on another row, which is hidden. To see the other row:
The expanded Taskbar looks like this:

To switch to any running application:
 |
Click on the application's button in the Taskbar. The application's window will be restored if minimized, brought to the front, and become the focus window. |
If you click on the button of the application that's in focus, the application is minimized.
|
If you hide the Taskbar (see "Setting workspace options" in the Customizing Photon chapter), it will reappear temporarily whenever you move the pointer to the very bottom of your workspace. |
To set the time, double-click the clock button on the Taskbar.
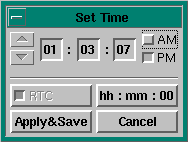
The time is separated into three fields: hours, minutes, and seconds. To change the time:
The RTC option sets the clock chip. This option may be disabled on your system. The hh:mm:00 button sets the seconds field to 00.
The following tables summarize the keyboard shortcuts you can use for:
|
If the Alt keychords listed below don't work, it may be because
some character-based applications need to receive Alt key presses.
To run such an application successfully, you need to configure its
pterm window to pass the Alt to the application. See
"Configuring
pterm" in the Terminal Window chapter.
To use the following keychords after doing this, press Ctrl -Alt instead of just Alt. |
| If you want to: | Press: |
|---|---|
| Move back window to the front of the window stack. | Alt -Esc |
| Move front window to the back of the window stack. | Alt -Shift -Esc |
| Cycle through applications, showing the name first; to bring a displayed application to the front, release Alt. | Alt -Tab |
| Cycle though applications, but moving front to back. | Alt -Shift -Tab |
| Display Workspace Menu. | Alt -Enter |
| Toggle between bringing the Taskbar and Desktop Manager to the front and sending them to the back. If they were hidden, they'll be brought to the front. | Alt -F11 |
| Exit Photon (see "How to exit Photon"). | Ctrl -Alt -Shift -Backspace |
All of these commands affect the focus window:
| If you want to: | Press: |
|---|---|
| Move the window to the front. | Alt -F2 |
| Move the window to the back. | Alt -F3 |
| Close the window. | Alt -F4 |
| Restore the window to previous size if it has been maximized. | Alt -F5 |
| Move the window. | Alt -F7 |
| Resize the window (use the mouse or cursor keys to choose the new size). | Alt -F8 |
| Minimize the window. | Alt -F9 |
| Maximize the window. | Alt -F10 |
| Display the window menu. | Alt -Space |
| Close the window menu. | Esc |
Common User Access (CUA) is a standard that defines how a user can change the keyboard focus within a window.
Here are two of the more common CUA keys:
| To go to the: | Press: |
|---|---|
| Next button or text field | Tab |
| Previous button or text field | Shift -Tab |
Photon is equipped with a very versatile and easy-to-use clipboard. It lets you cut, copy, and paste between text fields and pterm. You can also copy from the Helpviewer, but it supports only full-line copying.
You can use either the mouse or keyboard to cut, copy, and paste to and from the clipboard.
| If you want to: | Keyboard actions: | Mouse actions: |
|---|---|---|
| Select a section of text. | Hold the Shift key down and use the arrow keys to highlight the desired text. | Press the left mouse button and drag the mouse to highlight the desired text. |
| Cut a section of selected text. | Ctrl -X or Ctrl -Alt -X | n/a |
| Copy a section of selected text. | Ctrl -C or Ctrl -Alt -C | While holding the left mouse button down, press the right mouse button. |
| Paste a section of selected text. First, give focus to the field where you want to paste the text, then do the correct keyboard or mouse action. | Ctrl -V or Ctrl -Alt -V | Hold the Ctrl key down and press the right mouse button. |
| If you want to: | Keyboard actions: | Mouse actions: |
|---|---|---|
| Select a section of text. | n/a | Press the left mouse button and drag the mouse to highlight the desired text. |
| Copy a section of selected text. | Ctrl -Alt -X | While holding the left mouse button down, press the right mouse button. |
| Paste a section of selected text. First, give focus to the field where you want to paste the text, then: | Ctrl -Alt -V | Hold the Ctrl key down and press the right mouse button. |
|
You can also press the right mouse button that invokes the pterm menu containing
the copy and paste options. For more information, see
"Using the pterm menu" in the
Terminal Window chapter.
See the pterm utility in the Photon Installation & Configuration guide for a the complete list of pterm-specific keychords. |
There are two ways to exit Photon: via the mouse or the keyboard.
|
Exiting Photon will close all the windows, terminating the applications running in them without prompting you to confirm. If this is a problem, you should exit your applications one at a time before exiting Photon. |
To exit Photon with the mouse:
Or
|
The shutdown dialog doesn't appear if the PHWMEXIT environment variable is set. For more information, see your system administrator. |
You can also use the following keychord to exit Photon:
Ctrl -Alt -Shift -Backspace
|
The shutdown dialog doesn't appear when you use this keychord. |