![[Previous]](prev.gif) |
![[Contents]](contents.gif) |
![[Index]](keyword_index.gif) |
![[Next]](next.gif) |
|
|
|
|
 |
This version of this document is no longer maintained. For the latest documentation, see http://www.qnx.com/developers/docs. |
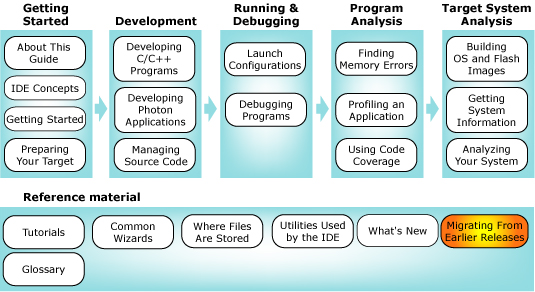
You can select a topic from this diagram:
You can easily migrate your old workspace and projects to this release.
In this chapter:
Upgrading from 6.3.2 to 6.4.0 of the IDE involves two basic steps:
Step 1 -- converting your development workspace to be compliant with the latest version of the IDE framework. The IDE performs this process automatically at startup when it detects an older workspace version.
 |
You can redirect the IDE to point at different workspaces by launching it with this command:
qde -data path_to_workspace |
Optional Step 2 -- converting your individual managed make projects. For more information, see "Creating a make project".
|
Upgrading from earlier versions to 6.3.2 requires that you upgrade your projects to IDE 4.0.1, and then follow the two step migration process (above) to upgrade to IDE 4.5. For additional information about migrating, see "Migrating from 6.3.2 to 6.4.0." |
When migrating to IDE 4.5, you might encounter the following issues:
The IDE has the following changes with respect to co-existence:
The IDE includes the following changes to its compilers:
After you import a project from IDE 4.0.1, if the compiler is not 4.2, the IDE will detect it and automatically change it for you.
To use the new version of libc.so, you'll need to update your buildfiles to use libc.so.3 instead of libc.so.2. For additional information, see the Release Notes.
In addition to the many fixes and enhancements to the QNX IDE plugins, this version of the QNX IDE Tool Suite includes the features from the Eclipse 3.3 and CDT 4.0 integration.
When creating projects, you no longer need to select between Standard and Managed C and C++ project. You simply select a C or C++ project, and the IDE launches the CDT new project wizard. In this wizard, you can pick between different project types. Makefile projects are almost the same as Standard Make projects. The main addition with Makefile projects is the ability to tell the CDT which tool chain you are using which will help the CDT with various tasks such as source navigation into system header files. All other project types are the same as Managed Make projects in IDE 4.0.1.
|
When upgrading your IDE 4.0.1 projects to IDE 4.5, all 4.0.1 projects should successfully upgrade except for managed make projects. For managed make projects, you will receive an error message. For information about creating this type of project, see below. |
You can continue to create a typical make project using the C or C++ wizard.
The result is an empty make project, which is similar to the Set QNX Environment action in previous IDE releases.
To create a make file that can be launched outside the IDE:
As a result, the IDE generates a number of .mk files, and a top level make file for each processed configuration (the last one in the configuration folder). This make file can be processed from command line using make utility:
make -f [configuration]/makefile [target]
For more information about using the CDT new project wizard, see "Creating a C/C++ project", "Creating a target project", "Converting projects", and "Importing projects".
For a list of new workbench features, see "What's New in 3.0" in the Workbench User Guide ().
For a list of new CDT features, see "What's new in the CDT?" in the C/C++ Development User Guide ().
In addition to information about "migrating your workspace" and "your projects", this section includes some "issues" you might run into.
Previously, the IDE was installed separately under C:/Program Files/QNX Software Systems. Now, the IDE is installed as part of the QNX Software Development Platform.
In 6.4.0, your workspace is located in home_directory/ide-4.5-workspace on Linux, and C:\ide-4.5-workspace on Windows, and in 6.3.2 it was $HOME/QNX630/ide-4-workspace.
Because of the internal data structure changes, launch configurations created with an older version of the IDE won't automatically switch to the Debug perspective when used as a debug configuration.
To fix this problem:
If you're missing new features in context menus, such as the ones available in the C/C++ Projects perspective, or if you're missing views, you need to reset your perspective.
To reset your perspective, follow the instructions in the "Migrating your workspace" section.
By default, the QNX System Builder perspective's Console view doesn't automatically switch to the front when building. In the new IDE, changed views change the style of the view title.
If you prefer the old behavior and want the Console view to automatically come to the front during a build:
When you load an existing project that was created with an older version of the IDE, the IDE updates the project to take advantage of the new features. This can cause problems if you try to load the project into an older version of the IDE.
If you plan to revert to an older version of the IDE, you need to make a backup copy of your workspace before using the new version of the IDE.
|
Don't use cp to back up your workspace under Windows; use xcopy or an archiving/backup utility. |
You can also import an existing project to an older version of the IDE:
When you migrate your workspace and projects from version 6.3.2 (IDE 4.0.1) to version 6.4.0 (IDE 4.5), there are two areas that require updating:
Your workspace is automatically upgraded the first time you launch the new IDE. This process is entirely automated and cannot be prevented. If you need to revert to an older version of the IDE, be sure to read the "Reverting to an older IDE" section.
You might receive an error message during this process with the following text:
"Could not restore Workbench layout. Reason: Problems occurred restoring workbench."
This message is caused by internal changes to many of the perspectives commonly used for C/C++ development. You can safely ignore this error.
To prevent this error from displaying when you load the IDE (and to prevent a similar error when you exit the IDE):
|
This error reappears later if you open a perspective that's currently closed, but that had been used at some point in the older IDE. Use this same process to remove the error message. |
Resetting the existing perspectives also gives you full access to all of the new features available in views that were open in those perspectives.
Note the following:
|
Many project options have changed from the QNX Momentics Development Suite version 6.3.x (and earlier) to QNX Momentics Software Development Platform version 6.4.0. Although the conversion process attempts to maintain configuration options, you should verify your individual project files to make sure any new settings have been initialized to the values you want. |
Like your existing workspace, your projects are automatically upgraded to take advantage of the new IDE, except for managed make projects.
|
If you want to use any of your existing managed make projects created in earlier versions of the IDE in QNX Momentics IDE version 4.5, these projects can't automatically be converted. You'll need to create a new managed make project in QNX Momentics IDE version 4.5 for each project you want to convert, and then copy the source code directly to the new project. |
To complete the migration of your projects to the new IDE:
|
|
|
|