This chapter covers the following topics:
To customize your Photon workspace, you use two facilities:

The Photon Window Manager menu lets you set several options that control how windows behave and appear on your workspace.
To set a workspace option:
Or
Position your pointer anywhere on the workspace background and click the right mouse button.
The following dialog appears:
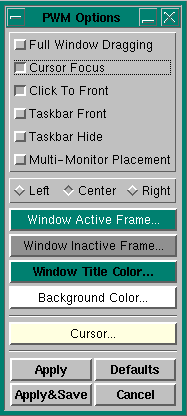
You'll see a toggle button beside each option in the dialog. You enable an option by clicking on its toggle button, and disable it by clicking again. If a button appears pressed in, you know the option is enabled.
At the bottom of the dialog are four buttons:
Here are the options you can set:
 |
Make sure your pointer is on the focus window when you're entering text. If it's not, the characters you type won't appear in the window. |
|
If you hide the Taskbar, it will reappear temporarily whenever you move the pointer to the very bottom of your workspace. To keep the Taskbar on your workspace, just click again on the Taskbar Hide toggle button. |
|
If you want to specify the background color in this way, turn off any backdrops. See "Using the Configuration tool" for more information. |

The Configuration tool lets you set up the Desktop Manager to suit your needs. The tool also lets you select backdrops and screen savers for your workspace.
When you click on the Configuration tool, the following dialog appears:
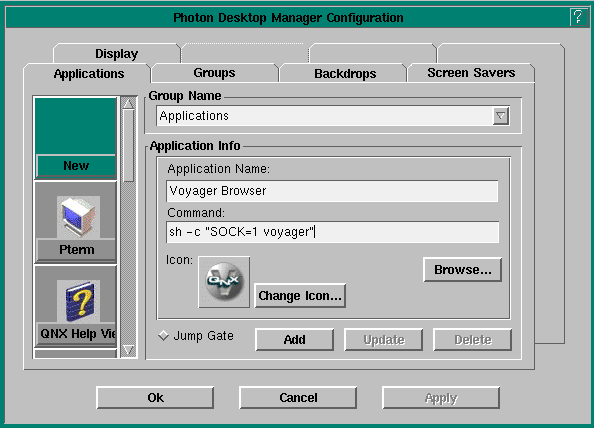
You'll find the following folders in the Configuration tool dialog:
To change any of the default settings, simply:
|
You can enter shell (sh) commands in the Command field. For
example, the following command runs Voyager in compact mode in a shell:
sh -c "SOCK=1 voyager" |
Here's a simple exercise to show you how to use the Configuration tool. We'll change the workspace backdrop image.
When you start Photon for the first time, you'll be presented with the following dialog to choose display preferences for your workstation (you can also use the Display folder in PDM's Configuration tool, or select Configure Display... from the PWM menu to display this dialog at any time):
|
The list of available graphics modes displayed in the following dialog will most likely be different from those on your machine. |
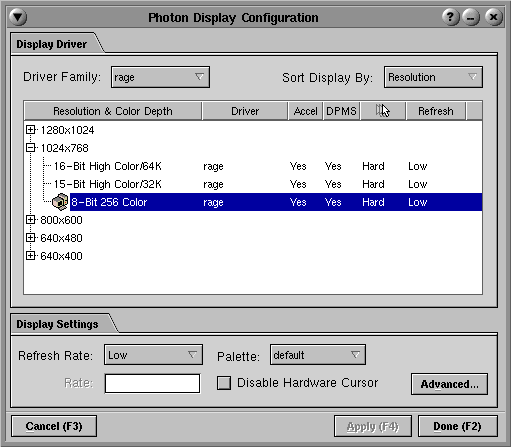
The initial settings are the result of a hardware scan Photon did during the installation. The default selection is a "safe" choice based on this scan; you'll probably want to choose something better. The hardware detection program presents only options that correspond to the kind of graphics card you have. To save these initial settings, choose the Done button.
Photon supports the following settings for the color depth, depending on the capabilities of your graphics card:
| Number of colors | Number of bits |
|---|---|
| 16 million | 32 |
| 16 million | 24 |
| 64,000 | 16 |
| 32,000 | 15 |
| 256 | 8 |
| 16 | 4 |
| monochrome | 1 |
Choose the best one!
The resolution setting that's currently in effect for your type of display is shown by an icon to the left of the setting. The default setting is 256 color with a 640*480 resolution.
The type of graphics card Photon detected is one of a family of cards that are listed in the Driver Family list (top left corner). One card may support different families, such as generic drivers. A driver can be selected using the Driver Family button.
The refresh rate determines how often the image on your display is redrawn. Selecting a higher refresh rate can produce a better screen image with less flicker, but it may slow down some graphics cards. The options include:
 |
Setting the refresh value incorrectly can damage your monitor. Consult your monitor and video card manuals first. |
The color palette is used by 256- and 16-color graphics drivers. It provides the base set of colors a graphics driver can use to display images on your screen.
Click the button beside the Palette field to choose from a list of palette files. All palette files are kept in the /usr/photon/palette directory. The default setting is symbolically linked to the photon11.pal file. For a life-like rendering of flesh tones, try portrait.pal.
If you want Photon to automatically launch an application at startup, add the name of the application's executable to your $HOME/.photon/phapps configuration file.