Next, use the QNX Momentics IDE to create your QNX Neutrino RTOS target system as a VM.
- on Windows, choose from the Start menu, where X contains the minor version number followed by the build number and timestamp, such as 0.00319T202003251340A. You can also click the desktop icon with the same label, which is added when you install the QNX Momentics Tool Suite.
- on Linux, run IDE_base_dir/qde,
where IDE_base_dir is where you installed the IDE package
Note: This path is probably different from that for QNX SDP 7.0. In QNX SDP 7.0, the default path is ~/qnx/qnxmomentics/qde, but in SDP 7.1, it's ~/qnxmomenticside/qde.
- on macOS, click the icon labelled QNX Momentics IDE from the launchpad; this icon is added when you install the QNX Momentics Tool Suite
The first time you start the IDE, it asks you to choose a
workspace, a folder where it can store your projects and other files.
The IDE then displays its Welcome page.
When you're ready to start, click the Workbench icon in the upper right corner:
![]()
If you plan to use VirtualBox as the VM platform and it's your first time using VirtualBox on your development host, you likely have to create a network interface. For information on doing so, see the mkqnximage description in the Utilities Reference. If you don't create a network interface, when the IDE finishes creating the VM and tries to start it on the target, the VM will fail to boot and the IDE will output a vague error message.
QNX recommends using VirtualBox version 6.1.18 (or earlier) or 6.1.32 (or later).
To access your target system from the IDE and run programs on it, you have to create a target connection.
Click on the on: box in the launch bar at the top of the IDE, and select
New Launch Target.

Select QNX Virtual Machine Target in the list of target types. This tells the IDE to set up a target system by generating a VM that runs QNX Neutrino. Then, click Next.
In the New QNX Virtual Machine Target window, configure the settings as needed. This includes selecting the VM platform and target CPU architecture, which determine the type of VM generated (e.g., an x86_64 machine that runs in VMware software).
To run the target VM, you must have the appropriate platform software on your development host. For instance, if you select VMware for the VM platform, you must have VMware Workstation Player (or Workstation Pro or Fusion Pro) so the generated VM can run.
There are only certain combinations of host OS, VM platform, and target CPU architecture that are officially supported in this release. For a table listing of all supported combinations, see the “Description” section in the mkqnximage entry.
Click Finish. The IDE generates the VM and displays the new target in the launch target list. You can now specify this target as the destination for your programs to run.
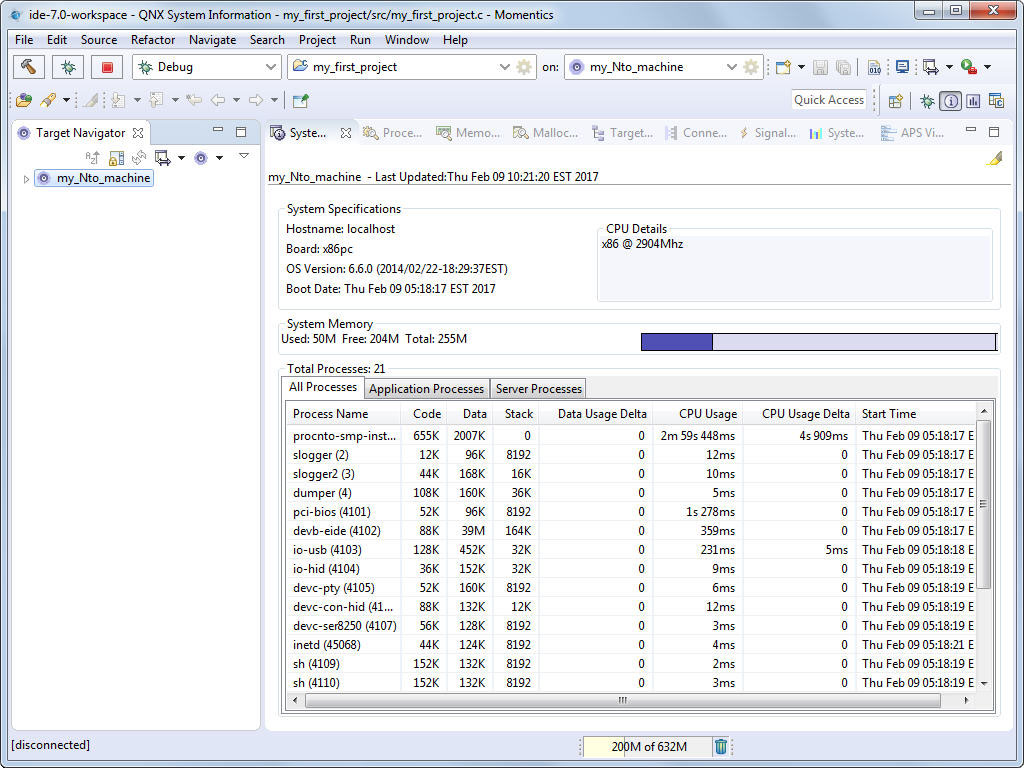
If you want to see what's running on the target, open the System Information perspective by clicking on its
icon ( )
in the right side of the toolbar, then select your new target in the Target Navigator view.
You'll notice the qconn process, which allows your target system
to respond to requests from the development environment. This utility is included by the IDE when it generates the VM.
In the System Summary view,
you will see a list of all processes in your QNX Neutrino RTOS system:

The views (the tabs at the top) provide other information and you can find even more views in the Window menu under Show View.