The C/C++ Build panel displays builder-specific properties. From this panel, you can define these properties through the Builder settings, Behavior, and Refresh Policy tabs.
At the top of the panel, for all tabs, the Configuration dropdown list lets you select a build configuration. The settings you define in the other fields will then be applied to that configuration only.
Build configurations are based on the architecture of the target platform (e.g., x86, ARM) and whether a Debug or Release binary is generated. A Debug configuration lets you see what's going on inside a program as it executes. A Release configuration creates applications with the best performance.
Builder settings
From this tab, you can define preferences for the builder-specific project settings.
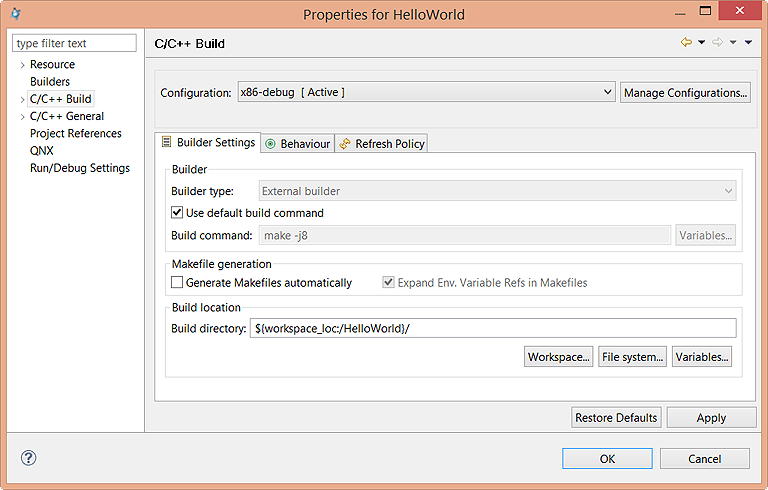
- Builder type
- Specifies the type of builder to use: Internal builder, which builds C/C++ programs using a compiler that implements the C/C++ Language Specification, or External builder, which lets you use external tools to configure and run programs and use Ant buildfiles with Workbench. With the latter selection, the tools can be run at a later time to perform a build.
- Use default build command
- When enabled, this option indicates that you want to use the default make command. When disabled, it indicates the use of a new make command. This option is only available when the Builder type option is set to External builder.
- Build command
- Specifies the default command used to start the build utility for your specific toolchain. Use this field if you want to use a build utility other than the default make command. This field is active only when Use default build command is not selected. When you use an external builder or a custom makefile, you can provide your own build commands.
- The IDE provides the following button to help
you fill in this field:
- Variables
- Opens the Select build variable dialog where you can add environment variables and custom variables to the build command.
- Generate Makefiles automatically
- When selected, Eclipse changes between two different CDT modes: either it uses the customer's Makefile for the build if one exists, or it generates Makefiles for the user. By default, this option is set.
- Env. Variable Refs in Makefiles
- When Generate Makefiles automatically is selected, you can toggle the Env. Variable Refs in Makefiles field to indicate whether environment variables (${VAR}) should be expanded in the Makefile. This option is set by default.
- Build directory
- Defines the location where the build operation takes place. This location will contain the generated artifacts from the build process. This option is disabled when the Generate Makefiles automatically option is enabled.
- The IDE provides the following buttons to help
populate the text field:
- Workspace
- Opens the Folder Selection dialog where you can select a workspace location for the project. This is the directory that will contain the plug-ins and features to build, including any generated artifacts. This button is only visible when Generate makefiles automatically is not selected.
- File system
- Opens the filesystem navigator where you can specify another filesystem to use. This button is only visible when Generate makefiles automatically is not selected.
- Variables
- Opens the Select build variable dialog where you can select a variable to specify as an argument, or create and configure simple build variables which you can reference in some build configurations. This button is only visible when Generate makefiles automatically is set not selected.
Behavior
From this tab, you can define settings related to the build behavior of your project.
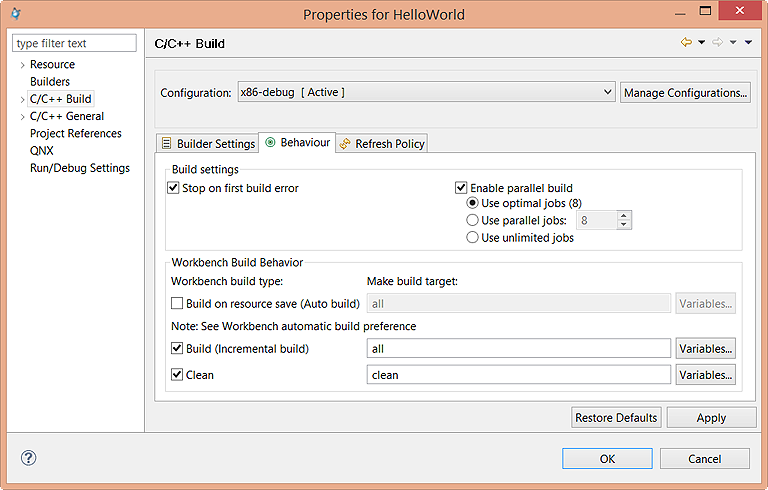
- Stop on first build error
- Stops building when Eclipse encounters an error. Note that this option is helpful for building large projects because it tells make to continue executing other independent rules even when one rule fails.
- Enable parallel build
- This option enables parallel builds. If you enable this option, you must
determine the number of parallel jobs to perform:
- Use optimal jobs — Lets the system determine the optimal number of parallel jobs to perform.
- Use parallel jobs — Lets you specify the maximum number of parallel jobs to perform.
- Use unlimited jobs — Lets you specify there's no limit on the number of parallel jobs to perform.
- Workbench Build Behavior
- By default, the builder uses these settings when instructed to build, rebuild, clean, and so on. You can change these settings so that new projects can use different targets if these defaults are not appropriate.
- Build on resource save (Auto build)
- When selected, builds your project whenever resources are saved. This option is on by default. If you require more control over when builds occur (for example, when a build should wait until you finish a large assortment of changes), disable this option and manually invoke builds yourself.
- To build your project when resources are saved and change the default make build target, enable the Build on resource save (Auto Build) option and specify a new build target in the Make build target field.
- The IDE provides the following button to help
you fill in this field:
- Variables
- Opens the Select build variable dialog where you can add environment variables and custom variables to the build command.
- Build (Incremental build)
- Defines what the builder calls when an incremental build is performed. When this option is enabled, an incremental build occurs, meaning that only resources that have changed since the last build are rebuilt. If this option is disabled, a full build occurs, meaning that all resources within the scope of the build are rebuilt.
- To change the build default make target, enable the Build (Incremental build) option and specify a new target in the Make build target field. You can use variables, as described above.
- Clean
- Defines what the builder calls when a clean is performed. The make clean command is defined in the Makefile.
- To change the rebuild default make target, enable the Clean option and specify a new target in the Make build target field. You can use variables, as described above.
Refresh Policy
From this tab, you can specify which resources will be refreshed after the project is built.
Note that this feature applies only to external builders.
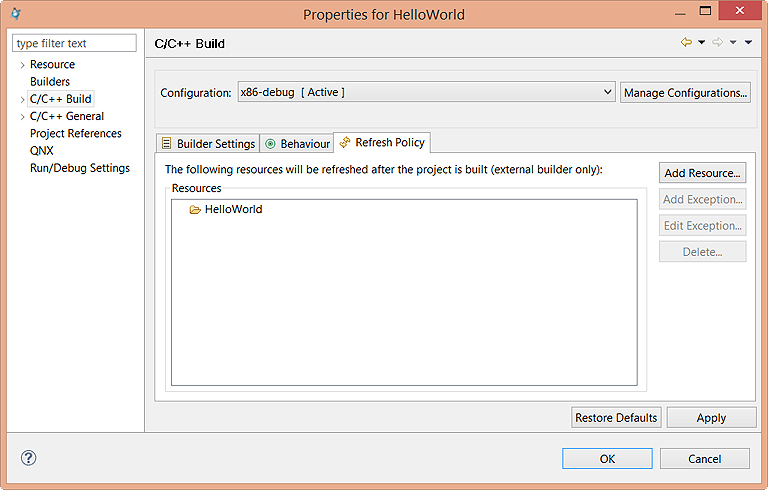
The Add Resource button on the right opens the Resource Selection dialog. This window lists the projects in the current workspace. Check the boxes next to any projects that you want to include in the resource refresh list, then click OK to close the dialog.
You can add exceptions to prevent certain components within resources from being refreshed. To do so, select a resource and click Add Exception to bring up a popup window that lets you define the list of individual exceptions (through the Add and Remove buttons on the right). When you click Add, another popup window appears; this window lets you select individual components within a project, to prevent them from being refreshed automatically. After you've defined the exceptions, click OK in the Add Exception dialog to return to the Properties dialog.
You can select an existing exception and click Edit Exception to bring up the same popup window so you can reconfigure the exception at any time.
The Delete button lets you delete any selected resource or exception.