The IDE offers built-in features to simplify the job of building OS and flash images for embedded systems.
To create an image, you first need to understand the components of an image
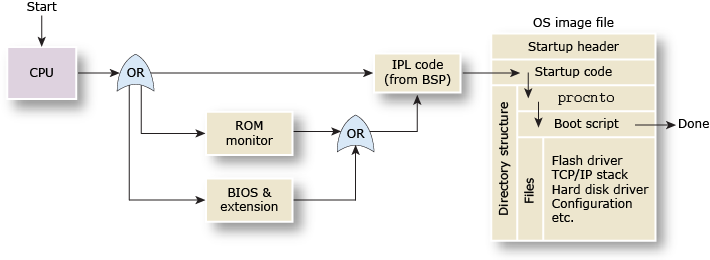
as well as the boot process. The following diagram illustrates the boot sequence:
-
Initial code execution at reset vector
The processor executes code at the reset vector, which is the fixed address at which the processor looks for code when it's first powered on.
This code could be a BIOS, ROM monitor, or an IPL. If it's a BIOS, it finds and jumps to a BIOS extension (for example, a network boot ROM or disk controller ROM), which loads and jumps to the IPL code. If it's a ROM monitor, typically uboot, it too jumps to the IPL code.
The Initial Program Loader (IPL) code configures the hardware so the startup program can run. This entails selecting the chip and setting up the RAM. The IPL then locates the image and transfers control to the startup program in it.
An image is a file that contains the OS, your executables and libraries, and any data files related to your programs. You can think of the image as a filesystem; it contains a directory structure and some files.
Startup program execution
The startup program configures the system, including timers, interrupt controllers, and cache controllers, then transfers control to the microkernel and process manager module, procnto. For more information, see the Startup Programs chapter in Building Embedded Systems.
Kernel module (procnto) and embedded system setup
The procnto module sets up the kernel and loads the drivers and applications in the image. This second task involves running a script that contains the commands that start the drivers and processes in your embedded system. The files included in this script are those specified by the mkifs buildfile, as explained in "Buildfiles".