 |
You should use widgets whenever possible because they do all of the above themselves. |
This chapter describes:
The Pg routines in the Photon library are the lowest-level drawing functions. They're used by the widget library to draw the widgets. You can use the Pg functions in a Photon application, but your application has to:
|
You should use widgets whenever possible because they do all of the above themselves. |
If your application must do its own drawing, you should use the PtRaw widget. It does the following:
To create a PtRaw widget in PhAB, click on its icon in the widget palette:

Position it where you want your drawing to appear.
You can provide various functions for the PtRaw widget; they're called in the order given below when the widget is realized, and are then called as necessary:
Most of the time you'll need to specify only the drawing function (see below). You can use PhAB's function editor (described in the Editing Resources and Callbacks in PhAB chapter) to edit these resources — but you must give the raw widget a unique instance name first. You can also set these resources in your application's code; for more information, see “Function resources” in the Manipulating Resources in Application Code chapter.
For information on PtRaw's resources, see the Photon Widget Reference.
When you create a PtRaw widget in PhAB and edit its Pt_ARG_RAW_DRAW_F function, you'll see default code like this:
void my_raw_draw_fn( PtWidget_t *widget,
                     PhTile_t *damage )
{
    PtSuperClassDraw( PtBasic, widget, damage );
}
The call to PtSuperClassDraw() (described in the Building Custom Widgets guide) invokes PtBasic's draw function, which draws the raw widget's borders, fills the widget, and so on, as specified by its resources. The raw widget can do all this by itself, but using PtSuperClassDraw() reduces the complexity of the raw drawing function.
There are several things to consider in the raw drawing function:
These are described below, followed by some examples of simple drawing functions.
|
Don't call
PtBkgdHandlerProcess()
in a
PtRaw
widget's drawing function.
Don't change any other widget in any way (creating, destroying, setting resources, and so on) in a raw widget's drawing function. It's safe to get resources from other widgets. Don't call the drawing function directly from your program. Instead, damage the widget by calling PtDamageWidget(), and let the library call the drawing function. |
You can determine the raw widget's canvas by calling PtCalcCanvas() as follows:
PhRect_t  raw_canvas;

PtCalcCanvas (widget, &raw_canvas);
You'll need this canvas to perform any required translations and clipping.
The origin for the drawing primitives is the upper left corner of the raw widget's parent's canvas. You'll probably find it easier to use the upper left corner of the raw widget's canvas as the origin.
Once you've determined the raw widget's canvas, you can do one of the following:
PhPoint_t    c1 = { 80, 60 };
PhPoint_t    r = { 72, 52 };

c1.x += raw_canvas.ul.x;
c1.y += raw_canvas.ul.y;
PgSetFillColor(Pg_YELLOW);
PgDrawEllipse ( &c1, &r, Pg_DRAW_FILL );
This is the preferred method.
PhPoint_t    c1 = { 80, 60 };
PhPoint_t    r = { 72, 52 };

PgSetTranslation (&raw_canvas.ul, Pg_RELATIVE);

PgSetFillColor(Pg_YELLOW);
PgDrawEllipse ( &c1, &r, Pg_DRAW_FILL );
|
Be sure to restore the old translation before leaving the raw widget's
drawing function. Here's one way to do it:
/* Restore the translation by subtracting the
   coordinates of the raw widget's canvas. */

raw_canvas.ul.x *= -1;
raw_canvas.ul.y *= -1;
PgSetTranslation (&raw_canvas.ul, Pg_RELATIVE);
|
As mentioned above, it's possible to draw beyond the raw widget's extent in its drawing function, but it's not a good thing to do:
It's possible to write the drawing function so that clipping isn't needed, but it can make your code more complicated. For example, if you try to write text that extends beyond the raw widget's canvas, you might need to draw partial letters. You'll also have to consider what happens if the user changes the size of the raw widget.
It's much easier to use PtClipAdd() to set the clipping area to be the raw widget's canvas and let the graphics driver restrict the drawing:
PtClipAdd ( widget, &raw_canvas);
Before leaving the drawing function, call PtClipRemove() to reset the clipping area:
PtClipRemove ();
If your raw widget's drawing function takes a lot of time, you might not want to redraw the entire canvas when a small portion of it has been damaged. You can speed up the repairs by using the drawing function's damage argument.
The damage argument is a pointer to a linked list of PhTile_t structures (see the Photon Library Reference), each of which includes these members:
The damaged areas are relative to the raw widget's disjoint parent (usually a PtWindow widget). Use PtWidgetOffset() to obtain the offset.
If there's more than one tile in the linked list, the first one covers the entire area covered by the rest. Either use the first tile and ignore the rest, or ignore the first and use the rest:
void rawDrawFunction (PtWidget_t *widget,
                      PhTile_t *damage)
{
  if (damage->next != NULL) {

    /* If there's more than one tile, skip the first. */

    damage = damage->next;
  }

  while (damage != NULL) {

    /* Examine 'damage' to see if any drawing
       needs doing:
         damage->rect.ul.x, damage->rect.ul.y,
         damage->rect.lr.x, damage->rect.lr.y */

    …
    damage = damage->next;  /* Go on to the next tile. */
  }
}
The following functions (described in the Photon Library Reference) work with tiles:
If the contents of the raw widget are static, you can call the Pg drawing primitives directly from the raw drawing function. If the contents are dynamic, you'll need to define a data structure or model that describes them.
The structure of the model depends on your application; the raw drawing function must be able to traverse the model and draw the required graphics. Use the raw widget's Pt_ARG_USER_DATA or Pt_ARG_POINTER resource to save a pointer to the model.
This drawing function draws a couple of ellipses, one of which is clipped:
void my_raw_draw_fn( PtWidget_t *widget,
                     PhTile_t *damage )
{
   PhRect_t     raw_canvas;
   PhPoint_t    c1 = { 80, 60 };
   PhPoint_t    c2 = { 30, 210 };
   PhPoint_t    r = { 72, 52 };

   PtSuperClassDraw( PtBasic, widget, damage );
   PtCalcCanvas(widget, &raw_canvas);

   /* Set the clipping area to be the raw widget's
      canvas. */

   PtClipAdd ( widget, &raw_canvas);

   /* Draw the ellipses. */

   c1.x += raw_canvas.ul.x;
   c1.y += raw_canvas.ul.y;
   PgSetFillColor(Pg_YELLOW);
   PgDrawEllipse ( &c1, &r, Pg_DRAW_FILL );

   c2.x += raw_canvas.ul.x;
   c2.y += raw_canvas.ul.y;
   PgSetFillColor(Pg_RED);
   PgDrawEllipse ( &c2, &r, Pg_DRAW_FILL );

   /* Reset the clipping area. */

   PtClipRemove ();
}
This function is the same, but it sets the translation:
void my_raw_draw_fn( PtWidget_t *widget,
                     PhTile_t *damage )
{
   PhRect_t     raw_canvas;
   PhPoint_t    c1 = { 80, 60 };
   PhPoint_t    c2 = { 30, 210 };
   PhPoint_t    r = { 72, 52 };

   PtSuperClassDraw( PtBasic, widget, damage );
   PtCalcCanvas(widget, &raw_canvas);

   /* Set the clipping area to be the raw widget's
      canvas. */

   PtClipAdd ( widget, &raw_canvas);

   /* Set the translation so that drawing operations
      are relative to the raw widget's canvas. */

   PgSetTranslation (&raw_canvas.ul, Pg_RELATIVE);

   /* Draw the ellipses. */

   PgSetFillColor(Pg_YELLOW);
   PgDrawEllipse ( &c1, &r, Pg_DRAW_FILL );

   PgSetFillColor(Pg_RED);
   PgDrawEllipse ( &c2, &r, Pg_DRAW_FILL );

   /* Restore the translation by subtracting the
      coordinates of the raw widget's canvas. */

   raw_canvas.ul.x *= -1;
   raw_canvas.ul.y *= -1;
   PgSetTranslation (&raw_canvas.ul, Pg_RELATIVE);

   /* Reset the clipping area. */

   PtClipRemove ();
}
Colors are specified in the Photon microGUI with the PgColor_t type. The library and graphics drivers interpret this data type according to the current color model (described in the documentation for PgColor_t).
The default color model, Pg_CM_PRGB, uses a 32-bit Red-Green-Blue (RGB) representation:
| Reserved | Red | Green | Blue |
|---|---|---|---|
| 0000 0000 | rrrr rrrr | gggg gggg | bbbb bbbb |
Macros for the most commonly used colors are defined in <photon/Pg.h>.
Although PgColor_t uses 32 bits, only 24 bits are used per color. This representation is called true color. The Photon microGUI is a true-color windowing system; it uses this 24-bit RGB representation internally.
Most graphics cards currently use true color (24 bits) or high color (16 bits). However, some graphics drivers take advantage of the palette on older palette-based cards.
The following datatypes and functions that deal with color are described in the Photon Library Reference:
When doing raw drawing, you can set various attributes, including fonts, palettes, fill colors, line colors and styles, and text colors. The attributes that you set affect all raw drawing operations until you set them again. For example, the line color affects all lines, pixels, and bitmaps that you draw using the drawing primitives.
|
You don't need to set these attributes if you're using widgets; the
drawing attributes are set based on the widgets' definitions and resources.
However, in all other cases you should set these attributes before you begin drawing. The defaults are undefined and drawing before setting the relevant attributes may produce unexpected results. |
The functions that set general drawing attributes are:
The text attributes affect all the text that you draw by calling the drawing primitives described in “Text,” below. The functions that set text attributes are:
The fill attributes affect all the drawing that you do by calling the primitive functions described in
The functions that set fill attributes are:
The stroke attributes affect all the drawing that you do by calling the primitive functions described in
The functions that set stroke attributes are:
The Photon libraries include a number of primitive functions that you can use to draw shapes, including:
|
Don't use these drawing primitives in an interface that uses widgets;
widgets redisplay themselves when damaged, so anything drawn on top
of them disappears.
To display arcs, lines, etc. in an interface:
|
By using each primitive's flags, you can easily draw an outline (stroke), draw the filled “inside” (fill), or draw both as a filled outline.
The current fill and stroke attributes are used. For more information, see “Drawing attributes,” earlier in this chapter.
| To: | Set flags to: |
|---|---|
| Fill the primitive, using the current fill attributes | Pg_DRAW_FILL |
| Outline the primitive, using the current stroke attributes | Pg_DRAW_STROKE |
| Fill the primitive and outline it, using the current fill and stroke attributes | Pg_DRAW_FILL_STROKE |
The mx versions of these functions place the address of the primitive into the draw buffer in your application's data space. When the draw buffer is flushed, the primitive is copied to the graphics driver. The non-mx versions copy the primitive itself into the draw buffer.
You can draw rectangles, using the current drawing attributes, by calling PgDrawIRect() or PgDrawRect().
PgDrawRect() uses a PhRect_t structure (see the Photon Library Reference) for the rectangle coordinates, while PgDrawIRect() lets you specify the coordinates individually. Use whichever method you want.
The following example draws a rectangle that's filled, but not stroked (i.e. it has no border):
void DrawFillRect( void )
{
    PgSetFillColor( Pg_CYAN );
    PgDrawIRect( 8, 8, 152, 112, Pg_DRAW_FILL );
}
If you wish, you can call PgDrawRect() instead:
void DrawFillRect( void )
{
    PhRect_t rect = { {8, 8}, {152, 112} };

    PgSetFillColor( Pg_CYAN );
    PgDrawRect( &rect, Pg_DRAW_FILL );
}
The following example draws a stroked, unfilled rectangle:
void DrawStrokeRect( void )
{
    PgSetStrokeColor( Pg_BLACK );
    PgDrawIRect( 8, 8, 152, 112, Pg_DRAW_STROKE );
}
This code draw a stroked, filled rectangle:
void DrawFillStrokeRect( void )
{
    PgSetFillColor( Pg_CYAN );
    PgSetStrokeColor( Pg_BLACK );
    PgDrawIRect( 8, 8, 152, 112, Pg_DRAW_FILL_STROKE );
}

Filled and stroked rectangles.
Rounded rectangles are programmed almost the same way as rectangles — just call PgDrawRoundRect() with a PhPoint_t parameter to indicate, in pixels, the roundness of the rectangle corners. The radii are truncated to the rectangle's sides.
The following example draws a black rounded rectangle with five pixels worth of rounding at the corners:
void DrawStrokeRoundRect( void )
{
    PhRect_t rect = { {20, 20}, {100, 100} };
    PhPoint_t radii = { 5, 5 };

    PgSetStrokeColor( Pg_BLACK );
    PgDrawRoundRect( &rect, &radii, Pg_DRAW_STROKE );
}
PgDrawBevelBox() draws a beveled box, which is a special type of rectangle:
This code draws a dark grey beveled box with a green and red bevel that's four pixels wide:
void DrawBevelBox( void )
{
    PhRect_t r = { 8, 8, 152, 112 };
    PgSetFillColor( Pg_DGREY );
    PgSetStrokeColor( Pg_RED );
    PgDrawBevelBox( &r, Pg_GREEN, 4, Pg_DRAW_FILL_STROKE );
}
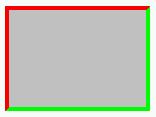
A beveled box.
You can call PgDrawBeveled() to draw a beveled rectangle (optionally with clipped or rounded corners) or a beveled arrow. If you draw a rectangle with square corners, the results are the same as for PgDrawBevelBox(). Here's some code that draws clipped and rounded rectangles, and a set of arrows:
void DrawBeveled() {

    PhRect_t clipped_rect = { {10, 10}, {150, 62} };
    PhRect_t rounded_rect = { {10, 67}, {150, 119} };
    PhPoint_t clipping = { 8, 8 };
    PhPoint_t rounding = { 12, 12 };

    PhRect_t rup    = { {190, 20}, {230, 40} };
    PhRect_t rdown  = { {190, 90}, {230, 110} };
    PhRect_t rleft  = { {165, 45}, {185, 85} };
    PhRect_t rright = { {235, 45}, {255, 85} };

    /* Draw beveled rectangles: one clipped, one rounded. */

    PgSetFillColor( Pg_GREEN );
    PgSetStrokeColor( Pg_GREY );
    PgDrawBeveled( &clipped_rect, &clipping, Pg_BLACK, 2,
                   Pg_DRAW_FILL_STROKE | Pg_BEVEL_CLIP );
    PgDrawBeveled( &rounded_rect, &rounding, Pg_BLACK, 2,
                   Pg_DRAW_FILL_STROKE | Pg_BEVEL_ROUND );

    /* Draw beveled arrows. */

    PgSetFillColor( Pg_CYAN );
    PgSetStrokeColor( Pg_GREY );
    PgDrawBeveled( &rup, NULL, Pg_BLACK, 2,
                   Pg_DRAW_FILL_STROKE | Pg_BEVEL_AUP );
    PgDrawBeveled( &rdown, NULL, Pg_BLACK, 2,
                   Pg_DRAW_FILL_STROKE | Pg_BEVEL_ADOWN );
    PgDrawBeveled( &rleft, NULL, Pg_BLACK, 2,
                   Pg_DRAW_FILL_STROKE | Pg_BEVEL_ALEFT );
    PgDrawBeveled( &rright, NULL, Pg_BLACK, 2,
                   Pg_DRAW_FILL_STROKE | Pg_BEVEL_ARIGHT );
}
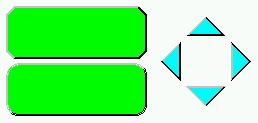
Beveled rectangles and arrows.
If you want to draw an arrow that fits inside a given rectangle (for example, the arrow for a scrollbar), call PgDrawArrow().
You can create polygons by specifying an array of PhPoint_t points. If you use Pg_CLOSED as part of the flags, the last point is automatically connected to the first point, closing the polygon. You can also specify points relative to the first point (using Pg_POLY_RELATIVE).
The following example draws a blue-filled hexagon with a white outline:
void DrawFillStrokePoly( void )
{
    PhPoint_t start_point = { 0, 0 };
    int num_points = 6;
    PhPoint_t points[6] = {
        { 32,21 }, { 50,30 }, { 50,50 },
        { 32,59 }, { 15,50 }, { 15,30 }
    };

    PgSetFillColor( Pg_BLUE );
    PgSetStrokeColor( Pg_WHITE );
    PgDrawPolygon( points, num_points, start_point,
        Pg_DRAW_FILL_STROKE | Pg_CLOSED );
}
Polygons that overlap themselves are filled using the so-called even-odd rule: if an area overlaps an odd number of times, it isn't filled. Another way of looking at this is to draw a horizontal line across the polygon. As you travel along this line and cross the first line, you're inside the polygon; as you cross the second line, you're outside. As an example, consider a simple polygon:
Filling a simple polygon.
This rule can be extended for more complicated polygons:
Filling an overlapping polygon.
The PgDrawArc() function can be used for drawing:
You can also call PgDrawEllipse() to draw an ellipse.
The start and end angles of arc segments are specified in binary gradations (bi-grads), with 65536 bi-grads in a complete circle.
To draw a full circle or ellipse, specify the same value in bi-grads for the start and end angles. For example:
void DrawFullCurves( void )
{
    PhPoint_t circle_center  = { 150, 150 },
              ellipse_center = { 150, 300 };
    PhPoint_t circle_radii  = { 100, 100 },
              ellipse_radii = { 100, 50 };

    /* Draw a white, unfilled circle. */
    PgSetStrokeColor( Pg_WHITE );
    PgDrawArc( &circle_center, &circle_radii, 0, 0,
        Pg_DRAW_STROKE | Pg_ARC );

    /* Draw an ellipse with a white outline, filled
       with black. */
    PgSetFillColor( Pg_BLACK );
    PgDrawArc( &ellipse_center, &ellipse_radii, 0, 0,
        Pg_DRAW_FILL_STROKE | Pg_ARC );
}
To draw a chord (a curve with the end points connected by a straight line), add Pg_ARC_CHORD to the flags parameter. For example:
void DrawChord( void )
{
PhPoint_t center = { 150, 150 };
PhPoint_t radii = { 100, 50 };
/* Draw an elliptical chord with a white outline,
filled with black. The arc is drawn from 0 degrees
through to 45 degrees (0x2000 bi-grads). */
PgSetStrokeColor( Pg_WHITE );
PgSetFillColor( Pg_BLACK );
PgDrawArc( ¢er, &radii, 0, 0x2000,
Pg_DRAW_FILL_STROKE | Pg_ARC_CHORD );
}
Similarly, to draw a pie section or curve, add Pg_ARC_PIE or Pg_ARC to the flags. For example:
void DrawPieCurve( void )
{
    PhPoint_t pie_center = { 150, 150 },
              arc_center = { 150, 300 };
    PhPoint_t pie_radii  = { 100, 50 },
              arc_radii  = { 50, 100 };

    /* Draw an elliptical pie with a white outline,
       filled with black. */

    PgSetStrokeColor( Pg_WHITE );
    PgSetFillColor( Pg_BLACK );
    PgDrawArc( &pie_center, &pie_radii, 0, 0x2000,
        Pg_DRAW_FILL_STROKE | Pg_ARC_PIE );

    /* Draw a black arc. */
    PgSetStrokeColor( Pg_BLACK );
    PgDrawArc( &arc_center, &arc_radii, 0, 0x2000,
        Pg_DRAW_STROKE | Pg_ARC );
}

Filled and stroked arcs.
If the shape you want to draw can't be expressed as any of the other shapes that the Photon microGUI supports, you can draw it as a series of spans by calling PgDrawSpan().
This function takes as one of its arguments an array of PgSpan_t records. The members are:
Lines and pixels are drawn using the current stroke state (color, thickness, etc.). The drawing primitives are:
The following example draws red, green, and blue lines:
void DrawLines( void )
{
    PgSetStrokeColor( Pg_RED );
    PgDrawILine( 8, 8, 152, 8 );
    PgSetStrokeColor( Pg_GREEN );
    PgDrawILine( 8, 8, 152, 60 );
    PgSetStrokeColor( Pg_BLUE );
    PgDrawILine( 8, 8, 152, 112 );
}
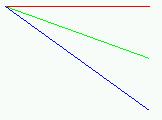
Lines created by the drawing primitives.
There are various routines that draw text, depending on your requirements:
Text is drawn using the current text attributes; for more information, see “Text attributes,” above. If you set flags to Pg_BACK_FILL, the text's extent is filled according to the current fill attributes (see “Fill attributes”). If you define an underline with PgSetUnderline(), the underline is drawn under the text and on top of the backfill.
For example, to print black text in 18-point Helvetica:
void DrawSimpleText( void )
{
    char *s = "Hello World!";
    PhPoint_t p = { 8, 30 };
    char Helvetica18[MAX_FONT_TAG];

    if(PfGenerateFontName("Helvetica", 0, 18,
                          Helvetica18) == NULL) {
        perror("Unable to generate font name");
    } else {
        PgSetFont( Helvetica18 );
    }
    PgSetTextColor( Pg_BLACK );
    PgDrawText( s, strlen( s ), &p, 0 );
}
To print black text on a cyan background:
void DrawBackFillText( void )
{
    char *s = "Hello World!";
    PhPoint_t p = { 8, 30 };
    char Helvetica18[MAX_FONT_TAG];

    if(PfGenerateFontName("Helvetica", 0, 18,
                          Helvetica18) == NULL) {
        perror("Unable to generate font name");
    } else {
        PgSetFont( Helvetica18 );
    }
    PgSetTextColor( Pg_BLACK );
    PgSetFillColor( Pg_CYAN );
    PgDrawText( s, strlen( s ), &p, Pg_BACK_FILL );
}
To print black text with a red underline:
void DrawUnderlineText( void )
{
    char *s = "Hello World!";
    PhPoint_t p = { 8, 30 };
    char Helvetica18[MAX_FONT_TAG];

    if(PfGenerateFontName("Helvetica", 0, 18,
                          Helvetica18) == NULL) {
        perror("Unable to generate font name");
    } else {
        PgSetFont( Helvetica18 );
    }
    PgSetTextColor( Pg_BLACK );
    PgSetUnderline( Pg_RED, Pg_TRANSPARENT, 0 );
    PgDrawText( s, strlen( s ), &p, 0 );
    PgSetUnderline( Pg_TRANSPARENT, Pg_TRANSPARENT, 0 );
}
To print black text with a red underline on a cyan background:
void DrawBackFillUnderlineText( void )
{
    char *s = "Hello World!";
    PhPoint_t p = { 8, 30 };
    char Helvetica18[MAX_FONT_TAG];

    if(PfGenerateFontName("Helvetica", 0, 18,
                          Helvetica18) == NULL) {
        perror("Unable to generate font name");
    } else {
        PgSetFont( Helvetica18 );
    }
    PgSetTextColor( Pg_BLACK );
    PgSetFillColor( Pg_CYAN );
    PgSetUnderline( Pg_RED, Pg_TRANSPARENT, 0 );
    PgDrawText( s, strlen( s ), &p, Pg_BACK_FILL );
    PgSetUnderline( Pg_TRANSPARENT, Pg_TRANSPARENT, 0 );
}
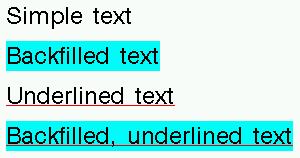
Text created by the drawing primitives.
Bitmaps are drawn using the current text state. If you set flags to Pg_BACK_FILL, the blank pixels in the image are drawn using the current fill state. The drawing primitives for bitmaps are:
This example draws the bitmap with a transparent background:
void DrawSimpleBitmap( void )
{
    PhPoint_t p = { 8, 8 };

    PgSetTextColor( Pg_CELIDON );
    PgDrawBitmap( TestBitmap, 0, &p, &TestBitmapSize,
                  TestBitmapBPL, 0 );
}

A bitmap with a transparent background.
This example draws the bitmap against a yellow background:
void DrawBackFillBitmap( void )
{
    PhPoint_t p = { 8, 8 };

    PgSetTextColor( Pg_CELIDON );
    PgSetFillColor( Pg_YELLOW );
    PgDrawBitmap( TestBitmap, Pg_BACK_FILL, &p,
                  &TestBitmapSize, TestBitmapBPL, 0 );
}

A backfilled bitmap.
This section discusses:
The Photon microGUI supports these main types of images:
Direct-color images have a type that starts with Pg_IMAGE_DIRECT_.
Palette-based images have a type that starts with Pg_IMAGE_PALETTE_.
You can define any image by its pixel size, bytes per line, image data, and format. Images can be stored in structures of type PhImage_t (described in the Photon Library Reference). The type field of this data structure identifies the type of image.
Palette-based images provide a fast, compact method for drawing images. Before drawing a palette-based image, you must set either a hard palette or soft palette to define the colors for the image.
Setting a hard palette changes the physical palette. All colors set with a PgSetFillColor() function are chosen from this palette. Other processes continue to choose colors from the Photon microGUI's global palette and may appear incorrect. When you release the hard palette, the other processes return to normal without being redrawn. You should always release the hard palette when your window loses focus.
Setting a soft palette lets you redefine how colors are interpreted for the given draw context without changing the physical palette. All colors in the soft palette are mapped to the physical palette.
|
If your physical palette uses more colors than your graphics card supports, some colors are dropped, and the image won't look as nice. |
The image data (either bytes or nibbles) is an index into the current palette. For example:
PgColor_t   ImagePalette[256];
char       *ImageData;
PhPoint_t   ImageSize;
int         ImageBPL;

void DrawYourImage( PhPoint_t pos )
{
     PgSetPalette( ImagePalette, 0, 0, 256,
                   Pg_PALSET_SOFT );
     PgDrawImage( ImageData, Pg_IMAGE_PALETTE_BYTE, pos,
         ImageSize, ImageBPL, 0 );
}
With direct-color images, every pixel can be any color. But compared to palette-based images, the image data is larger and the image may take longer to draw. You can choose from several types of direct-color images, listed in the description of PhImage_t in the Photon Library Reference; each has a different image-pixel size and color accuracy.
With gradient-color images, colors are algorithmically generated as a gradient between two given colors.
To create a PhImage_t structure:
Or:
Or:
Or:
Or:
|
It's better to call PhCreateImage() than to allocate the structure and fill it in by hand. Not only does PhCreateImage() provide the convenience of setting up a blank image, but it also observes the restrictions that the graphics drivers impose on image alignment, and so on. |
The image_tag and palette_tag members of the PhImage_t structure are used for caching images when dealing with remote processes via phrelay (see the QNX Neutrino Utilities Reference) for example, when using phindows.
These tags are cyclic-redundancy checks (CRCs) for the image data and the palette, and can be computed by PtCRC() or PtCRCValue() If these tags are nonzero, phindows and phditto cache the images. Before sending an image, phrelay sends its tag. If phindows finds the same tag in its cache, it uses the image in the cache. This scheme reduces the amount of data transmitted.
|
You don't need to fill in the tags if the images don't need to be saved in the cache. For example, set the tags to 0 if you're displaying animation by displaying images, and the images never repeat. |
PxLoadImage() and ApGetImageRes() set the tags automatically. PhAB generates the tags for any images generated through it (for example, in the pixmap editor).
If you want parts of an image to be transparent, you can:
Or:
Chroma is accelerated by most hardware, whereas transparency bitmaps are always implemented in software.
To make a given color transparent in an image, using chroma if possible, call PhMakeTransparent(), passing it the image and the RGB color that you want to be made transparent.
The transparency mask is stored in the mask_bm member of the PhImage_t structure. It's a bitmap that corresponds to the image data; each bit represents a pixel:
| If the bit is: | The corresponding pixel is: |
|---|---|
| 0 | Transparent |
| 1 | Whatever color is specified in the image data |
The mask_bpl member of the PhImage_t structure specifies the number of bytes per line for the transparency mask.
You can build a transparency mask by calling PhMakeTransBitmap().
|
If you use PxLoadImage() to load a transparent image, set PX_TRANSPARENT in the flags member of the PxMethods_t structure. If you do this, the function automatically makes the image transparent; you don't need to create a transparency mask. |
There are various ways to display an image:
To draw the image repeatedly, call PgDrawRepPhImage() or PgDrawRepPhImagemx().
To draw a rectangular portion of the image, call PgDrawPhImageRectmx().
To draw the image repeatedly, call PgDrawRepImage() or PgDrawRepImagemx()
The mx versions of these functions place the address of the image into the draw buffer in your application's data space. When the draw buffer is flushed, the entire image is copied to the graphics driver. The non-mx versions copy the image itself into the draw buffer.
You can speed up the drawing by using shared memory. Call PgShmemCreate() to allocate the image data buffer:
my_image->image = PgShmemCreate( size, NULL );
If you do this, the image data isn't copied to the graphics driver.
The following functions let you manipulate images:
The PhImage_t structure includes a flags member that can make it easier to release the memory used by an image. These flags indicate which members you would like to release:
Calling PhReleaseImage() with an image frees any resources that have the corresponding bit set in the image flags.
|
|
The flags for images created by ApGetImageRes(), PiCropImage(), PiDuplicateImage(), PiFlipImage(), and PxLoadImage() aren't set. If you want PhReleaseImage() to free the allocated members, you'll have to set the flags yourself:
my_image->flags = Ph_RELEASE_IMAGE |
                 Ph_RELEASE_PALETTE |
                 Ph_RELEASE_TRANSPARENCY_MASK |
                 Ph_RELEASE_GHOST_BITMAP;
When should you set the release flags? When you know that the image is referred to only by one entity. For example, if one widget will be using an image, then it should free the image once it's done with it. If you set the release flags appropriately, prior to setting the image resource, then this will happen automatically — that is, the widget will free the image and data when it's destroyed, or you apply a new setting for the resource.
If multiple widgets use the same image (they have their own copies of the image structure but share the data to conserve memory), then you need to be a little more clever and make sure the image is freed only when all the widgets are done with it, and never before. There are a number of ways to accomplish this. For example, you could:
The approach you take will depend on your situation and requirements.
If the image is stored in a widget, the allocated members of images are automatically freed when an new image is specified or the widget is destroyed, provided that the appropriate bits in the flags member of the PhImage_t structure are set before the image is added to the widget.
This section describes how you can create simple animation. There are two basic steps:
|
It's better to use images for animation than bitmaps, as images aren't transparent (provided you haven't created a transparency mask). This means that the background doesn't need to be redrawn when replacing one image with another. As a result, there's no flicker when you use images. For other methods of eliminating flicker, see “Flickerless animation”, below. |
It's also possible to create animation by using a PtRaw widget and the Photon drawing primitives. See “PtRaw widget”, earlier in this chapter.
To animate an image you'll need a series of snapshots of it in motion. For example, you can use a PtLabel widget (with a Pt_ARG_LABEL_TYPE of Pt_IMAGE or Pt_TEXT_IMAGE) for animation. Create one PtLabel widget where you want the animation to appear, and create another PtLabel widget for each snapshot. You can store these snapshots in a widget database or a file.
As described in “Widget databases” in the Accessing PhAB Modules from Code chapter, you can use a picture module as a widget database. To use one for animation, do the following in PhAB:
In your application's initialization function, open the database by calling ApOpenDBase() or ApOpenDBaseFile(). Then, load the images with the ApGetImageRes() function. For example:
/* global data */
PhImage_t *images[4];
ApDBase_t *database;
int cur_image = -1,
    num_images = 4;

int
app_init( int argc, char *argv[])

{
  int       i;
  char      image_name[15];

  /* eliminate 'unreferenced' warnings */
  argc =  argc, argv = argv;

  database = ApOpenDBase (ABM_image_db);

  for (i = 0; i < num_images; i++)
  {
    sprintf (image_name, "image%d", i);
    images[i] = ApGetImageRes (database, image_name);
  }

  return (PT_CONTINUE);
}
|
ApGetImageRes() returns a pointer into the widget database. Don't close the database while you're still using the images in it. |
You can also load the snapshots from a file into a PhImage_t structure, by using the PxLoadImage() function. This function supports a number of formats, including GIF, PCX, JPG, BMP, and PNG. For a complete list, see /usr/photon/dll/pi_io_*.
No matter where you get the images, the animation is the same:
For example, the callback for the timer could be as follows:
/* Display the next image for our animation example.     */

/* Standard headers */
#include <stdio.h>
#include <stdlib.h>
#include <unistd.h>
#include <string.h>

/* Toolkit headers */
#include <Ph.h>
#include <Pt.h>
#include <Ap.h>

/* Local headers */
#include "globals.h"
#include "abimport.h"
#include "proto.h"

int
display_image( PtWidget_t *widget,
               ApInfo_t *apinfo,
               PtCallbackInfo_t *cbinfo )

    {

    /* eliminate 'unreferenced' warnings */
    widget = widget, apinfo = apinfo, cbinfo = cbinfo;

    cur_image++;
    if (cur_image >= num_images)
    {
       cur_image=0;
    }

    PtSetResource (ABW_base_image, Pt_ARG_LABEL_IMAGE,
                   images[cur_image], 0 );
    PtFlush ();

    return( Pt_CONTINUE );

    }
ABW_base_image is the widget name of the PtLabel widget in which the animation appears.
There are two ways to eliminate flicker in animation:
Or:
When you do animation in a child of an offscreen-context container, the PtOSContainer renders the draw stream into offscreen video memory, taking advantage of any hardware-acceleration features that the graphics driver supports. The graphics hardware can then blit the image directly onto the screen, resulting in flicker-free widgets and/or animation.
|
PtRaw (like any other widget) can be a child of PtOSContainer. This means that you can have flicker-free animation even when using the Photon drawing primitives. |
You can call these functions to use a memory context to reduce flickering:
Start by creating a memory context:
PmMemoryContext_t * PmMemCreateMC(
                        PhImage_t *image,
                        PhDim_t *dim,
                        PhPoint_t *translation );
The image structure must at least specify the type and size members. The image data buffer is optional, but if you want it in shared memory, you must provide it. The image type must be either Pg_IMAGE_DIRECT_888 or Pg_IMAGE_PALETTE_BYTE.
Once you've created the memory context:
When you no longer need the memory context, call PmMemReleaseMC().
In normal (nondirect) mode, an application sends drawing requests to the Photon manager. The graphics driver blocks on the Photon manager.

Communication in normal (nondirect) mode.
When an application enters direct mode, it's requesting that the graphics driver receive draw streams and service messages directly from the application, instead of from the Photon manager. The driver blocks on the application, which is now responsible for telling the graphics driver what to do.

Communication in direct mode.
While in direct mode, the application has complete control over the display, since no other applications are able to be serviced by the graphics driver. The graphics driver's region is also no longer sensitive to draw events (this way the Photon manager discards all other applications' requests for rendering services to this driver). The other benefit with this mode is that graphical services are no longer sent through the Photon event space, so performance is improved. The drawback for this mode is that applications that expect to capture draw events can't record the application's view.
For convenience, a new context type, called a PdDirectContext_t, has been created. This context, when activated, becomes the default context for the application, so all other Photon Pg* calls work correctly while in this mode.
|
While in this mode, the origin of all drawing operations is the upper left corner of the display, since the requests are no longer clipped or translated by the Photon event space. Your application can still translate and clip the events by calling PgSetTranslation() and PgSetClipping() if necessary. |
The following functions deal with direct mode:
Here are some things to keep in mind:
Here's how to get the address of any video memory context (including the display, which is considered to be one).
If you create a direct context by calling PdCreateDirectContext(), and then enter direct mode by calling PdDirectStart(), your application “owns” the graphics driver (PgFlush() goes to the video driver directly, instead of to the Photon server). You don't need to be in direct mode to get a pointer to offscreen RAM, but you do need to be to get a pointer to the primary display.
Here's some pseudo-code:
/* Create the direct context. */
direct_context = PdCreateDirectContext();

/* Start Direct Mode. */
PdDirectStart(direct_context);

/* Get the primary display. */
primary_display = PdCreateOffscreenContext( 0, 0, 0,
                                            Pg_OSC_MAIN_DISPLAY);

/* Get a pointer to the display. */
vidptr = PdGetOffscreenContextPtr(primary_display);

/* Make sure the Photon driver isn't doing anything
   (it shouldn't be at this point but this is just to
   be sure that we haven't gotten ahead of the video
   card's draw engine). */
PgWaitHWIdle();

/* Do what ever you do to the memory. */
Do_something(vidptr);

/* Leave direct mode, and destroy the direct context
   (an alternative would be PdDirectStop if you don't
   want to destroy the context). */
PdReleaseDirectContext(direct_context);
These API calls allow you to use the leftover memory on a video card. When a video card is in a video mode, there's usually video RAM leftover that isn't being used by the display area. These areas of RAM can be used to do a variety of graphical operations while still using the accelerator on the video card. They're treated in the Photon microGUI basically the same way that a memory context is used, but should be much faster because there's hardware acceleration for these areas.
The functions and data structures include:
Here's an example that loads an image, creates an offscreen context for the image, and then blits the image data to the screen. It creates a window that contains a PtRaw, and uses PgContextBlit() in the PtRaw's raw drawing callback to redraw the image whenever the window is damaged or resized. You can specify a starting size for the window by passing -h and -w commandline options, followed by the path to an image (the format must be supported by PxLoadImage()).
|
|
#include <Pt.h>
#include <photon/PxImage.h>

static PdOffscreenContext_t *context;
static void *my_alloc(long nbytes,int type);
static void raw_draw(PtWidget_t *widget,PhTile_t *damage);


int main(int argc,char *argv[])
{
    int c;
    PhDim_t dim = { 0,0 };

    if(PtInit(NULL))
        return(-1);

    while((c = getopt(argc,argv,"h:w:")) != -1)
    {
        switch(c)
        {
            case 'h':
                dim.h = atoi(optarg);
                break;
            case 'w':
                dim.w = atoi(optarg);
                break;
        }
    }

    if(argv[optind])
    {
        PxMethods_t methods;
        PhImage_t *image;

        memset(&methods,0,sizeof(methods));
        methods.px_alloc = my_alloc;
        methods.flags = PX_DIRECT_COLOR;

        if((image = PxLoadImage(argv[optind],&methods)) != NULL)
        {
            /* Create a context to render the image into.  The context will be
               created to be the size of the image and will store an exact copy
               of the original.  Note:  if you are short on video RAM, you
               might want to enable the Pg_OSC_MEM_SYS_ONLY flag to force
               the context to go to system RAM.  This will result in a slower
               1:1 blit though because the video h/w will not be able to access
               the image data directly - the data will have to be transferred
               from system memory (over the PCI bus) to video memory.  However
               if using a s/w scaled blit (ie scaled blit not supported in your
               h/w) it's better for the original image to be in system
               RAM because otherwise the CPU has to read the original,
               unscaled image from video RAM (over the PCI bus) to
               scale, then put it back into video RAM (over the PCI bus).
               The round trip (particularly the read) is expensive.  */

            if((context = PdCreateOffscreenContext(image->type,
                             image->size.w,image->size.h,0)) != NULL)
            {
                PtArg_t args[4];
                PtWidget_t *window;
                PhDrawContext_t *dc = PhDCSetCurrent(context);

                if(!dim.w || !dim.h)
                    dim = image->size;

                PgSetFillColor(Pg_WHITE);
                PgDrawIRect(0,0,image->size.w - 1,image->size.h - 1,Pg_DRAW_FILL);
                PgDrawPhImagemx(NULL,image,0);
                PgFlush();
                PgWaitHWIdle();
                PhDCSetCurrent(dc);

                image->flags |= Ph_RELEASE_IMAGE_ALL;
                PhReleaseImage(image);
                free(image);

                /* create a PtWindow with a PtRaw inside to draw the image */

                PtSetArg(&args[0],Pt_ARG_DIM,&dim,0);
                PtSetArg(&args[1],Pt_ARG_WINDOW_TITLE,argv[optind],0);
                if((window = PtCreateWidget(PtWindow,Pt_NO_PARENT,2,args)) != NULL)
                {
                    PhRect_t arect = { { 0,0 },{ 0,0 } };

                    PtSetArg(&args[1],Pt_ARG_RAW_DRAW_F,raw_draw,0);
                    PtSetArg(&args[2],Pt_ARG_ANCHOR_FLAGS,
                        Pt_LEFT_ANCHORED_LEFT | Pt_RIGHT_ANCHORED_RIGHT |
                        Pt_TOP_ANCHORED_TOP | Pt_BOTTOM_ANCHORED_BOTTOM,
                        Pt_LEFT_ANCHORED_LEFT | Pt_RIGHT_ANCHORED_RIGHT |
                        Pt_TOP_ANCHORED_TOP | Pt_BOTTOM_ANCHORED_BOTTOM);
                    PtSetArg(&args[3],Pt_ARG_ANCHOR_OFFSETS,&arect,0);
                    if(PtCreateWidget(PtRaw,Pt_DFLT_PARENT,4,args) != NULL)
                    {
                        PtRealizeWidget(window);
                        PtMainLoop();
                        return(0);
                    }
                }
            }
        }
    }

    return(-1);
}


static void *my_alloc(long nbytes,int type)
{
    return(type == PX_IMAGE ? PgShmemCreate(nbytes,NULL) : malloc(nbytes));
}


static void raw_draw(PtWidget_t *widget,PhTile_t *damage)
{
    /* raw widget draw function; simply blit the context onto the screen.
       PgContextBlit() will take care of scaling */

    PhRect_t src;

    src.ul.x = src.ul.y = 0;
    src.lr.x = context->dim.w - 1;
    src.lr.y = context->dim.h - 1;

    PgContextBlit(context,&src,PhDCGetCurrent(),PtCalcCanvas(widget,NULL));
}
Offscreen contexts can be invalidated by the graphics driver for a number of reasons. When this happens, the graphics driver sends to the Photon manager a Ph_EV_INFO event with a subtype of Ph_OFFSCREEN_INVALID. The event data is a single long describing why the offscreen areas have been invalidated. The possible reasons are as follows:
Applications planning on using offscreen contexts should be sensitive to this event and reinitialize their off screen contexts accordingly.
You generally use offscreen locks with pointers that you gained via PdGetOffscreenContextPtr(). The locks ensure that:
|
Your application should lock offscreen memory for as little time as possible. If the graphics driver needs to do something with the offscreen memory, it tries to gain a lock itself, potentially blocking io-graphics for a long period of time (the result being that the display may not get updated, and the user thinks that the computer has locked up). |
The locks are implemented as semaphores in shared memory between io-graphics and the application.
The basic steps for using offscreen locks are:
When you're debugging, you can call PdIsOffscreenLocked() to determine whether or not the offscreen context is currently locked.
|
If you've locked the context, call PdUnlockLockOffscreen() to unlock it before destroying the lock or releasing the offscreen context. |
Alpha blending is a technique of portraying transparency when drawing an object. It combines the color of an object to be drawn (the source) and the color of whatever the object is to be drawn on top of (the destination). The higher the portion of source color, the more opaque the object looks.
Alpha blending can be applied in three ways:
A 32-bit color is made up of four 8-bit channels: alpha, red, green, and blue. These channels are represented as (A, R, G, B). When referring to the source, the channels are denoted as As, Rs, Gs, and Bs; for the destination, they're Ad, Rd, Gd, and Bd.
The basic formula for alpha blending is:
        Sm = source pixel        *   source multiplier
        Dm = destination pixel   *   destination multiplier
        destination pixel = Sm + Dm
There are several options for multipliers to achieve different blending effects. Flags are defined for source and destination multipliers in PgSetAlpha().
You can also perform an “alpha test”, which tests for certain conditions in the alpha channel before writing the source pixel to the destination. In an alpha test, pixels aren't blended — the source pixel is either written to the destination or it's not. For example, you can set the operation to only write the source pixel to the destination if the source alpha is less than the destination alpha.
The functions include:
Chroma-key operations are a method of masking out pixel data during a rendering operation (copies, image rendering, rectangles, etc.) based on a chroma color value. The basic modes of operation are:
The functions include:
The Photon microGUI supports 256 raster operations. Operations can be done using a combination of source pixel data, destination pixel data, and color expanded monochrome pattern pixel data. Extended raster operations are set the same way the normal raster operations are set, using PgSetDrawMode().
The extended raster operations are pervasive, meaning that they affect all subsequent drawing operations, including bit-blit operations and images. The old style raster operations still exist and behave the same way they did in earlier versions of the Photon microGUI.
The extended raster operations are defined as Pg_DrawModecharacters, in reverse notation, where the characters are chosen from the following:
| Character | Meaning |
|---|---|
| P | Pattern |
| S | Source |
| D | Destination |
| o | OR |
| a | AND |
| n | NOT |
| x | XOR |
For example:
For a complete list of all raster operations available, see <photon/Pg.h>.
Here's some sample code:
PdOffscreenContext_t *context1;
PhRect_t rsrc,rdst;

/* Initialize the offscreen area and render the data
   we want in it. */
   …

/* Copy an image stored in an offscreen context to
   the display, ORing the source and pattern data
   together. */
rsrc.ul.x = rdst.ul.x = rsrc.ul.y = rdst.ul.y = 0;
rsrc.lr.x = rdst.lr.x = rsrc.lr.y = rdst.lr.y = 100;

PgSetDrawMode(Pg_DrawModePSo);
PgSetFillDither(Pg_BLUE,Pg_BLACK,Pg_PAT_CHECKB8);
PgContextBlit(context1, &rsrc, NULL, &rdst);

/* OR a blue and black checkerboard pattern with
   source data and copy it to the display area. */
PgFlush();
A video mode describes what the display (what you see on your monitor) looks like. The description includes:
The Photon microGUI's method of video mode enumeration is similar to the VESA spec, where there are “mode numbers”, numerical representations of the width, height, and pixel depth of a video mode. The refresh rate is independent of the mode numbers (it's a different member of PgDisplaySettings_t).
The driver determines the mode numbers, so for one video card 640x480x8 might be mode 2, while on another card it might be mode 3022. Use PgGetVideoModeInfo() to determine the properties of any given mode number. Use PgGetVideoModeList() to get a list of the mode numbers supported by a particular graphics driver.
The functions for working with video modes are:
Here's some sample code:
PgVideoModes_t ModeList;
PgVideoModeInfo_t ModeInfo;
PgDisplaySettings_t ModeSetting;
int i=0, done=0;

if (PgGetVideoModeList(&ModeList))
{
    /* Error -- driver doesn't support this. */
}

/* Use the default refresh rate for this mode. */
ModeSetting.refresh = 0;

while (!done)
{
    if (PgGetVideoModeInfo(ModeList.modes[i], &ModeInfo))
    {
        /* Error code */
    }

    if ((ModeInfo.width == 640) && (ModeInfo.height == 480) &&
(ModeInfo.bits_per_pixel == 16))
    {
        /* We found the mode we were looking for. */
        done = 1;
        ModeSetting.mode = ModeList.modes[i];
    }

    i++;
    if (i >= ModeList.num_modes)
    {
        /* Error -- Mode wasn't found. */
        done=1;
    }
}

PgSetVideoMode (&ModeSetting);
A gradient is a gradual blend of two colors. The Photon library supports:
Although the Photon library supports a large variety of gradients (see PhImage_t), there are times when you would just want a simple gradient to be rendered without having to store it in a PhImage_t. As a result, some basic gradient rendering operations have been added to the graphics driver:
These functions let you create your own gradients:
A video overlay scaler is a hardware feature that allows a rectangular area of the visible screen to be replaced by a scaled version of a different image. The prescaled video frames are typically stored in offscreen memory, and are fetched from memory and overlaid on top of the desktop display image in real time, by the overlay scaler.
Chroma keying is used to control what parts of the video frame are visible. Typically, the application picks a color to be the chroma-key color and draws a rectangle of this color where video content is to appear. When another application's window is placed on top of the video playback application, the chroma-colored rectangle is obscured. Since the video hardware is programmed to display video content only where the chroma-key color is drawn, video doesn't show through where the chroma-colored rectangle is obscured.
The following functions and data types deal with video overlay:
#include <stdio.h>

#include <Ph.h>

#define SRC_WIDTH   100
#define SRC_HEIGHT  100

#define DATA_FORMAT Pg_VIDEO_FORMAT_YV12

unsigned char   *ybuf0, *ybuf1;
unsigned char   *ubuf0, *ubuf1;
unsigned char   *vbuf0, *vbuf1;

void
grab_ptrs(PgVideoChannel_t *channel)
{
    /* Buffers have moved; get the pointers again. */
    ybuf0 = PdGetOffscreenContextPtr(channel->yplane1);
    ybuf1 = PdGetOffscreenContextPtr(channel->yplane2);
    ubuf0 = PdGetOffscreenContextPtr(channel->uplane1);
    ubuf1 = PdGetOffscreenContextPtr(channel->uplane2);
    vbuf0 = PdGetOffscreenContextPtr(channel->vplane1);
    vbuf1 = PdGetOffscreenContextPtr(channel->vplane2);

    if (channel->yplane1)
        fprintf(stderr, "ybuf0: %x, stride %d\n", ybuf0,
            channel->yplane1->pitch);
    if (channel->uplane1)
        fprintf(stderr, "ubuf0: %x, stride %d\n", ubuf0,
            channel->uplane1->pitch);
    if (channel->vplane1)
        fprintf(stderr, "vbuf0: %x, stride %d\n", vbuf0,
            channel->vplane1->pitch);

    if (channel->yplane2)
        fprintf(stderr, "ybuf1: %x, stride %d\n", ybuf1,
            channel->yplane2->pitch);
    if (channel->uplane2)
        fprintf(stderr, "ubuf1: %x, stride %d\n", ubuf1,
            channel->uplane2->pitch);
    if (channel->vplane2)
        fprintf(stderr, "vbuf1: %x, stride %d\n", vbuf1,
            channel->vplane2->pitch);
}

void
overlay_example()
{
    PgVideoChannel_t *channel;
    PgScalerCaps_t  vcaps;
    PgScalerProps_t props;
    unsigned char   *ptr;
    unsigned short  *ptr16;
    int     i = 0, j, k, index;
    int     color;
    PhDrawContext_t *old;
    int     rc;

    if ((channel = PgCreateVideoChannel(
                     Pg_VIDEO_CHANNEL_SCALER, 0)) == NULL) {
        perror("PgCreateVideoChannel");
        exit(1);
    }

    /*
     * Cycle through the available formats looking for the one
     * we're interested in.
     */
    vcaps.size = sizeof (vcaps);
    while (PgGetScalerCapabilities(channel, i++, &vcaps) == 0) {
        if (vcaps.format == DATA_FORMAT)
            break;
        vcaps.size = sizeof (vcaps);
    }
    if (vcaps.format != DATA_FORMAT) {
        fprintf(stderr, "Format not supported?\n");
        exit(1);
    }

    props.size = sizeof (props);
    props.format = DATA_FORMAT;
    props.viewport.ul.x = 20;
    props.viewport.ul.y = 20;
    props.viewport.lr.x = 600;
    props.viewport.lr.y = 440;
    props.src_dim.w = SRC_WIDTH;
    props.src_dim.h = SRC_HEIGHT;
    props.flags =
        Pg_SCALER_PROP_SCALER_ENABLE |
        Pg_SCALER_PROP_DOUBLE_BUFFER |
        Pg_SCALER_PROP_DISABLE_FILTERING;
    if (PgConfigScalerChannel(channel, &props) == -1) {
        fprintf(stderr, "Configure channel failed\n");
        exit(1);
    }

    grab_ptrs(channel);

    for (i = 0; i < 100; i++) {
        index = PgNextVideoFrame(channel);
        delay(50);
        ptr = (void *)(index ? ybuf1 : ybuf0);
        color = rand() & 0xff;
        for (k = 0; k < props.src_dim.h; k++) {
            memset(ptr, color, channel->yplane1->pitch);
            ptr += channel->yplane1->pitch;
        }
    }

    props.flags &= ~Pg_SCALER_PROP_DISABLE_FILTERING;
    switch (PgConfigScalerChannel(channel, &props)) {
    case -1:
        fprintf(stderr, "Configure channel failed\n");
        exit(1);
        break;
    case 1:
        grab_ptrs(channel);
        break;
    case 0:
    default:
        break;
    }

    fprintf(stderr, "\"TV snow\" effect\n");
    for (i = 0; i < 1000; i++) {
        index = PgNextVideoFrame(channel);
        ptr = (void *)(index ? ybuf1 : ybuf0);
        for (k = 0; k < props.src_dim.h; k++) {
            for (j = 0; j < channel->yplane1->pitch; j++)
                *(ptr + j) = rand() & 0xff;
            ptr = (void *)((char *)ptr + channel->yplane1->pitch);
        }

        /* Set the chromanance to neutral for monochrome */
        ptr = ubuf0;
        for (i = 0; i < props.src_dim.h; i++) {
            memset(ptr, 128, props.src_dim.w / 2);
            ptr += channel->uplane1->pitch;
        }
        ptr = vbuf0;
        for (i = 0; i < props.src_dim.h; i++) {
            memset(ptr, 128, props.src_dim.w / 2);
            ptr += channel->vplane1->pitch;
        }

        if (rand() % 200 == 23) {
            props.viewport.ul.x = rand() % 400;
            props.viewport.ul.y = rand() % 300;
            props.viewport.lr.x =
                props.viewport.ul.x + SRC_WIDTH + rand() % 200;
            props.viewport.lr.y =
                props.viewport.ul.y + SRC_HEIGHT + rand() % 200;
            if (PgConfigScalerChannel(channel, &props) == 1)
                grab_ptrs(channel);
        }
    }

    /*
     * This isn't really necessary, since the video resources
     * should automatically be released when the app exits
     */
    PgDestroyVideoChannel(channel);
}

int
main(int argc, char *argv[])
{
    PhAttach(NULL, NULL);

    overlay_example();

    fprintf(stderr, "Exiting normally\n");
}
Some display controllers allow you to transparently overlay multiple "screens" on a single display. Each overlay is called a layer.
Layers can be used to combine independent display elements. Because overlaying is performed by the graphics hardware, it can be more efficient than rendering all of the display elements onto a single layer. For example, a fast navigational display can be implemented with a scrolling navigational map on a background layer, and pop-up GUI elements, such as menus or a web browser, on a foreground layer.
Layer capabilities vary depending on the display controller and the driver. Some display controllers don't support layers. Different layers on the same display may have different capabilities. You should use PgGetLayerCaps() to determine whether a layer exists and which features are supported by the layer.
Layers are indexed per-display, starting from 0, from back to front in the default overlay order.
A layer is either active (shown) or inactive (hidden). It may not be possible to activate a layer if its configuration is incomplete (if, for example, the layer format is unspecified, or there aren't enough surfaces assigned to it). A layer's configuration persists when it's inactive. After a video mode switch, all layers revert to their default configuration.
The images on all the active layers of a display are combined, using alpha blending, chroma keying, or both, to produce the final image on the display.
The image on a layer is fetched from one or more offscreen contexts, also called surfaces. The number of surfaces needed by a layer is determined by the layer format. For example, a layer whose format is Pg_LAYER_FORMAT_ARGB888 requires one surface, while a layer whose format is Pg_LAYER_FORMAT_YUV420 requires three surfaces for a complete image. The format of a layer is set using PgSetLayerArg().
Source and destination viewports.
The source viewport defines a rectangular window into the surface data. This window is used to extract a portion of the surface data for display by the layer.
The destination viewport defines a rectangular window on the display. This window defines where the layer will display its image.
Scrolling and scaling, if supported by the layer, can be implemented by adjusting the source and destination viewports. To scroll or pan an image, move the position of the source viewport. To scale an image, increase or decrease the size of the destination viewport.
The layer API includes:
 |
The layer API is incompatible with the existing video overlay API (PgCreateVideoChannel(), PgConfigScalerChannel(), PgNextVideoFrame(), and so on). Don't run two applications that use different APIs simultaneously. |
Note the following:
To use layers, you typically do the following:
See the code below for an example of using the layers API.
#include <errno.h>
#include <stdio.h>
#include <Ph.h>

int
FindFormatIndex(int layer, unsigned int format)
{
    PgLayerCaps_t caps;
    int format_idx = 0;

    while (PgGetLayerCaps(layer, format_idx, &caps) != -1) {
        if (caps.format == format)
            return format_idx;

        format_idx++;
    }
    return -1;
}

int
main(int argc, char **argv)
{
/*
 * For best results, these values should match your video mode.
 */
#define LAYER_FORMAT    Pg_LAYER_FORMAT_ARGB8888
#define SURFACE_WIDTH   1024
#define SURFACE_HEIGHT  768

    struct _Ph_ctrl         *ph;
    PgLayerCaps_t           caps;
    PdOffscreenContext_t    *surf;
    PdOffscreenContext_t    *scr = NULL;
    PhDrawContext_t         *olddc;
    PhRid_t                 driver_rid = -1;
    int     layer_idx = -1;
    int     format_idx = -1;
    int     active = 1;
    int     i;

    PhArea_t sarea, darea;

    /*
     * Arguments:
     * -d <driver region>
     * -l <layer index>
     */

    while ((i = getopt(argc, argv, "d:l:")) != -1) {
        switch(i) {
        case 'd': /* driver region */
            driver_rid = atol(optarg);
            break;
        case 'l': /* layer index */
            layer_idx = atoi(optarg);
            break;
        default:
            break;
        }
    }

    if (layer_idx == -1) {
        printf("Specify layer index.\n");
        exit(-1);
    }

    if (driver_rid == -1) {
        printf("Specify graphics driver region.\n");
        exit(-1);
    }

    ph = PhAttach(NULL, NULL);
    if (ph == NULL) {
        perror("PhAttach");
        exit(-1);
    }

    if (-1 == PdSetTargetDevice(PhDCGetCurrent(), driver_rid)) {
        perror("PdSetTargetDevice");
        exit(-1);
    }

    /* Check if the layer supports the required format */
    format_idx = FindFormatIndex(layer_idx, LAYER_FORMAT);
    if (format_idx == -1) {
        printf("Layer doesn't support format\n");
        exit(-1);
    }

    /* Get the layer capabilities */
    PgGetLayerCaps(layer_idx, format_idx, &caps);

    if (caps.caps & Pg_LAYER_CAP_MAIN_DISPLAY) {
        /* Save a reference to the current display surface */
        scr = PdCreateOffscreenContext(0, 0, 0,
                                       Pg_OSC_MAIN_DISPLAY);
    }

    /* Allocate a surface for the layer */
    surf = PgCreateLayerSurface(layer_idx, 0, format_idx,
            SURFACE_WIDTH, SURFACE_HEIGHT,
            Pg_OSC_MEM_PAGE_ALIGN);
    if (surf == NULL)
        exit(-1);

    /* Draw some stuff on the surface */
    olddc = PhDCSetCurrent(surf);
    PgSetFillColor(Pg_BLACK);
    PgDrawIRect(0, 0, SURFACE_WIDTH-1, SURFACE_HEIGHT-1,
                Pg_DRAW_FILL);
    PgSetFillColor(Pg_YELLOW);
    PgDrawIRect(0, 0, 100, 100, Pg_DRAW_FILL);
    PgSetFillColor(PgRGB(255,180, 0));
    PgDrawIRect(70, 80, 600, 500, Pg_DRAW_FILL);
    PhDCSetCurrent(olddc);

    /* Lock the layer */
    if (-1 == PgLockLayer(layer_idx))
        exit(-1);

    /* Start configuring arguments */
    PgSetLayerArg(layer_idx, Pg_LAYER_ARG_LIST_BEGIN, 0, 0);


    /* Select the layer format */
    PgSetLayerArg(layer_idx, Pg_LAYER_ARG_FORMAT_INDEX,
            &format_idx, sizeof(int));

    /* This changes the current display surface */
    PgSetLayerSurface(layer_idx, 0, surf);

    PgSetLayerArg(layer_idx, Pg_LAYER_ARG_ACTIVE,
            &active, sizeof(int));

    /* Configure other arguments ... */

    if (!(caps.caps & Pg_LAYER_CAP_MAIN_DISPLAY)) {
        sarea.pos.x = 0; sarea.pos.y = 0;
        sarea.size.w = SURFACE_WIDTH;
        sarea.size.h = SURFACE_HEIGHT;
        PgSetLayerArg(layer_idx, Pg_LAYER_ARG_SRC_VIEWPORT, &sarea,
                      sizeof(sarea));

        darea.pos.x =0; darea.pos.y =0;
        darea.size.w =SURFACE_WIDTH/2 ;
        darea.size.h =SURFACE_HEIGHT/2 ;
        PgSetLayerArg(layer_idx, Pg_LAYER_ARG_DST_VIEWPORT, &darea,
                      sizeof(darea));
     }

    /* End configuration */
    PgSetLayerArg(layer_idx, Pg_LAYER_ARG_LIST_END, 0, 0);

    /* Application continues ... */
    sleep(3);

    /* Finished using layer; Restore the current display
       surface */

       active = 0;

        PgSetLayerArg(layer_idx, Pg_LAYER_ARG_LIST_BEGIN, 0, 0);
        PgSetLayerArg(layer_idx, Pg_LAYER_ARG_ACTIVE, &active,
                      sizeof(int));
        PgSetLayerSurface(layer_idx, 0, scr);
        PgSetLayerArg(layer_idx, Pg_LAYER_ARG_LIST_END, 0, 0);


    PgUnlockLayer(layer_idx);

    if (scr) PhDCRelease(scr);
    PhDCRelease(surf);

    PhDetach(ph);
    exit(0);
}