There I was, on my summer break, preparing to do a bunch of painting and drywalling in the basement when the phone rings. It's a former student of mine asking if I'd like to help with a data acquisition project. Well, how could I resist? A few days later, FedEx showed up with a bunch of analog and digital I/O cards, and the festivities began.
This chapter documents the ADIOS project. ADIOS stands for Analog/Digital Input/Output Server. ADIOS consists of a series of inter-related modules, which I'll describe here.
ADIOS was developed under contract to Century Aluminum in Kentucky (USA), and I'd like to thank them for letting me publish the source code in this book!
This chapter includes:
Century Aluminum has several production lines where they smelt aluminum. Each line has several analog and digital I/O points that they monitor so they can feed data into the proprietary process control software that controls the line.
I was involved on the low-level driver and data acquisition side, and have no idea what they do with the data once it leaves the QNX Neutrino box.
The requirements for this contract came in two sets. The first set of requirements was to support three different hardware cards. For those of you not familiar with the industrial automation/process control world, the next statement will come as a surprise. The buses on all three cards are ISA (not PCI). These folks use rack-mounted PC's (with modern Pentium 3-class CPUs), with a huge ISA bus — some of them have room for up to twenty ISA cards! The three cards are the DIO-144 (144 digital I/O pins), PCL-711 (16 digital I/O, 8 analog inputs, and 1 analog output), and the ISO-813 (32 analog inputs).
The second set of requirements was for something to periodically read the data from the cards, and put that data into shared memory. The idea was that Century Aluminum's control software would then grab samples out of shared memory, do the processing, and control the lines.
As with all software projects, there were some extras that got included into the contract just because they came in handy during development. One of these extras was a showsamp utility that displayed samples out of the shared memory maintained by ADIOS. Another one was called tag and it lets you query or set various analog or digital I/O channels. Finally, a master parser was created to handle the configuration file. This was incorporated into the drivers, ADIOS, and tag, so everything could be referred to by a symbolic name (like OVEN_CONTROL_1, rather than “card at address 0x220, channel 3, port B, bit 4”). For analog ports, the configuration file also contained range information (so that a 12-bit analog converter might actually be scaled to represent voltages from -5V to +5V, rather than a raw binary value from 0x000 to 0xFFF).
So, in this chapter, we'll look at the following pieces of software:
We'll also discuss some of the common code that's shared between modules.
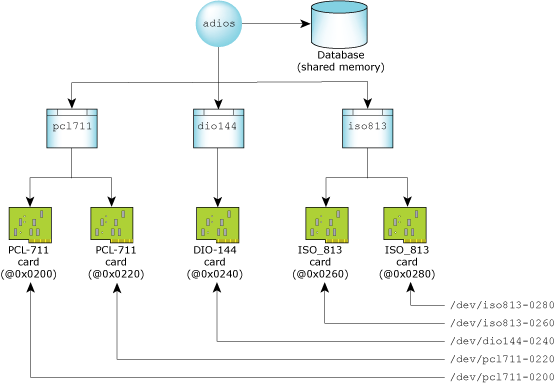
This high-level diagram shows the pieces that we'll be discussing:
The relationship between ADIOS, the shared memory database, the hardware drivers, and their cards.
Most of the design was fairly straightforward — we needed to configure each card, and we had to be able to get and set the analog and digital I/O points. For the shared memory interface, I had to figure out how to minimize the amount of work needed for the process control software to access data in the shared memory (an API library was created, along with some demo software).
The first design decision I made was that all of the device drivers should accept the same set of devctl() commands. This meant that to anyone using the device drivers, they'd all look the same. One could argue that sending a “turn on digital bit 1” command to a card that only has analog input doesn't make sense. That's true — in that case, the card simply returns ENOSYS. But the important thing is that we didn't reuse the command number for something else — all cards know about that command, but only some may support it.
The next design decision was that each driver would support one or more cards. This way, instead of having multiple pcl711 drivers running for multiple PCL-711 cards, there'd be only one driver running. Each driver creates multiple mount points under /dev — one for each card. So in a system with three PCL-711 cards and one DIO-144 card (at addresses 0x220, 0x240, 0x260 and 0x280, respectively) you'd see the following devices:
/dev/pcl711-0220
/dev/pcl711-0240
/dev/pcl711-0260
/dev/dio144-0280
The three PCL-711 devices are managed by the one pcl711 driver, and the one DIO-144 device is managed by the one dio144 driver. At one point I considered having just one mount point for each driver (e.g. /dev/pcl711), instead of multiple mount points, but it turned out to be much easier to consider each device as a separate entity.
You'll notice that we didn't take over /dev/pcl711 as a directory and create the individual devices underneath. This is because the number of devices is limited by the number of ISA slots, which, even in the industrial automation space, is still only a dozen or two. It wasn't worth the extra effort of maintaining a directory hierarchy in the driver.
As mentioned above, all three of the supported cards are ISA cards, so there's no automatic configuration to deal with — whatever you set the I/O port address to on the card is where the card will be. (The one thing that did get me, though, is that on the card's I/O port selector switch, “ON” is a zero and “OFF” is a one. That had me scratching my head for a few hours.)
The DIO-144 card has 144 bits of digital I/O, and you can configure them as inputs or outputs by 8-bit or (for some ports) 4-bit chunks. This gives you a fair bit of flexibility, but also presents some problems for the driver. There is no analog I/O on this card.
All of the programming for this card is done by reading and writing I/O ports.
 |
For those of you not familiar with the x86 architecture, an x86 CPU maintains two separate address spaces. One is the traditional memory address space that every CPU in the world has, and the second is called an I/O address space. There are special CPU instructions to access this second address space. From C, you can access the I/O address space using the in8() and out8() (and related) functions (see <hw/inout.h> and mmap_device_io()). |
The hardest part of the DIO-144 software driver design is setting up the bits to be input or output. Once you have the card configured, reading from it involves calling several in8() functions, and writing involves calling several out8() functions. The only trick to writing is that you often need to change just one bit — so the software will have to keep a current image of the other 7 bits, because the hardware allows only 8-bit-at-a-time writes.
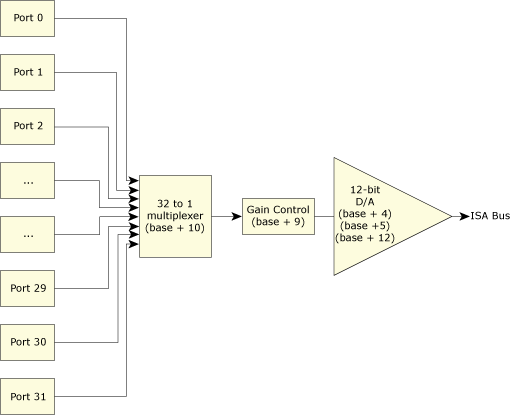
The ISO-813 card has 32 12-bit analog input channels. In reality, this is implemented as a 32-channel multiplexer that feeds into one analog-to-digital (A/D) converter. The trick with this card is that you need to tell the multiplexer which channel it should be reading, set up the gain (1x, 2x, 4x, 8x, or 16x), wait for the multiplexer and A/D to stabilize, and then trigger an A/D conversion. When the A/D conversion is complete, you can read the 12-bit result from an I/O port.
The PCL-711 card is the most versatile of the three. It has 16 digital inputs and 16 digital outputs (these are simple; you just read or write an I/O port). It has one analog output (this too is fairly simple; you just write the 12-bit value to an I/O port). It also has 8 analog inputs (these function like the ISO-813's analog input ports). There is no configuration for the digital I/O; they're fixed. The configuration of the analog input is the same as the ISO-813 card — mainly the selection of the gain.
|
Note that for both the ISO-813 and the PCL-711 cards, there are jumpers on the card to control the input range and whether the input is single-ended or differential. We're not going to discuss these jumpers further, because they have no impact on the software design. |
Another design consideration was the shared memory driver and the layout of the shared memory. We'll see the details when we look at the adios server itself.
The shared memory design involved setting up the layout of the data areas, as well as figuring out a method to ensure that the control process would get valid samples. To achieve this, I divided the shared memory into two sections, each on a 4 KB page boundary. The first section is a database section that has information about which drivers are being polled for data, how many analog and digital I/O points they have, as well as the current head and tail index into the data section. The second section is the data section, and it contains the actual data that's been acquired from the cards. Note that the shared memory contains only analog and digital inputs — when the software needs to write to an analog or digital output, it contacts the driver directly. We'll see an example of this when we look at the tag utility.
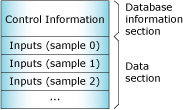
The shared memory layout.
The ability to associate ASCII labels with data points evolved during the term of the project. Initially, there was no requirement for it — as long as adios put the samples into shared memory, everyone was happy. When the time came to configure the analog and digital I/O ports, we decided we needed a way of saving that configuration. The tags database was really a text-file-based configuration database initially. Then I added the tag keyword, and the tags database was born.
Before we proceed with the details of the software, it's a good idea to explain the tags database because it's common to the drivers, adios, and the tag utility.
At a high level, the tags database is a flat ASCII text file. The default name is adios.cfg, and the utilities search for it in /etc first and then in the local directory (unless you override the name).
Configuration (and tag) information is presented card-by-card and spans multiple lines. It's important to keep in mind that this information is used by both the drivers and utilities. The drivers use it to configure their I/O ports, and the utilities use it to make sense of the shared memory region maintained by adios.
The device keyword indicates the beginning of configuration for a particular card. Recall that the dio144, pcl711, and iso813 drivers create device names of the form /dev/driver-port (e.g. /dev/pcl711-0220 for a PCL-711 card at port address 0x220). The device keyword uses the same format.
Once a device keyword has been read, all further configuration information in the file applies to that device, until another device keyword (or the end of file). Here's the formal grammar (I've broken the ccfga and cfgd keyword definitions over two lines):
cfgfile  :: [devdirs]… ["#" comment]

devdirs  :: devs [chandirs]…

devs     :: "device" devicename

chandirs :: "channel" channum [ [portspec] [cfg]… ]…

portspec :: "port" <"A" | "B" | "C">

cfg      :: <cfga | cfgd>

cfga     :: <"ain" | "aout"> ["span" loval","hival]
            ["gain" gainval] ["tag" tagname]

cfgd     :: "bit" bitnum [<"din" | "dout">]
            [<"positive" | "negative">] ["tag" tagname]
So, as a short example:
device /dev/pcl711-0220
  channel 1 ain span 0,70 tag BOILER_TEMPERATURE
  channel 2
    ain
    span -3,+4.2285
    gain 2
    tag VOLTAGE_1
  channel 3 ain span +100,-100 tag PRESSURE_1
  # channels 4 and 5 are not used here
  channel 6 ain tag RAW_ANALOG_1
  channel
    7 ain
      span 0,1 tag spud

  # Channel 8 is not used

  # Channel 9 is the output channel
  channel 9 aout span 0,8191 tag OUTPUT_TEMPERATURE_1

  # Channel 10 is the digital input channel with 8 bits
  channel 10
    bit 0 din negative tag CHECK_1
    bit 1 din positive tag CHECK_2
    din bit 2 positive tag SWITCH_1
    din bit 3 positive tag SWITCH_2
    # bits 4 through 7 are not used

  # Channel 11 is the digital output channel with 8 bits
  channel 11
    bit 0 dout positive tag CONVEYOR_MOTOR_1
    bit 1 negative tag CONVEYOR_START
    bit 2 negative tag ALARM_1_LED
    bit 3 dout negative tag ALARM_2_LED
    # bits 4 through 7 are not used
This configures a PCL-711 driver at port 0x220.
The gain settings are simply numbers passed directly to the driver. So, a gain setting of 2 doesn't mean that the gain setting is 2 ×, it simply means that the PCL-711 driver will receive the constant 2 and interpret it accordingly (i.e. in this case it means gain setting number 2, which is actually a 4 × gain setting.)
The drivers are all similar, so we'll examine only the PCL-711 driver (pcl711) because it's a superset of the other two (the DIO-144 and the ISO-813).
The first thing each driver does is read its configuration file. There is usually only one common configuration file, which describes the configuration of the entire system. Each driver must read through the configuration file, looking for entries that apply to it and ignoring entries for other drivers.
Once the configuration file is read and parsed, the individual fields are validated. That's because only the driver knows the intimate details of which ports can be configured how. It also lets you easily add other drivers, without having to add knowledge about the characteristics of the new driver.
Once validation is done, the driver becomes a resource manager and waits for requests.
We'll walk through the following modules:
The main() function is typically short; it does the option processing and then calls the resource manager mainline. However, there's one important call in main() that should be pointed out:
ThreadCtl (_NTO_TCTL_IO, 0);
This function allows a root-owned process (or one that's setuid() to root) to access the hardware I/O ports. If you don't call this function, and attempt to do I/O port manipulation (via in8() for example), your process dies with a SIGSEGV.
Option processing is fairly standard as well, except that at the end of option processing we read in the configuration file. The configuration file drives the card installation (I've deleted some of the long error messages for clarity and brevity):
parser_t        *p;
parser_handle_t *ph;

…

if (ph = parser_open (optc)) {
  if (p = parser_parse (ph, "/dev/pcl711*")) {
   if (p -> status != PARSER_OK) {
      // error message
      exit (EXIT_FAILURE);
    }
    if (optv) {
      parser_dump (p);
    }
    install_cards_from_database (p);
    parser_free (p);
  }
  parser_close (ph);
} else {
  if (optc) {
    // error message
    exit (EXIT_FAILURE);
  } else {
    // warning message
  }
}
Basically, the logic is that we call parser_open() to get a parse handle, which we then pass to parser_parse(). Notice that parser_parse() is given a wild-card pattern of /dev/pcl711* to match — this is how we filter out only our card's information from the configuration file. This aspect of the driver names was one of the reasons that I create multiple mount points per driver, rather than just one. Finally, the real work is done in install_cards_from_database() (in pcl711.c).
Skipping vast amounts of code (the parser_*() functions — see the source code) and hiding the details, install_cards_from_database() boils down to:
int
install_cards_from_database (parser_t *data)
{
  int s;

  s = strlen ("/dev/pcl711-");

  for (nd = 0; nd < data -> ndevices; nd++) {
    card = install_card (d -> devname,
             strtol (d -> devname + s, NULL, 16));
    for (nc = 0; nc < d -> nchannels; nc++) {
      for (np = 0; np < c -> nports; np++) {
        for (naio = 0; naio < p -> naios; naio++) {
          // verify and optionally default configuration
        }
        for (ndio = 0; ndio < p -> ndios; ndio++) {
          // verify and optionally default configuration
        }
      }
    }
  }
}
We process all devices in the database (the first for loop). This is to handle the case where there are multiple PCL-711 cards installed; this iterates through all of them. The next for loop processes all of the channels on each card, and then the next for loop processes all of the ports on each channel. Finally, the two innermost for loops process the analog and digital points.
Notice that we call install_card() within the first for loop. This function registers the card name with the process manager via resmgr_attach().
Processing mainly involves range checking. For the PCL-711, the channels are organized like this:
| Channel(s) | Meaning |
|---|---|
| 0 - 7 | Analog Inputs |
| 8 | Analog Output |
| 9 | Digital Input (16 bits) |
| 10 | Digital Output (16 bits) |
There is no concept of a “port” on the PCL-711 card (nor on the ISO-813 card, for that matter), so we don't do any checking for ports in that logic.
An easy way to remember the ordering is with the name of the server, ADIOS. Analog channels are grouped together first, followed by digital channels. Within each group, the inputs are first, followed by the outputs.
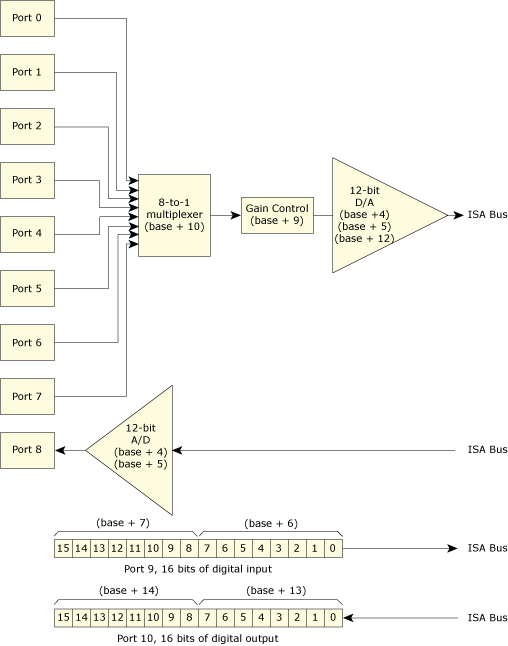
The PCL-711 card, with register offsets.
For reference, here are the channel assignments for the other two cards (DIO-144 and ISO-813), starting with the DIO-144:
| Channel(s) | Port(s) | Meaning |
|---|---|---|
| 0 - 5 | A, B, or C | Digital I/O |
On the DIO-144, ports A and B can be configured as input or output for the entire 8-bit port, whereas port C can be configured on a nybble (4-bit) basis (the upper or lower 4 bits have the same direction within each nybble, but the nybbles are configured independently). To obtain the base address for any given channel and port, multiply the channel number by 4 and add it to the base address plus the port offset.
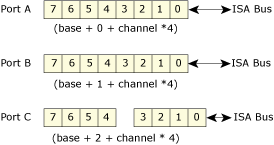
The DIO-144 card with register offsets.
On the ISO-813, the assignments are as follows:
| Channel(s) | Meaning |
|---|---|
| 0 - 31 | Analog input |
The ISO-813 card high-level view with register offsets.
When install_cards_from_database() returns, we have already registered the pathnames with the process manager (via install_card()) and configured it (again via install_card()). All that's left to do is to enter the resource manager main loop, execute_resmgr().
There's nothing special or different in execute_resmgr() that we haven't seen before in the other examples (like the web counter presented in the Web Counter Resource Manager chapter) so we won't discuss it.
What I will quickly discuss is the extended attributes structure:
typedef struct pcl711_s
{
    iofunc_attr_t   attr;
    int             port;
    char            *name;
    int             dout;
    int             gains [NAI];
}   pcl711_t;
As usual, the normal attributes structure is the first member of the extended attributes structure. Here are the other members:
We'll see how most of these fields are used when we discuss the code for the analog and digital I/O functions.
Once the option processor has finished, all of the cards are initialized, and we've entered the execute_resmgr() main processing loop. From that point on, we are a resource manager, and we're waiting for requests. The driver doesn't do anything on its own; it's entirely client-driven.
In iofuncs.c you see the one and only callout that we're providing, namely the io_devctl() handler.
The io_devctl() handler is responsible for the following commands:
The other drivers (DIO-144 and ISO-813) are responsible for the same commands (and use similarly named card interface functions), and return EINVAL for any commands that aren't appropriate.
So as far as the resource manager interface goes, it's very simple. The real work gets done in the individual interface functions in pcl711.c (and dio144.c and iso813.c for the other cards).
Finally, we'll look at the hardware interface.
As mentioned above, card configuration happens with the install_card() function. You'll note that there's a special debug flag, -d, that puts the driver into diagnostic mode (for the first detected card) and causes it to never become a resource manager.
The pcl711_read_analog() function is used to handle the analog input:
#define PCL711_DELAY    1000  // 1 us

int pcl711_read_analog (pcl711_t *pcl, int channel)
{
  int   data, base, timeout;
  static int calibrated = 0;
  static struct timespec when;

  // 1) calibrate nanospin if required
  if (!calibrated) {
    nanospin_calibrate (1);      // with interrupts off
    nsec2timespec (&when, PCL711_DELAY);
    calibrated = 1;
  }

  // 2) ensure we are in range
  channel &= 7;
  base = pcl -> port;

  // 3) select the channel
  out8 (base + PCL711_MUX_SCAN_CONTROL, channel);

  // 4) select the gain
  out8 (base + PCL711_GAIN_CONTROL, pcl -> gains [channel]);

  // 5) trigger the conversion
  out8 (base + PCL711_SOFTWARE_AD_TRIGGER, 0 /* any data */);

  // 6) wait for the conversion
  timeout = PCL711_TIMEOUT;
  do {
    data = in8 (base + PCL711_ANALOG_HIGH);
    nanospin (&when);     // spin
  } while ((data & PCL711_ANALOG_HIGH_DRDY) && (timeout-- >= 0));

  // 7) indicate timeout if any
  if (timeout < 0) {
    return (-1);
  }

  // 8) return data
  data = ((data & 0x0f) << 8) + in8 (base + PCL711_ANALOG_LOW);
  return (data);
}
The code performs the following steps:
Notice that the first parameter, pcl, is of type pointer to pcl711_t. The pcl711_t is the extended attributes structure used in the resource manager. It's a convenient place to store additional information, such as the base port address.
Notice that in step 6 we are polling. While polling is generally frowned upon in realtime control systems, we have no choice. The manual states that the conversion will take place within microseconds, so the overhead of giving up the CPU and letting another thread run is going to be the same as, or greater than, the time it takes to poll and get the data. So we might as well poll. Note also that we don't poll forever; we poll only for PCL711_TIMEOUT number of iterations.
The polling is in place to handle hardware that's not present — if the hardware is missing (or defective), we will time out. Also, notice that we use nanospin() to give up the ISA bus between polling. The nanospin() delay value is selected to be 1 microsecond; this ensures that we poll “often enough” to minimize the number of times we poll.
In conjunction with the pcl711_read_analog() function, there's a function that sets the gain value. While we could have written the gain value directly into the extended attributes structure's gain member, it's much nicer to have a function to do it, so that we can isolate accesses to that parameter (and change things around if we need to, without changing a bunch of code).
This function is pcl711_set_gain():
void
pcl711_set_gain (pcl711_t *pcl, int channel, int gaincode)
{
  if (gaincode < 0 || gaincode > 4) {
    return;
  }
  channel &= 7;
  pcl -> gains [channel] = gaincode;
}
Notice the sanity checking up front to ensure that no bad values are used before we write the value into the gains array member.
For analog output, the function pcl711_write_analog() is used:
void
pcl711_write_analog (pcl711_t *pcl, int value)
{
  out8 (pcl -> port + PCL711_ANALOG_LOW, value & 0xff);
  out8 (pcl -> port + PCL711_ANALOG_HIGH, (value & 0xf00) >> 8);
}
This function simply writes the low byte of the value to the register PCL711_ANALOG_LOW and then writes the high byte (actually, bits 8 through 11) of the value to PCL711_ANALOG_HIGH.
|
Order is important here!
The PCL-711 is an 8-bit ISA card, which means that the I/O ports are only eight bits, so they
must be written individually.
The D/A conversion is triggered after the HIGH portion of the value is written, so if we
wrote the data in the opposite order, we'd be triggering a conversion with the correct
HIGH value, but the previous LOW value.
Just something to watch out for. |
Digital input is accomplished by:
static int bits [16] = {
  0x0001, 0x0002, 0x0004, 0x0008,
  0x0010, 0x0020, 0x0040, 0x0080,
  0x0100, 0x0200, 0x0400, 0x0800,
  0x1000, 0x2000, 0x4000, 0x8000
};

int
pcl711_read_digital_bit (pcl711_t *pcl, int bitnum)
{
  bitnum &= 15;       // guarantee range

  if (bitnum < 8) {
    return (!!(in8 (pcl -> port + PCL711_DI_LOW) & bits [bitnum]));
  } else {
    return (!!(in8 (pcl -> port + PCL711_DI_HIGH) & bits [bitnum - 8]));
  }
}
This function determines if the bit that's to be read is in the LOW or HIGH register, and then reads it. The read bit is then logically ANDed against the bits array to isolate the bit, and then the special Boolean typecast operator (“!!”) that I invented a few years back is used to convert a zero or nonzero value to a zero or a one.
|
The !! technique is something I discovered a few years back. It's 100% legal ANSI C and, more importantly, guaranteed to work. And it made my editor think there was a feature of C that he'd missed! :-) |
Finally, digital output is accomplished by:
void
pcl711_write_digital_bit (pcl711_t *pcl, int bitnum, int bitval)
{
  bitnum &= 15;       // guarantee range

  if (bitval) {
    pcl -> dout |= bits [bitnum];
  } else {
    pcl -> dout &= ~bits [bitnum];
  }

  if (bitnum < 8) {     // 0 .. 7 are in the first byte
    out8 (pcl -> port + PCL711_DO_LOW, pcl -> dout & 0xff);
  } else {
    out8 (pcl -> port + PCL711_DO_HIGH, pcl -> dout >> 8);
  }
}
Digital output is a little bit trickier, because the hardware wants to be written to one byte at a time, rather than one bit at a time. We manage this by maintaining a shadow, called dout, in the extended attributes structure. This shadow contains the currently written value of the digital output port. When we wish to set or clear a particular bit, the first if in the function updates the shadow register to reflect the about-to-be-written value. Next, we determine whether the bit is in the HIGH or LOW portion of the word, then write out the entire 8-bit byte to the port.
Now that we've seen all of the work that goes into the low-level driver, it's time to look at the ADIOS server that uses these drivers.
At the highest layer of abstraction, ADIOS creates a shared memory segment and periodically polls all of the installed drivers for their analog and digital data before sticking it into shared memory.
ADIOS has two threads: one thread handles the resource manager side of things, and another thread handles polling the individual drivers. This approach was taken because I didn't want the polling thread to bog down the responsiveness of the resource manager. However, this is a moot point, because the resource manager currently doesn't actually do anything. I provided a resource manager interface for future compatibility in case we needed a way of changing the sampling rate (for example), but there haven't been any requirements to do that.
There's nothing to see in main(), optproc(), and execute_resmgr() that you haven't seen before, with the possible exception of the pthread_create() in main() to create the worker thread, daq_thread():
pthread_create (NULL, NULL, daq_thread, NULL);
Even that is a plain vanilla call to pthread_create().
For every card that's specified in the configuration file, optproc() calls the worker function install_cards_from_database() to create a database (stored in the global variable adios). Part of the work of installing the card is to send its driver a devctl() asking it about its capabilities. You'll recall from above that this is the DCMD_GET_CONFIG message.
Finally, the main thread sets up a shared memory region.
|
If we find that there's already a shared memory region present, we invalidate its signature block and unlink it. The rationale here is that a previous ADIOS manager created one, and was killed (or died). By invalidating the signature, we're telling any users of that shared memory region that it's no longer valid. |
Creating the shared memory region (and setting up various pointers and data areas) is done by the function create_shmem() in daq.c. Since it's a fairly large function (about 100 lines), I'll present the steps it performs first, and then we'll look at the details in smaller chunks:
As mentioned above, the shared memory region is divided into two sections, each beginning on a 4 KB page boundary. The first section contains the adios_signature_t, followed by the adios_daq_status_t, followed by one adios_cis_t for each installed card.
Suppose that we have one PCL-711 card and one DIO-144 installed. This is what the first part of the memory layout will look like:
| Offset (bytes) | Name | Size (bytes) | Description | Value |
|---|---|---|---|---|
| adios_signature_t | ||||
| 0000 | signature | 4 | Signature | "ADIO" |
| 0004 | datablock | 4 | Datablock; which 4 KB page the data section starts on | 1 |
| 0008 | num_cis | 4 | Number of entries in the CIS | 2 |
| 000C | num_elems | 4 | Size of the ring buffer | 2000 |
| adios_daq_status_t | ||||
| 0010 | head | 4 | Index to the newest valid and stable data element | 0 |
| 0014 | tail | 4 | Index to the oldest valid and stable data element | 99 |
| 0018 | element_size | 4 | Size of each element, including any padding | 52 |
| adios_cis_t | ||||
| 001C | name | 128 | Name of the device | /dev/pcl711-02d0 |
| 009C | nai | 4 | Number of analog inputs | 8 |
| 00A0 | nao | 4 | Number of analog outputs | 1 |
| 00A4 | ndi | 4 | Number of digital inputs | 16 |
| 00A8 | ndo | 4 | Number of digital outputs | 16 |
| 00AC | nbpc | 4 | Number of bytes per channel | 2 |
| 00B0 | maxresai | 4 | Maximum bit resolution of analog input | 12 |
| adios_cis_t | ||||
| 00B4 | name | 128 | Name of the device | /dev/dio144-0220 |
| 0134 | nai | 4 | Number of analog inputs | 0 |
| 0138 | nao | 4 | Number of analog outputs | 0 |
| 013C | ndi | 4 | Number of digital inputs | 144 |
| 0140 | ndo | 4 | Number of digital outputs | 144 |
| 0144 | nbpc | 4 | Number of bytes per channel | 3 |
| 0148 | maxresai | 4 | Maximum bit resolution of analog input | 0 |
| 014C–0FFF | Filler |
The second part of the shared memory contains the data. Each data set consists of a tiny adios_data_header_t followed by the samples from the various cards. There are as many data sets as specified with the command line -S option (or the default of 1000).
Continuing with our example of the two cards from above, here's what the first and part of the second data set look like:
| Offset (bytes) | Name | Size (bytes) | Description |
|---|---|---|---|
| adios_data_header_t | |||
| 1000 | t0ns | 8 | Beginning of snapshot 0 time |
| 1008 | t1ns | 8 | End of snapshot 0 time |
| (Data) | |||
| 1010 | ai0 | 2 | PCL-711 analog input channel 0 sample |
| 1012 | ai1 | 2 | PCL-711 analog input channel 1 sample |
| 1014 | ai2 | 2 | PCL-711 analog input channel 2 sample |
| 1016 | ai3 | 2 | PCL-711 analog input channel 3 sample |
| 1018 | ai4 | 2 | PCL-711 analog input channel 4 sample |
| 101A | ai5 | 2 | PCL-711 analog input channel 5 sample |
| 101C | ai6 | 2 | PCL-711 analog input channel 6 sample |
| 101E | ai7 | 2 | PCL-711 analog input channel 7 sample |
| 1020 | di | 2 | PCL-711 digital input channel 8 (16 bits) |
| 1022 | di | 18 | DIO-144 digital input channel 0–5 samples |
| adios_data_header_t | |||
| 1034 | t0ns | 8 | Beginning of snapshot 1 time |
| 103C | t1ns | 8 | End of snapshot 1 time |
| (Data) | |||
| 1044 | ai0 | 2 | PCL-711 analog input channel 0 sample |
| 1046 | ai1 | 2 | PCL-711 analog input channel 1 sample |
| ... | ... |
Therefore, the first job of create_shmem() is to figure out the sizes of the various data structures.
void
create_shmem (void)
{
  int   size;
  int   size_c, size_d;
  int   size_d_ai, size_d_di;
  int   size_element;
  int   i;
  int   sts;

  // size_c is the control section size
  size_c = sizeof (adios_signature_t) + sizeof (adios_cis_t) * nadios;

  // size_d is the data section size
  size_d = sizeof (adios_data_header_t);
  for (i = 0; i < nadios; i++) {
    size_d_ai = adios [i].nai * ((adios [i].maxresai + 15) / 16) * 2;
    size_d_di = (adios [i].ndi + 31) / 32 * 4;
    size_d += size_d_ai + FILLER_ALIGN_32bits (size_d_ai) + size_d_di;
  }
  size_element = size_d;
  size_d *= optS;

  // compute the total size of shared memory
  size = size_c + FILLER_ALIGN_4kbytes (size_c)
       + size_d + FILLER_ALIGN_4kbytes (size_d);
…
As you can see, the code runs through the adios global database that it filled in as the final phase of option processing, and accumulates the total data sizes that all of the samples will need. The optS variable is the number of samples; once we know each sample's size we multiply by that number to compute the total size. The total size of the shared memory is size_c (rounded up to be a multiple of 4096 bytes) plus size_d (also rounded up).
The next step in processing is to open the shared memory region. If one already exists, we invalidate it and remove it, and then try to open it again (error messages in code not shown):
…

  sts = shm_open (opts, O_RDWR | O_CREAT | O_EXCL, 0644);
  if (sts == -1) {
    if (errno == EEXIST) {

      // in the case that it already exists, we'll wipe the
      // signature of the existing one and unlink it.
      sts = shm_open (opts, O_RDWR, 0);
      if (sts == -1) {
        exit (EXIT_FAILURE);
      }

      // map it in so we can wipe it
      shmem_ptr = mmap (0, 4096, PROT_READ | PROT_WRITE,
                        MAP_SHARED, sts, 0);
      if (shmem_ptr == MAP_FAILED) {
        exit (EXIT_FAILURE);
      }

      // wipe it
      memset (shmem_ptr, 0, 4096);
      close (sts);
      munmap (shmem_ptr, 4096);
      shm_unlink (opts);

      // now try again to open it!
      sts = shm_open (opts, O_RDWR | O_CREAT | O_EXCL, 0644);
      if (sts == -1) {
        exit (EXIT_FAILURE);
      }
    } else {
      // if the initial open failed for any reason
      // *other than* EEXIST, die.
      exit (EXIT_FAILURE);
    }
  }
  shmem_fd = sts;
…
The first call to shm_open() uses the O_CREAT and O_EXCL flags. These indicate that the shared memory region is being created, and must not already exist. Notice that the work involved in wiping the signature is the same work that we must do later to map the shared memory region into our address space.
At this point, we now have shmem_fd as the shared memory file descriptor.
Finally, we need to set the size of the shared memory segment:
…

  sts = ftruncate (shmem_fd, size);
  // error check code omitted
…
And map it into our address space via mmap():
…

  shmem_ptr = mmap (0, size, PROT_READ | PROT_WRITE,
                    MAP_SHARED, shmem_fd, 0);
  // error checking code omitted
…
The flags to mmap() are:
Now that our shared memory region exists and is the correct size, we assign some utility pointers into the areas within the shared memory:
…

  // set up our utility pointers
  sig = (adios_signature_t *) shmem_ptr;
  daq = (adios_daq_status_t *) (shmem_ptr + sizeof (*sig));
  cis = (adios_cis_t *) (shmem_ptr + sizeof (*sig)
        + sizeof (*daq));
…
|
Note that inside the shared memory region we never store any pointer values. After all, the shared memory region could be mapped into a different address space within each process that needs to access it. In the code snippet above, we create pointers into the areas of interest after we know where the shared memory region is mapped in our address space. |
Then we fill the shared memory structure:
…

  // clear the signature (just for safety, a
  // new shmem region is zeroed anyway)
  memset (sig -> signature, 0, sizeof (sig -> signature));
  sig -> datablock = size_c + FILLER_ALIGN_4kbytes (size_c);
  sig -> datablock /= 4096;  // convert to blocks
  sig -> num_cis = nadios;
  sig -> num_elems = optS;
  database = shmem_ptr + sig -> datablock * 4096;

  daq -> element_size = size_element;

  // head points to the last entry in the buffer, so that
  // when we add our first entry head will point to 0
  daq -> tail = daq -> head = optS - 1;

  for (i = 0; i < nadios; i++) {
    strncpy (cis [i].name, adios [i].name, MAXNAME);
    cis [i].nai = adios [i].nai;
    cis [i].nao = adios [i].nao;
    cis [i].ndi = adios [i].ndi;
    cis [i].ndo = adios [i].ndo;
    cis [i].nbpc = adios [i].nbpc;
    cis [i].maxresai = adios [i].maxresai;
  }
}
Filling the shared memory structure means that we set:
Notice that we did not fill in the signature field (we only zeroed it). That's because we validate the signature only when we have at least one valid sample in the shared memory ring buffer.
That was a lot of work. Compared to this, managing the shared memory ring buffer data is much simpler!
Now that the shared memory ring buffer is set up, we can enter a polling loop and acquire data from the various devices.
This involves the following steps:
Notice that we sign the signature if we haven't done so yet. This ensures that there is at least one valid sample before we declare the shared memory area okay to use.
Here are the pieces of the DAQ thread that do the above steps (error messages in code not shown):
daq_thread (void *not_used)
{
  …
  // calculate the *maximum* transfer size
  ai = di = 0;
  for (i = 0; i < nadios; i++) {
    if (adios [i].ndi > di) {
      di = adios [i].ndi;
    }
    if (adios [i].nai > ai) {
      ai = adios [i].nai;
    }
  }

  // allocate a buffer which we never free
  xfersize = ai * 2 + di / 8;

  c = malloc (sizeof (*c) + xfersize);
  if (c == NULL) {
    // trash the process; no real use in continuing
    // without this thread
    exit (EXIT_FAILURE);
  }
…
We have the adios array in memory, and that tells us the number of analog and digital input points. We use this in our calculation to come up with a transfer size (xfersize) that represents the maximum transfer size. The transfer size calculated may be much bigger than actually required, because we've summed all of the data I/O points, rather than trying to figure out the biggest transfer size required per card. In smaller systems, this won't be a problem because we're talking about only a few hundred bytes. In a large system, you may wish to revisit this piece of code and calculate a more appropriate transfer size. The xfersize variable gets overwritten later, so it's safe to modify it in the above code.
Within the loop, we perform some head and tail manipulations in a local copy. That's because we don't want to move the head and tail pointers in shared memory until the data set is in place. In case the shared memory region is full (as it will be once it initially fills up — it never actually “drains”), we do need to adjust the tail pointer in the shared memory region as soon as possible, so we do so immediately.
…

  // now loop forever, acquiring samples
  while (1) {
    // do one sample

    // adjust the head in a local working copy
    // while we futz with the data
    head = daq -> head + 1;
    if (head >= optS) {
      head = 0;
    }

    // adjust the tail in an atomic manner
    // so that it's always valid
    if (daq -> tail == head) {
      tail = daq -> tail + 1;
      if (tail >= optS) {
        tail = 0;
      }
      daq -> tail = tail;
    }
…
Notice how the daq -> tail member is adjusted after we calculate the correct version of tail in a local copy. This is done in order to present an atomic update of the tail index. Otherwise, we'd have a potentially out-of-range value of tail in shared memory after we incremented it, and before we looped it back around to zero.
|
There's another window of failure here.
Theoretically, the client of the shared memory interface and ADIOS should maintain
a mutex (or semaphore) to control access to the shared memory.
That's because it's possible that, if the client requires the full number of sample sets
(i.e. the 1000 samples or whatever it's been changed to via -S on the command
line), ADIOS could be in the middle of writing out the new data sample set over top
of the oldest data set.
I thought about this, and decided not to incur the additional complexity of a synchronization object, and instead informed the end-users of ADIOS that they should make their number of samples bigger than the number of samples they actually require from the shared memory region. While this may appear to be somewhat tacky, in reality it's not that bad owing to the speed at which things happen. In normal operation, the customer needs something like a few hundred samples at most, and these samples are updated at a rate of ten per second. So by extending the number of samples to be much bigger than a few hundred, it would take a significant amount of time (tens of seconds) before the oldest data set reached this about-to-be-overwritten state. |
…

    // get the data
    ptr = (void *) (database + head * daq -> element_size);
    dhdr = ptr;
    ClockTime (CLOCK_REALTIME, NULL, &dhdr -> t0ns);
    ptr = dhdr + 1;

…

    /*
     * Here we get the data; I've moved this code into the next
     * para so we can see just the clock manipulation here.
    */

…

    ClockTime (CLOCK_REALTIME, NULL, &dhdr -> t1ns);

    // finally, set the daq -> head to our "working" head now
    // that the data is stable
    daq -> head = head;
…
The code above illustrates the outer time snapshot and update of the head index. Between the two time snapshots, we acquire the data (see the code below). The point of doing the two ClockTime() snapshots was for performance measuring, statistics, and sanity.
The ClockTime() function gives us the number of nanoseconds since the beginning of time (well, Neutrino's concept of the “beginning of time” anyway). The difference in the value of the members t0ns and t1ns is the amount of time it took to acquire the samples, and t0ns can also be used to determine when the sample acquisition started. This data is stored with each sample set. The performance measurement aspect of this should be obvious — we just determine how long it takes to acquire the samples. The statistics and freshness aspects of this are based on the customer's requirement. They need to know exactly when each sample was taken, so that they can plug these numbers into their proprietary process control formula.
…

    // code removed from section above:
    for (i = 0; i < nadios; i++) {
      c -> i.nais = adios [i].nai;
      c -> i.ndis = adios [i].ndi;
      xfersize = c -> i.nais * 2 + c -> i.ndis / 8;
      sts = devctl (adios [i].fd, DCMD_GET_ADIS,
                    c, xfersize, NULL);
      if (sts != EOK) {
        // code prints an error here...
        exit (EXIT_FAILURE);
      }
      // just memcpy the data from there to shmem
      memcpy (ptr, c -> o.buf, xfersize);
      ptr = (void *) ((char *) ptr + xfersize);
    }
…
Above is the code that went between the two time snapshots. As you can see, we run through our adios array database, calculate an appropriate transfer size for each particular transfer (but still using the bigger transfer buffer we allocated above). The transfer is accomplished by a devctl() to each driver with the DCMD_GET_ADIS command. This command returns a packed analog input and digital input array, which we simply memcpy() into shared memory at the correct place. (We do pointer math with ptr to get it to walk along the data set.)
…

    /*
     *  See if we need to sign the data area.  We do this only
     *  after at least one sample has been put into shmem.
     */

    if (!memory_signed) {
      memcpy (sig -> signature, ADIOS_SIGNATURE,
              sizeof (sig -> signature));
      memory_signed = 1;
    }

    // wait for the next sample time to occur
    delay (optp);
  }
}
Finally, we sign the shared memory region if we haven't already (to ensure that there's at least one sample before the signature is valid), and we delay until the next sample time.
You may have noticed that we aren't going to be acquiring samples at exactly 10 Hz (or whatever rate the user specifies on the command line). That's because the amount of time spent in accumulating the samples adds to the total delay time. This was not a concern for the customer, and code with a fixed delay (and with slippage) is much easier to implement than code that runs at a fixed period.
If we did want the code to run at a fixed period, then there are a couple of ways to do that:
Both approaches are almost identical as far as timing is concerned. The semaphore approach may also suffer from “lag” if the thread that's hitting the semaphore gets preempted. Both approaches may suffer from the inability to keep up on a large system, or if a higher sample rate were used. Because enabling the next sample (i.e. the sem_wait() or the MsgReceive()) is asynchronously updated with respect to the data acquisition, it's possible that if the data acquisition takes longer than the period, things will start to “back up.”
This too can be solved, by draining all events (semaphore or pulses) before continuing to the next sample set. If you count the number of events you've drained, you can get a good idea of how far behind you are lagging, and that can be output to an operator or a log for diagnostics.
Now that we have a good understanding of where the data comes from (the pcl711, iso813, and the dio144 drivers and their implementation) and how the data gets put into shared memory (the adios server), let's take a quick look at two additional utilities, namely showsamp and tag.
The showsamp utility was written first, and was mainly a debugging aid to determine if the samples being stored by ADIOS were correct and accessible. Then tag was written to exercise the configuration files and the tag accessibility. So, as with most projects, two of the useful utilities weren't in the initial requirements, and were actually written as simple debug programs.
Before we dive into the code for showsamp, here is an example of what the output looks like. I'm running this with a simulated device, called /dev/sim000-0220, which generates patterns of data.
# showsamp

SHOWSAMP
Shared memory region:  /adios
Size:          40960 bytes
Devices: (1)
    [0] "/dev/sim000-0220" 8 x AI, 16 x DI
HEAD 206 TAIL 999 ELEMENT_SIZE 36 NUM_ELEMS 1000
Data Set 202, acquired 2003 10 09 14:25:50.73824624 (delta 0 ns)
CARD /dev/sim000-0220, 8 AI, (1 AO), 16 DI, (16 DO)
  AI: 0651 0652 0653 0654 0655 0656 0657 0658
  DI: 00CB

Data Set 203, acquired 2003 10 09 14:25:50.83914604 (delta 0 ns)
CARD /dev/sim000-0220, 8 AI, (1 AO), 16 DI, (16 DO)
  AI: 0659 065A 065B 065C 065D 065E 065F 0660
  DI: 00CC

Data Set 204, acquired 2003 10 09 14:25:50.94004585 (delta 0 ns)
CARD /dev/sim000-0220, 8 AI, (1 AO), 16 DI, (16 DO)
  AI: 0661 0662 0663 0664 0665 0666 0667 0668
  DI: 00CD

Data Set 205, acquired 2003 10 09 14:25:51.04096166 (delta 0 ns)
CARD /dev/sim000-0220, 8 AI, (1 AO), 16 DI, (16 DO)
  AI: 0669 066A 066B 066C 066D 066E 066F 0670
  DI: 00CE

Data Set 206, acquired 2003 10 09 14:25:51.14186147 (delta 0 ns)
CARD /dev/sim000-0220, 8 AI, (1 AO), 16 DI, (16 DO)
  AI: 0671 0672 0673 0674 0675 0676 0677 0678
  DI: 00CF
The showsamp utility starts up and tells me that it's using a shared memory region identified as /adios, that it's 40 KB in size, and that there is only one device present, called /dev/sim000-0220. It then tells me that this device has 8 analog inputs and 16 digital inputs and dumps the default 5 samples, showing the analog and the digital values.
The showsamp utility has a rather large main() function. That's because, as stated above, it was written initially to be a quick hack to test ADIOS's shared memory. Basically, it opens the shared memory segment, calls mmap() to map the shared memory segment to a pointer, and then verifies the signature.
If this all succeeds, then main() creates a series of pointers into the various data structures of interest, and dumps out the last N samples (where N defaults to 5 and can be overridden on the command line with -n):
for (i = head - optn + 1; i <= head; i++) {
  if (i < 0) {
    do_data_set (i + sig -> num_elems);
  } else {
    do_data_set (i);
  }
}
The code above starts at N positions before the current head and goes until the head. Notice that the result of the subtraction may be negative, and that's fine — we handle it by adding in the number of elements from the num_elems member in shared memory.
To actually get one data set's worth of samples:
static void
do_data_set (int ds)
{
  int                   i, j;
  adios_data_header_t   *dhead;
  uint16_t              *u16;
  struct tm             *tm;
  char                  buf [BUFSIZ];

  dhead = (adios_data_header_t *) (database
        + ds * daq -> element_size);
  i = dhead -> t0ns / 1000000000LL;
  tm = localtime (&i);
  strftime (buf, sizeof (buf), "%Y %m %d %H:%M:%S", tm);

  printf ("Data Set %d, acquired %s.%09lld (delta %lld ns)\n",
          ds, buf, dhead -> t1ns % 1000000000LL,
          dhead -> t1ns - dhead -> t0ns);
  u16 = (uint16_t *) (dhead + 1);
  for (i = 0; i < sig -> num_cis; i++) {
    printf ("CARD %s, %d AI, (%d AO), %d DI, (%d DO)\n",
            cis [i].name,
            cis [i].nai, cis [i].nao,
            cis [i].ndi, cis [i].ndo);
    if (cis [i].nai) {
      printf ("  AI: ");
      for (j = 0; j < cis [i].nai; j++) {
        printf ("%04X ", *u16++);
      }
      printf ("\n");
    }
    if (cis [i].ndi) {
      printf ("  DI: ");
      for (j = 0; j < (cis [i].ndi + 15) / 16; j++) {
        printf ("%04X ", *u16++);
      }
      printf ("\n");
    }
  }
  printf ("\n");
}
The ds parameter is the data set number, and the first line of code does pointer arithmetic to get the pointer dhead to point to the appropriate data set. We adjust and format the time that the sample was acquired, and then dump out all of the data elements. The CIS tells us how many samples we are expecting. Note that the CIS does not tell us the formatting of the digital I/O — whether they are “naturally” presented as 8-bit or 16-bit samples, or how they are grouped (e.g. on the DIO-144 they are grouped as three sets of 8-bit samples). There are other assumptions in this code, like that all analog samples will be 16 bits or less, and that all digital samples will be printed as 16-bit quantities. You can easily change this by adding more information into the CIS and then examining that information here.
Here's an example of a command-line session using the tag utility with the simulator device, sim000:
[wintermute@ttyp0] tag -m1000 s_pc10b9=1 s_pc8=259 \
s_pc9b0 s_pc9b1 s_pc9b2
Data Set 217, acquired 2003 10 09 14:32:36.16915388 (delta 0 ns)
Tag "s_pc9b0" 0
Tag "s_pc9b1" 1
Tag "s_pc9b2" 0

Data Set 227, acquired 2003 10 09 14:32:37.17816996 (delta 0 ns)
Tag "s_pc9b0" 0
Tag "s_pc9b1" 0
Tag "s_pc9b2" 1

Data Set 237, acquired 2003 10 09 14:32:38.18866655 (delta 0 ns)
Tag "s_pc9b0" 0
Tag "s_pc9b1" 1
Tag "s_pc9b2" 1

Data Set 247, acquired 2003 10 09 14:32:39.19768263 (delta 0 ns)
Tag "s_pc9b0" 0
Tag "s_pc9b1" 0
Tag "s_pc9b2" 0

Data Set 257, acquired 2003 10 09 14:32:40.20668071 (delta 0 ns)
Tag "s_pc9b0" 0
Tag "s_pc9b1" 1
Tag "s_pc9b2" 0
In this example, I've instructed tag to set the tag s_pc10b9 to the value 1, and the tag s_pc8 to the value 259 (decimal). Then, via the -m option, I told tag to dump out the values for the three tags s_pc9b0, s_pc9b1, and s_pc9b2 every 1000 milliseconds. I killed the tag program via Ctrl-C after five samples were printed.
Part of the functionality present in the tag utility is identical to that from showsamp, namely the setup of shared memory, mapping the shared memory to a pointer, and setting up the various utility pointers to point into items of interest in the shared memory.
Basically, tag can do three things:
Obviously, the last two are mutually exclusive. Setting a tag is performed within the option processor optproc(), while all display activities are deferred until after the shared memory has been set up. This is because in order to set a tag, we don't need the shared memory — we can talk directly to the device driver and get it to perform the work. However, in order to read a tag, we need to have access to the shared memory, because that's where we will be reading the tag from.
To set a tag, the library function adios_set_tag_raw() or adios_set_tag_span() is called. What I mean by “raw” is that the value that you are writing is not interpreted by the configuration file's optional span keyword — on a card with a 12-bit D/A converter, the raw value would be between 0 and 4095. Contrast that with the span version, where we look at the configuration file and determine, for example, that the analog output point has a range of -5 to +5, so only values in that range would be valid. (They're converted from floating-point to raw values by the library anyway — this is a nicety for the applications programmer.)
To display a tag, the option processor adds the tag into a list of tags. After option processing has finished, the list of tags is finalized (by looking into shared memory and finding the actual offsets into the data set), and displayed. The function fixup_display_list() that does this is long and boring. Basically, what it does is match the channel, port, and, in the case of digital I/O points, the bit number, against the data contained in the CIS, and then it determines the offset.
You can see the result of this by looking at the function that actually displays the data, display_list():
static int bits [16] = {
  0x0001, 0x0002, 0x0004, 0x0008,
  0x0010, 0x0020, 0x0040, 0x0080,
  0x0100, 0x0200, 0x0400, 0x0800,
  0x1000, 0x2000, 0x4000, 0x8000};

static void
display_list (void)
{
  adios_data_header_t  *dhead;
  int                  ds;
  int                  i;
  char                 buf [BUFSIZ];
  uint16_t             *u16;
  uint8_t              *u8;
  struct tm            *tm;
  double               v;

  ds = daq -> head;
  dhead = (adios_data_header_t *) (database
        + ds * daq -> element_size);

  i = dhead -> t0ns / 1000000000LL;
  tm = localtime (&i);
  strftime (buf, sizeof (buf), "%Y %m %d %H:%M:%S", tm);
  u16 = (uint16_t *) (dhead + 1);   // get ptr to sample set
  u8 = (uint8_t *) u16;             // get 8-bit version too

  printf ("Data Set %d, acquired %s.%09lld (delta %lld ns)\n",
          ds, buf, dhead -> t1ns % 1000000000LL,
          dhead -> t1ns - dhead -> t0ns);

  for (i = 0; i < ntags; i++) {
    if (tags [i].type == 'a') {
      printf ("Tag \"%s\" raw value 0x%04X", tags [i].name,
              u16 [tags [i].offset / 2]);
      if (tags [i].span_low != tags [i].span_high) {
        v = u16 [tags [i].offset / 2];
        v = v / 4095. * (tags [i].span_high - tags [i].span_low)
          + tags [i].span_low;
        printf (" span-compensated value %s%g",
                v > 0.0 ? "+" : "", v);
      }
      printf ("\n");
    }
    if (tags [i].type == 'd') {
      printf ("Tag \"%s\" %d\n", tags [i].name,
        !!(u8 [tags [i].offset] & bits [tags [i].bitnum]));
    }
  }
  printf ("\n");
}
It has similar date and time printing and calculation logic as the showsamp utility. The for loop runs through all of the tags, and determines if they are analog or digital. If the tag is an analog tag, we display the raw value. If the tag has a span range that's not zero, we calculate and display the converted value as well. In the case of a digital value, we simply fetch the appropriate byte, and mask it off with the appropriate bit number.
The fine distinction between displaying the values once and displaying the values repeatedly is handled by main():
do {
  display_list ();
  if (optm != -1) {
    delay (optm);
  }
} while (optm != -1);
The do-while ensures that the code executes at least once. The delay factor, optm (from the command line -m), is used as both a flag (when the value is -1, meaning “display once”) and the actual delay count in milliseconds (if not -1).
The following references apply to this chapter.
See the following functions in the Neutrino C Library Reference: