 |
For a full understanding of how the kernel works, see the QNX Neutrino Microkernel chapter in the System Architecture guide. |
This chapter includes:
In many computing environments, developers need to monitor a dynamic execution of realtime systems with emphasis on their key architectural components. Such monitoring can reveal hidden hardware faults and design or implementation errors, as well as help improve overall system performance.
In order to accommodate those needs, we provide sophisticated tracing and profiling mechanisms, allowing execution monitoring in real time or offline. Because it works at the operating system level, the SAT, unlike debuggers, can monitor applications without having to modify them in any way.
The main goals for the SAT are:
In a running system, many things occur behind the scenes:
The results of this activity are changes to the system state that are normally hidden from developers. The SAT is capable of intercepting these changes and logging them. Each event is logged with a timestamp and the ID of the CPU that handled it.
|
For a full understanding of how the kernel works, see the QNX Neutrino Microkernel chapter in the System Architecture guide. |
The SAT offers valuable information at all stages of a product's life cycle, from prototyping to optimization to in-service monitoring and field diagnostics.
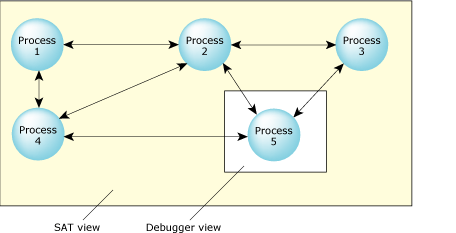
The SAT view and the debugger view.
In complicated systems, the information provided by standard debugging programs may not be detailed enough to solve the problem. Or, the problem may not be a bug as much as a process that's not behaving as expected. Unlike the SAT, debuggers lack the execution history essential to solving the many complex problems involved in “application tuning.” In a large system, often consisting of many interconnected components or processes, traditional debugging, which lets you look at only a single module, can't easily assist if the problem lies in how the modules interact with each other. Where a debugger can view a single process, the SAT can view all processes at the same time. Also, unlike debugging, the SAT doesn't need code augmentation and can be used to track the impact of external, precompiled code.
Because it offers a system-level view of the internal workings of the kernel, the SAT can be used for performance analysis and optimization of large interconnected systems as well as single processes.
It allows realtime debugging to help pinpoint deadlock and race conditions by showing what circumstances led up to the problem. Rather than just a “snapshot”, the SAT offers a “movie” of what's happening in your system.
Because the instrumented version of the kernel runs with negligible performance penalties, you can optionally leave it in the final embedded system. Should any problems arise in the field, you can use the SAT for low-level diagnostics.
The SAT offers a nonintrusive method of instrumenting the code—programs can literally monitor themselves. In addition to passive/non-intrusive event tracing, you can proactively trace events by injecting your own “flag” events.
The QNX Neutrino System Analysis Toolkit (SAT) consists of the following main components:
You can also trace and analyze events under control of the Integrated Development Environment.
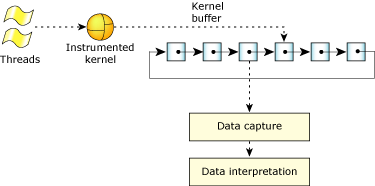
Overall view of the SAT.
The instrumented kernel is actually the regular QNX Neutrino microkernel with a small, highly efficient event-gathering module included. Except for the instrumentation, its operation is virtually indistinguishable—the instrumented kernel runs at 98% of the speed of our regular microkernel.
As threads run, the instrumented kernel continuously intercepts information about what the kernel is doing, generating time-stamped and CPU-stamped events that are stored in a ring of buffers. Because the tracing occurs at the kernel level, the SAT can track the performance of all processes, including the data-capturing program.
To check to see if your system is running the instrumented kernel, type:
ls /proc/boot
and then look for a file whose name includes procnto. If the file name is procnto-*instr, you're running the instrumented kernel; if the file name doesn't include instr, you're running the noninstrumented kernel.
To switch to the instrumented kernel, do the following:
The kernel buffer is composed of many small buffers. Although the number of buffers is limited only by the amount of system memory, it's important to understand that this space must be managed carefully. If all of the events are being traced on an active system, the number of events can be quite large.
To allow the instrumented kernel to write to one part of the kernel buffer and store another part of it simultaneously, the trace buffers are organized as a ring. As the buffer data reaches a high-water mark (about 70% full in linear mode, or 90% in ring mode), the instrumented kernel module raises an _NTO_HOOK_TRACE synthetic interrupt to notify the data-capture program with the address of the buffer. The data-capture program can then retrieve the buffer and save it in a storage location for offline processing or pass it to a data interpreter for realtime manipulation. In either case, once the buffer has been emptied, it's once again available for use by the kernel.
QNX Neutrino includes a tracelogger that you can use to capture data. This service receives events from the instrumented kernel and saves them in a file or sends them to a device for later analysis.
|
The data-capture utilities require root privileges to allocate buffer memory or to use functions such as InterruptHookTrace() (see the Neutrino Library Reference). Data-capture utilities won't work properly without these privileges. |
Because the tracelogger may write data at rates well in excess of 20 MB/minute, running it for prolonged periods or running it repeatedly can use up a large amount of space. If disk space is low, erase old log files regularly. (In its default mode, tracelogger overwrites its previous default file.)
You can also control tracing from your application (e.g. to turn tracing on just for a problematic area) with the TraceEvent() kernel call. This function has over 30 different commands that let you:
For more information, see the Capturing Trace Data chapter in this guide, the entry for tracelogger in the Utilities Reference, and the entry for TraceEvent() in the QNX Neutrino Library Reference.
To aid in processing the binary trace event data, we provide the libtraceparser library. The API functions let you set up a series of functions that are called when complete buffer slots of event data have been received/read from the raw binary event stream.
We also provide a linear trace event printer (traceprinter) that outputs all of the trace events ordered linearly by their timestamp as they're emitted by the kernel. This utility uses the libtraceparser library. You can also use the API to create an interface to do the following offline or in real time:
The traceparser library provides an API for parsing and interpreting the trace events that are stored in the event file. The library simplifies the parsing and interpretation process by letting you easily:
For more information, see the Interpreting Trace Data chapter in this guide, as well as the entry for traceprinter in the Utilities Reference.
The QNX Momentics IDE provides a graphical interface that you can use to capture and examine tracing events. The IDE lets you filter events, zoom in on ranges of them, examine the associated data, save subsets of events, and more.
For more information, see the Analyzing Your System with Kernel Tracing chapter of the IDE User's Guide.