When you reference image boots, by default, the Camera MUX 2x2 application runs immediately, but exits if you don't have four cameras connected to your board. If you want the application to run with a less than four cameras, use the -n parameter.
The application also requires that the board has four connected and configured as CAMERA_UNIT_1, CAMERA_UNIT_2, CAMERA_UNIT_3, and CAMERA_UNIT_4. The default camera configuration file on the reference image is configured to use four FPD-Link III interface cameras.
- -n numberofcameras
- You can use this optional parameter to run the application using 1–3 cameras.
When this parameter isn't specified, four cameras are required for this
application to run; otherwise it exits.
For example, if you want to run this application with one camera, you would run this command:
camera_mux2x2 -n 1
- in the top-left corner is CAMERA_UNIT_1 the camera connected to port 0
- in the top-right corner is CAMARA_UNIT_2, the camera connected to port 1
- in the bottom-left corner is CAMARA_UNIT_3, the camera connected to port 2
- in the bottom-right corner is CAMARA_UNIT_4, the camera connected to port 3
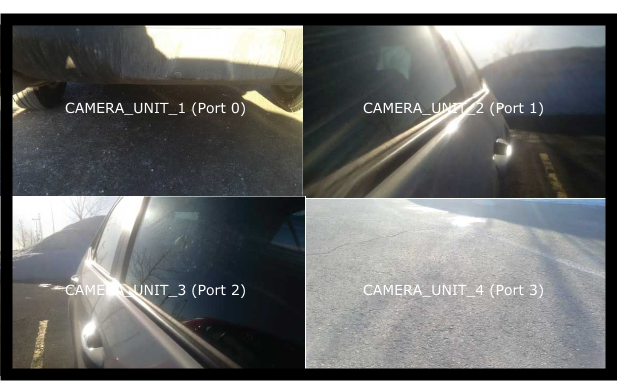
Figure 1. Camera MUX 2x2 application
If you don't have four cameras to connected to your board, you can run this application by using file cameras. For more information about how to configure file cameras, see“ Configuration for file cameras”.
Run the application
- Connect to the target board using a serial connection, terminal via a network connection (telnet or ssh), or via a terminal in the QNX Momentics IDE.
- Type camera_example to run the Camera MUX 2x2 example.
Build the Camera MUX 2x2 application
On your host computer, the source code is provided for Camera MUX 2x2 example. You can build the source and deploy the binary on to your target.
- In a command prompt, copy camera_mux2x2_ADAS1.0_[buildstamp].zip, where buildstamp is a numeric value representing an internal build number to location on your computer, such as %HOME%/qnx_install/adas.
- If you are running on a Windows host, type bash in your command prompt.
- Navigate to the location that you copied the ZIP file, and type unzip camera_mux2x2_ADAS1.0_[buildstamp].zip.
- A directory should be created called camera_mux2x2, navigate into that directory, and type make all.
- Navigate to nto/arm/o.le.v7 and transfer the camera_mux2x2 file to your the /usr/bin/ directory on the target. For example, you can use the IDE to transfer the file.
Note: Ensure that you can create a backup of the original camera_mux2x2 executable before you deploy your newly built version of the Camera MUX 2x2 application.
- On your target, in a terminal connection, type camera_mux2x2 to run the application. Keep in mind, the Camera MUX 2x2 application may run, but exits immediately if it doesn't detect that there are four cameras available.