The Pedestrian detection application demonstrates how to use InfoADAS to detect pedestrians in an image buffer.
You can run this application with a camera connected to the board or run it with a file camera. On the reference image, there's a video that you can use for the file camera. When you run the application, you can put a picture in front of the camera and you should see red boxes surround any pedestrians in the video as show in the following illustration:
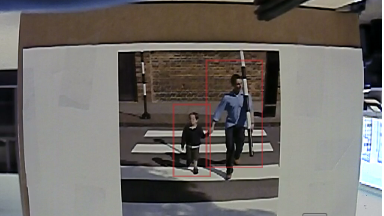
Figure 1. Application showing pedestrians detected.
Figure 1. Application showing pedestrians detected.
The Pedestrian detection application (infoadas-demo-pd) takes the following parameters:
- -p: The name of the plugin to use. Use the value qnx-demo.
- -c: The name of the chain to use. The value to use is pedestrian_detection.
- -r: The amount to rotate an image in degrees. Rotation is typically required for parallel interface cameras and you need to rotate it by 180 degrees.
- -s: The resolution of the image (in
pixels). The valid values you can use are: 640x480 (USB cameras) and 640x360
(for cameras connected via parallel interfaces). If you specify a size larger than your video, blue occurs around the video. If you don't specify this parameter, the application attempts to determine the best resolution to use.Note: FPD-Link III cameras are not supported for this application.
Follow the instructions below based on the type of camera that you are using for your system:
Run application using a file camera
To run the application as a file camera, complete these steps:
- Connect to the target board using a serial connection, terminal via a network connection (telnet or ssh), or via a terminal in the QNX Momentics IDE.
- Configure a file camera. For information about how to configure a file camera, see “Configuration for using a file camera”.
- Restart the target board (reset the power or run the shutdown command).
- Restart the IPC and load additional firmware. To do this, run the ipc command as show here:
# slay ipc
# ipc IPU2 /lib/firmware/dra7xx-m4-ipu2.xem4 IPU1 /lib/firmware/dra7-ipu1-fw.xem4
  DSP1 /lib/firmware/dra7-dsp1-fw.xe66 DSP2 /lib/firmware/dra7-dsp2-fw.xe66
- Start the mqueue service.
# mqueue
- Run the Pedestrian detection application (infoadas-demo-pd) specifying -p as qnx_demo, the -c as pedestrian_detection, and -s to match the dimensions of the video. For example:
# infoadas-demo-pd -p qnx_demo –r 180 -c pedestrian_detection -s 640x360
Run application using a camera connected via USB
To run the application as a file camera, complete these steps:
- Connect to the target board using a serial connection, terminal via a network connection (telnet or ssh), or via a terminal in the QNX Momentics IDE.
- Configure a USB camera. For information about how to configure a USB camera, see “Configuration for using a USB camera”.
- Restart the target board (reset the power or run the shutdown command).
- Restart the IPC and load additional firmware. To do
this, run ipc command as shown here:
# slay ipc # ipc IPU2 /lib/firmware/dra7xx-m4-ipu2.xem4 IPU1 /lib/firmware/dra7-ipu1-fw.xem4 DSP1 /lib/firmware/dra7-dsp1-fw.xe66 DSP2 /lib/firmware/dra7-dsp2-fw.xe66 - Start the mqueue service.
# mqueue
- Run the Pedestrian detection application (infoadas-demo-pd) specifying -p as qnx-demo, the -c as pedestrian_detection, and -s to match the dimensions of the video. For example:
# infoadas-demo-pd -p qnx_demo -c pedestrian_detection -s 640x480
Run application using a camera connected by a parallel interface
To run the application with a camera connected via a parallel interface, complete these steps:
- Connect to the target board using a serial connection, terminal via a network connection (telnet or ssh), or via a terminal in the QNX Momentics IDE.
- Configure a camera connected via the parallel port. For information about how to configure a parallel interface-connected camera, see “Configuration for cameras connected via a parallel interface”.
- Restart the target board (reset the power or run the shutdown command).
- Restart the IPC and load additional firmware. To do this, run ipc command as shown here:
# slay ipc # ipc IPU2 /lib/firmware/dra7xx-m4-ipu2.xem4 IPU1 /lib/firmware/dra7-ipu1-fw.xem4 DSP1 /lib/firmware/dra7-dsp1-fw.xe66 DSP2 /lib/firmware/dra7-dsp2-fw.xe66 - Start the mqueue service.
# mqueue
- Run the Pedestrian detection application (infoadas-demo-pd), specifying -p as qnx_demo, the -c as pedestrian_detection, and -s to match the dimensions of the video. You must include the -r parameter to rotate the image, otherwise it appears upside-down on the display. For example:
# infoadas-demo-pd -p qnx_demo –r 180 -c pedestrian_detection -s
                    640x360
Run application one camera connected with a FPD-Link III interface
To run the application with a camera connected via a FPD-Link III interface, complete these steps:
- Connect to the target board using a serial connection, terminal via a network connection (telnet or ssh), or via a terminal in the QNX Momentics IDE
- Configure one camera connected via a FPD-Link III interface. For information about how to configure one camera camera, see “Configuration for using one camera connected via an FPD-Link III interface”.
- Restart the target board (reset the power or run the shutdown command).
- Restart the IPC and load additional firmware. To do this, run ipc command as shown here:
# slay ipc # ipc IPU2 /lib/firmware/dra7xx-m4-ipu2.xem4 IPU1 /lib/firmware/dra7-ipu1-fw.xem4 DSP1 /lib/firmware/dra7-dsp1-fw.xe66 DSP2 /lib/firmware/dra7-dsp2-fw.xe66 - Start the mqueue service.
# mqueue
- On the target, run the Pedestrian detection application (infoadas-demo-pd) specifying -p as qnx_demo, the -c as pedestrian_detection, and -s to match the dimensions of the video. For example:
# infoadas-demo-pd -p qnx_demo -c pedestrian_detection -s 640x360
Build the Pedestrian detection application
Your can download the source code from the QNX website. It's available in a separate package. The instructions to build and deploy the application are available in the Installation Notes for the package.