![[Previous]](prev.gif) |
![[Contents]](contents.gif) |
![[Index]](keyword_index.gif) |
![[Next]](next.gif) |
|
|
|
|
 |
This version of this document is no longer maintained. For the latest documentation, see http://www.qnx.com/developers/docs. |
Transparent Distributed Processing (TDP) allows you to leverage the processing power of your entire network by sharing resources and services transparently over the network. TDP uses Neutrino native network protocol Qnet to link the devices in your network.
This chapter contains the following topics:
Qnet is Neutrino's protocol for distributed networking. Using Qnet, you can build a transparent distributed-processing platform that is fast and scalable. This is accomplished by extending the Neutrino message passing architecture over a network. This creates a group of tightly integrated Neutrino nodes (systems) or CPUs — a Neutrino native network.
A program running on a Neutrino node in this Qnet network can transparently access any resource, whether it's a file, device, or another process. These resources reside on any other node (a computer, a workstation or a CPU in a system) in the Qnet network. The Qnet protocol builds an optimized network that provides a fast and seamless interface between Neutrino nodes.
 |
For a high-level description, see
Native Networking (Qnet)
in the System Architecture guide;
for information about what the user needs to know
about networking, see
Using Qnet for Transparent
Distributed Processing
in the Neutrino User's Guide.
For more advanced topics and programming hints on Qnet, see Advanced Qnet Topics appendix. |
The Qnet protocol extends interprocess communication (IPC) transparently over a network of microkernels. This is done by taking advantage of the Neutrino's message-passing paradigm. Message passing is the central theme of Neutrino that manages a group of cooperating processes by routing messages. This enhances the efficiency of all transactions among all processes throughout the system.
For more information about message passing and Qnet, see Advanced Qnet Topics appendix.
The Qnet protocol is deployed as a network of trusted machines. It lets these machines share all their resources efficiently with minimum overhead. This is accomplished by allowing a client process to send a message to a remote manager in the same way that it sends a message to a local one. See the “How does it work?” section of this chapter. For example, using Qnet, you can use the Neutrino utilities (cp, mv and so on) to manipulate files anywhere on the Qnet Network as if they were on your machine — by communicating with the filesystem manager on the remote nodes. In addition, the Qnet protocol doesn't do any authentication of remote requests. Files are protected by the normal permissions that apply to users and groups (see “File ownership and permissions” in Working with Files in the User's Guide).
Qnet, through its distributed processing platform, lets you do the following tasks efficiently:
Since Qnet extends Neutrino message passing over the network, other forms of interprocess communication (e.g. signals, message queues, and named semaphores) also work over the network.
Any application that inherently needs more than one computer, due to its processing or physical layout requirements, could likely benefit from Qnet.
For example, you can apply Qnet networking successfully in many industrial-automation applications (e.g. a fabrication plant, with computers scattered around). From an application standpoint, Qnet provides an efficient form of distributed computing where all computers look like one big computer because Qnet extends the fundamental Neutrino message passing across all the computers.
Another useful application is in the telecom space, where you need to implement large routers that have several processors. From an architectural standpoint, these routers generally have some interface cards and a central processor that runs a set of server processes. Each interface card, in turn, has a processor that runs another set of interface (e.g. client) processes. These client processes communicate via Qnet using Neutrino message passing with the server processes on the central processor, as if they were all running on the same processor. The scalability of Qnet allows more and more interface cards to be plugged into the router, without any code changes required to the application.
In order to support different hardware, you may need to write a driver for Qnet. The driver essentially performs three functions: transmits a packet, receives a packet, and resolves the remote node's interface.
In most cases, you don't need a specific driver for your hardware, for example, for implementing a local area network using Ethernet hardware or for implementing TCP/IP networking that require IP encapsulation. In these cases, the underlying io-pkt* and TCP/IP layer is sufficient to interface with the Qnet layer for transmitting and receiving packets. You use standard Neutrino drivers to implement Qnet over a local area network or to encapsulate Qnet messages in IP (TCP/IP) to allow Qnet to be routed to remote networks.
But suppose you want to set up a very tightly coupled network between two CPUs over a super-fast interconnect (e.g. PCI or RapidIO). You can easily take advantage of the performance of such a high-speed link, because Qnet can talk directly to your hardware driver. There's no io-pkt* layer in this case. All you need is a little code at the very bottom of Qnet layer that understands how to transmit and receive packets. This is simple as there is a standard internal API between the rest of Qnet and this very bottom portion, the driver interface. Qnet already supports different packet transmit/receive interfaces, so adding another is reasonably straightforward. The transport mechanism of Qnet (called the L4) is quite generic and can be configured for different size MTUs, whether or not ACK packets or CRC checks are required, to take the full advantage of your link's advanced features (e.g. guaranteed reliability).
For details about how to write a driver, see the section on “Writing a driver for Qnet” later in this chapter.
The source for Transparent Distributed Processing is available from the Foundry 27 part of our website. It will help you develop custom drivers and/or modify Qnet components to suit your particular application.
As explained in the System Architecture guide, Neutrino client and server applications communicate by Neutrino message passing. Function calls that need to communicate with a manager application, such as the POSIX functions open(), write(), read(), ioctl(), or other functions such as devctl() are all built on Neutrino message passing.
Qnet allows these messages to be sent over a network. If these messages are being sent over a network, how is a message sent to a remote manager vs a local manager?
When you access local devices or manager processes (such as a serial device, TCP/IP socket, or mqueue), you access these devices by opening a pathname under /dev. This may be apparent in the application source code:
/*Open a serial device*/
fd = open("/dev/ser1",O_RDWR....);
or it may not. For example, when you open a socket:
/*Create a UDP socket*/
sock = socket(AF_INET, SOCK_DGRAM, 0);
The socket() function opens a pathname under /dev called /dev/socket/2 (in the case of AF_INET, which is address family two). The socket() function call uses this pathname to establish a connection with the socket manager (io-pkt*), just as the open() call above established a connection to the serial device manager (devc-ser8250).
The magic of this is that you access all managers by the name that they added to the pathname space. For more information, see the Writing a Resource Manager guide.
When you enable the Qnet native network protocol, the pathname spaces of all the nodes in your Qnet network are added to yours. The pathname space of remote nodes appears (by default) under the prefix /net.
|
Under QNX 4, you use a double slash followed by a node number to refer to another node. |
The /net directory is created by the Qnet protocol manager (lsm-qnet.so). If, for example, the other node is called node1, its pathname space appears as follows:
/net/node1/dev/socket
/net/node1/dev/ser1
/net/node1/home
/net/node1/bin
....
So with Qnet, you can now open pathnames (files or managers) on other remote Qnet nodes, in the same way that you open files locally. This means that you can access regular files or manager processes on other Qnet nodes as if they were executing on your local node.
First, let's see some basic examples of Qnet use:
less /net/node1/etc/TIMEZONE
$ pidin net
pidin -n node1 | less
on -f node date
In all of these uses, the application source or the libraries (for example libc) they depend on, simply open the pathnames under /net. For example, if you wish to make use of a serial device on another node node1, perform an open() function with the pathname /net/node1/dev/ser1 i.e.
fd = open("/net/node1/dev/ser1",O_RDWR...);
As you can see, the code required for accessing remote resources and local resources is identical. The only change is the pathname used.
In the TCP/IP socket() case, it's the same, but implemented differently. In the socket case, you don't directly open a filename. This is done inside the socket library. In this case, an environment variable is provided to set the pathname for the socket call (the SOCK environment variable — see io-pkt*).
Some other applications are:
|
The alternate implementation of message queues that uses the mq server and asynchronous messages doesn't support access to a queue via Qnet. |
This brings up an important issue for the client application or libraries that a client application uses. If you think that your application will be distributed over a network, you will want to include the capability to specify another pathname for connecting to your services. This way, your application will have the flexibility of being able to connect to local or remote services via a user-configuration adjustment. This could be as simple as the ability to pass a node name. In your code, you would add the prefix /net/node_name to any pathname that may be opened on the remote node. In the local case, or default case if appropriate, you could omit this prefix when accessing local managers.
In this example, you're using standard resource managers, such as would be developed using the resource manager framework (see the Writing a Resource Manager guide). For further information, or for a more in-depth view of Qnet, see Advanced Qnet Topics appendix.
There is another design issue to contend with at this point: the above design is a static one. If you have services at known locations, or the user will be placing services at known locations, then this may be sufficient. It would be convenient, though, if your client application could locate these services automatically, without the need to know what nodes exist in the Qnet network, or what pathname they've added to the namespace. You can now use the Global Name Service (gns) manager to locate services with an arbitrary name representing that service. For example, you can locate a service with a name such as printer instead of opening a pathname of /net/node/dev/par1 for a parallel port device. The printer name locates the parallel port manager process, whether it's running locally or remotely.
You use gns, the Global Name Service or GNS manager to locate services. GNS is a standalone resource manager. With the help of this utility, an application can advertise, look up, and use (connect to) a service across Qnet network, without knowing the details of where the service is, or who the provider is.
The gns utility runs in two different modes: server- and client-mode. A server-mode manager is a central database that stores advertised services, and handles lookup and connect requests. A client-mode manager relays advertisement, lookup, and connect requests between local application and the GNS server(s).
For more information on starting and configuring GNS, see the gns utility in the Utilities Reference.
Here's a simple layout for a GNS client and a GNS server distributed over a network:
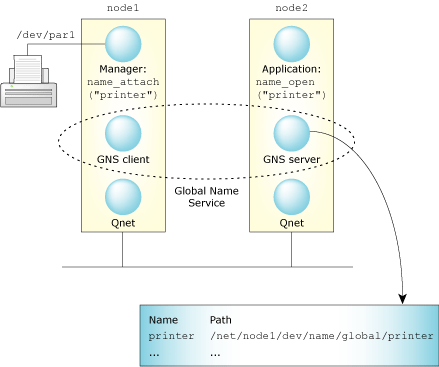
A simple GNS setup.
In this example, there's one gns client and one gns server. As far as an application is concerned, the GNS service is one entity. The client-server relationship is only between gns processes (we'll examine this later). The server GNS process keeps track of the globally registered services, while the client GNS process on the other node relays gns requests for that node to the gns server.
When a client and server application interacts with the GNS service, they use the following APIs:
In order to use GNS, you need to first register the manager process with GNS, by calling name_attach().
When you register a service, you need to decide whether to register this manager's service locally or globally. If you register your service locally, only the local node is able to see this service; another node is not able to see it. This allows you to have client applications that look for service names rather than pathnames on the node it is executing on. This document highlights registering services globally.
When you register GNS service globally, any node on the network running a client application can use this service, provided the node is running a gns client process and is connected to the gns server, along with client applications on the nodes running the gns server process. You can use a typical name_attach() call as follows:
if ((attach = name_attach(NULL, "printer", NAME_FLAG_ATTACH_GLOBAL)) == NULL) {
     return EXIT_FAILURE;
     }
First thing you do is to pass the flag NAME_FLAG_ATTACH_GLOBAL. This causes your service to be registered globally instead locally.
The last thing to note is the name. This is the name that clients search for. This name can have a single level, as above, or it can be nested, such as printer/ps. The call looks like this:
if ((attach = name_attach(NULL, "printer/ps", NAME_FLAG_ATTACH_GLOBAL)) == NULL) {
     return EXIT_FAILURE;
     }
Nested names have no impact on how the service works. The only difference is how the services are organized in the filesystem generated by gns. For example:
$ ls -l /dev/name/global/
total 2
dr-xr-xr-x  0 root      techies           1 Feb 06 16:20 net
dr-xr-xr-x  0 root      techies           1 Feb 06 16:21 printer

$ ls -l /dev/name/global/printer
total 1
dr-xr-xr-x  0 root      techies           1 Feb 06 16:21 ps
The first argument to the name_attach() function is the dispatch handle. You pass a dispatch handle to name_attach() once you've already created a dispatch structure. If this argument is NULL, a dispatch structure is created automatically.
What happens if more than one instance of the server application (or two or more applications that register the same service name) are started and registered with GNS? This is treated as a redundant service. If one application terminates or detaches its service, the other service takes over. However, it's not a round-robin configuration; all requests go to one application until it's no longer available. At that point, the requests resolve to another application that had registered the same service. There is no guaranteed ordering.
There's no credential restriction for applications that are attached as local services. An application can attach a service globally only if the application has root privilege.
When your application is to terminate, or you wish not to provide access to the service via GNS, you should call name_detach(). This removes the service from GNS.
For more information, see name_attach() and name_detach().
Your client should call name_open() to locate the service. If you wish to locate a global service, you need to pass the flag NAME_FLAG_ATTACH_GLOBAL:
if ((fd = name_open("printer", NAME_FLAG_ATTACH_GLOBAL)) == -1) {
     return EXIT_FAILURE;
     }
or:
if ((fd = name_open("printer/ps", NAME_FLAG_ATTACH_GLOBAL)) == -1) {
     return EXIT_FAILURE;
     }
If you don't specify this flag, GNS looks only for a local service. The function returns an fd that you can then use to access the service manager by sending messages, just as if you it had opened the service directly as /dev/par1, or /net/node/dev/par1.
A service is represented by a path namespace (without a leading “/”) and is registered under /dev/name/global or /dev/name/local, depending on how it attaches itself. Every machine running a gns client or server on the same network has the same view of the /dev/name/global namespace. Each machine has its own local namespace /dev/name/local that reflects its own local services.
Here's an example after a service called printer has attached itself globally:
$ ls -l /dev/name/global/
total 2
dr-xr-xr-x  0 root      techies     1 Feb 06 16:20 net
dr-xr-xr-x  0 root      techies     1 Feb 06 16:21 printer
When you deploy the gns processes on your network, you start the gns process in two modes: server and client. You need at least one gns process running as a server on one node, and you can have one or more gns clients running on the remaining nodes. The role of the gns server process is to maintain the database that stores the advertised services. The role of a client gns process is to relay requests from its node to the gns server process on the other node. A gns process must be running on each node that wishes to access GNS.
It's possible to start multiple global name service managers (gns process) in server mode on different nodes. You can deploy server-mode gns processes in two ways: as redundant servers, or as servers that handle two or more different global domains.
In the first scenario, you have two or more servers with identical database information. The gns client processes are started with contact information for both servers. Operations are then sent to all gns server processes. The gns servers, however, don't communicate with each other. This means that if an application on one gns server node wants to register a global service, another gns server can't do it. This doesn't affect other applications on the network, because when they connect to that service, both GNS servers are contacted.
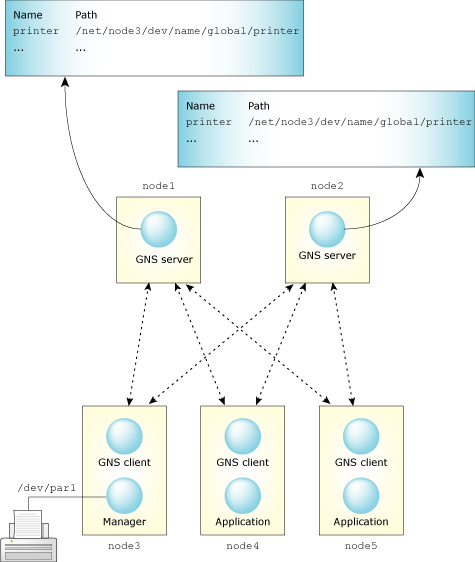
A redundant GNS setup.
You don't have to start all redundant gns servers at the same time. You can start one gns server process first, and then start a second gns server process at a later time. In this case, use the special option -s backup_server on the second gns server process to make it download the current service database from another node that's already running the gns server process. When you do this, the clients connected to the first node (that's already running the gns server process) are notified of the existence of the other server.
In the second scenario, you maintain more than one global domain. For example, assume you have two nodes, each running a gns server process. You also have a client node that's running a gns client process and is connecting to one of the servers. A different client node connects to the other server. Each server node has unique services registered by each client. A client connected to server node1 can't see the service registered on the server node2.
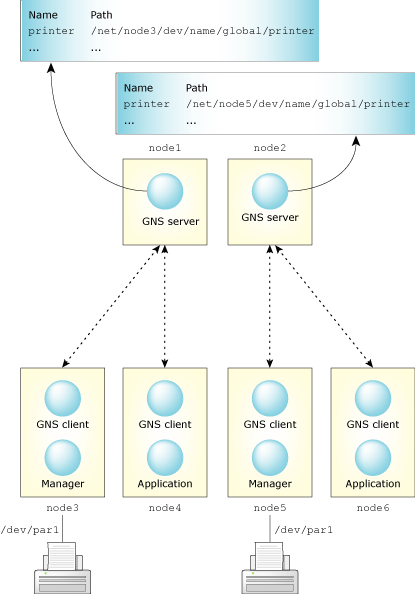
Separate global domains.
What is demonstrated in each scenario is that it's the client that determines whether a server is acting as a redundant server or not. If a client is configured to connect to two or more servers, then those servers are redundant servers for that client's services. The client can see the services that exist on those servers, and it registers its services with those servers.
There's no limit to the number of server mode gns processes that can be run on the network. Increasing the number of servers, however, in a redundant environment can increase network use and make gns function calls such as name_attach() more expensive as clients send requests to each server that exists in its configuration. It's recommended that you run only as many gns servers in a redundant configuration as your system design requires and no more than that.
For more information, see gns documentation in the Utilities Reference.
Quality of Service (QoS) is an issue that often arises in high-availability networks as well as realtime control systems. In the Qnet context, QoS really boils down to transmission media selection — in a system with two or more network interfaces, Qnet chooses which one to use, according to the policy you specify.
|
If you have only a single network interface, the QoS policies don't apply at all. |
Qnet supports transmission over multiple networks and provides the following policies for specifying how Qnet should select a network interface for transmission:
Qnet decides which links to use for sending packets, depending on current load and link speeds as determined by io-pkt*. A packet is queued on the link that can deliver the packet the soonest to the remote end. This effectively provides greater bandwidth between nodes when the links are up (the bandwidth is the sum of the bandwidths of all available links) and allows a graceful degradation of service when links fail.
If a link does fail, Qnet switches to the next available link. By default, this switch takes a few seconds the first time, because the network driver on the bad link will have timed out, retried, and finally died. But once Qnet “knows” that a link is down, it will not send user data over that link. (This is a significant improvement over the QNX 4 implementation.)
The time required to switch to another link can be set to whatever is appropriate for your application using command-line options of Qnet. See lsm-qnet.so documentation.
Using these options, you can create a redundant behavior by minimizing the latency that occurs when switching to another interface in case one of the interfaces fail.
While load-balancing among the live links, Qnet sends periodic maintenance packets on the failed link in order to detect recovery. When the link recovers, Qnet places it back into the pool of available links.
|
The loadbalance QoS policy is the default. |
With this policy, you specify a preferred link to use for transmissions. Qnet uses only that one link until it fails. If your preferred link fails, Qnet then turns to the other available links and resumes transmission, using the loadbalance policy.
Once your preferred link is available again, Qnet again uses only that link, ignoring all others (unless the preferred link fails).
You use this policy when you want to lock transmissions to only one link. Regardless of how many other links are available, Qnet will latch onto the one interface you specify. And if that exclusive link fails, Qnet will not use any other link.
Why would you want to use the exclusive policy? Suppose you have two networks, one much faster than the other, and you have an application that moves large amounts of data. You might want to restrict transmissions to only the fast network, in order to avoid swamping the slow network if the fast one fails.
You specify the QoS policy as part of the pathname. For example, to access /net/node1/dev/ser1 with a QoS of exclusive, you could use the following pathname:
/net/node1~exclusive:en0/dev/ser1
The QoS parameter always begins with a tilde (~) character. Here we're telling Qnet to lock onto the en0 interface exclusively, even if it fails.
You can set up symbolic links to the various “QoS-qualified” pathnames:
ln -sP /net/note1~preferred:en1 /remote/sql_server
This assigns an “abstracted” name of /remote/sql_server to the node node1 with a preferred QoS (i.e. over the en1 link).
|
You can't create symbolic links inside /net because Qnet takes over that namespace. |
Abstracting the pathnames by one level of indirection gives you multiple servers available in a network, all providing the same service. When one server fails, the abstract pathname can be “remapped” to point to the pathname of a different server. For example, if node1 fails, then a monitoring program could detect this and effectively issue:
rm /remote/sql_server
ln -sP /net/magenta /remote/sql_server
This removes node1 and reassigns the service to node2. The real advantage here is that applications can be coded based on the abstract “service name” rather than be bound to a specific node name.
For a real world example of choosing appropriate QoS policy in an application, see the following section on designing a system using Qnet.
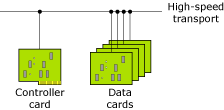
In order to explain the design of a system that takes advantage of the power of Qnet by performing distributed processing, consider a multiprocessor hardware configuration that is suitable for a typical telecom box. This configuration has a generic controller card and several data cards to start with. These cards are interconnected by a high-speed transport (HST) bus. The controller card configures the box by communicating with the data cards, and establishes/enables data transport in and out of the box (i.e. data cards) by routing packets.
The typical challenges to consider for this type of box include:
You need several pieces of software components (along with the hardware) to build your distributed system. Before going into further details, you may review the following sections from Using Qnet for Transparent Distributed Processing chapter in the Neutrino User's Guide:
Power up the data cards to start procnto and qnet in sequence. These data cards need a minimal amount of flash memory (e.g. typically 1 MB) to store the Neutrino image.
In the buildfile of the data cards, you should link the directories of the data cards to the controller cards as follows:
[type=link] /bin  = /net/cc0/bin
[type=link] /sbin = /net/cc0/sbin
[type=link] /usr  = /net/cc0/usr
where cc0 is the name of the the controller card.
Assuming that the data card has a console and shell prompt, try the following commands:
$ ls /net
You get a list of boards running Neutrino and Qnet:
cc0 dc0 dc1 dc2 dc3
Or, use the following command on a data card:
$ ls /net/cc0
You get the following output (i.e. the contents of the root of the filesystem for the controller card):
.                  .inodes            mnt0         tmp
..                 .longfilenames     mnt1         usr
.altboot           bin                net          var
.bad_blks          dev                proc         xfer
.bitmap            etc                sbin
.boot              home               scratch
Configure the controller card in order to access different servers running on it — either by the data cards, or by the controller card itself. Make sure that the controller card has a larger amount of flash memory than the data cards do. This flash memory contains all the binaries, data and configuration files that the applications on the data cards access as if they were on a local storage device.
Call the following API to communicate with the mqueue server by any application:
mq_open("/net/cc0/dev/mqueue/app_q", ....)
A simple variation of the above command requires that you run the following command during initialization:
$ ln -s /net/cc0/dev/mqueue /mq
Then all applications, whether they're running on the data cards or on the controller card, can call:
mq_open("/mq/app_q", ....)
Similarly, applications can even utilize the TCP/IP stack running on the controller card.
Qnet provides design choices to improve the reliability of a high-speed transport bus, most often a single-point of failure in such type of telecom box.
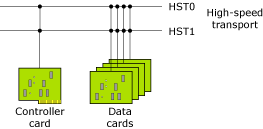
You can choose between different transport selections to achieve a different Quality of Service (or QoS), such as:
These selections allow you to control how data will flow via different transports.
In order to do that, first, find out what interfaces are available. Use the following command at the prompt of any card:
ls /dev/io-net
You see the following:
hs0 hs1
These are the interfaces available: HST 0 and HST 1.
Select your choice of transport as follows:
| Use this command: | To select this transport: |
|---|---|
| ls /net/cc0 | Loadbalance, the default choice |
| ls /net/cc0~preferred:hs0 | Preferred. Try HST 0 first; if that fails, then transmit on HST 1. |
| ls /net/cc0~exclusive:hs0 | Exclusive. Try HST 0 first. If that fails, terminate transmission. |
You can have another economical variation of the above hardware configuration:
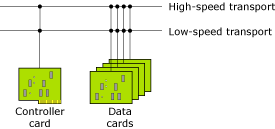
This configuration has asymmetric transport: a High-Speed Transport (HST) and a reliable and economical Low-Speed Transport (LST). You might use the HST for user data, and the LST exclusively for out-of-band control (which can be very helpful for diagnosis and during booting). For example, if you use generic Ethernet as the LST, you could use a bootp ROM on the data cards to economically boot — no flash would be required on the data cards.
With asymmetric transport, use of the QoS policy as described above likely becomes even more useful. You might want some applications to use the HST link first, but use the LST if the HST fails. You might want applications that transfer large amounts of data to exclusively use the HST, to avoid swamping the LST.
The reliability of such a telecom box also hinges on the controller card, that's a critical component and certainly a potential SPOF (single point of failure). You can increase the reliability of this telecom box by using additional controller cards.
The additional controller card is for redundancy. Add another controller card as shown below:
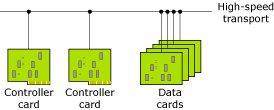
Once the (second) controller card is installed, the challenge is in the determination of the primary controller card. This is done by the software running on the controller cards. By default, applications on the data cards access the primary controller card. Assuming cc0 is the primary controller card, Use the following command to access this card in /cc directory:
ln -s /net/cc0 /cc
The above indirection makes communication between data card and controller card transparent. In fact, the data cards remain unaware of the number of controller cards, or which card is the primary controller card.
Applications on the data cards access the primary controller card. In the event of failure of the primary controller card, the secondary controller card takes over. The applications on the data cards redirect their communications via Qnet to the secondary controller card.
You can also scale your resources to run a particular server application using additional controller cards. For example, if your controller card (either a SMP or non-SMP board) doesn't have the necessary resources (e.g. CPU cycle, memory), you could increase the total processor and box resources by using additional controller cards. Qnet transparently distributes the (load of) application servers across two or more controller cards.
When you're creating a network of Neutrino hosts via Qnet, one thing you must consider is how they locate and address each other. This falls into two categories: autodiscovery and static mappings.
The decision to use one or the other can depend on security and ease of use.
The autodiscovery mechanism (i.e. en_ionet; see lsm-qnet.so for more information) allows Qnet nodes to discover each other automatically on a transport that supports broadcast. This is a very convenient and dynamic way to build your network, and doesn't require user intervention to access a new node.
One issue to consider is whether or not the physical link being used by your Qnet nodes is secure. Can another untrusted Qnet node be added to this physical network of Qnet nodes? If the answer is yes, you should consider another resolver (file: filename). If you use this resolver, only the nodes listed in the file can be accessed. This file consists of node names and a string representing the addressing scheme of your transport layer. In the Ethernet case, this is the unique MAC address of the Qnet node listed. If you're using the file resolver for this purpose, you also want to specify the option auto_add=0 in lsm-qnet.so. This keeps your node from responding to node discovery protocol requests and adding a host that isn't listed in your resolver file.
Another available resolver, dns lets you access another Qnet node if you know its name (IP). This is used in combination with the IP transport (lsm-qnet.so option bind=ip). Since it doesn't have an auto_add feature as the en_ionet resolver does, you don't need to specify a similar Qnet option. Your Qnet node resolve the remote Qnet node's name only via the file used by the Qnet file resolver.
In your network design, when should you use Qnet, TCP/IP, or NFS? The decision depends on what your intended application is and what machines you need to connect.
The advantage of using Qnet is that it lets you build a truly distributed processing system with incredible scalability. For many applications, it could be a benefit to be able to share resources among your application systems (nodes). Qnet implements a native network protocol to build this distributed processing system.
The basic purpose of Qnet is to extend Neutrino message passing to work over a network link. It lets these machines share all their resources with little overhead. A Qnet network is a trusted environment where resources are tightly integrated, and remote manager processes can be accessed transparently. For example, with Qnet, you can use the Neutrino utilities ( cp, mv and so on) to manipulate files anywhere on the Qnet network as if they were on your machine. Because it's meant for a group of trusted machines (such as you'd find in an embedded system), Qnet doesn't do any authentication of remote requests. Also, the application really doesn't know whether it's accessing a resource on a remote system; and most importantly, the application doesn't need any special code to handle this capability.
If you're developing a system that requires remote procedure calling (RPC), or remote file access, Qnet provides this capability transparently. In fact, you use a form of remote procedure call (a Neutrino message pass) every time you access a manager on your Neutrino system. Since Qnet creates an environment where there's no difference between accessing a manager locally or remotely, remote procedure calling (capability) is builtin. You don't need to write source code to distribute your services. Also, since you are sharing the filesystem between systems, there's no need for NFS to access files on other Neutrino hosts (of the same endian), because you can access remote filesystem managers the same way you access your local one. Files are protected by the normal permissions that apply to users and groups (see “File ownership and permissions” in the Working with Files chapter in the User's Guide).
There are several ways to control access to a Qnet node, if required:
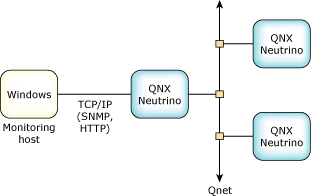
You can also configure Qnet to be used on a local LAN, or routed over to a WAN if necessary (encapsulated in the IP protocol).
Depending on your system design, you may need to include TCP/IP protocols along with Qnet, or instead of Qnet. For example, you could use a TCP/IP-based protocol to connect your Qnet cluster to a host that's running another operating system, such as a monitoring station that controls your system, or another host providing remote access to your system. You'll probably want to deploy standard protocols (e.g SNMP, HTTP, or a telnet console) for this purpose. If all the hosts in your system are running different operating systems, then your likely choice to connect them would be TCP/IP. The TCP/IP protocols typically do authentication to control access; it's useful for connecting machines that you don't necessarily trust.
|
You can also build a Neutrino-based TCP/IP network. A Neutrino TCP/IP network can access resources located on any other system that supports TCP/IP protocol. For a discussion of Neutrino TCP/IP specifics, see TCP/IP Networking in the System Architecture guide. |
Another issue may be the required behavior. For example, NFS has been designed for filesystem operations between all hosts and all endians. It's widely supported and a connectionless protocol. In NFS, the server can be shut down and restarted, and the client resumes automatically. NFS also uses authentication and controls directory access. However, NFS retries forever to reach a remote host if it doesn't respond, whereas Qnet can return an error if connectivity is lost to a remote host. For more information, see “NFS filesystem” in Working with Filesystems in the User's Guide).
If you require broadcast or multicast services, you need to look at TCP/IP functionalities, because Qnet is based on Neutrino message passing, and has no concept of broadcasting or multicasting.
In order to support different hardware, you may need to write a driver for Neutrino's Qnet. The driver essentially performs three functions: transmitting a packet, receiving a packet, and resolving the remote node's interface (address). This section describes some of the issues you'll face when you need to write a driver.
First, let's define what exactly a driver is, from Qnet's perspective. When Qnet is run with its default binding of raw Ethernet (e.g. bind=en0), you'll find the following arrangement of layers that exists in the node:
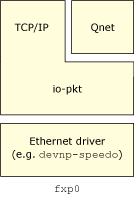
In the above case, io-pkt* is actually the driver that transmits and receives packets, and thus acts as a hardware-abstraction layer. Qnet doesn't care about the details of the Ethernet hardware or driver.
So, if you simply want new Ethernet hardware supported, you don't need to write a Qnet-specific driver. What you need is just a normal Ethernet driver that knows how to interface to io-pkt*.
There is a bit of code at the very bottom of Qnet that's specific to io-pkt* and has knowledge of exactly how io-pkt* likes to transmit and receive packets. This is the L4 driver API abstraction layer.
Let's take a look at the arrangement of layers that exist in the node when Qnet is run with the optional binding of IP encapsulation (e.g. bind=ip):
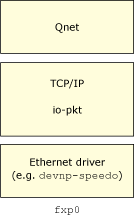
As far as Qnet is concerned, the TCP/IP stack is now its driver. This stack is responsible for transmitting and receiving packets.
Therefore, if IP encapsulation is acceptable for your application, you really don't need to write a Qnet driver, you can use any existing IP transport mechanism.
Again, it's worth mentioning that at the very bottom of Qnet there is a bit of code (L4 driver API) that's specific to TCP/IP and knows exactly how to transmit and receive packets using the TCP/IP stack.
If you have some superfast network hardware that you don't want to write an io-pkt* driver for, you could get the ultimate in performance by writing a dedicated driver. A possible arrangement of layers is as follows:
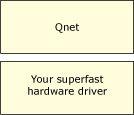
Just as before, Qnet needs a little code at the very bottom that knows exactly how to transmit and receive packets to this new driver. There exists a standard internal API (L4 driver API) between the rest of Qnet and this very bottom portion, the driver interface. Qnet already supports different packet transmit/receive interfaces, so adding another is reasonably straightforward. The transport mechanism of Qnet (called the L4) is quite generic, and can be configured for different size MTUs, whether or not ACK packets or CRC checks are required, to take the full advantage of your link's advanced features (e.g. guaranteed reliability).
|
|
|
|