In this chapter:
Wizards guide you through a sequence of tasks, such as
creating a new project or converting an existing non-QNX
project to a QNX C/C++ application or library project.
Wizards aren't directly connected to any perspective. You
can access all the project creation wizards from the main menu by selecting
.
In the New Project dialog, the wizards are categorized
according to the nature of the project. If you expand
C, you'll see all projects that
have a C nature; expand
QNX, and you'll see all the projects with a QNX
nature:
Notice the overlap: the C Project wizard appears in both C and QNX.
 |
In the C/C++ perspective, you can also access
the QNX C/C++ Projects wizards via the New C/C++ Project button:
|
Besides the nature-specific wizards, the IDE also has
“simple” wizards that deal with the very basic
elements of projects: Project, Folder, and
File. These elements have no natures associated
with them. You can access these wizards by selecting
.
|
Although a project may seem to be nothing other than a
directory in your workspace, the IDE attaches special
meaning to a project — it won't automatically
recognize as a project any directory you happen to create in
your workspace.
Once you've created a project in the IDE, you can bring
new folders and files into your project folder, even if they
were created outside of the IDE (e.g. using Windows Explorer).
|
-
To have the IDE recognize folders and files:
-
In the Navigator view, right-click the navigator pane and
select Refresh.
You use the New Project wizard to create a C or C++
project, which can be one of these varieties:
- QNX C Project
QNX C++ Project
- A C or C++ project for multiple target platforms. It
supports the QNX-specific project structure using
common.mk files to perform a QNX recursive
make. A QNX Project can automatically build either one
executable or one library object (in different formats). You can switch between
application or library nature by using the project properties.
- C Project
C++ Project
- Depending on the project type you specify, it will provide one of the following:
- Executable - Provides an executable application. This project type folder contains three templates.
- Hello World C++ Example - a basic C or C++ application with main(). The result is a project that uses a standard
Makefile and GNU make to build the source files. You don't get the added functionality of the
QNX build organization and the common.mk file, but these projects adapt well to your existing code that you wish to bring into the IDE. (For more about Makefiles and the make utility, see the
Conventions for Recursive Makefiles and Directories chapter in the Neutrino Programmer's Guide.)
- Hello World ANSI C Example - a basic C or C++ application with main(). The result is a project that uses a standard Makefile and GNU make to build the source files. You don't get the added functionality of the
QNX build organization and the common.mk file, but these projects adapt well to your
existing code that you wish to bring into the IDE. (For more about Makefiles and the make utility, see the
Conventions for Recursive Makefiles and Directories chapter in the
Neutrino Programmer's Guide.)
- Empty Project - a single source project folder that doesn't contain any files. After specifying an Executable template, the workbench creates a project with only the metadata files required for your project type. Now, you can modify these source files, as required, and provide the source files for the project's target. Note that for an Executable project type, a makefile is automatically created for you.
- Shared Library - An executable module compiled and linked separately. When you create a project that uses a shared library (libxx.so), you define your shared library's project as a Project Reference for your application. For this project type, the CDT combines object files together and joins them so they're relocatable and can be shared by many processes. Shared libraries are named using the format libxx.so.version, where version is a number with a default of 1. The libxx.so file usually is a symbolic link to the latest version. The makefile for this project type is automatically created by the CDT.
- Static Library - A collection of object files that you can link into another application (libxx.a). The CDT combines object files (i.e. *.o) into an archive (*.a) that is directly linked into an executable. The makefile for this project type is automatically created by the CDT.
- Makefile Project - Creates an empty project without any metadata files. This template type is useful for importing and modifying existing makefile-based projects; a new makefile is not created for this project type.
By default, the Toolchain and template types that currently show up in the lists are based on the language support for the project type that you selected.
|
As a rule, the IDE provides UI elements to control most of the
build properties of QNX projects. The module.dep and module.mk
files are created for every project subdirectory.
These files are required for your managed make projects to build successfully. |
To create a C/C++ project:
- From the menu, select
.
- In the left pane, select the project's nature and type according
to this table:
| If you want to build a: |
Select: |
| C Project |
|
| QNX C Project |
|
| C++ Project |
|
| QNX C++ Project |
|
- Click Next.
- In the Project name field, type a name for your project.
|
Although the wizard allows it, don't use any of the following characters in
your project name:
| ! $ ( " ) & ` : ; \ ' * ? [ ] # ~ = % < > { }
as they may cause problems later. |
- If you don't want to use the default location for the project, ensure that the Use Default Location option is deselected, and specify
where the resources reside in the filesystem (if they don't reside in your workspace).
- Required (when Use Default Location is not selected): In the Location field, type the path to
your source (or click Browse…).
- Click Next.
- Select a type:
- For a QNX C or C++ Project:
- For a C++ Project:
- Executable - Provides an executable application. This project type folder contains three templates:
- Hello World C++ Example - a simple C++ application with main().
- Hello World ANSI C Example - a simple C application with main().
- Empty Project - a single-source project folder that doesn't contain any files.
After specifying an Executable template, the workbench creates a project with only the metadata files required for your project type, and automatically creates a makefile for you. You can modify these source files, and provide them for the project's target.
- Shared Library - An executable module compiled and linked separately. For more information about this type, see “Creating a C/C++ project.”
- Static Library - A collection of object files that you can link into another application (libxx.a). For more information about this type, see “Creating a C/C++ project.”
- Makefile Project - Creates an empty project without any metadata files. For more information about this type, see “Creating a C/C++ project.”
|
When you create a shared library, it's name is recorded in a special dynamic section. You can display the information in this section to see a SONAME record. For example, you can use the following:
ntoarm-readelf -d libname.so
When you link against this library, your application will look for that name.
When you perform a make install, the .so is copied to .so.1, and a .so symbolic link is created to point to it. You'll also notice that .so will get the right version. If you install a .so.2 (where the .so points to it), your old version 1 clients can still run. |
- Select a required toolchain from the Toolchain list.
A toolchain represents the specific tools (such as a compiler, linker, and assembler) used to build your project. Additional tools, such as a debugger, can also be associated with a toolchain. Depending on the compilers installed on your system, there might be several toolchains available to select from.
- Click Next.
- Optional: You can specify basic properties for the project, and click Next.
- Select the types of platforms and configurations you want to deploy for this project.
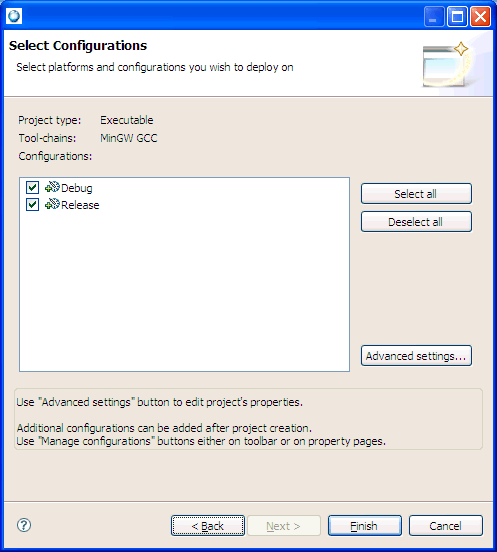
- Optional: Click Advanced Settings... to edit' the project's properties.
The fields for each panel are described in the “Project options” section, below.
- Expand C/C++ Build and select Settings.
- Click the Binary Parsers tab.
- Select a parser.
After you select the correct parser for your development environment and build your project, you
can view the components of the .o file in the Project Explorer view. You can also view the contents
of the .o file in the C/C++ editor.
- Click OK.
- Click Finish.
The IDE creates your new project in your workspace. Your new project is listed in the Project Explorer view, and in the Navigator view. If a message box prompts you to change perspectives, click Yes.
Assuming that the working directory of the make is the root folder of the project, to create a C Makefile project:
- Select , select either and click Next.
- In the Project name field, type a name for your project.
- In the Project Types area, expand Makefile and select Empty project.
- In the Toolchain list, select QNX QCC.
- Click Finish.
Next, you'll change the project properties.
- In the Target Navigator view, right-click the new project you created, and select Properties.
- On the left, select C/C++ Build.
- On the right, select the Builder settings tab and deselect the option Use default build command.
- In the make field, add the command line (without the target to build) that calls your make (e.g. >c:\make\make -f makefile.mak -k).
- Click the Behaviour tab, then add your targets for running an incremental build, the clean build, and the compile build.
- Ensure that the option Build (Incremental Build) is selected; otherwise, the build won't start.
- Specify any other desirable options.
- Click OK.
- From the toolbar menu select to run the make project.
If you're building a library project, you'll need to choose the type of library you want to build:
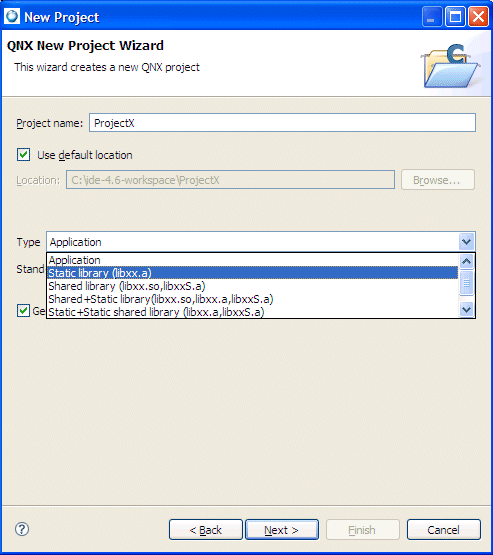
The library types available in the IDE.
- Static library (libxx.a)
- Combine object files (i.e. *.o)
into an archive (*.a) that is directly linked into an
executable.
- Shared library (libxx.so)
- Combine object files together and join them so they're
relocatable and can be shared by many processes. Shared
libraries are named using the format
libxx.so.version, where
version is a number with a default of 1. The
libxx.so file usually is a symbolic link to the
latest version.
- Static library for shared objects (libxxS.a)
- Same as a static library, but using position-independent
code (PIC). Use this if you want a library that is
linked into a shared object. The System Builder uses
these types of libraries to create new shared libraries that
contain only the symbols that are absolutely required by a
specific set of programs.
- Shared library without export (xx.dll)
- A shared library without versioning. Generally, you
manually open the library with the dlopen() function
and look up specific functions with the dlsym() function.
Since this type of project doesn't use the QNX recursive
multivariant Makefile structure, you'll have to set up your
own Makefile.
Here's how to create a simple “Hello World” non-QNX project:
- Open the New Project wizard.
- Select or , then click Next.
- Name your project.
|
Even though the wizard allows it, don't use any of the following characters in
your project name (they'll cause problems later): | ! $ ( " ) & ` : ; \ ' * ? [ ] # ~ = % < > { } |
- Select a project type.
- Select a Toolchain.
- Click Finish.
The IDE has now created a project structure in the C/C++ Project view.
- Now you'll create a makefile for your project. In the
Navigator view, highlight your project, then click the Create a
File button on the toolbar:

- Name your file “Makefile” and
click Finish. The editor should now open, ready for you to
create your Makefile.
Here's a sample Makefile you can use:
CC:=qcc

hello: hello.c

all: hello

clean:
    rm -f hello.o hello
|
Use Tab characters to indent commands inside of
make rules, not spaces. |
- When you're finished editing, save your file
(right-click, then select Save, or click the Save button in
the tool bar).
- Finally, you'll create your “hello world” C
(or C++) source file. Again, open a new file, which might
look something like this when you're done:
#include <stdlib.h>
#include <stdio.h>

int main(int argc, char *argv[]) {
    printf("Hello, world!\n");
    return EXIT_SUCCESS;
}
Depending on the type of project you choose, the New Project wizard shows different tabs:
- QNX C or C++ Project tabs:
- C or C++ project panels:
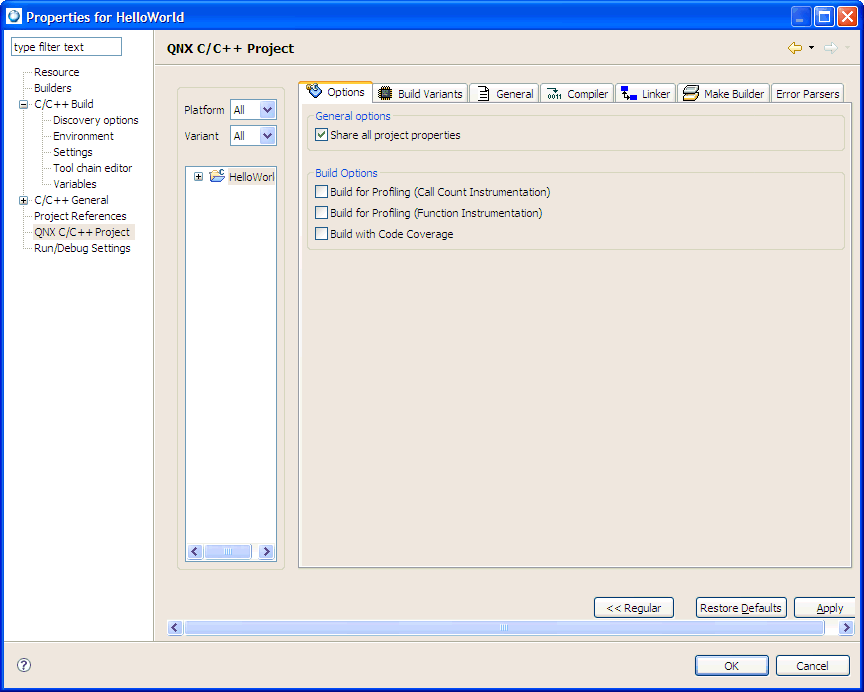
The Options tab lets you specify several attributes for the
project you're building:
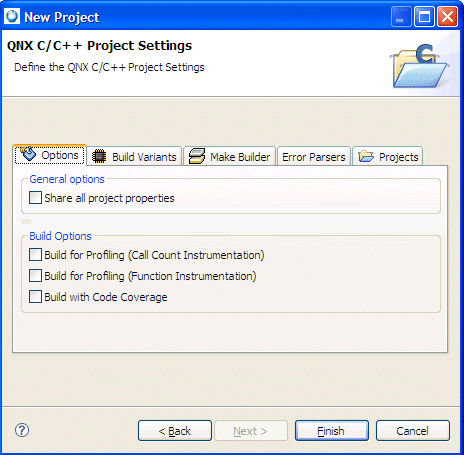
Specifying build options on the Options tab.
- General options
- By default, some project properties (e.g. active
targets) are local — they're stored in the
.metadata folder in your own workspace. If you
want other developers to share all of your project's
properties, then set Share all project properties
on. The IDE then stores the properties in a
.cdtproject file, which you can save in your
version control system so that others may share the project
file.
- Build Options
- If you want to profile your application and take full
advantage of the QNX Application Profiler, then check
Build with Profiling (see the Profiling an Application
chapter in this guide).
If you want to use the QNX Code Coverage tool, then check
Build with Code Coverage (see the Using Code Coverage chapter in this guide).
If you want the IDE to do more dependency checking than it
normally would, then set the Enhanced dependency
checking option on. Note that this means slower
builds, so you may want to turn this off in order to improve
build times.
The Build Variants tab lets you choose the platforms to compile executables for:
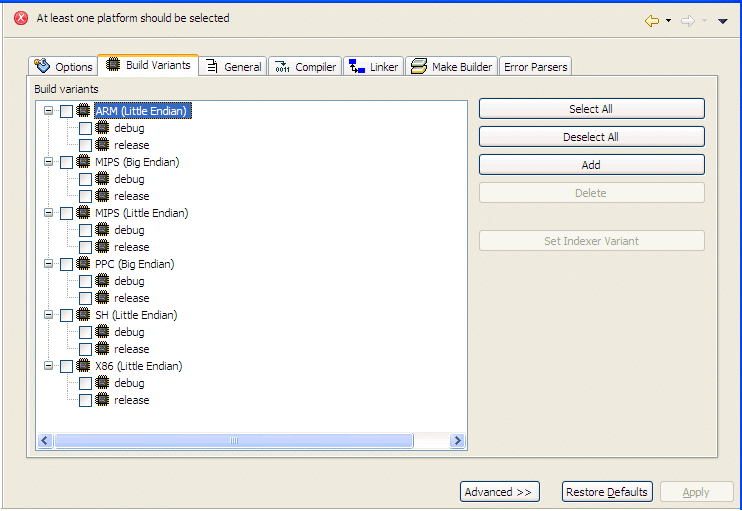
Selecting a build variant on the Build Variants tab.
|
By default, none of the platforms are enabled. You might
want to change your default preferences for all new QNX projects.
To do this, open .
|
Select the specific architecture(s) and build variant(s) you want to build your project for. And for managed projects, to make a change to your existing variant(s), you'll need to select and then build again, or perform the clean before you make the change to the target variant(s).
You can click the Select All button to enable all of the listed
variants, or the Deselect All button to disable all of the
listed variants.
You can click the Add button to add a new variant under the
currently selected target architecture, or the Delete button
to remove the currently selected variant.
To choose a build variant for the Indexer to use:
- Select the build variant for the Indexer to use.
- Click the Set Indexer Variant button.
The variant's name changes to include “>”. This variant's symbols and include paths will be used for source indexing.
The Make Builder tab lets you configure how the IDE handles
make errors, what command to use to build your
project, and when to do a build:
Configuring make, build commands, and when to build on the Make Build tab.
- Build Setting
- If you want the IDE to stop building when it encounters
a make or compile error, check Stop on
first build error..
- Build Command
- If you want the IDE to use the default make
command, check Use Default. If you want to use a
different utility, uncheck Use
Default and enter your own command in the Build Command
field (e.g. C:/myCustomMakeProgram).
- Workbench Build Behavior
- You can specify how you want the IDE to build your
project. For example, you can:
- check Build on resource save (Auto Build) to enable automatic building
- change the name of the Auto Build target (the default is all)
- change the name of the incremental build target (the default is all)
- change the name of the clean target (the default is clean)
The Error Parsers tab lets you specify which build output
parsers (e.g. CDT GNU Assembler Error Parser, etc.) apply to this project and in
which order. To change the order, simply select an item,
then use the Up or Down buttons to
position the item where you want in the list.
Specifying the build output parsers for a project and their order on the Error Parsers tab.
In the Referenced C/C++ Projects list, you can set project dependencies
for the new project. In the list of other projects in the Workbench,
you can select one or more projects that the new project will depend on.
Initially, no projects will be selected.
Setting project dependencies on the Projects tab.
For example, if you associate myProject with
mySubProject, the IDE builds
mySubProject first, followed by your project (myProject).
If you change mySubProject, the IDE
doesn't automatically rebuild myProject.
This window shows the resource information for the selected project.
Showing resource information for the project.
- Path
- The location of the selected resource type within the workspace. For example, similar to folders, projects map to directories in the file system.
- Type
- The type for the selected resource: Folder, Project, or File.
- Location
- The location of the selected resource within the filesystem.
- Last modified
- The date that the selected resource was last modified.
- Text file encoding
- Sets an alternate text encoding. Because text files are encoded differently (depending on the locale and platform), use the default text file encoding for the locale of your host operating system. However, if you want to work with text files that originate from another source (for example, to work with text files that use a different encoding scheme than your native one, so that you can easily exchange files with another team), choose Other and select an appropriate one from the list.
- Inherited from container
- When enabled, the selected resource inherits the text encoding specified for its container resource.
- Other
- When enabled, the selected resource uses an alternate text encoding other than that specified for its container resource. You can enable this option if you want to work with text files that originate from another source (ones that use a different encoding scheme than your native one), so that you can easily exchange files with others.
- New text file line delimiter
- Specifies the end of line character(s) to use for new text files being created.
- Inherited from container
- When enabled, the selected resource inherits the character line ending for new text files from that specified for its container resource.
- Other
- When enabled, the selected resource uses an alternate end of line character(s) for new text files other than that specified for its container resource. For example, you can set the Text file encoding option to UTF-8, and then set the line endings character for new files to Unix, so that text files are saved in a format that is not specific to the Windows operating system, and the files can easily be shared amongst various developer systems.
From the Builders panel, you can specify which Builders to enable for this project, and in which order they are used.
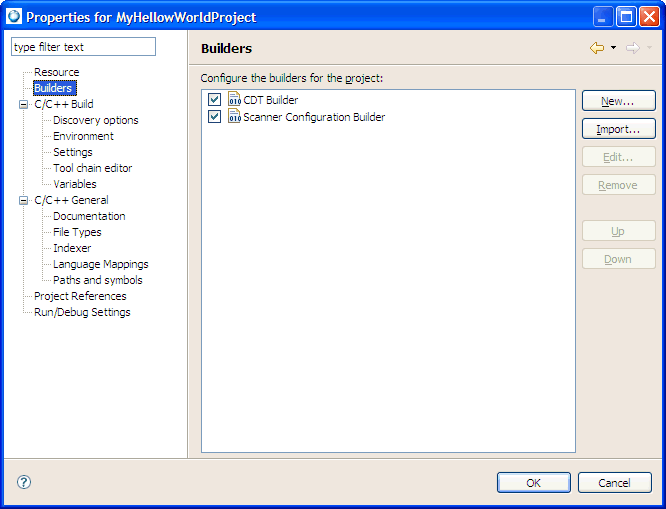
Specifying the builders to enable and their order for the selected project.
- Configure the builders for the project
- Selects which builders to enable from the list. You can disable the CDT Builder and you can control when the CDT Builder runs with respect to the project builders that you define.
- New
- Opens the Choose configuration type dialog so that you can add a new builder to the list.
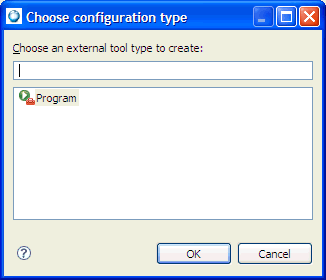
The Ant Builder option lets you configure and deploy projects; however, if you want to use some other tool or prefer to do it yourself, you can set up a Program external tool project builder. This type allows you to customize the deployment of your project as you require, while maintaining the convenience of automatically running your script every time your project is built.
The Program option lets you to define an external tool for any executable file that is accessible on your local or network file system. For example, if instead of Ant you prefer to use your own shell scripts or Windows .bat files to package and deploy your Eclipse projects, you can then create a Program external tool that would specify where and how to execute that script.
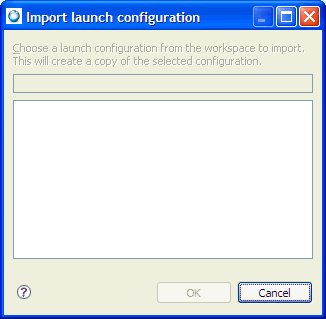
- Import
- Opens the Import launch configuration dialog so that you can import a builder to include it in the list.
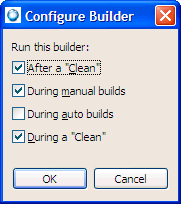
- Edit
- Opens the Configure Builder dialog that lets you specify when to run the selected builder.
When you configure a builder, you have the following options:
- After a Clean - When enabled, the selected builder is scheduled to run after a clean operation occurs.
- During manual builds - When enabled, the selected build is initiated when you explicitly select a menu item or press its corresponding shortcut key combination.
- During auto builds - When enabled, automatic builds are performed as resources are saved (they are incremental and operate over an entire workspace). Note that running your project builder during auto builds is possible, although it is not recommended because of performance concerns.
- During a Clean - When enabled, the selected builder is scheduled to run during a clean operation.
For program external tool types, clicking Edit lets you modify the properties for the selected launch configuration:
- Remove
- Removes the selected builder from the list.
- Up
- Moves the currently selected builder higher in the list to change the builder order.
- Down
- Moves the currently selected builder lower in the list to change the builder order.
The C/C++ Build panel serves as the main window that contains all builder-specific property pages.
In addition, directly from this window you can define preferences for the Builder settings and Behaviour properties. The C/C++ Build panel has the following tabs:
From the Builder Settings tab, you can define preferences for the builder specific settings for your project.
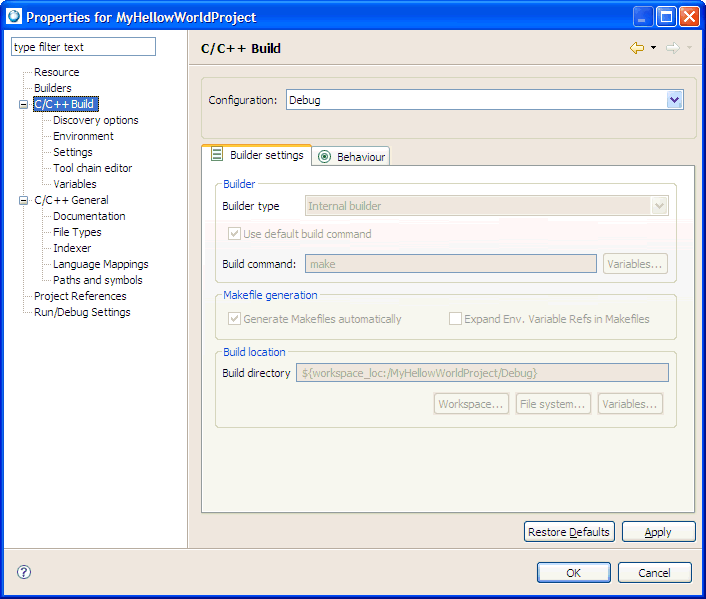
Setting builder preferences for your project.
|
Modifying some settings, such as the Generate makefiles automatically option, might affect other parameters (setting them from enabled to disabled in some situations) and, moreover, change the visibility of other property pages. |
- Configuration
- Specifies the type of configuration(s) for the selected project. A Debug configuration lets you see what's going on
“inside” a program as it executes. To debug your application, you must use executables compiled for debugging.
These executables contain additional debug information that lets the debugger make direct associations between the source code and the
binaries generated from the original source. A Release configuration creates applications with the best performance.
- Builder type
- Specifies the type of builder to use: Internal builder (builds C/C++ programs using a compiler that implements the C/C++ Language Specification) and External builder (external tools let you configure and run programs and Ant buildfiles using the Workbench. These can be saved and run at a later time to perform a build).
- Use default build command
- When enabled, this option indicates that you want to use the default make command. When disabled, it indicates the use of a new make command. This option is only available when the Build type option is set to External.
- Build command
- Specifies the default command used to start the build utility for your specific toolchain. Use this field if you want to use a build utility other than the default make command (when the Use default build command is not selected the field is active, and when you use an external builder or a custom makefile, you can provide your specific commands).
- Variables
- Opens the Select build variable dialog where you can add environment variables and custom variables to the build command.
- Generate Makefiles automatically
- When selected, Eclipse changes between two different CDT modes: it either uses the customer's makefile for the build (referred to as a “Standard Make project” in CDT 3.x) if one exists, or it generate makefiles for the user (called “Managed build project” in CDT 3.x). By default, this option is automatically set.
Expand Env. Variable Refs in Makefiles defines whether environment variables ( ${xxx} ) should be expanded in makefile. This option is set by default.
- Build directory
- Defines the location where the build operation takes place. This location will contain the generated artifacts from the build process. This option is disabled when the Generate makefiles automatically option is enabled.
- Workspace
- Opens the Folder Selection dialog where you can select a workspace location for the project. This is the directory that will contain the plug-ins and features to build, including any generated artifacts. This button is only visible when Generate makefiles automatically is not selected.
- File system
- Opens the file system navigator where you can specify another file system to use. This button is only visible when Generate makefiles automatically is not selected.
- Variables
- Opens the Select build variable dialog where you can select a variable to specify as an argument, or create and configure simple build variables which you can reference in some build configurations. This button is only visible when Generate makefiles automatically is set not selected.
From the Behaviour tab, you can define preferences for the build specific settings for your project.
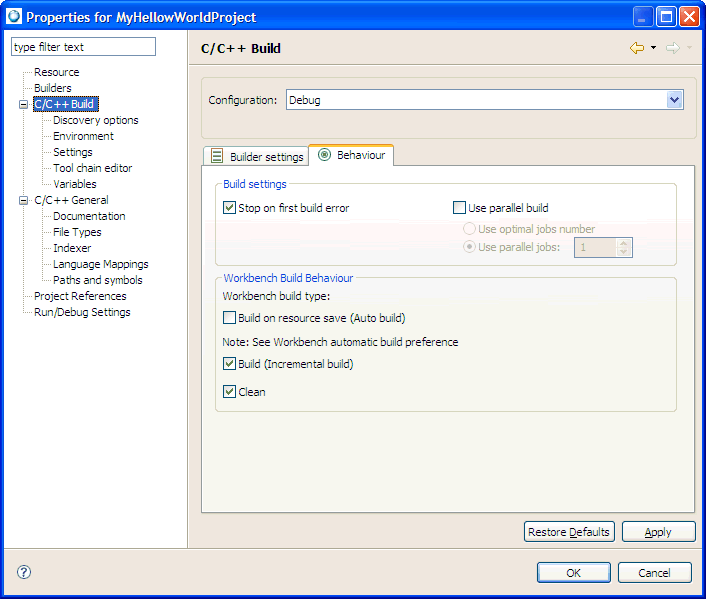
Setting build preferences on the Behavior tab.
- Stop on first build error
- Stops building when Eclipse encounters an error. Note that this option is helpful for building large projects because it tells make to continue making other independent rules even when one rule fails.
- Use parallel build
- This option enables parallel builds.
If you enable this option, you must determine the number of parallel jobs to perform:
- Use optimal jobs number - Lets the system determine the optimal number of parallel jobs to perform.
- Use parallel jobs - Lets you specify the maximum number of parallel jobs to perform.
- Workbench build behavior
- By default, the builder uses these settings when instructed to build, rebuild, clean, and so on. You can change these settings so that new projects can use different targets if these defaults are not appropriate.
- Build on resource save (Auto build)
- When selected, builds your project whenever resources are saved. This option is on by default. If you require more control over when builds occur (for example, when a build should wait until you finish a large assortment of changes), disable this option and manually invoke builds yourself.
- make build target (for Build on resource save (Auto build))
- To build your project when resources are saved and change the default make build target, enable the Build on resource save (Auto Build) option, and specify a new build target in the Make build target field.
- Variables
- Opens the Select build variable dialog where you can add variables to the build command.
- Build (Incremental build)
- Defines what the builder calls when an incremental build is performed. When this option is enabled, an incremental build occurs, meaning that only resources that have changed since the last build are rebuilt. If this option is disabled, a full build occurs, meaning that all resources within the scope of the build are rebuilt.
- make build target (for Build (Incremental build))
- To change the build default make build target, enable the Build (Incremental build) option, and specify a new build target in the Make build target field.
- Clean
- Defines what the builder calls when a clean is performed. The make clean command is defined in the makefile.
- make build target (for Clean)
- To change the rebuild default make build target, enable the Clean option, and specify a new build target in the Make build target field.
- Variables
- Opens the Select build variable dialog where you can add variables to the make build target command.
If you're building a C/C++ project, this
tab lets you control how include paths and C/C++ macro
definitions for this particular project are automatically
discovered. Certain features of the IDE (e.g. syntax highlighting,
code assistance, etc.) rely on this information, as do source-code
parsers. You can configure various options for the scanner configuration on the Discovery Options page of the Makefile Project panel in the Preferences window.
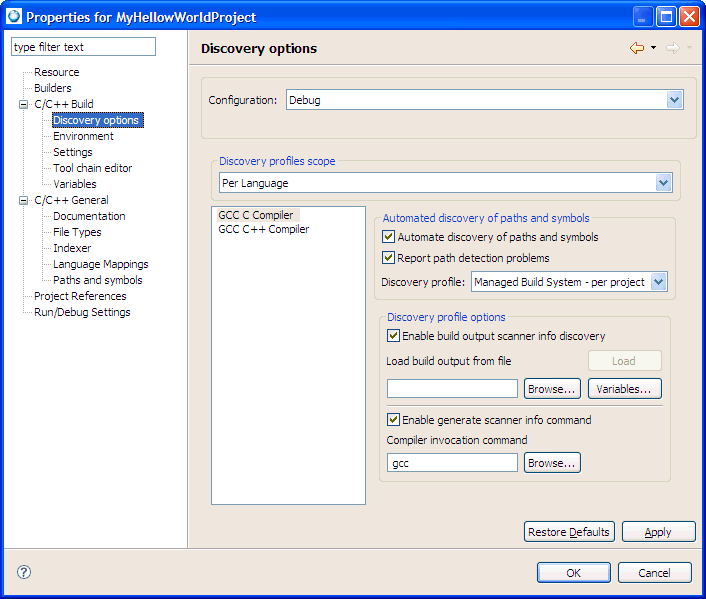
Controlling how include paths and C/C++ macro definitions are automatically discovered on the Discovery options tab.
|
At a later time, you can supply this data using the Search Paths item in the project properties. |
- Configuration
- Refer to the "Builder settings tab" section for more information about the Configuration field.
- Discovery Profiles Scope
- Specifies the type of profile to set for discovery:
- Per Language - Enables the association of different profiles with different resource types (different tools and input types), to have different settings discovered, e.g. for C and C++ source files and for different tools used by the project. In addition, selecting this option lets you specify different profile settings for different folders; however, only project profile types are allowed.
- Configuration-wide - The Eclipse CDT uses only one profile for discovering scanner information for the entire project (configuration). This means that both the project and per-file discovery profiles are allowed.
- Left pane list (language specific)
- Shows a list of language specific compilers. Select a language from the list.
- Automate discovery of paths and symbols
- Scans the build output to populate the path and symbol tables, such as symbol definitions, system include directories, local include directories, macros, and include files.
- Report path detection problems
- Sets the notification of diagnostic errors for include paths that the Eclipse CDT is unable to resolve.
- Discovery profile
- Indicates the discovery profile to use for paths and symbol detection. The type of configuration and Discovery Profile Scope you specify determine which Discovery Profile options appear on this tab.
- Enable build output scanner info discovery
- Configures the scanner to parse build output for compiler commands with options that specify the definition of preprocessor symbols, and include search paths (for GCC compiler, -D and -I respectively). This button is only visible when Configuration is set to Release and the Discovery Profiles Scope is set to Configuration-wide.
- Load
- Lets you load a file to discover paths and symbols based on a previous builds' output. To activate the discovery select a build log file and then click the Load button. This button is only visible when Configuration is set to Release and the Discovery Profiles Scope is set to Configuration-wide. Note that you can click Variables to open the Select Variables window to define a build output file.
- Load build output from file
- Specifies the name of the file you selected to load the build output from. This button is only visible when Configuration is set to Release and the Discovery Profiles Scope is set to Configuration-wide.
- Browse
- Click to locate a previously built output file. This button is only visible when Configuration is set to Release and the Discovery Profiles Scope is set to Configuration-wide.
- Variables
- Click to specify an argument, or create and configure simple launch variables which you can reference in some launch configurations. This button is only visible when Configuration is set to Release and the Discovery Profiles Scope is set to Configuration-wide.
- Enable generate scanner info command
- Enables the retrieval of information from the scanner. If it is not selected, the includes will be populated with default gcc system includes. Eclipse gathers the compiler settings based on the specified toolchain. This means that the Eclipse CDT can obtain the default gcc system includes to associate with the project.
When selected, you can specify any required compiler specific commands in the Compiler invocation command field.
- Compiler invocation command
- Indicates the compiler specific command used to invoke the compiler. For example, the command gcc -E -P -v hello.c | hello.cpp reads a compiler's configuration file and prints out information that includes the compiler's internally defined preprocessor symbols and include search paths. The information is complementary to the scanner configuration discovered when the output is parsed (if you've enabled the Enable build output scanner info discovery option), and is added to the project's scanner configuration. You can click Browse to locate this command, if required.
The parsing of build output for scanner information is compiler specific. For example, the GNU toolchain compilers (gcc and g++) use -I for include paths, and -D for symbol definitions. Consult your compiler specific documentation for more information about scanner information commands, such as the following gcc commands:
- -D name
- -I
- -U name
- -I-
- -nostdinc
- -nostdinc++
- -include file
- -imacros file
- -idirafter dir
- -isystem dir
- -iprefix prefix
- -iwithprefix dir
- -iwithprefixbefore dir
- Browse
- Browse for a file to include in the compiler invocation command. This button is only visible when Configuration is set to Release and the Discovery Profiles Scope is set to Configuration-wide.
This tab lets you customize the build environment for all projects in the workspace. It also lets you control the environment variables used by the build.
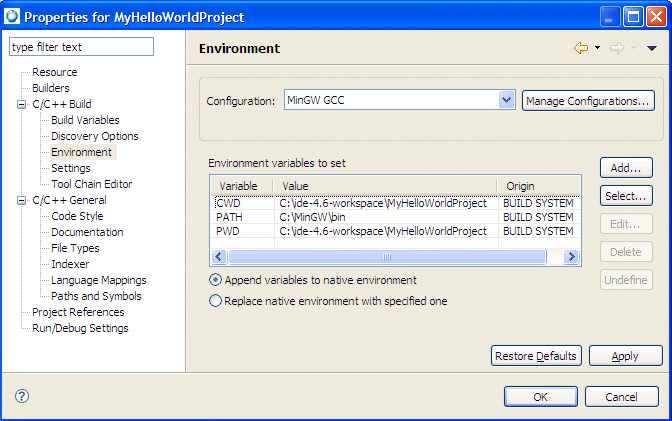
Customizing the build environment for projects in the workspace on the Environment tab.
- Configuration
- Refer to the "Builder settings tab" section for more information about the Configuration field.
- Environment variables to set
- Shows the current list of environment variables and their corresponding value. These environment variable values are used at build time.
- Variable
- Specifies the name of the environment variable.
- Value
- Specifies the value of the environment variable.
- Append variables to native environment
- Appends the variables to the native environment during its execution.
- Replace native environment with specified one
- Replaces the native environment with the specified variables, and then restores the native environment upon its completion.
- New
- Opens a dialog to create a new environment variable and value. Custom environment variables that you create appear in bold within the list.
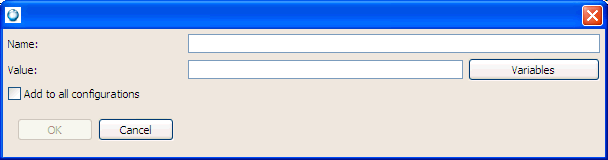
Click Variables to select variables to include in the value. Select Add to all configurations to make this new environment variable available to all configurations for the selected project; otherwise, the variable is only available for the currently selected configuration.
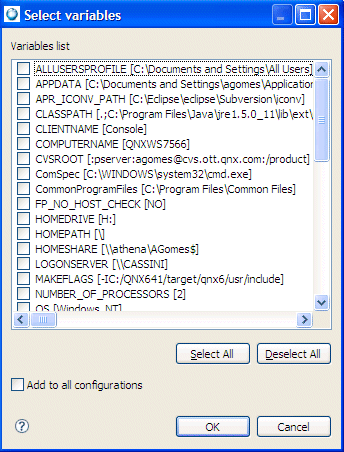
Select Opens the Select variables dialog where you can choose from a list of system variables.
Edit Modifies the name and value of the selected environment variable.
Remove Removes the selected environment variables from the list.
- Undefine
- Undefines the currently selected variable; however, some variables, such as the PATH variable, cannot be undefined.
The Settings panel lets you specify settings for your project. From this panel you can set options from these tabs:
This tab lets you customize the tools and tool options used in your build configuration.
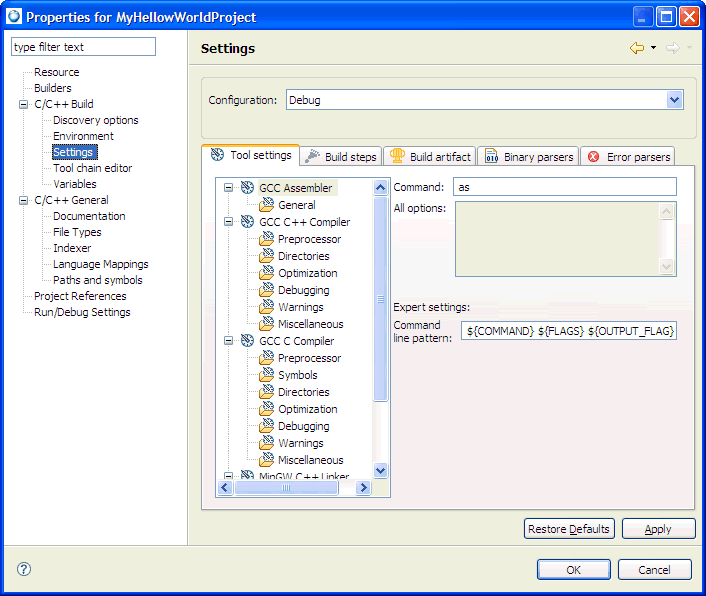
Customizing the tolls and their corresponding options on the Tools tab.
- Configuration
- Refer to the "Builder settings tab" section for more information about the Configuration field.
- (Left pane)
- Show a list of tools and their option categories. Select a desired tool from the list to modify its options.
- (Right pane)
- Show the options that you can modify for the selected tool. This list of options changes depending on which options category you select for a specific tool in the left pane.
This tab lets you customize the selected build configuration. It allows you to set user-defined build command steps as well as defining a descriptive message in the build output, immediatley before and after normal build processing executes.
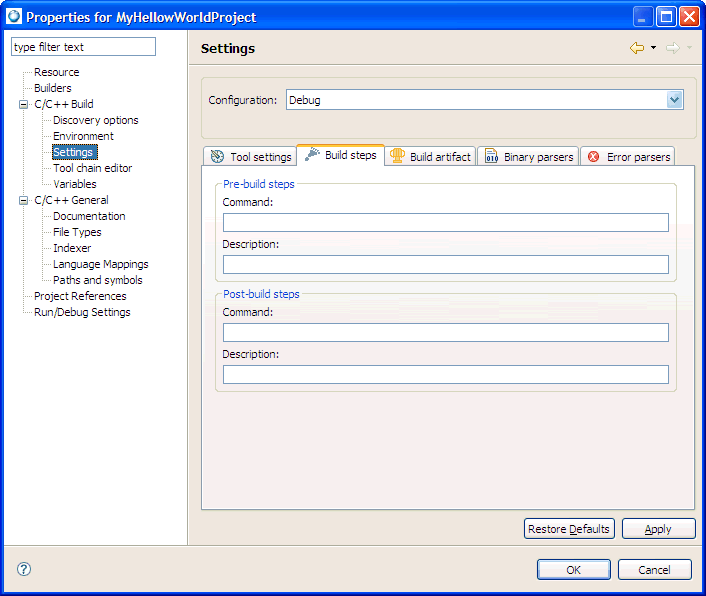
Customizing the build configuration on the Build steps tab.
|
To ensure reasonable custom build step behavior, sensible input must be provided when specifying custom build step information. Custom build steps are not verified for correctness and are passed exactly as entered into the build stream.
In the descriptive text, below, the term "main build" is defined as the sequence of commands to execute when a build is invoked, not including pre-build or post-build steps. |
- Configuration
- Refer to the "Builder settings tab" section for more information about the Configuration field.
- Pre-build Steps
- Identifies any steps that must occur before the build takes place. Note that the pre-build step is not executed if the state of the main build is up to date; otherwise it is executed. An attempt to execute the main build will occur regardless of the success or failure of the pre-build step.
- Command
- Specifies one or more commands to execute immediately before the execution of the build. Use semicolons to separate multiple commands.
- Description
- Specifies optional descriptive text associated with the pre-build step that is shown in the build output immediately before the execution of the pre-build step command (or commands).
- Post-build steps
- Identifies any steps that must occur after the build takes place. Note that the post-build step is not executed if the state of the main build is determined to be up to date. It will be executed only if the main-build has executed successfully.
- Command
- Specifies one or more commands to execute immediately after the execution of the build. Use semicolons to separate multiple commands.
- Description
- Specifies any optional descriptive text associated with the post-build step that is shown in the build output immediately after the execution of the post-build step command (or commands).
This tab lets you specify build artifact information, such as the type and name, that gets built by the selected build configuration.
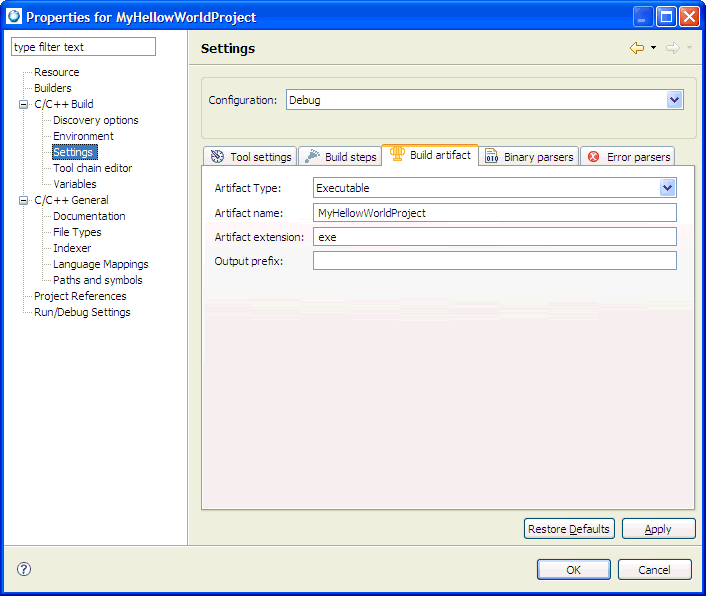
Specify build information for the build configuration.
- Configuration
- Refer to the "Builder settings tab" section for more information about the Configuration field.
- Artifact Type
- Shows the type for the selected artifact. Select an artifact type that is built by the currently selected build configuration (such as an Executable, Static library, and Shared library).
- Artifact name
- Indicates the name of artifact. By default, the name is the same as project name.
- Artifact extension
- Specifies the file extension for the specified artifact type.
- Output prefix
- Indicates a prefix that you want to prepend to the output results.
You can select the Binary Parsers you require for a project to ensure the accuracy of the Project Explorer view, and to successfully run and debug your programs. After you select the correct parser for your development environment and build your project, you can view the symbols of the object file using the Project Explorer view. If you're building a C/C++ project, then this tab lets you define which binary parser (e.g. ELF Parser) to use to deal with the project's binary objects.
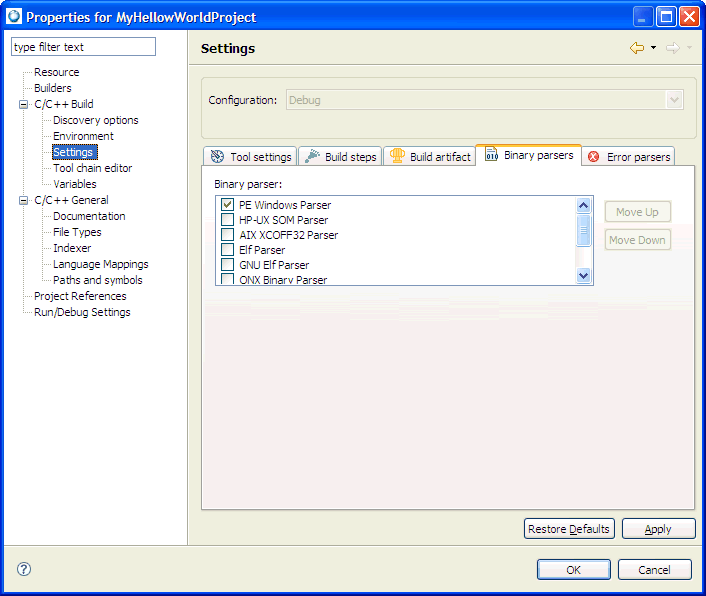
Selecting binary parsers to ensure the accuracy of the Project Explorer view and to successfully run and debug your programs on the Binary Parsers tab.
- Configuration
- Refer to the "Builder settings tab" section for more information about the Configuration field.
- Binary Parser (top pane)
- Lists all of the binary parsers currently known to CDT. Select the parsers that you want to use, and select the corresponding line to edit parser's options, if required.
- Binary Parser Option
- Shows the parameters for the currently selected parser in the list above. Depending on the parser you select, the options in the list will be different (in particular, some may have no options at all).
- Move up
- Moves the selected parser higher in list. Note that the order matters for selected parsers only: they are applied to binaries in the same sequence as defined by the user. The order is not preserved for unchecked parsers, so you do not have to move them.
- Move down
- Move the selected parser lower in list. Note that the order matters for selected parsers only: they are applied to binaries in the same sequence as defined by the user. The order is not preserved for unchecked parsers, so you do not have to move them.
For more information about indexers, see the “Choosing an indexer” chapter.
Use this tab to customize the list of filters that detect error patterns in the build output log.
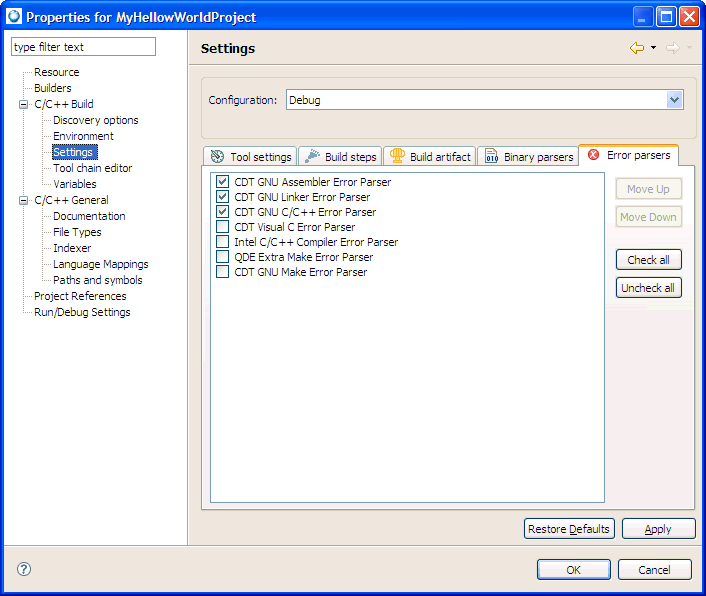
Customizing the list of filters that detect error patterns in the build output log on the Error Parsers tab.
- Configuration
- Refer to the "Builder settings tab" section for more information about the Configuration field.
- Error Parsers
- Lists all of the error parsers currently known to CDT.
- Move up
- Moves the selected parser higher in list. Note that the order matters for selected parsers only: they are applied to error logs in the same sequence as defined by the user. The order is not preserved for unchecked parsers, so you do not have to move them.
- Move down
- Move the selected parser lower in list. Note that the order matters for selected parsers only: they are applied to error logs in the same sequence as defined by the user. The order is not preserved for unchecked parsers, so you do not have to move them.
- Check all
- Selects all error parsers in the list.
- Uncheck all
- Makes all error parsers in the list unselected.
If you're building a managed Make C/C++ project, then this tab lets
you control the C/C++ source code indexer. Certain features of the
IDE rely on this information.
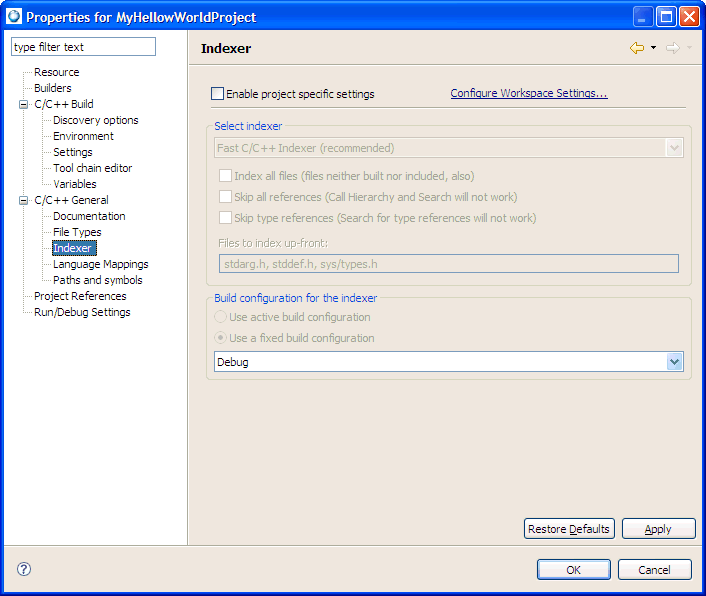
Controlling the C/C++ indexer on the Indexer tab.
- Enable project specific settings
- Enables specific index settings for the selected project; otherwise, common settings are applied (those defined in Preferences), and all controls below are disabled.
- Select indexer
- Specifies the indexer to use for this project. The option No Indexer disables indexing. Note that every indexer may have its own set of options.
- Build configuration for the indexer
- Since indexing takes a lot of time, using active configuration is not recommended because a reindex operation occurs after each active configuration change; the index source comes from the specified configuration, or from the active one.
- Environment variables to set
- Refer to the "Builder settings tab" section for more information about the Configuration field.
- Configuration
- Specifies the type of configuration(s) for the selected project. A Debug configuration lets you see what's going on “inside” a program as it executes. To debug your application, you must use executables compiled for debugging. These executables contain additional debug information that lets the debugger make direct associations between the source code and the binaries generated from the original source. A Release configuration provides the tools with options set to create an application with the best performance.
- (The variables table)
- Lists the CDT build variables and system variables, by Name, Type, and the Value. Custom build variable names are highlighted using a bold font.
- Name
- Indicates the name of the variable, either a user defined variable or a system variable.
- Type
- Shows the type for the variable.
- Value
- Specifies the value of the variable.
- Show system variables
- When selected, system variables are included in the Variables table; otherwise, they are excluded so that only user defined variables appear in the Variables list.
- Add
- Creates a new variable and corresponding value.
- Edit
- Modifies the name and value of the selected variable.
- Delete
- Removes the selected variables from the list. Note that some variables are read-only and cannot be removed.
You must create a Target System Project for every
target you want to use with the IDE.
To create a new target:
- From the main menu, select .
- Expand QNX category.
- Select QNX Target System Project.
- Click Next. The New QNX Target System Project wizard appears:
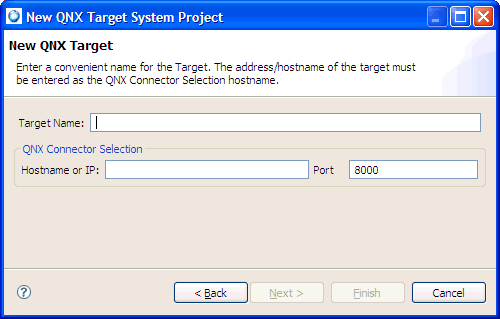
- Complete the fields described below:
- Target Name
- Type a descriptive name for your QNX Target System Project.
- Hostname or IP
- Enter the hostname or IP address for the target system that's running qconn.
- Port
- Enter the port number for qconn. Leave this as the default (8000),
if you're running qconn with the default settings.
- Click Finish. Your new QNX Target System
Project appears in the Navigator view. When you create a
launch configuration, the target is listed under the Main
tab in the Target Options pane. Note that you can use the
Add New Target button in the Target Options pane to
open the New Target System Project wizard.
|
You can also reach the New Target System Project wizard
from within the Target Navigator view (right-click, then select
Add New Target). |
|
In earlier versions of the IDE, there were two different project types: Managed make, which automatically generated a makefile, and Standard make, which required a makefile to build. Now, you are required to select a project type, and which determines the build system to use. |
At various times, you may need to convert non-QNX projects
to QNX projects (i.e. give them a QNX nature). For example,
suppose another developer committed a project to CVS without
the .project and .cdtproject
files. The IDE won't recognize that project as a QNX project
when you check it out from CVS, so you'd have to convert it.
Or, you may wish to turn a Standard Make C/C++ project into a
QNX C/C++ project in order to take advantage of the QNX
recursive Makefile hierarchy (a project with a QNX nature
causes the IDE to use the QNX make tools and
structure when building that project).
The IDE lets you convert many projects at once, provided
you're converting all those projects into projects of the
same type.
To convert a QNX project into a managed make C/C++ project:
|
The converter only converts projects created in IDE 4.5 or later. |
- From the Project Explorer view, select a QNX project that you want to convert.
- Right-click on the project and select Convert to Managed Project.
The IDE converts the selected QNX project to a managed project (a managed build system project).
If you wish to convert a regular project into a managed make C/C++ project, you can use the Convert C/C++ Projects wizard. To convert a QNX project, see “Converting a QNX project to a managed make C/C++ project.”
|
The converter only converts regular projects created in IDE 4.5 or later. |
To convert to a CDT project:
- From the main menu, select .
- Expand C, then select Convert to a C/C++ Make Project.
- Follow the instructions in the Conversion wizard.
To convert a non-QNX project into a QNX project:
- From the menu, select .
- Expand QNX.
- Select Convert to a QNX
Project.
- Click Next. The Convert C/C++ Projects wizard appears.

- Select the project(s) you want to convert in the
Candidates for conversion field.
- Specify the language (C or C++).
- Specify the type of project (application or library).
- Click Finish. Your converted project appears in the Project Explorer view.
|
For IDE 4.5 or later, you will also have to do the following steps in order to successfully complete the conversion process:
- After the conversion, right-click on the project and select Properties.
- On the left, expand C/C++ Build and select Tool chain editor.
- On the right, deselect the option Display compatible toolchains only.
The Current toolchain list shows the defined toolchains.
- Select a tool chain, such as QNX QCC.
- Click OK and exit the Project properties page.
- Re-enter the project properties page to verify that all of the C/C++ build settings are set to their default values, including the error parser.
|
 |
You now have a project with a QNX nature, but you'll need to
make further adjustments (e.g. specify a target platform)
via the Properties dialog if you want it to be a working QNX
project. |
The conversion wizard gave your Standard Make project a QNX
nature; you now need to use the Properties dialog
to fully convert your project to a working QNX project.
To open the Properties dialog for a project:
- In the C/C++ Projects or Navigator view, right-click your project.
- Select Properties from the context menu. The
Properties dialog appears:
- In the left pane, select QNX C/C++ Project.
- Specify the properties you want using the available tabs:
- Options
- See the section “Tabs in the New C/C++ Project wizard,” above.
- Build Variants
- See the section “Tabs in the New C/C++ Project wizard,” above.
- General
- In the Installation directory field, you can specify the destination directory (e.g. bin) for the output binary you're building. (For more information, see the Conventions for Recursive Makefiles and Directories chapter in the Neutrino Programmer's Guide.)
In the Target base name field, you can specify your
binary's base name, i.e. the name without any prefixes or
suffixes. By default, the IDE uses your project name as the
executable's base name. For example, if your project is
called “Test_1,” then a debug version of your
executable would be called “Test_1_g” by default.
In the Use file name, enter the name of the file containing the usage message for your
executable. (For more on usage messages, see the entry for
usemsg in the Utilities Reference.
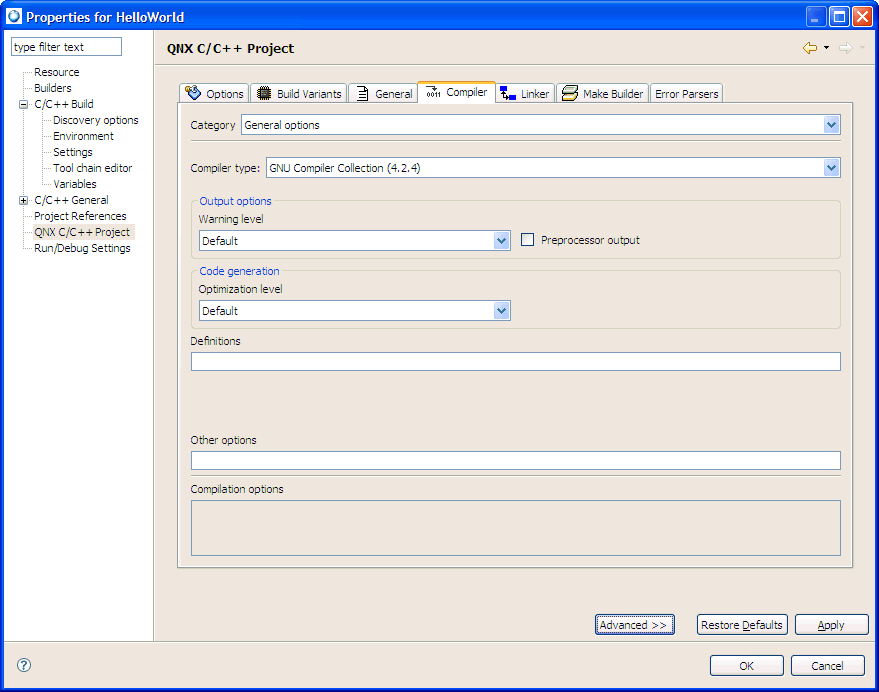
- Compiler
- See the section “Compiler tab,” below.
- Linker
- See the section “Linker tab,” below.
- Make Builder
- See the section “Tabs in the New C/C++ Project wizard,” above.
- Error Parsers
- See the section “Tabs in the New C/C++ Project wizard,” above.
- When you've finished specifying the options you want,
click Apply, then OK. The conversion
process is complete.
The Compiler tab changes depending on which of these
categories you select:
- General options
- Extra source paths
- Extra include paths
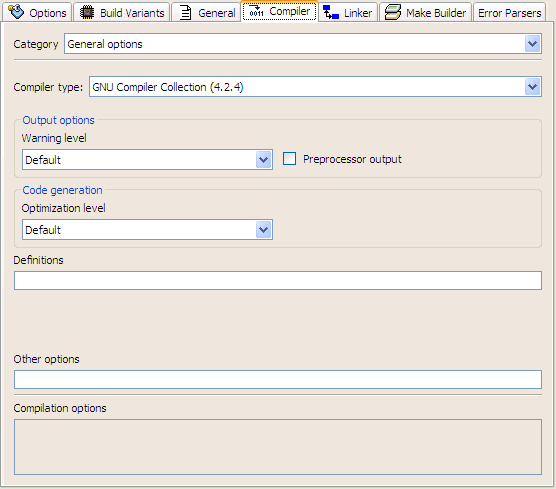
- Compiler type
- If you've selected General options, the first
item you specify is the type of compiler, such as GCC 4.3.
- Output options
- Here you can specify the warning level (0 to 9), i.e.
the threshold level of warning messages that the compiler
outputs. You can also choose to have the preprocessor output
intermediate code to a file; the IDE names the output file
your_source_file.i (C) or
your_source_file.ii (C++), using the name of your
source file as the base name.
- Code generation
- For the Optimization level, you can specify
four levels: from 0 (no optimization) to 3 (most
optimization). In the Stack size field, you can
specify the stack size, in bytes or kilobytes.
- Definitions
- Here you can specify the list of compiler defines to
pass to the compiler on the command line in the form
-D name[=value].
You don't have to bother with the -D part;
the IDE adds it automatically.
- Other options
- Here you can specify any other command-line options that
aren't already covered in the Compiler tab. For more
information on the compiler's command-line options, see
qcc in the Utilities Reference.
- Extra source paths
- If you want to specify source locations other than your
project's root directory, select this category. Then click
the appropriate button to specify the location:
- Project… — You can add source from
another project in your current workspace. Note that the IDE
uses relocatable notation, so even if other team members
have different workspace locations, they can all work
successfully without having to make any additional project
adjustments.
- QNX target… — You can add source from
anywhere in or below the ${QNX_TARGET} directory on your host.
- Disk… — You can choose to add source
from anywhere in your host's filesystem.
- Extra include paths
- You can specify a list of directories where the compiler
should look for include files. The options here are the same
as for Extra source paths, except that here you can
change the order of directories in the list, which can be
important if you happen to have more than one header file
with the same name.
The appearance of the Linker tab changes depending on the type of category you select:
The Properties dialog can appear in two different modes: regular and advanced. By default, Advanced mode is set.
To activate Regular mode, click Regular at the bottom of the dialog.

The Advanced mode for the Linker tab.
To return to Advanced mode, click Advanced.
The Regular mode for the Linker tab.
In Advanced mode, you can override various options that were set at the project level for the particular build variant you've selected. The options that you can override are:
- platform (the one specified, or all supported platforms)
- build mode (e.g. debug, release, or user-defined)
- compiler options
- linker options
For example, you can change the optimization level for a particular C file, specify which set of import libraries to use for a specific architecture, and so on.
Changing the optimization level for a C file to use a specific architecture.
During the final build, the IDE merges the options you've set for the project's general configuration with the advanced options, giving priority to the advanced settings.
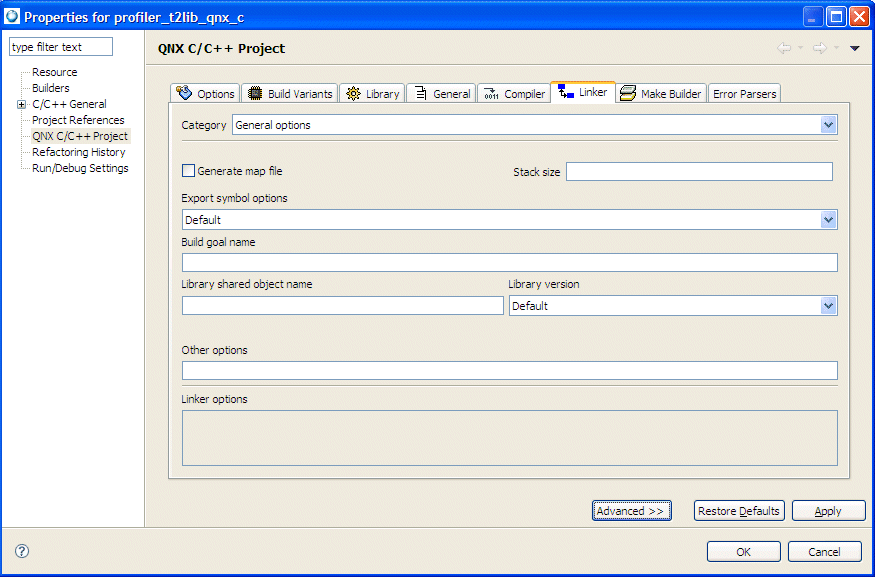
The General options category lets you specify various options for the linker.
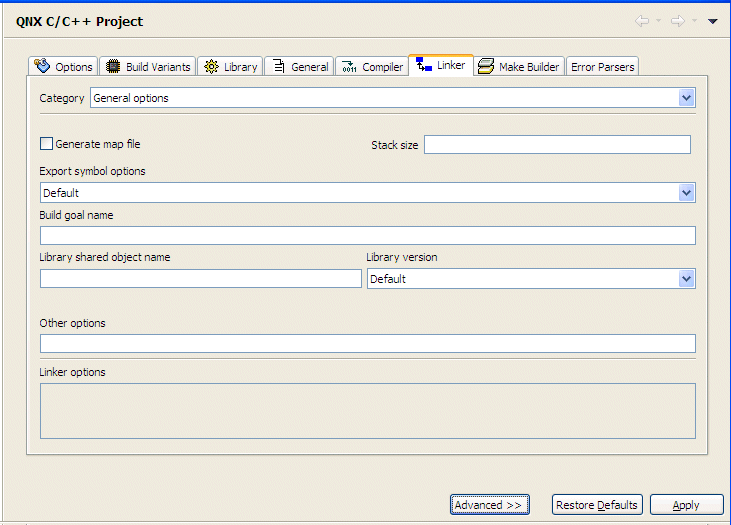
The default dialog for the General options category.
- Generate map file
- When set, the IDE prints a link map to the build console.
- Stack size
- Define the size of the stack as the number of bytes (in decimal) you want for the stack.
- Export symbol options
- Define the level of final stripping for your binary, ranging from exporting all symbols, to only removing the debugger symbols, to removing all of them.
- Build goal name
- Specify the output filename for an application or library project. The name you specify in this field forces the library's shared-object name to match.
By default, a generated application has the same name as the project it's built from. A library has prefix of “lib” and a suffix of “.a” or “.so” after the project name. In addition, debug variants of applications and libraries have a suffix of “_g”.
- Link against CPP library (valid for C++ projects only)
- Select the particular C++ library you want to use. QNX Momentics Tool Suite currently ships with these C++ libraries:
- Default — The standard QNX C++ library, with support for all standard C++ features (exceptions, STL, etc.).
- Dinkum with exceptions and Dinkum without exceptions — The Dinkum C++ library, with support for exceptions or without.
- Dinkum Abridged with exceptions and Dinkum Abridged without exceptions — The Dinkum Abridged C++ library, with support for exceptions or without.
- Dinkum Embedded with exceptions and Dinkum Embedded without exceptions — The Dinkum Embedded C++ library, with support for exceptions or without.
- GNU with exceptions — The GNU G++ Standard Library, with support for exceptions.
|
Compiling C++ code without support for exceptions usually results in a faster executable. |
- Library shared object name
- Override the shared-object name used in C/C++ library projects. This override doesn't affect the actual filename.
|
If you specify a filename in the Build goal name field, don't use the Library shared object name field. |
- Library version
- Select a version number for both the library's shared-object name and filename. If this is a library that doesn't have a version number (e.g. “platform.so”), then select “No.”
The so version comes from the linker option. For example, if you're using a QNX project for the library project, right-click and select , and then select General options for the Category type. You can see that the “Default” for the Library version on the Linker tab is “1"”.
If you specify No, then the SONAME isn't hard coded in the library.
When it is so.1,the loader requires the library to be called exactly like this because all dependent projects refer to is as so.1 (in the NEEDED section of executable).
If you use the IDE to upload libraries to the target during a launch, it silently renames it to the proper version, and makes a copy in
the host directory so that the host tools (i.e., debugger) can find it as well.
If you manually upload a library to a target, you have to manually rename it because it isn't necessary if you don't need to keep the library versioning (it is better not to use it at all).
|
If Build goal name is specified, you cans still set the library version. |
- Other options
- Specify any other command line options that aren't already covered on the Linker tab. For more information about the linker's options, see the entry for ld in the Utilities Reference.
- Linker options
- Shows the general linker options that you specified.
|
When a shared library is created, it's name is documented in a special dynamic section, and when you link against this library, your application will look for that name.
When you perform a make install, the .so is copied to .so.1, and a .so symbolic link is created to point to it. You'll also notice that .so will get the right version. If you install a .so.2 (where the .so points to it), your old version 1 clients can still run. |
Select this category to modify the list of library paths (to specify locations where the linker should look for import libraries (.so or .a files), and change the order in which they are referenced.
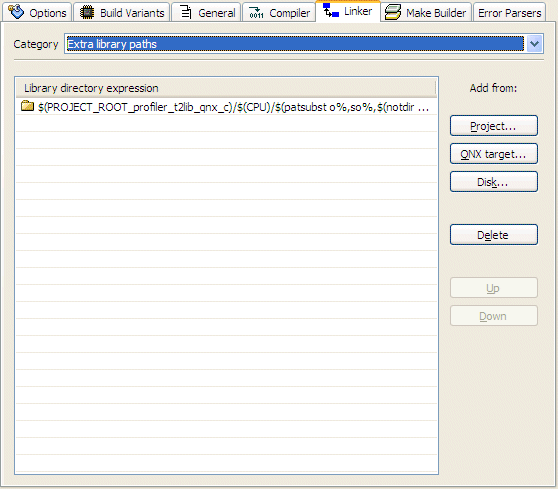
The default dialog for the Extra paths category.
- Library directory expression
- Show the list of directory expressions for the library paths you specified.
- Project…
- Add a library project path by browsing your workspace for the library. When you add a library from your workspace, the IDE uses a relocatable notation so that other members with different workspace locations can all work successfully without having to make any project adjustments.
- QNX target…
- Add a library path from an existing QNX target.
- Disk…
- Add a library path from a disk source.
- Delete
- Remove the selected library path reference from the list of library directory expressions.
- Up
- Change the order by moving the currently selected library path up in the list.
- Down
- Change the order by moving the currently selected library path down in the list.
You can add a list of libraries (.so or .a files) to search for unsatisfied references. For each item in this list, you can define:
- the stripped name, the base name without the lib prefix (which ld adds automatically), and without the suffix (.so or .a).
- the library type (static or dynamic)
- debug or release mode. A “No” or “Yes” in this field indicates whether or not the builder matches the debug or release version of the library with the final binary's type. For example, if you select “Yes” and you want to link against a debug version of the library, the IDE appends _g to the library's base name. If you select “No,” then the builder passes (to ld) this name exactly as you entered it. Therefore, if you want to use a release version of your binary and link against a debug version of the library, specify MyLibraryName_g for the name.
|
Adding a new element to the extra library list automatically adds the directory where this library resides to the Extra library paths list (see above), provided that it's path isn't already in the list. However, if you remove an item from the list, its parent directory is not automatically removed. |
You can add a library in three ways: the Add, Project…, and QNX target… buttons.
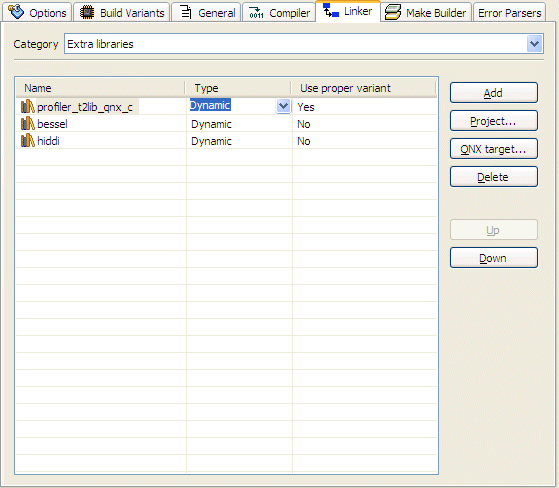
Shows the additional library to use for given build configuration.
- Name
- Name of the library.
- Type
- Show the type for the library. To modify the type, select a cell in the Type column, and then click the arrow to select a different type from the dropdown list (Static, Dynamic, Stat+Dyn, and Dyn+Stat).
- Use proper variant
- Indicate whether the proper variant is used for the library. To modify the type, select a cell in the Use proper variant column, and then click the arrow to select either Yes or No.
- Add
- Add a new library by creating an empty element and allowing you to define it manually.
- Project…
- Add a library project by browsing your workspace for the library. When you add a library from your workspace, the IDE uses a relocatable notation so other members with different workspace locations can all work successfully without having to make any project adjustments.
- QNX target…
- Add a library from an existing QNX target.
- Delete
- Remove the selected library from the list of extra libraries.
- Up
- Change the order by moving the currently selected library up in the list.
- Down
- Change the order by moving the currently selected library down in the list.
This category lets you link a project against any object file or library, regardless of the filename.
|
The file-selection dialog may seem slow when adding new files. This is because the system can't make assumptions about naming conventions and instead must use a binary parser to determine if a file is an object file or a library.
The Extra object files option is available for an individual platform only. If a project has more than one active platform, you can't use this feature. In that case, you can still specify extra object files using the Advanced mode for each platform separately. |
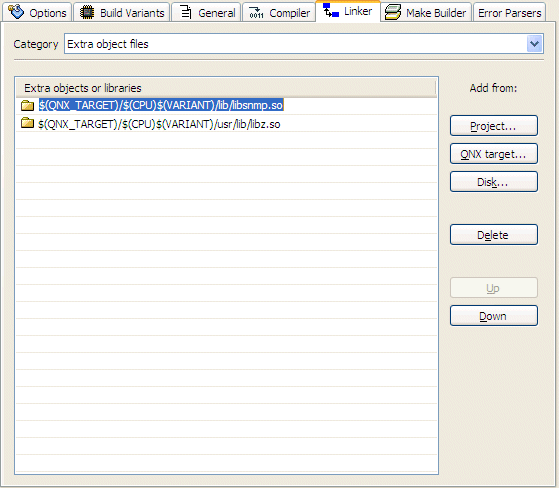
The default dialog for the Extra object files category.
- Extra objects or libraries
- Project…
- Add a library or object by browsing your workspace. When you add a library or object from your workspace, the IDE uses a relocatable notation so that other members with different workspace locations can all work successfully without having to make any project adjustments.
- QNX target…
- Add a library or object from an existing QNX target.
- Disk…
- Add a library or object from a disk source.
- Delete
- Remove the selected library or object from the list of extra library or object references.
- Up
- Change the order by moving the currently selected library or object up in the list.
- Down
- Change the order by moving the currently selected library or object down in the list.
Select this category to specify one of four predefined post-build actions for your project. For information about these predefined actions, see “Adding a post-build action.”
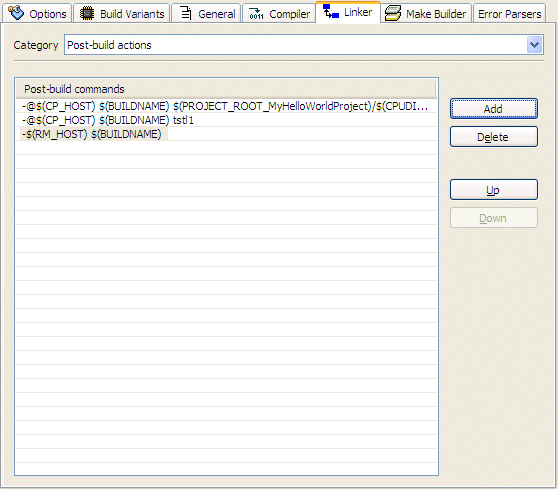
The default dialog for the Post-build actions category.
- Post-build commands
- A list of the commands that occur after a build in the specified order that they appear in the list.
- Add
- Add a post-build action. For detailed information about adding a post-build action, see “Adding a post-build action.”
- Delete
- Remove a post-build action from the list.
- Up
- Change the order by moving the currently selected post-build action up in the list.
- Down
- Change the order by moving the currently selected post-build action down in the list.
For Post-build actions, when you select this category and click Add, the Add Post-build actions dialog will display.
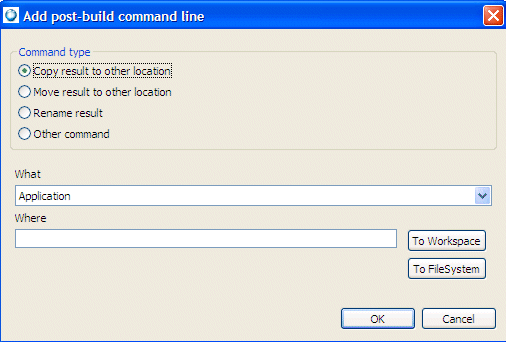
The available predefined post-build actions.
When you select the Post-build actions category and click Add, you'll see a dialog that lets you select one of four predefined post-build actions for your project:
- Copy result to other location
- Move result to other location
- Rename result
- Run other shell command
In the What field, you specify the item (e.g. application) you want to copy or move; in the Where field, you specify the destination. You can use the To Workspace or To Filesystem buttons to locate the place.
If you select Rename result, a New Name field appears for you to enter the name. If you select Other command, enter the shell command in the field.
|
You can set up more than one post-build action; they're processed sequentially. |
Use the Import wizard to bring resources into your workspace
from a filesystem, ZIP archive, or CVS repository.
-
To open the Import wizard:
-
Choose ,
or right-click in the Navigator or C/C++ Projects
view, and then choose Import….
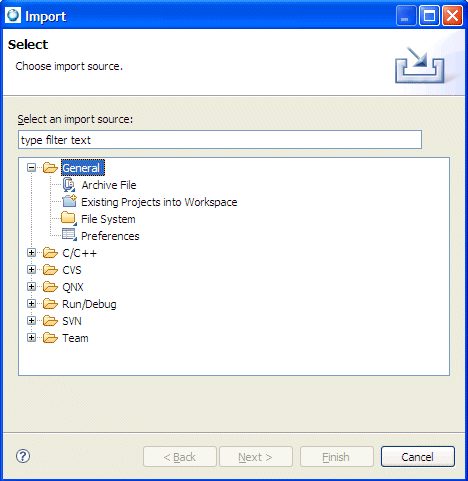
The Import wizard.
The Import wizard can import resources from several different
sources:
To import a container project and its associated C/C++ projects from
another workspace:
- In the Import wizard (), expand QNX, choose Existing Container
Project into Workspace and click the Next button.
The IDE shows the Import Container Project From File
System panel.
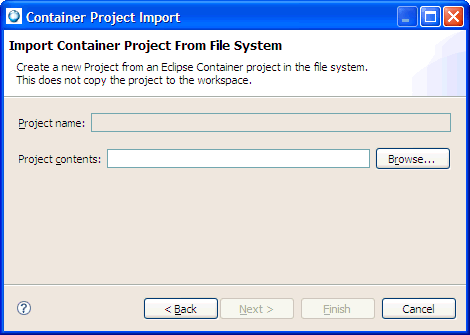
- Enter the full path to an existing container project directory in
the Project contents field, or click the
Browse… button to select a container project
directory using the file selector.
- Click Next to continue. The IDE shows the Select
components to install panel.
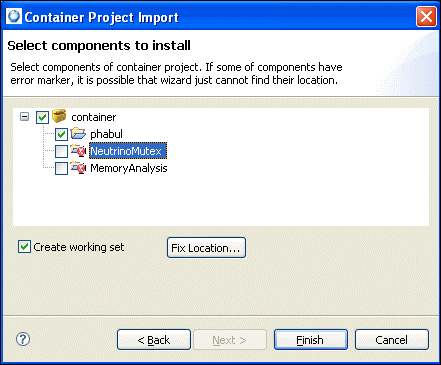
- By default, every project referenced by the container project is
also imported. To exclude certain projects, expand the project
tree and deselect projects you don't want to import.
- Click Finish to import the container project and its
subprojects.
To copy an existing project from another workspace:
- In the Import wizard (), expand General, choose Existing Project into
Workspace and click the Next button.
The IDE shows the Import Projects
panel.
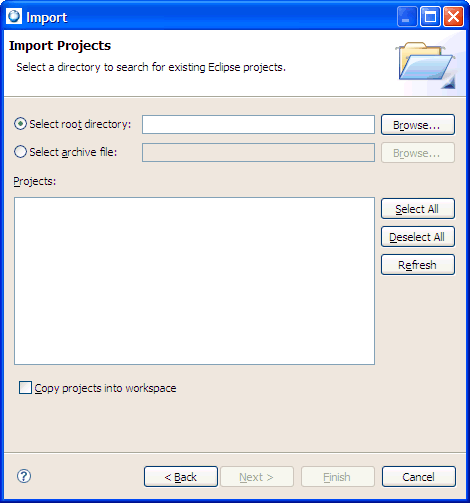
- Enter the full path of an existing project directory in the
Select root directory field, or the path to an archive in
the Select archive file field, or click the appropriate
Browse… button to select a project directory or
archive using
the file selector.
- Check the projects you want to import.
- If you wish, click Copy projects into workspace
to leave the original project unchanged.
- Click the Finish button to import the selected project
into your workspace.
Eclipse developers use this for developing IDE plugins and features.
Eclipse developers use this for developing IDE plugins and features.
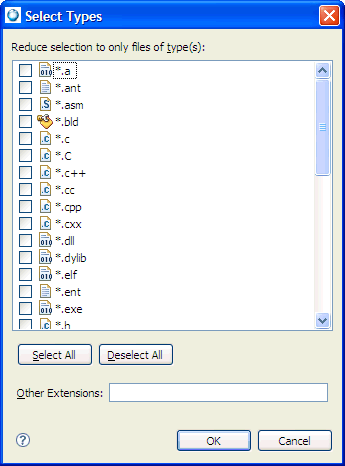
To copy files and folders from your filesystem into an existing
project in your workspace:
- In the Import wizard (), expand General, choose File System, and then click Next.
The IDE shows the File system panel.

- Enter the full path to the code in the From directory
field, or click the Browse… button to select a
source directory.
- Use the Filter Types…, Select All, and
Deselect All buttons to control which files are
imported.
- Enter the name of a project or folder in the Into folder
field, or click the Browse… button to select one.
|
This project or folder must already exist before you open the
Import wizard.
|
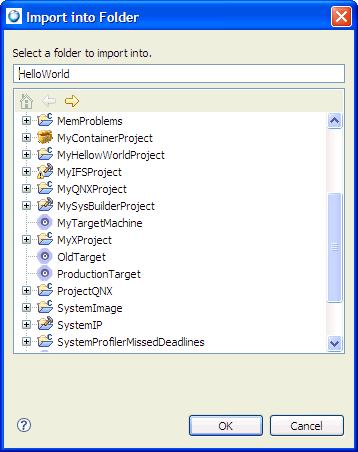
- To overwrite existing files, check the Overwrite existing
resources without warning box.
- To import only the selected folders, check Create selected
folders only.
To import the selected folder and all sub folders, check
Create complete folder structure.
- Click Finish to import the selected resources.
The GCC Coverage Data from Project option in the
Import wizard lets you import code coverage data from
applications that have been run outside of the IDE.
For example, in a self-hosted build environment, if you run a
code-coverage-enabled program from the command-line, it writes
code-coverage data into a programname.da
file in the same directory as the program's code.
To import code-coverage data:
- In the Import wizard (), expand , choose GCC Coverage Data, and then click Next.
The IDE shows the GCC Coverage Import panel.

- Enter a code-coverage session name in the Session name
field.
- Enter a project name in the Project field, or click the
Browse… button to select a project.
- Click Next to continue.
- Select a protocol type and a location for the coverage data.
- Click Next.
The IDE shows the next panel.
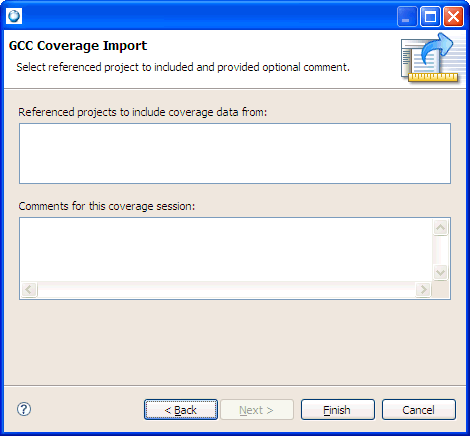
- To include code-coverage data from referenced projects, select
them in the Referenced projects to include coverage data
from list.
- To include any comments with the new code-coverage session (such
as details about the data you're importing), enter them in the
Comments for this coverage session field.
- Click Finish to import the code coverage data as a new
session in the Code Coverage Sessions view.
- Click Next.
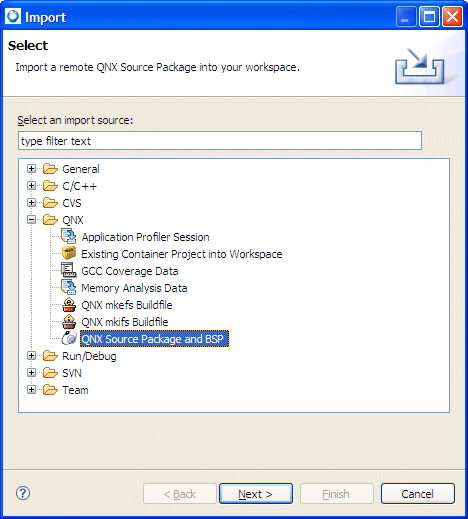
To copy a Source Package into your workspace, in the Import wizard (), expand QNX, choose QNX Source
Package and BSP, and then click Next. The IDE shows the Import QNX Source Packages panel.
The Import wizard.
Although a BSP is, in fact, a package that contains source code, the two types are
structured differently and generate different types of
projects. If you try to import a BSP archive as a QNX Source
Package, the IDE won't create a System Builder project.
Select the method that you want to use to import the package or BSP: from a local file archive, or from a SVN repository on Foundry27.
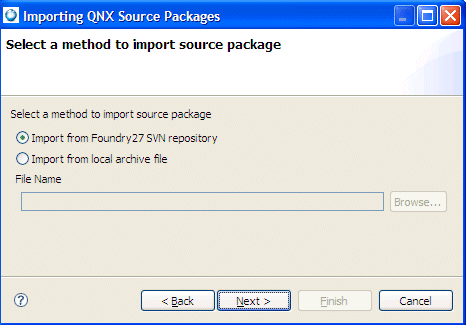
Selecting the method to use to import the source package.
If you select a package archive file, you'll need to specify a name in the File Name field, or click Browse to locate and select a file. After you choose the archive file type, by default the wizard presents you with a list of the packages on your host:
Choosing a package to import.
Notice that as you highlight a package in the list, the IDE shows a
description for that package.
If you select a file from a SVN repository on Foundry27, you'll need to select a package:
Choosing a package to import from Foundry27.
Click Next.
Each source package contains several components (or
projects, in IDE terms). For the package you
selected, the wizard gives you a list of each source
project contained in the archive:
Selected source projects to import.
You can decide to import only certain parts of the source
package; simply uncheck the entries you don't want
(they're all selected by default). Again, as you highlight a
component, you'll see its description in the bottom pane.
Click Next.
The last page of the import wizard lets you name your source projects. You can specify:
- Working Set Name — to group all related imported projects together as a set.
- Project Name Prefix — for BSPs, this becomes the name of the System Builder project; for other source projects, this prefix lets you import
the same source several times without any conflicts.
The Settings panel for specifying options for the project being created for the imported source package or BSP.
To specify the settings for the project being created:
- Optional: To change the destination directory for the projects, enter a new path in the Directory for Projects field, or click Browse… to select one. The default is your IDE workspace.
- Optional: In the Project Prefix field, type a prefix name that you'd like to use for the project other than the default one specified. This is prepended to the
name of each project imported from the BSP.
- Optional: If this project is to belong to a working set (meaning that you want to group all related imported projects together as a set), select the Add project to working sets option, and then select the name of the working set to use for the BSP.
If this is the first time you perform a checkout from Foundry27, the SVN New Repository Wizard is displayed.
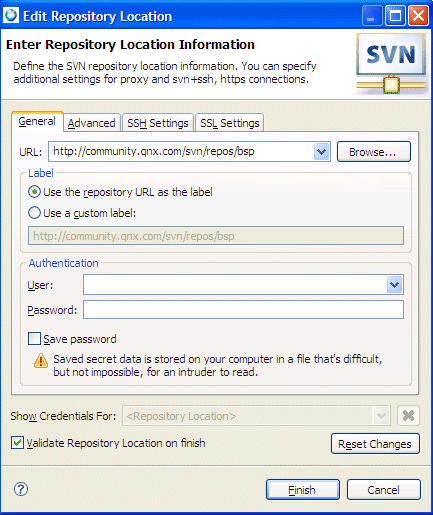
You'll need to specify your user ID and password that correspond to your Foundry27 account. In addition, you'll need to be successfully authenticated before you can proceed to the next panel in the wizard.
Click Finish to begin importing the package.
You might see a list of dependent package(s) with warning message at the bottom of the panel. The package won't build if you don't checkout the dependencies for the selected package.
|
If required, you might have to select any required dependency checkbox(s); you'll need to select which dependent package(s) to checkout at the same time. |
The IDE sets up the required project properties (compiler options, build targets, and so on) so that the projects are able to build after the checkout process. In addition, the IDE maintains the source tree layout (to preserve the current status of the checked out source), sets up prebuilt and staging areas for the project, when necessary, and also creates the BSP project.
If you plan to import a BSP into the IDE, remember to give each project a different
name.
|
If you import dual-endian BSPs, the wizard shows this informational message:
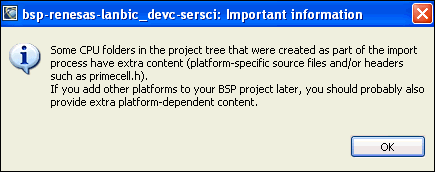
If you add build variants, you need to copy the CPU-specific files to the new variant's build directories. |
Click Next.
When you finish with the wizard, it creates all the projects and brings in the source from the archive. After the checkout of the BSP completes, right-click on the BSP project and select Build; the src project will be auto-built by the BSP project. The IDE will build all of the source under one project. Because the IDE creates a dependency between the BSP project and the src project, you don't need to build the src project; only the BSP project.
|
If you answer Yes, the IDE begins the build process, which may take several minutes (depending on how much source you've imported). |
If you decide not to build now, you can always do a Rebuild All from the main toolbar's Project menu at a later time.
If you didn't import all the components from a BSP package,
you can bring in the rest of them by selecting the System
Builder project and opening the import wizard (right-click
the project, and then select Import…). The IDE
detects your selection and then extends the existing BSP
(rather than making a new one).
When you import a QNX BSP, the IDE opens the QNX BSP Perspective. This perspective combines the minimum elements from the C\C++ Development Perspective and the System Builder Perspective.
When you import a QNX Board Support Package, the IDE opens the QNX BSP perspective, which combines the minimum elements from both the C/C++ Development perspective and the System Builder perspective:
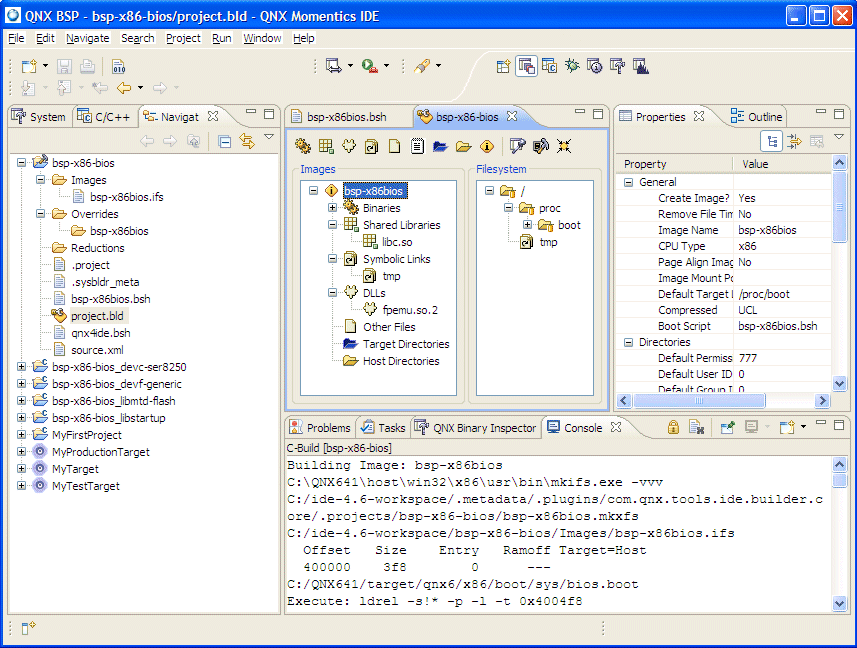
The BSP perspective.
The IDE can import the .build files used by
mkifs into an existing System Builder project.
To import a mkifs .build file:
- In the Import wizard (), expand QNX, choose QNX mkifs Buildfile, and then click Next.
The IDE shows the Import mkifs Buildfile panel.
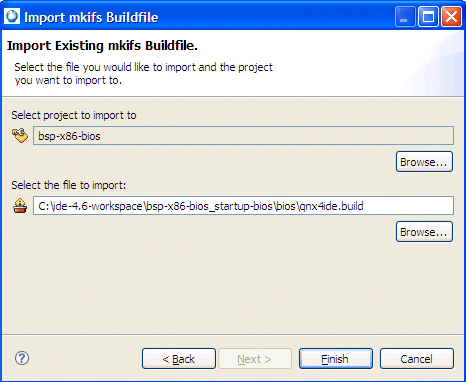
- Click the Browse… button beside Select project to import to select a destination for this import.
- Enter the full path to a mkifs .build
file in the Select the file to import to field, or click the
Browse… button to select one.
- Select one or more projects, and then click OK.
The IDE imports the selected .build file's System
Builder configuration.
To copy a QNX source package into your workspace:
- In the Import wizard (), expand QNX, choose QNX Source
Package, and then click Next.
The IDE shows the Import QNX Source Package panel.
- Select an installed source package from the Known
Packages list.
You can also enter the full path to a source package
(.zip file) in the Filename field, or
click the Select Package… button to browse to a
source package.
- Click Next to continue.
The IDE shows the Select Source Projects panel.
- All of the projects in the source package are imported by default.
Uncheck any projects you don't need to import. Click
Next to continue.
The IDE shows the Select Working Set panel.
- To change the working-set name for the imported projects, enter a
new working-set name in the Working Set Name field, or
select one from the drop-down list.
To change the project name prefix, enter a new prefix in the
Project Name Prefix field. This is prepended to the
name of each project imported from the source package.
To change the destination directory for the projects, enter a new
path in the Directory for Projects field, or click the
Browse… button to select one. The default is your
IDE workspace.
- Click Finish to import the projects.
The IDE imports the selected projects from the source package and
shows the Build Projects dialog.
- Click Yes to build all of the projects that were just
imported. Click No to return to the IDE.
Team project sets are a convenient way of distributing a collection of
projects stored in a CVS server among members of your development
team. Create them with the Export wizard.
To import a team project set and the projects it references:
- In the Import wizard (), expand Team, choose Team Project Set,
and then click Next.
The IDE shows the Import a Team Project Set panel.
- To create a working set for the imported projects, check the
Create a working set containing the imported projects
box, and enter a name for the working set in the Working Set
Name field.
- Click Finish to import the projects from the CVS
repository.
To copy files and folders from a ZIP archive into an existing
project in your workspace:
- In the Import wizard (), expand General, choose Archive File, and then click Next.
The IDE shows the Archive File panel.
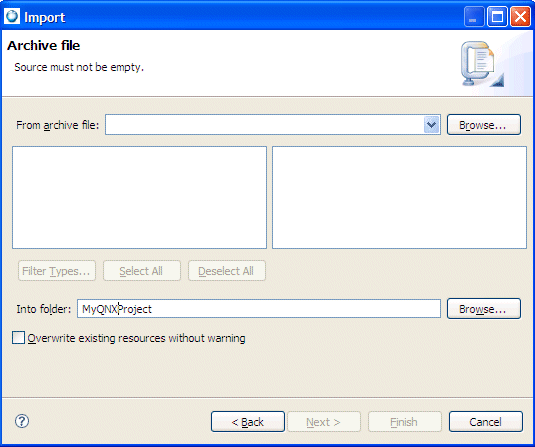
- Enter the full path to the ZIP archive in the From zip file
field, or click the Browse… button to select a
ZIP archive.
- Use the Filter Types…, Select All, and
Deselect All buttons to control which files are
imported.
Click a directory on the left panel to see a list of files in the
right panel.
The Select Types dialog lets you filter imported files by
selecting one or more extensions.
- Enter the name of a project or folder in the Into folder
field, or click the Browse… button to select one.
|
This project or folder must already exist before you open the
Import wizard.
|
- To overwrite existing files, check the Overwrite existing
resources without warning box.
- To import only the selected folders, check Create selected
folders only.
To import the selected folder and all subfolders, check
Create complete folder structure.
- Click Finish to import the selected resources.
A breakpoint makes your program stop whenever a certain point in the program is reached. For each breakpoint, you can add conditions to better control whether or not your program stops. You can use the Import wizard to import your existing breakpoints that you previously exported.
To import breakpoints:
- In the Import wizard, (), expand Run/Debug, choose Breakpoints, and then click Next.
The IDE shows the Import a Team Project Set panel.
- Select the file that contains the breakpoints to import.
- Optional: Select the options to determine how you want your breakpoints to be updated.
- Click Finish.
Use the Import wizard to import your existing launch configurations so you can quickly reproduce the particular execution conditions of a setup you've done before, no matter how complicated.
|
Each launch configuration specifies a single program running on a single target. To run your program on a different target, modify any imported launch configurations. |
To import launch configurations:
- In the Import wizard, (), expand Run/Debug, choose Launch Configurations, and then click Next.
The IDE shows the Import Launch Configurations panel.
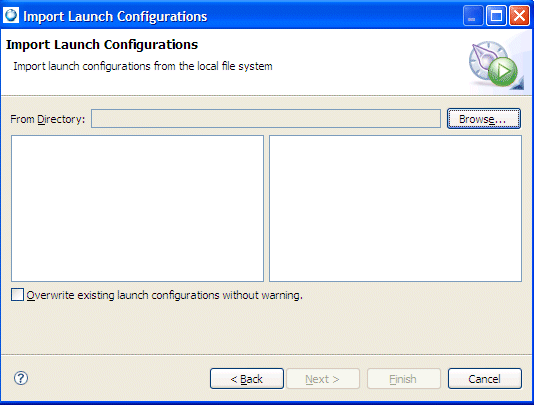
- Browse to the location that contains the launch configurations to import.
- Select projects that contain the launch configurations you want to import.
- Click Finish.
![[Previous]](prev.gif)
![[Contents]](contents.gif)
![[Index]](keyword_index.gif)
![[Next]](next.gif)