![[Previous]](prev.gif) |
![[Contents]](contents.gif) |
![[Index]](keyword_index.gif) |
![[Next]](next.gif) |
|
|
|
|
 |
This version of this document is no longer maintained. For the latest documentation, see http://www.qnx.com/developers/docs. |
This chapter provides an overview of writing input device drivers for QNX Neutrino. Use this along with the code in the sample and hirun directories (under ddk_install_dir/ddk-input/src/hardware/devi).
When you install the DDK package, the source is put into a directory under the ddk_install_dir/ddk-input directory. Currently, the directory structure for the Input DDK looks like this:
Directory structure for the Input DDK.
The input driver consists of two main components:
At run time, modules are linked together to form a data path for gathering data from an input device, processing the data, and then outputting the data to the system.
There are three types of modules:
The modules are typically organized as follows:
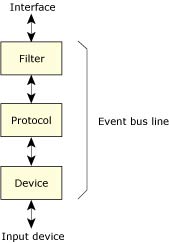
The input chain.
When modules are linked together, they form an “event bus line.” Data passes from an input device up the event bus line and out to the system. Conversely, configuration control flows the other way (i.e. down the line to the device).
There are three different types of event bus lines:
The term “relative” simply means that the device provides position data that's relative to the last location it reported. This is typically the method that mice use.
An “absolute” bus line is used with devices (e.g. touchscreens) that provide position data at absolute coordinates.
Finally, a “keyboard” type of bus line is one in which some sort of keypad device provides codes for every key press and release.
As mentioned earlier, there are three types of modules:
Modules are linked together according to the command-line parameters passed into the input driver. The command line has the following format:
devi-driver_name [options] protocol [protocol_options]
    [device [device_options]] [filter [filter_options]]
In this example:
devi-hirun ps2 kb -2 &
the elements are as follows:
You don't need to specify a filter module, because the three classes of event bus lines are represented by three modules, called rel, abs, and keyboard. When the input driver parses the command line, it can tell from the ps2 module that it needs to link in the rel filter-module. The only time you would explicitly specify a filter module on the command line is if you need to pass it optional command-line parameters. For example:
devi-hirun ps2 kb -2 rel -G2
This tells the relative filter module to multiply X and Y coordinates passed in by 2, effectively providing a gain factor (a faster-moving mouse).
After data has passed from the input device up the event bus line to the filter module, it's passed to the system. There are currently two interfaces to the system:
The default interface started by the input system is the Photon interface. If you want to run input drivers without Photon, then you'd use the resource manager interface.
You start the resource manager interface by passing the -r option to the devi-* driver. You can disable the Photon interface by passing the -P option to the devi-* driver.
The input (or devi-*) source base is organized as follows:
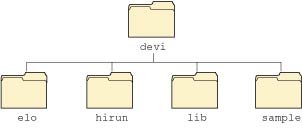
How the input SDK source base is organized.
The lib directory contains “glue” code used by all drivers. It contains the command-line parsing code, the code used to manipulate modules and event bus lines, the code for the Photon and resource manager interfaces, as well as the filter modules (rel, abs, and keyboard). In addition, the lib directory contains functions used by modules to request services of the input system (e.g. for attaching interrupts and pulse handlers, mapping device I/O space, etc.)
 |
We don't recommend changing anything in the lib directory. The source code is there simply to aid in understanding and debugging. |
The hirun directory is an example of an actual input driver, devi-hirun. In this directory, you'll find various device and protocol modules.
The elo directory contains source for the “ELO” touchscreen drivers.
The sample directory contains sample code with lots of comments detailing the steps required to initialize your module, and what to put in your module's functions.
When writing your own input driver, you would create your own directory and put your new input modules there.
|
|
|
|