QNX Software Center Technotes
These technotes explain how to work around many issues with using the QNX Software Center.
What's in this guide?
This guide explains QNX Software Center issues that may occur with common workstation and network setups. It doesn't discuss issues related to a particular release of the product; these are explained in the Release Notes for the version you're using. If you encounter issues beyond what's described in the Release Notes, you can consult this guide for information about issues that require advanced manual steps and extra configuration.
To set up and use the product, you should read and follow the steps in the Installation Note and the QNX Software Center User's Guide.
If you encounter an issue that requires manual steps that aren't explained here but that you feel should be covered in these technotes, contact your sales representative or QNX Technical Support.
Which QNX Software Center version should I use?
We always recommend using the latest version of QNX Software Center. To determine which version you're using, launch the product and select . The version is listed in the window that appears. To see what's the latest version available, go to the QNX Download Center, select QNX Software Center, and log in to your myQNX account. The resulting page provides a link to download the latest version of the product, and this link lists the version and build numbers.
What issues are covered?
| To find out about: | See: |
|---|---|
| Fixing problems in downloading and installing packages | Addressing Common Connection and Package Installation Issues |
| Fixing proxy server connection and myQNX login issues | Addressing Proxy Server Issues |
| Interpreting and handling license server errors | Addressing License Server Errors |
Addressing Common Connection and Package Installation Issues
You may encounter issues when trying to download and install software packages.
The following topics describe the symptoms, reasons, and fixes for various QNX Software Center failures related to package installation. There are two kinds of fixes: workarounds, which are temporary fixes that avoid the problem, and solutions, which are permanent fixes. Sometimes there are workarounds or solutions for the specific underlying problem, but other times you need to try the general workarounds given at the end.
Cannot connect to the server
- The QNX Software Center client seems to be hanging with Connecting progress at 10%.
- The client displays an error message saying it can't contact the server:
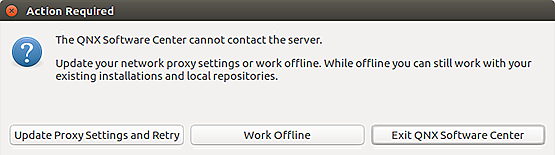
- Your internet connection is down.
Solution: Check your network setup. The connection could be broken due to an HTTP proxy server. If you think that the network you're using has such a server, see “Addressing Proxy Server Issues” for steps on providing the proxy server's address to QNX Software Center.
If connecting still isn't possible, use offline mode to install the packages.
- The proxy server is configured in QNX Software Center but access to qnx.com is blocked.
Solution: The IT administrator has to enable access to qnx.com and fusion.qnx.com (which is on a different subnet), by adding their IP addresses and subnet masks to the proxy server whitelist.
- If your network has an HTTP proxy or is just slow, you may have hit the client read timeout.
To confirm this, search for java.net.SocketTimeoutException: Read timed out in the latest session log file. If you don't find this string, see the other possible causes.
Workaround: Open qnxsoftwarecenter.ini, which is found in the root directory of your installation, in an editor and add as the last line:-Dswupdate.http.socketTimeoutMillis=60000
- Your QNX Software Center client may be out of memory.
To verify this, open the log file for the latest use session (~/.qnx/swupdate/qnxsoftwarecenter-0.log) in an editor. In the file, search for java.lang.OutOfMemoryError: Java heap space. If you don't find this string, see the other possible causes.
Workaround:- Open qnxsoftwarecenter.ini in an editor and change:
-Xmx1024m
to-Xmx2048m
- Restart the software.
If you find that the client is still hanging or saying it can't connect to the server, you can further increase the heap size (e.g., to 4096 MB).
- Open qnxsoftwarecenter.ini in an editor and change:
Cannot obtain authorization
Symptom: The QNX Software Center client displays an error message stating that the user isn't authorized to perform the operation.
- Your myQNX account is suspended. This happens if your account was inactive for a year.
Solution: Contact QNX Technical Support to restore your account.
- Your account password has non-alphanumeric characters. Note that our current rules enforce the use of such characters;
this happens only with old accounts.
Solution: Change your myQNX password to contain only letters and numbers.
- Your account credentials are registered with different capitalization.
Solution: This bug occurs in QNX Software Center 1.x. Install version 1.2.1 or later, which ignores differences in capitalization when you enter your myQNX account credentials.
- You updated your account password but the stored password wasn't updated so it no longer matches.
Solution: Remove the stored password through the QNX Software Center preferences. For instructions on doing so, see the “Manage secure storage of your myQNX credentials” section in the QNX Software Center Developer's Guide.
Cannot obtain or activate license key
Remote activation fails
Symptom: The client displays an error message stating that it failed to activate the license key:
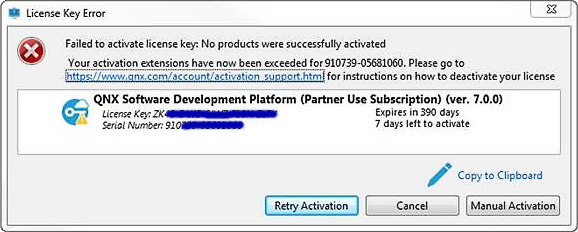
Reason: The number of activations has been exceeded.
Workaround: Make sure you're not purposely activating the same license on multiple hosts (because it's not allowed). You can deactivate the license manually on the QNX website: https://www.qnx.com/account/product_de-activation.html.
License isn't assigned
Symptom: The required license key isn't shown in the License tab.
Reason: The required license key isn't assigned to you.
Solution: Log into your myQNX account and check whether the license key is assigned to you; ask the license administrator to assign it if need be. If you're an administrator, you still have to assign a license key to yourself to use it. If the key is assigned but you still don't see it, contact QNX Technical Support.
License registration is incomplete
- The required license key isn't shown in the License tab.
- No available packages are shown.
Reason: Your license registration is incomplete. Your account may be in an incorrect state if you didn't download QNX Software Center from the QNX website.
Solution: Log into the QNX website and agree to the EULA to complete the registration.
Remote activation fails due to unsupported proxy
Symptom: The client displays an error stating that it can't access the server.
Reason: Even if the QNX Software Center proxy configuration works and the client can retrieve packages, remote activation may fail because the activation code supports only certain proxy types. For the list of supported HTTP proxies, see “Configuring proxy servers”.
Workaround: Use manual activation.
Manual activation appears to fail
Symptom: After you do manual activation, the QNX Software Center client displays an error saying that it failed.
Reason: It appears that manual activation failed (because of the error display), but it might have succeeded. This is a known issue.
- In the Licenses tab, right-click the license for the product you're trying to activate, then choose Properties from the context menu.
- Examine the Status field. If it's Activated, no further action is required. Otherwise, contact QNX Technical Support.
Cannot access packages
No packages are displayed or can be accessed
Symptom: The client can't access or doesn't show any packages.
- You haven't been assigned a license key. For more information, see “License isn't assigned”.
- You haven't completed your license registration. For details, see “License registration is incomplete”.
- If you've never downloaded QNX Software Center from the QNX website,
you might not have agreed to the Download Center Usage Policy.
Workaround: Log into the QNX website, navigate to the QNX Software Center download area, and click through and agree to the Download Center Usage policy.
A package can't be accessed
Symptom: The client can't access a specific package.
- You might not have agreed to the Download Center Usage Policy; for details on fixing this issue, see the last item in the previous subsection.
- You haven't been assigned a license key. For details, see “License isn't assigned”.
- No support plan has been registered.
- You are not entitled for the package.
Solution: Contact QNX Technical Support if you think it's a mistake.
- The package is experimental and the installation is configured to hide experimental packages.
Solution: Contact your QNX license manager or QNX Technical Support.
- The package is a debug symbol package. Since version 1.2.1, debug packages are invisible. To install debug symbols for a package, right-click its entry in the Installed tab and select Install Debug Package from the context menu.
- The package is invisible. Since version 1.2.1, packages of the “component” type are invisible on the Available tab (to unclutter the view).
- The package is architecture-specific and the installation is configured for a different platform.
Workaround: Go the Advanced tab, click Edit Installation Properties, and in the Target Architectures panel, ensure that the platform required for the package is checked (or all platforms are checked).
- The package wasn't actually posted or there was an error during publishing.
Solution: Contact QNX Technical Support.
No packages are displayed
Symptom: The client fails to display any packages and instead displays an error stating: An internal error occurred during : "Preparing operation..."
Reason: A bug in QNX Software Center server version 1.2 when the user session has expired.
Workaround: Restart QNX Software Center. To avoid this problem in the future, perform any package installations within 30 minutes of starting. Upgrade to version 1.2.1 to solve this problem permanently.
Cannot start installation
Baseline product can't be installed
Symptom: The QNX Software Center client hangs when you press Next to start installing the baseline product (QNX SDP), or there's an internal error when dealing with license activation.
Reason: If you're using version 1.1 or 1.2, this may caused by the license key bug.
Solution: Upgrade your QNX Software Center installation to version 1.2.1 or later.
Packages in dependency chain are inaccessible
Symptom: The client shows an error stating: Cannot complete the install because one or more required items could not be found
Reason: One or more packages in the dependency chain are inaccessible. For more information, see the section about not being able to access a specific package.
Filter is not applicable
Symptom: The client shows an error stating: Cannot complete the install because some dependencies are not satisfiable... cannot be installed in this environment because its filter is not applicable
- Experimental packages in a stable installation
- Debug symbol packages in a non-debug installation
- Host-specific packages for another platform (e.g., Windows tools on Linux)
- Group patches when patching is disabled
Conflicting dependency
Symptom: The client shows an error stating: Cannot complete the install because of a conflicting dependency... Only one of the following can be installed at once
Reason: You're trying to update packages that are in a locked group such as a locked patchset or a locked parent group.
Workaround: To install the update on top of a locked patchset, uninstall the patchset package first (to unlock the other packages).
Internal error when installing
Symptom: The client displays an error message saying an internal error occurred during “Preparing operation...”. The session log file contains the following message: java.lang.NoSuchMethodError: org.eclipse.equinox.p2.operations.InstallOperation.setAllowDowngrad
Reason: A plugin wasn't updated during the last QNX Software Center self-update.
Workaround: Uninstall your current QNX Software Center client and install the latest version using the installer available from the QNX Download Center. All packages and license data will be preserved (unless you previously chose to install QNX SDP packages inside of the QNX Software Center installation folder).
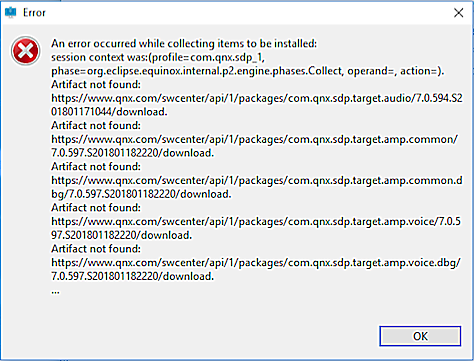
Cannot finish installation
- The QNX Software Center client displays an error message saying that it can't find the items to be installed:
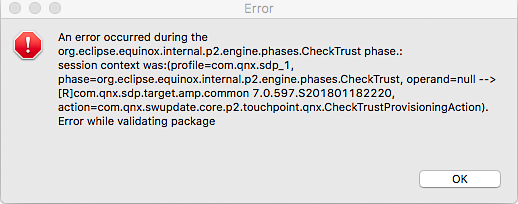
- The client displays an error message saying that it can't validate a package:
- The HTTP proxy server in your network prevents access to the server where the packages are kept.
To confirm this, in the latest session log file, search for HTTP 403 error codes. If you don't find them, see the other possible causes.
Solution: If do you find these error codes, you must address the network connectivity issues.
- Your login session has expired. This happens if QNX Software Center is idle for more than 30 minutes.
Workaround: Clear the package cache and repeat the operation. Upgrade to version 1.2.1 to solve this problem for good.
- The packages can't be saved and retrieved successfully on your workstation.
The possible reasons include:
- Your workstation is out of disk space.
Workaround: Ensure there's enough space in your home directory, possibly by relocating the package storage to another disk (if need be, contact QNX Technical Support for details).
- Although rare, your anti-virus software might be interferring with packages being saved or read.
Workaround: Check the anti-virus software logs and reconfigure the software to not interfere. If related log entries are found, clear the package cache.
- Although rare, it's possible that you have disk errors that are causing package corruption.
Workaround: Run disk-checking software and reboot the machine.
- You're experiencing permissions issues. This can happen if you previously installed or ran the
QNX Software Center client as root but now are running not as root.
Solution: Remove and reinstall your product, as explained in “Performing a complete wipe”.
- Your workstation is out of disk space.
- The download operation is timing out.
To confirm this, in the latest session log file (~/.qnx/swupdate/qnxsoftwarecenter-0.log), search for java.net.SocketTimeoutException: Read timed out. If you don't find this string, see the other possible causes.
Workaround: Open qnxsoftwarecenter.ini, which is found in the root directory of your installation, in an editor and add as the last line:-Dswupdate.http.socketTimeoutMillis=60000
- The software package is posted with errors.
Workaround: Try the general workarounds stated below, including contacting QNX Technical Support if necessary.
Verification actions
The QNX Software Center performs the following types of verification:
At install time:
- Verification of the package archive checksum.
- Verification of the package manifest signatures.
- Verification of the payload after an install operation has been performed on disk.
After an installation:
- Automatic verification of the payload when opening the Advanced tab.
- Manual verification when invoking the Verify action.
Encountering errors during installation
During a package installation you can encounter the following errors, some of which are a result of verification at install time.
- Artifact not found; an error occurred while collecting items to be installed.
- Various io-errors (e.g. disk write failures).
- Problem downloading the artifact.
- Post installation verification issues. Possibly due to packaging issues, data-transfer issues, disk corruption, anti-virus interference, or malicious packages.
Causes and mitigation:
Packaging issue (duplicate files):
In some cases, two different packages may have the same file listed due to a packaging or dependency error. To resolve this issue, consult the release notes of the affected packages, identify the package with the correct file out of the two colliding packages, and invoke the Repair action on the identified package to make sure that the correct version of the file is written on disk. Once the package has been repaired, the error will persist if a manual verification is performed. The error will be reported as a checksum error, file size mismatch error or a duplicate file error, but no further action is required.
Antivirus Issue:
Occasionally, antivirus software can trigger false positives that mistakenly identify an installation as malicious activity. Consult the release notes of the package in question, if antivirus software interference is listed as a known issue, configure your antivirus software accordingly, restart QNX Software Center and re-install the affected package.
Disk Corruption:
If an installation is being repeated, this could cause various checksum errors, reporting multiple files as affected. If this is the case, use your host's disk validation utility to repair or replace the affected drive.
Disk Write Error:
- Permission issue.
- Read-only file system.
- File collision due to a packaging issue, or another issue listed above.
- Limited disk space.
- Installing and uninstalling components in parallel.
- Manually deleting files in parallel.
Data Transfer Issue:
It is possible that an error could have occurred during the file transfer protocol, causing a file to be improperly sent or received. This could also be a result of an issue with your firewall or proxy settings. If you have a firewall or a proxy server, see configuring proxy servers.
Malicious Package:
It is theoretically possible that a package you received could have been altered maliciously. It is highly unlikely that such a package would have been downloaded from the QNX Software Center server, but rather obtained in some other way. If this is the case, you will receive a warning that the affected package is not signed or that the signature validation has failed. If you continue to receive invalid checksum errors, and there is no other valid explanation, please contact QNX Technical Support.
Manual verification error codes and actions
| Error code | Description | Linked to | Follow-up action |
|---|---|---|---|
| AssetListingViolation | Error while reading expected assets from the metadata. | Package | Investigate and proceed with actions to correct the appropriate package. |
| ChangedFileSizeViolation | File size is different than the expected file size. | Package | Investigate and proceed with actions to correct the appropriate package. |
| ExtraFileViolation | Unexpected file. | File | Delete the affected file. |
| FileInMultiplePackagesViolation | File is listed in multiple packages. | Package | Investigate and proceed with actions to correct the appropriate package. |
| IncorrectSignatureViolation | Package signature does not match key information. | Package | Investigate and proceed with actions to correct the appropriate package. |
| MissingFileViolation | File not found. | Package | Investigate and proceed with actions to correct the appropriate package. |
| NoPackagesViolation | No installation found in path. | Package | N/A |
| PackageScanningViolation | Unable to scan the package metadata. | Package | Investigate and proceed with actions to correct the appropriate package. |
| PackageVerificationViolation | Verification failed. | Package | Investigate and proceed with actions to correct the appropriate package. |
| SignedWithTestKeyViolation | Package was signed with an untrusted key. | Package | Remove the affected package. |
| SignedWithUnknownKeyViolation | Package signature references an unknown key. | Package | Remove the affected package. |
| UnsignedViolation | Package is not signed. | Package | Remove the affected package. |
General workarounds
Clearing the package cache
- Exit QNX Software Center.
- Remove the cache directory (~/.qnx/swupdate/cache).
- Restart the software.
Clearing your cached myQNX credentials
- Select and then in the resulting window, select .
- Click the Contents tab, select Default Secure Storage, then click Delete.
- When prompted, click Yes to restart the QNX Software Center.
- When prompted, enter your myQNX credentials, then click Save password to disk if you want to create a new storage record for the credentials.
The Secure Storage dialog contains other settings but you rarely need to use them. They're provided mostly for troubleshooting and somewhat for use by system administrators and power users.
Installing packages in offline mode
- A baseline (QNX SDP) installation; this also can be installed offline (see instructions referred to in Step 3 below)
- A valid and activated QNX SDP license; the activation can be done offline also (see instructions referred to in Step 3 below)
- Download the necessary packages from the QNX website:
- URL for QNX SDP 7.0 packages — http://www.qnx.com/download/group.html?programid=30107
- URL for QNX SDP 7.1 packages — http://www.qnx.com/download/group.html?programid=51771
- Start (or restart) the QNX Software Center client. When it displays a dialog box saying that it can't connect to the server, click Work Offline.
- In the QNX Software Center User's Guide, go to the section
titled “Import packages or package archives from your local filesystem” and
follow the instructions for importing packages.
Note that you may have to select multiple packages to resolve any interpackage dependencies.
Installing packages offline without QNX Software Center
- Obtain the packages by other means (e.g., a QNX contact person). Note that group packages have no payload; you need to obtain all of their children.
- On your host, navigate to the root directory of the QNX SDP installation; for example:
cd ~/qnx710
- Untar the package; for example:
tar xvf aaa.qpkg
Don't add the z option to the tar command.
Performing a complete wipe
The first time you try wiping the QNX products from your host development system, you may want to skip the optional steps (to see if the simpler procedure fixes your problems). If the usability issues persist, you can then try an in-depth wipe by doing all of the steps.
- Remove all baseline (QNX SDP) installations by going to the Advanced tab and for each installation:
- Select it in the top-right dropdown shown next to the gear icon.
- Click Remove Installation in the bottom right corner.
- Click OK at the confirmation prompt and wait for QNX Software Center to remove the baseline installation (this can take a couple of minutes).
- Deactivate all of your licenses by going to the Licenses tab, selecting all licenses in the list, then clicking Deactivate in the bottom right corner (and Yes at the confirmation).
- Exit the software by selecting .
- Optional: Uninstall QNX Software Center using the uninstaller located in the installation directory, then reinstall the software by downloading the latest version from our website.
- Remove the software update directory (~/.qnx/swupdate/).
- Optional: Remove the Eclipse secure storage directory (~/.eclipse).
The QNX Software Center and QNX Momentics IDE use this for storing passwords and other permanent
settings. Note that this directory's location is platform-dependent; to learn its location:
- Open QNX Software Center and select .
- In the left-side navigation, select .
- Click the Contents tab. The secure storage directory is listed at the bottom.
- Optional: Remove any detached installations. An installation of QNX SDP 7.0 or another QNX product is detached if the QNX Software Center doesn't see it. In this case, you must manually uninstall it and remove its folder from the filesystem.
- Restart QNX Software Center (if you haven't already) and try reinstalling the baseline product and any packages you need.
Contacting QNX Technical Support
- The log file for the latest use session (this is the same file described in the “Cannot connect to the server” step that talks about the QNX Software Center being out of memory)
- What version of QNX Software Center you're using
- What workstation architecture and OS you're using
- What type of license key arrangement you have
- Whether your organization uses proxy servers or outbound firewalls
- Whether this issue occurs with other users
Addressing Proxy Server Issues
If your company uses an HTTP proxy server to control internet access, the QNX Software Center can usually detect it automatically and communicate with the necessary QNX servers upstream of the proxy server. Sometimes, though, you have to manually configure the proxy server or provide proxy credentials. The procedures given here help you address these and other connectivity problems.
Communication with server processes
- myQNX server, hosted on www.qnx.com
- The QNX Software Center queries this server to discover and download available packages.
- QNX license server, hosted on www.qnx.com
- This server is queried to discover any licenses the user might have, and to remotely activate or deactivate those licenses.
- Floating license server installed in end-user's local network (optional)
- This server is used only by customers who have floating licenses.
All communications with the myQNX server and the QNX license server occur over HTTP and can be mediated through an HTTP proxy server. The floating license server, however, uses a proprietary protocol that isn't affected by proxy servers—it works only over direct connections.
Dealing with bad connection attempts to myQNX server
- Make sure your workstation is connected to the internet.
- Try accessing www.qnx.com from your workstation web browser. If that fails, ask your IT department to give you access to our website, either directly or through a proxy server.
- If you're using a macOS host, configure the QNX Software Center to use the same proxy settings as your web browser, as explained in “Manually configuring proxy settings”.
- If the QNX Software Center prompts you for proxy server credentials, follow the steps in “Entering proxy credentials”.
There's an issue in version 1.0 that prevents you from using uppercase characters in your login credentials. So, always enter your login name in all lowercase characters; for instance, use myusername@mycompany.com, not MyUserName@mycompany.com.
Where to find the log file with networking information
The QNX Software Center creates a log file that QNX support staff can use to diagnose networking issues. You can find this file at ~/.qnx/swupdate/.metadata/.log.
Configuring proxy servers
The QNX Software Center usually picks up proxy settings automatically. However, some proxy-OS combinations can be problematic. In particular, on macOS, you need to configure the proxy settings manually.
HTTP proxy support
| OS | No proxy | Unauthenticated proxy | Basic proxy1 | Digest proxy1 2 | NTLM proxy1 2 | Kerberos, Negotiate proxy | SOCKS proxy |
|---|---|---|---|---|---|---|---|
| Windows | Native | Native | Native | Native | Native | Not supported | Not supported |
| Linux | Native | Native | Native | Native | Native | Not supported | Not supported |
| macOS | Native | Manual | Manual | Manual | Manual | Not supported | Not supported |
Manually configuring proxy settings
In general, you shouldn't attempt to manually configure the proxy settings, because usually the default settings picked up from the OS work. However, on macOS, you need to enter the settings manually. On any host OS, you may need to experiment with manual settings when troubleshooting proxy connection issues.
Select , then click Proxy Connections on the left of the resulting window:
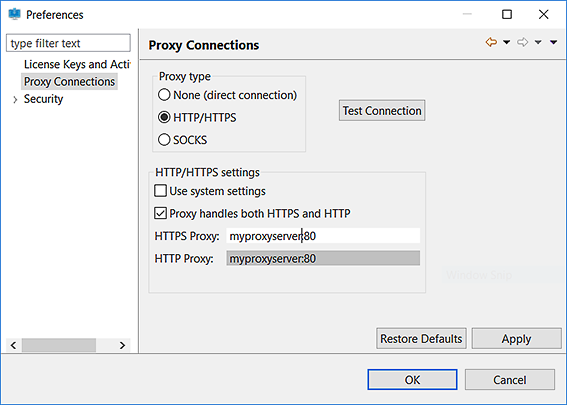 Note: The SOCKS option is available but not supported.
- Under HTTP/HTTPS settings, uncheck Use System Settings.
- In the HTTPS Proxy text field, enter your proxy address using the format proxyhost:proxyport.
- Click Test Connection to verify that you can connect to the myQNX server. You may be prompted for proxy credentials and may expect the check to take a few seconds. Information on providing these credentials is given in the next section.
- Click OK to apply your changes and exit the window.
Entering proxy credentials
If your host is downstream of an authenticated HTTP proxy server, when the QNX Software Center attempts to connect to the myQNX server, you'll see the Proxy Authentication window. This window asks for proxy credentials, and indicates what type of authentication your proxy is requesting, such as Basic, Digest, or NTLM.
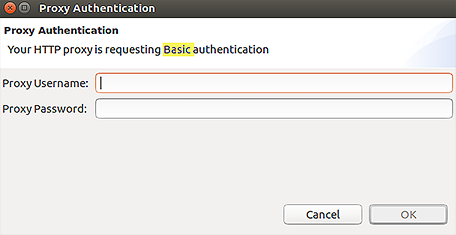
If you see this window, enter the proxy credentials for the HTTP proxy server in your corporate network; these are the same credentials that your browser uses to connect to internet sites.
Determining your proxy credentials
You can enter the same proxy credentials used by your desktop browser, but it isn't always obvious what those credentials are. That's because web browsers and other HTTP applications often supply the proxy username and password automatically.
In many corporate networks, the HTTP proxy server is integrated with the corporate network login mechanism. So, when prompted for your proxy credentials, try using your normal network username and password; for instance, your domain username and password on a Windows network. If you can't guess your credentials, contact your IT department.
> curl --proxy webproxy:3128 --proxy-basic --proxy-user mylogin:mypasswd http://www.qnx.com
Resetting proxy server settings
- On Linux: ~/qnx/qnxsoftwarecenter/configuration/.settings/org.eclipse.core.net.prefs
- On macOS: ~/Applications/QNX Software Center.app\Contents\Eclipse\configuration\.settings\org.eclipse.core.net.prefs
- On Windows: \QNX\QNX Software Center\configuration\.settings\org.eclipse.core.net.prefs
Addressing License Server Errors
QNX Software Systems uses a license monitor server to ensure license compliance. On the client side, QNX Software Center sends heartbeat requests to the QNX license server. The server's response includes the latest license activation status data. If there's a problem with your license, the status data contain error information, and you may need to perform follow-up actions.
If the QNX license monitor server finds a problem with any license owned by the myQNX user,
QNX Software Center reports the error code and message included in the server's response.
In the GUI, it appears in a popup window that looks like this:
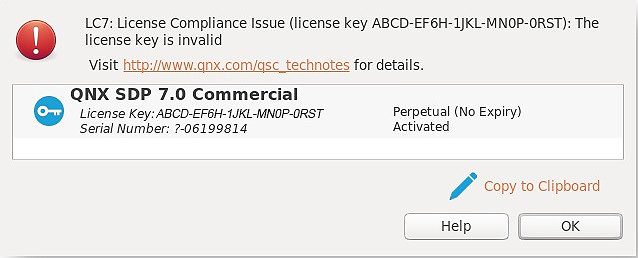
If you're using the command-line client, any license error information is written to the session log file.
| Error code | Message | Description | Follow-up action |
|---|---|---|---|
| 2 | Your QNX development seat license is not properly activated on your local host. Please deactivate and activate again to fix this issue. | The license is marked as activated on the server but not_activated locally and it's a single-activation license. This can happen if the local license record file was removed, or if the same license is being used on two hosts (one of them possibly a VM) and it's already activated on one of them. | Deactivate and reactivate the license. If the problem persists, contact your QNX license administrator. |
| 3 | Your QNX development seat license is not properly activated and may be in use on another host machine. Please contact your QNX license administrator for assistance. | The license is marked as not_activated on the server but activated locally. This can be caused by a second host deactivating a license or by a manual deactivation (i.e., our records indicate this license has already been deactivated). | Confirm this is the host on which the license should be activated. If the problem persists, contact your QNX license administrator. |
| 5 | Your QNX development seat license is not valid. Please contact your QNX license administrator to obtain a valid license. | The serial number is invalid because it doesn't match any value in the server's list of known values. | Contact your QNX license administrator. |
| 7 | Your QNX development seat license is not valid. Please contact your QNX license administrator to obtain a valid license. | The license key is not valid. That is, the submitted key doesn't match any key on the server's list of known license keys. | Contact your QNX license administrator. |
| 8 | Your QNX development seat license appears to be in use on another development host. Please contact your QNX license administrator for assistance. | There's a duplicate transaction. QNX Software Center will now use the chained UIDs from the server's most recent responses in a new transaction to prevent duplicate license key inserts. Note that duplicate chained UIDs can occur on initially cloned machines and may be legitimate behavior based on licensing. | If the problem persists, contact your QNX license administrator. |
| 9 | Your QNX development seat license is not valid. Please contact your QNX license administrator to obtain a valid license. | Both the serial number and license key were found to be invalid when tested by the server. | Contact your QNX license administrator. |
Copyright and patent notice
Copyright © 2018–2021, BlackBerry Limited. All rights reserved.
BlackBerry QNX
1001 Farrar Road
Ottawa, Ontario
K2K 0B3
Canada
Voice: +1 613 591-0931
Fax: +1 613 591-3579
Email: info@qnx.com
Web: http://www.qnx.com/
Date of this edition: Wednesday, June 16, 2021
Trademarks, including but not limited to BLACKBERRY, EMBLEM Design, QNX, MOMENTICS, NEUTRINO, and QNX CAR, are the trademarks or registered trademarks of BlackBerry Limited, its subsidiaries and/or affiliates, used under license, and the exclusive rights to such trademarks are expressly reserved. All other trademarks are the property of their respective owners.
Patents per 35 U.S.C. § 287(a) and in other jurisdictions, where allowed: http://www.blackberry.com/patents