The QNX CAR platform 2.0 RR allows you to use one of several supported navigation engines.
- TeleCommunication Systems (TCS)
- Telenav Scout
- Elektrobit (EB) Street Director
By default, the navigation tab on the HMI launches the HTMLGears demo, which is only a programming reference and doesn't have any navigational capabilities. To replace HTMLGears, you'll need to download and unpackage an actual navigation engine and modify some key system files so that the tab will launch that navigation engine.
You'll find instructions for setting up each of the supported third-party navigation engines at the QNX CAR platform wiki:
Instructions on Installing Navigation Engines
TeleCommunication Systems (TCS) offboard navigation system
The TCS Navigation system is an application that demonstrates offboard turn-by-turn navigation, routing, and display services. TCS includes touch- and voice-operated commands for search and navigation operations, including requests for directions and locations.

The reference application is a simulation (not an actual offboard system) that uses GPS data for US locations configured under settings. After your first navigation session, you can select a destination—either a location listed under Recents or a destination selected from a Near Me category—to simulate turn-by-turn navigation. On the navigation screen, the application shows turn and distance information as well as a 3D map. The HMI's Home screen displays turn and distance information while TCS navigation is active.
To run a turn-by-turn simulation:
- Tap settings to open the Settings screen.
- In the Settings screen, ensure that Generate track for route is selected and that Hybrid mode is unselected.
- Use the default track (Detroit) or select a track (GPS data file), such as Wynn.gps.
- Reset the GPS data by tapping the controls in the Settings screen in the following order:
Ensure that the screen acknowledges each button tap.
- On the main navigation screen, tap Near Me and select a destination from one of the categories. For example, if you loaded the Detroit_BrightCleaners.gps data set, from the Restaurants category select the Rojo Mountain Bistro, then tap Go. If you selected the Wynn.gps data set, you can try navigating to the Blair House Suites Hotel or the Sunrise Hospital Medical Center.
When you restart a navigation session, remember to always reset the GPS data in the Settings screen.
You can use standard zoom and pan controls to resize the map and change the area you're viewing. Tap the center of the movement control to reset the view to your current location. You can also change the map display and add traffic data with the satellite and traffic controls.
Scout by Telenav
Scout is a personalized navigation service that provides offboard, turn-by-turn navigation. The dashboard shows a detailed road map that is constantly updated during navigation. Touch-sensitive buttons let you access key features such as search and favorite destinations.
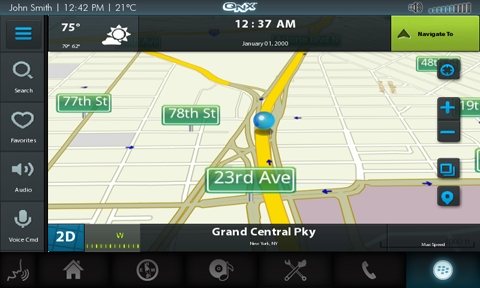
Scout comes preloaded with a navigation simulation that provides the route information for a trip between Wall Street and La Guardia Airport in New York City. This simulation is shown when you load the application for the first time.
In general, you can select your home or work as the next destination using the Navigate To feature as follows:
- Tap the Navigate To button in the upper-right corner of the main (default) screen to reveal two panels to select your home or work as your next destination.
- Tap the Go button in the Home or Work panels for a list of three precalculated routes, each of which has a name, total distance, and estimated travel time.
- Tap the entry for one of these route listings, then tap the Go button to begin navigating from your current location to the selected destination.
From the main screen you can tap the Search button and then tap one of the category buttons on the left side for a list of nearby destinations. You can search for banks, restaurants, gas stations, and more. You can then tap an entry in the results list to see the corresponding destination's address. To add that destination to your Favorites list, tap the button with the heart icon.
To access the Favorites lists at any time from the main screen, simply tap the Favorites button. The Favorites screen can list all favorite destinations that are near to your current location, recently used favorites, and the closest airports.
You can change the information drawn on the map by toggling a series of display options controls. Locate the button with the icon showing two overlapping rectangles in the bottom-right corner of Scout's main screen, then tap this button to reveal three more buttons. These let you turn on/off the traffic lights, video cameras, and satellite imagery overlays on the network of roads.
To move around on the map, tap and drag. To zoom in and out, tap the + and - buttons.
Elektrobit (EB) Street Director
Designed for automotive systems, this navigation software lets you search for a destination and, with one button tap, calculate the optimal route for reaching that destination and activate the navigation service to monitor your travel progress. As you drive, the map animates the travel progress in real time, while displaying the current street, next turn, and the estimated remaining time and distance to your destination.
The Street Director map gives a highly scalable view of your surroundings. You can zoom in (by tapping the + button) to a street-level view and see details of individual roads and buildings or zoom out (by tapping the - button) for a country- or even planet-wide view.

The Home screen displays turn and distance information while Street Director navigation is active.
In addition to the name-based destination search capability, Street Director has features for keeping track of your favorite destinations and recent travels. These features provide a fast way to look up and select one of your most frequently visited places as your next destination.
This release of the QNX CAR platform comes with sample map data for Toronto, Ontario, Canada, including location information for many points of interest, demonstrating realistic, map-based navigation. The map data is stored in the Foundry27 project:
File Releases > QNX CAR platform 2.0 RR - Navigation Package - Elektrobit
You must unzip the map data onto the QNX CAR platform during the setup of the EB navigation software, as explained on the Elektrobit Street Director Navigation page.