In the New Project dialog, the wizards are categorized according to the nature of the project. If you expand C, you'll see all projects that have a C nature; expand QNX, and you'll see all the projects with a QNX nature:
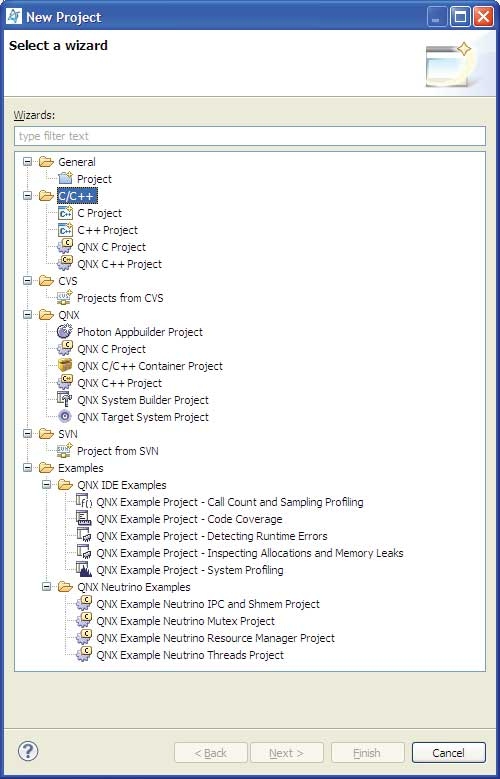
Notice the overlap: the C Project wizard appears in both C and QNX.
Besides the nature-specific wizards, the IDE also has simple wizards that deal with the very basic elements of projects: Project, Folder, and File. These elements have no natures associated with them. You can access these wizards by selecting .
Once you've created a project in the IDE, you can bring new folders and files into your project folder, even if they were created outside of the IDE (e.g. using Windows Explorer).
To have the IDE recognize folders and files:
- In the Project Explorer view, right-click and select Refresh.
If you select a QNX C/C++ project, the first panel in the wizard looks like this:
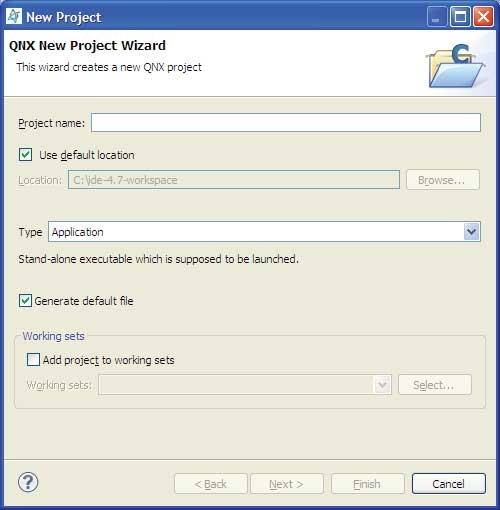
Field descriptions
- Project name
- Name for the QNX project. Although the wizard allows it, don't use any of the following characters in your project name: | ! $ ( " ) & ` : ; \ ' * ? [ ] # ~ = % < > { } as they may cause problems later.
- Use Default Location
- Use the current default workspace location to create the new project. If you don't want to use the default location for the project, ensure that the Use Default Location option is deselected, and specify where the resources reside in the filesystem (if they don't reside in your workspace). The Location field is required and must specify a valid location for the project when the Use Default Location is not selected.
- Type
- Specifies the type for the QNX project:
- Application — A standalone executable.
- Static library (libxx.a) — Archive of binary objects (i.e. *.o) that are directly linked against an executable.
- Shared library (libxx.so,libxxS.a) — Combines binary objects together and joins them so that they are relocatable and can be shared by many processes.
- Static+Static shared library (libxx.a,libxxS.a) — From one set of sources, creates a static library libxxx.a and a static library libxxS.a for shared objects (the same as Static library, but it uses position-independent code - PIC). Use this type if you want a library that will later be linked into a shared object. The System Builder uses these types of libraries to create new shared libraries that contain only the symbols that are absolutely required by a specific set of programs.
- Shared library without export (xx.dll) — A
shared library that you aren't going to link with another application.
Instead, it's intended to be manually opened at runtime using the
dlopen function, and you can use the
dlsym function to look up other specific
functions.
If you're building a library, see Extra libraries and Extra library paths.
- Generate default file
- Generate the default files associated with a project. If you want to check out source from version control, for a QNX project, make sure that you deselect the Generate default file option.
- Add project to working sets
- Set this project to belong to a working set, meaning that you want to group all related projects together as a set. Select this option, and then click Select to either choose an existing working set, or create a new working set. For more information about working sets, see the Workbench User Guide.
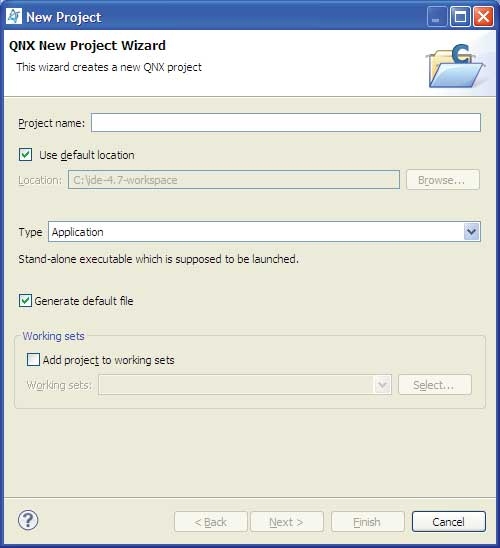
If you select a C/C++ project, the first panel in the wizard looks like this:
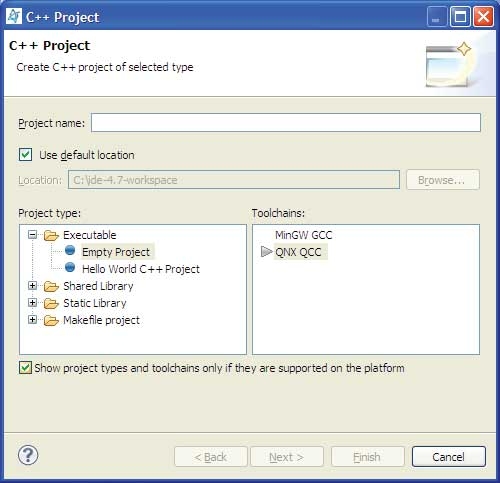
Field descriptions
- Project name
- Name for the QNX project. Although the wizard allows it, don't use any of the following characters in your project name: | ! $ ( " ) & ` : ; \ ' * ? [ ] # ~ = % < > { } as they may cause problems later.
- Use Default Location
- Use the current default workspace location to create the new project. If you don't want to use the default location for the project, ensure that the Use Default Location option is deselected, and specify where the resources reside in the filesystem (if they don't reside in your workspace). The Location field is required and must specify a valid location for the project when the Use Default Location is not selected.
- Project type
- Specifies the type for the QNX project:
- Executable — Provides an executable
application. This project type folder contains three templates:
- Empty Project — A single-source project folder that doesn't contain any files.
- Hello World C++ Project — A simple C++ application with main.
After specifying an Executable template, the workbench creates a project with only the metadata files required for your project type, and automatically creates a makefile for you. You can modify these source files, and provide them for the project's target.
- Shared Library — An executable module compiled and linked separately. For more information about this type, see Create a C/C++ project.
- Static Library — A collection of object files that you can link into another application (libxx.a). For more information about this type, see Create a C/C++ project.
- Makefile Project — Creates an empty project without any metadata files. For more information about this type, see Create a C/C++ project.
Note:When you create a shared library, its name is recorded in a special dynamic section. You can display the information in this section to see a SONAME record. For example, you can use the following:
ntoarm-readelf -d libname.so
When you link against this library, your application will look for that name.
When you perform a make install, the .so is copied to .so.1, and a .so symbolic link is created to point to it. You'll also notice that .so will get the right version. If you install a .so.2 (where the .so points to it), your old version 1 clients can still run.
- Executable — Provides an executable
application. This project type folder contains three templates:
- Toolchain
- Select a required toolchain from the Toolchain list. A toolchain represents the specific tools (such as a compiler, linker, and assembler) used to build your project. Additional tools, such as a debugger, can also be associated with a toolchain. Depending on the compilers installed on your system, there might be several toolchains available to select from.