![[Previous]](prev.gif) |
![[Contents]](contents.gif) |
![[Index]](keyword_index.gif) |
![[Next]](next.gif) |
|
|
|
|
This chapter covers the following topics:
The login utility controls user access to all QNX resources and system functions when a user attempts to login to the system. A user at a terminal /dev/ser1 can gain access to the system by entering correct responses to the following command:
on -t /dev/ser1 /bin/login
When invoked without options, the login utility prompts the user for a username and password. You can automate the login process through the tinit utility. To have tinit start the login process automatically at system startup, you would add the following entry to the node's sysinit.node file:
tinit -t /dev/ser1 &
The /etc/profile file is the first file executed by the login shell (e.g. /bin/sh). Local conventions can be established through this file.
The user-specific startup profile file, typically $HOME/.profile, is executed next. You can add any exported environment variables you need to this file. For example, if you'd like to preserve your login shell settings whenever a process starts a new shell on your behalf, be sure to define and export the ENV environment variable in your .profile file. For example:
export ENV=$HOME/.kshrc
This entry ensures that every time a new shell starts, the $HOME/.kshrc file will be executed. To display the values of all exported variables, type export -p.
When a user starts a session, the login shell program (e.g. /bin/sh) is started. See the login and sh man pages in Utilities Reference for info on how the shell variables and defaults operate.
Additional settings are retrieved from the user's .profile file, if it exists. The shell may add some of the values it requires to the user's .profile file automatically. For example, a user's .profile file may include settings for the following environment variables:
The set command can set (+) or unset (-) these shell options. To display a list of the variables that have been defined for your shell, you'd type set at the shell prompt. To see the value of one variable, you'd type echo $variable_name at the shell prompt (e.g. echo $WORKDIR). For more information about these shell commands, see the sh utility in the Utilities Reference.
QNX provides mechanisms to control access to resources and critical system functions. These mechanisms are based on the ability of the system to identify a particular user.
When the system boots for the first time (right after the initial installation), you're automatically logged in as the superuser (root). This username has access to every part of the system and doesn't require a password.
To prevent unauthorized users from accessing the system, you should give root a password. You can create a new user account for yourself that you can use afterwards for your daily work. The passwd utility allows a login password to be changed; you can use the utility to create new usernames for yourself and others.
The QNX access control utilities are:
The login utility may be started by tinit on tty devices. The utility demands a username and password, and verifies them against the user database /etc/passwd before granting access to the system. If the username/password combination is incorrect, login displays a message to that effect and terminates. If the user enters the correct combination, login starts the login shell and loads that user's environment.
The su utility lets you temporarily have the privileges of another user. If a user ID isn't entered on the command line when you start su, the utility prompts for a password that must match the superuser's password. Entering a valid access combination causes su to access the user database /etc/passwd and create a shell that has all the rights and privileges of the assumed user ID. Exiting from the shell returns you to your regular user ID.
The passwd utility can be used to change passwords or to add a new user account to the system. Anyone can change their own password, but the superuser (root) is the only user who has the right to create or change other passwords. In both cases, the passwd utility locks access to the user password file /etc/passwd to prevent any other attempts to access the file while it's being modified.
| If you are: | Then use this command: |
|---|---|
| a user | passwd to change your password |
| root | passwd username to create or change a password |
Before you start creating user IDs, you might want to modify passwd's behavior. The settings in the file /etc/default/passwd determine which local policies will be enforced by passwd, such as the stringency of passwords, user ID ranges, and so on. For more information about the options you can set, see the passwd utility in the Utilities Reference.
The superuser can add a new account by invoking passwd with the new user's username. The utility prompts for information that will control the new user's environment, including access privileges. The account permissions to include are the user's group ID membership and file permissions.
For example, to create a new account with the username jsmith, the superuser would enter:
passwd jsmith
By default, passwd will then prompt for the following information:
By convention, user accounts have a user ID number >= 100. User ID numbers below 100 are often used by system processes. User ID ranges are set in the /etc/default/passwd file.
If the group ID doesn't exist, the system will display a reminder to update the group file /etc/group.
The /etc/group file grants privileges to all users who are members of a defined group. For example, the "Finance" department would be allowed access to the company's financial records, but the "Customer Support" group would not. You can set up a group ID for "Finance" with the required access permissions, and then assign users to that group according to the privileges they require.
The /etc/group file contains a list of users by group. Each line has the following general syntax:
groupname::group_ID:user1, user2, user3, ..., userN
For example, the following entry defines the group "maestri" with group ID "123" and members "alvivaldi," "gfhandel," "gptelemann," and "jsbach":
maestri::123:alvivaldi, gfhandel, gptelemann, jsbach
Initially you'd add groups that have no users, as in the following example:
docs::0:
techies::1:
support::2:
marketing::3:
finance::4:
When a user logs in, the value in the password database /etc/passwd will specify the default group ID a user has been assigned to (if any). Users who belong to a group are allowed to switch to the privileges of that group any time using the newgrp command.
The home directory, initial command, and initial password items are optional. If you don't specify a value, the following defaults are used:
To delete an account, you must remove all of the following:
Upon logging in, a user is assigned two pieces of information: a user ID and a group ID.
These are known as the user's real user ID and real group ID.
The user ID should be unique -- no two users should share the same ID. This rule can be enforced by the passwd utility, but the superuser can override the rule by editing the password file directly.
The group ID allows several users to be associated with a group. This group mechanism lets a team of users share resources without making those resources available to the rest of the world. For more information about the /etc/group file and its contents, see the newgrp utility in the Utilities Reference.
Processes have two classes of user and group IDs: real and effective. When a process is created, it automatically inherits these four IDs from its parent (which is typically the login shell):
The effective user and group IDs are used for permission checking. A process can change its effective user or group ID, or both, so that they differ from their real counterparts. Typically, this is done to gain access to resources that aren't available to the real user and group IDs.
| To modify effective group and user IDs: |
You use the: |
|---|---|
| from within C programs | seteuid() and setegid() functions |
| from within the shell | su and newgrp utilities |
| for an executable on disk | chgrp and chmod utilities (e.g. to change
the group ownership and permission bits for the
mailx program: chgrp mail /usr/bin/mailx chmod g+s /usr/bin/mailx) |
For more information on setuid and setgid bits, see the "File permissions" section.
The newgrp utility starts a new shell with different real and effective group IDs. When invoked without arguments, newgrp switches the group ID to the one identified in the password database for the current user. The password database controls the groups that a particular user may switch to.
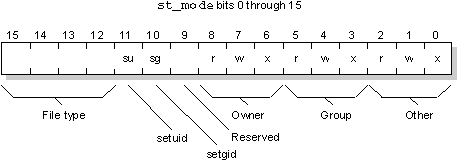
In QNX, each file has an associated set of permissions called mode bits. These mode bits, in conjunction with the file's owner and group, control access to the file.
When a process creates a file, the process's effective user ID and effective group ID become the file's owner and group. A set of mode bits is also assigned to the file (this is described in the "How mode bits are assigned" section).
There are three classes of mode bits:
When a process tries to access a file, the Filesystem Manager honors the appropriate class of mode bits by performing a few comparisons in a specific order:
 |
As root (uid 0), you can access any file for read/write regardless of the permissions, and you can execute any file that has at least one mode bit permitting execute access. |
The file mode bits are stored in the 16-bit st_mode field of the directory entry for the file; access is granted if a mode bit is set.
As the following table shows, permissions affect regular files and directories differently:
| This bit: | On files, affects: | On directories, affects: |
|---|---|---|
| r | Reading the file | Examining the names of files in the directory (e.g. via ls) |
| w | Writing to the file | Creating, removing, and renaming files within the directory, including subdirectories |
| x | Executing the file | Searching the directory. This means you can change your current working directory to this directory. Also, you may include this directory within pathnames (e.g. in open(), stat(), etc.) |
|
Execute permission has meaning only for directories and regular files; it doesn't apply to other file types. |
You can use the ls -l ("el") command to see a file's permissions, owner, and group. The following ls -l output for the file alpha.c shows that the owner and anyone in the techies group may read and write to the file, while other users may only read it:
-rw-rw-r-- 1 mplanck techies 8475 Apr 1 1997 alpha.c
In the following example, the ls -ld output for the directory /bin shows that the owner and group members may read, write, and search the directory, while other users don't have write permissions and therefore can't add any new files to the directory:
drwxrwxr-x 2 root techies 2048 Sep 19 1990 bin
But note that other users may still list or execute files in /bin.
It's possible -- though unusual -- to have read permission on a directory but not search permission. For example, ls could work (depending on the options you give it), but you wouldn't be able to access any file in the directory or do a cd to the directory.
The permissions on a file are derived by combining the current umask of the creating process with that process's requested open()/creat() mode.
The umask is a permission bit mask that indicates which permission bits are to be turned off if a process specifies default permission when a file, directory, or FIFO is created (see umask in the Utilities Reference).
The mask is the logical AND of the mode and the complement of the umask. For example, if the mode requests read-write permission for everyone as follows:
| Binary | Octal | Symbolic |
|---|---|---|
| 110 110 110 | 0666 | rw- rw- rw- |
and the umask indicates write permission for group and other:
| Binary | Octal | Symbolic |
|---|---|---|
| 000 010 010 | 0022 | --- -w- -w- |
then the result is read-write permission for the owner, and read permission for everyone else:
| Binary | Octal | Symbolic |
|---|---|---|
| 110 100 100 | 0644 | rw- r-- r-- |
You can change the permissions of a file with the following commands:
| To: | Use: |
|---|---|
| change owner and group | chown and chgrp utilities or chown() function (C programs) |
| change access permissions; setuid and setgid mode bits | chmod utility or chmod() function (C programs) |
| set the file mode creation mask | umask utility |
|
To modify the owner or access permissions of a file, your effective user ID must match that of the file's owner. If you change the owner of the file to be other than yourself, you'll no longer be able to change the permissions and ownership of the file. The superuser can modify the mode bits of any file, regardless of who owns the file. |
To perform certain functions, a user must sometimes run a command "pretending" to be a different user or a member of a different group. Two file mode bits allow a user to do this:
With these bits set, an executable file will run with the privileges of its owner and group rather than with the privileges of the process that invokes the executable. These mode bits apply only to executable regular files.
When a file is loaded for execution and the setuid mode bit is set, the effective user ID of the new process becomes that of the file's owner. Similarly, if the setgid mode bit is set, the effective group ID becomes that of the file's group.
To close a potential security hole, the setuid and setgid bits are cleared any time the file ownership (owner or group) is changed. This prevents users from writing an executable file to disk, setting the setuid bit, and then changing the ownership of the file to root, thereby gaining unlimited system access.
The passwd, login, su, and newgrp utilities are all setuid to root; these programs therefore run with the permissions of the superuser.
By convention, root is the only user with user ID zero, which yields superuser status. With respect to access control, you must ensure that only programs that can be trusted -- and absolutely need to be trusted -- are setuid to root. No special privileges are bestowed on a program when it's setgid to root.
 |
Since all programs setuid to root inherit superuser capabilities, you should make sure they do not have general write permissions so that only the superuser will be able to modify the programs. |
These files collectively form the password database:
The access permissions to these files should be set as follows:
| File: | Owner: | Group: | Permissions: |
|---|---|---|---|
| /etc/passwd | root | root | rw- r-- r-- |
| /etc/group | root | root | rw- r-- r-- |
| /etc/shadow | root | root | rw- --- --- |
| /etc/.pwlock | root | root | rw- r-- r-- |
The /etc/passwd file contains a set of lines in the following format:
username:haspw:userid:group:comment:homedir:shell
where:
Here's an example /etc/passwd line:
bubba:x:290:120:Bubba L. Jones:/home/bubba:/bin/sh
The /etc/group file contains lines in the following format:
groupname::group_ID:[user_ID[,user_ID]...]
where:
Here's an example /etc/group line:
techies::123:bubba,charlie,sue,jake
The /etc/shadow file contains lines in the following format:
user_ID:password:0:0:0
where:
Here's an example /etc/shadow line:
bubba:SRjg51|weIJ[H:819388588:0:0
The /etc/.pwlock file is created by passwd to indicate to other instances of passwd that the password file is currently being modified. When passwd finishes, the lock file is removed.
You may notice from the above permission list that /etc/passwd is readable by anyone. This is to provide standard utilities with a simple mechanism to find information about users. Since this file is readable, the encrypted password isn't stored in it.
The encrypted password is stored in the /etc/shadow file, which is readable only by the superuser. This is to inhibit unauthorized attempts to decrypt the passwords. To protect the security of your user community, you should ensure that these permissions are maintained.
QNX is shipped with a default password database that includes /etc/passwd and /etc/group. The /etc/shadow file isn't shipped, because the accounts initially don't have passwords associated with them.
|
If you must edit the /etc/passwd file on a
live system (not generally recommended!), follow these
precautions:
Note that if someone else (or some utility like login, su) tries to access the password database while you're editing the /etc/passwd file, you could end up with a corrupt password database! Note also that if you remove a user's password, you must also remove the corresponding entry from the /etc/shadow file. |
The default /etc/passwd file that was shipped with your QNX system contains the following:
root::0:0::/:/bin/sh
The default /etc/group file contains the following:
root::0:root
The login utility updates system accounting information, which is logged to the /etc/acclog file. If this file doesn't exist, all accounting information will be discarded -- this is the normal mode of operation after QNX has been installed.
For most realtime systems, this default of not keeping accounting information is recommended. If you have a dial-up line to a computer or if you run QNX on a network of many users, you may wish to change this default by creating an empty /etc/acclog file.
To enable accounting, you create an empty /etc/acclog file. You can do this using the touch utility:
touch /etc/acclog
chmod g=,o= /etc/acclog
Once this file is created, accounting information will be logged here.
Note that only the superuser (user ID root) may create and modify this file.
Each record in the /etc/acclog file is of the form:
tttttttttt cc data...
where tttttttttt is the time in seconds since 1970 (in decimal). This is always followed by a single space. The time is followed by a two-character code cc. This code is then followed by a space and data specific to each code. Each line is terminated by a newline character. The following utilities write to the /etc/acclog file:
| Utility: | Purpose: | Record: |
|---|---|---|
| login | user logged in | tttttttttt LO device uid gid uname |
| login | login failed | tttttttttt LF device uname |
| modem | modem connect | tttttttttt MO device baud |
| su | switch user | tttttttttt SU device uid gid uname |
| tinit | start a command | tttttttttt TS device command |
| tinit | arm a device | tttttttttt TA device |
A typical accounting file might look like this:
670464500 TS //1/dev/ser1 modem -b 19200 -L
670464545 MO //1/dev/ser1 2400
670464550 LO //1/dev/ser1 100 101 steve
670465824 TS //1/dev/ser1 modem -b 19200 -L
This record shows that tinit started a modem program to wait for calls. A call was received and answered at 2400 baud, and user ID steve logged in. Note that the log doesn't show a logout. The logout is inferred, because in the final entry tinit starts another modem program.
The total connect time for the user (from successful login) can be calculated like this:
670465824 - 670464550 = 1274 seconds
On a busy system, records from many devices will be interspersed throughout the accounting file. In order to match events keyed to each device, you'll find an associated node number that lets you track accounting records for all devices throughout a network in a single logfile.
Here are several common event sequences:
| Event sequence: | Meaning: |
|---|---|
| TS --> LO --> TS | A login and logout on a dedicated line. |
| TS --> MO --> LO --> TS | A login and logout on a dial-up line. |
| TA --> TS --> LO --> TA | A login and logout on a dedicated line armed by a keystroke. |
| TS --> TS | An unsuccessful login on a dedicated line. |
| TS --> MO --> TS | An unsuccessful login on a dial-up line. |
Once you create /etc/acclog, it will start to grow as records are appended to it. If left unmanaged, this file may grow to consume considerable disk space, so you should print or archive the information in this file on a regular basis. You may even want to automate this housekeeping job using the cron utility (see the Utilities Reference).
The following commands will move the accounting file to a file named by year and month, and then create a new empty log:
mv /etc/acclog /etc/acclogs/9607
touch /etc/acclog
chmod g=,o= /etc/acclog
Since the data in this file is very regular, you may use the gzip compression utility, which will achieve very high rates of compression on the file. This can significantly reduce disk space requirements if you keep the saved logs online or save them to a floppy.
|
Remember to move the file before compressing it. Never compress /etc/acclog directly. |
Here's an example of the recommended compression procedure:
mv /etc/acclog /etc/logs/9607
touch /etc/acclog
chmod g=,o= /etc/acclog
gzip /etc/logs/9607
Note also that other utilities (possibly third-party) may add their own accounting records to the /etc/acclog file.
To have QNX start recording events in a log file, simply create an empty log file in the appropriate directory. You must use the filenames given below. QNX will start logging system events as soon as the associated log file exists.
QNX utilities log problems or unexpected events to the /tmp/syslog file.
The logger utility appends lines to the /usr/adm/syslog file. As long as a program has write access to this file, it can run logger as a setuid process owned by adm:adm.
The login utility writes information to the /usr/adm/lastlog file (provided it exists). It can be used to track where and when a user last logged in. The finger utility can display information from the lastlog file by user.
The file $HOME/.lastlogin is created by login. It keeps track of the last time the user logged in, and from which device. The contents of this file are displayed when a user logs in. If a user hasn't logged in since the message of the day (motd) was last updated, the contents of the file /etc/motd (provided it exists) are printed to the user's terminal.
The presence of an /etc/nologin file prevents anyone from logging in.
The /etc/wtmp file maintains a list of who is currently on the system and how these users are logged in. TCP/IP for QNX uses this information.
The /etc/utmp file is updated by login. It contains login information in binary format and maintains a history of all changes to /etc/wtmp.
|
|
|
|