This chapter covers the following topics:
The following are included with your Photon Runtime package:
The Parts List & Installation Note details the software prerequisites required by the particular software version that you're installing along with any special hardware requirements. It also gives detailed installation instructions for the distribution media being used. The Release Notes contain last minute updates and changes.
Your distribution media could be one of the following:
If you have QNX 4.22 or earlier, your system supports "old style" licensing. QNX 4.23 supports both "old style" and "new style" licensing. For more information about licensing, including how to install additional network licenses, refer to your QNX OS documentation.
Each of the packages listed below comes with a Parts List & Installation Note that provides installation instructions for you to follow:
Note that the distribution media for these additional QSSL software products could be one of the following:
Follow the particular installation instructions that come with the software distribution media you're using.
To start Photon:
 |
Type the following command at the OS command prompt:
ph |
The first time Photon is started on a computer (node), the startup script will run two utilities to probe the hardware environment in order to determine which graphics driver and input parameters to use:
The probing utilities will pick initial default settings that can be customized as required.
The Display Configuration dialog shows the current graphics settings picked by the crttrap utility and a list of all graphics modes supported by the graphics card. The dialog is displayed automatically when Photon starts for the first time. You can also change the display settings at any time using the Photon Window Manager or the Desktop Manager (see the section "Using the Configuration tool" in the Customizing Photon chapter in the Photon User's Guide).
 |
The list of available graphics modes displayed in the following dialog may be different from those on your machine. |
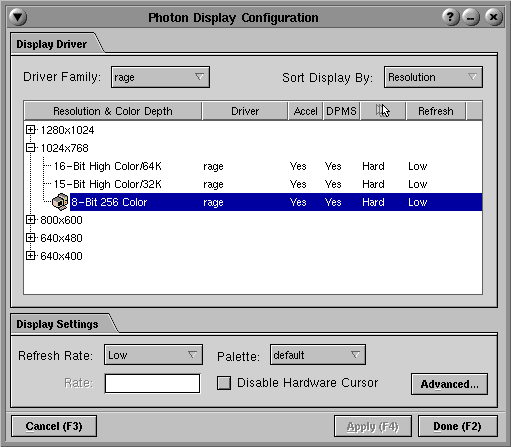
To change the graphics mode:
You can change the display settings any time in the future using the Photon Window Manager or Desktop Manager (see the Customizing Photon chapter in the Photon User's Guide). Provided the installation has gone well, Photon should be ready to use at this point. For introductory information about using Photon, see the Photon User's Guide.
The Input manager uses the default input settings determined by the inputtrap probing utility. The Input manager handles the keyboard and any pointing devices you have, including mice, pens, touchscreens, etc. Some input devices can't be detected by inputtrap, so you may find that some or all of your pointing devices won't work with the default input settings.
If you have problems starting Photon (e.g. if either crttrap or inputtrap can't determine your hardware environment appropriately), you can try to start Photon in its "safe" mode by typing the following at the OS command prompt:
ph -s
This will start Photon in VGA, 16-color mode with a keyboard handler only (no mouse). Using the keyboard, you can start a shell as follows:
From here you may perform some of the troubleshooting techniques described in Appendix A, Troubleshooting.
To obtain technical support for any QNX product, visit the Technical Support section in the Support area on our website (www.qnx.com). You'll find a wide range of support options, including our free web-based QNX Developer's Network at http://support.qnx.com/.
For up-to-date information on the various platforms, video cards, etc., that we support, go to the Supported Hardware section on the QNX Developer's Network (http://support.qnx.com/) website.
Most of the Photon Runtime files can be found under the /usr/photon directory. The trap files are stored in the /etc/config/trap directory. The files are stored in the existing OS directory tree structure according to the kind of services they provide. The general directory structure of a typical installation is as follows:
| To find: | Look in: |
|---|---|
| Applications | /usr/photon/bin |
| Color palettes | /usr/photon/palette |
| Directory of cache files used by phditto | /usr/photon/cache |
| Font files | /usr/photon/font |
| International character compose sequences | /usr/photon/keyboard |
| Keyboard definition files and utilities | /usr/photon/keyboard and /etc/config/kbd |
| Language translation files (if any are available) | /usr/photon/translations |
| Printer configuration files | /usr/photon/print |
| Screen savers, background preferences, and other defaults set through the Photon Desktop Manager | /usr/photon/pdm, /etc/backdrops |
| Small-screen demo files | /usr/photon/smallscreen |
| Trap files | /etc/config/trap |
| User application configuration files | $HOME/.photon |
| Calibration files | /etc/config/absf |
Here's a summary of the user application configuration files:
| To find files for: | Look in: |
|---|---|
| Fonts | $HOME/.photon/font |
| Helpviewer | $HOME/.photon/helpviewer |
| Launch an application automatically when Photon starts | $HOME/.photon/phapps |
| Photon CD Player (phcd) | $HOME/.photon/phcd |
| Photon Desktop Manager (pdm) | $HOME/.photon/pdm |
| Photon editor (ped) | $HOME/.photon/pedrc |
| Photon Terminal window (pterm) | $HOME/.photon/pterm.rc, $HOME/.photon/config |
| Photon Window Manager (pwm) | $HOME/.photon/pwm |
| Printers | $HOME/.photon/print |
| Small-screen demo | $HOME/.photon/smallscreen |