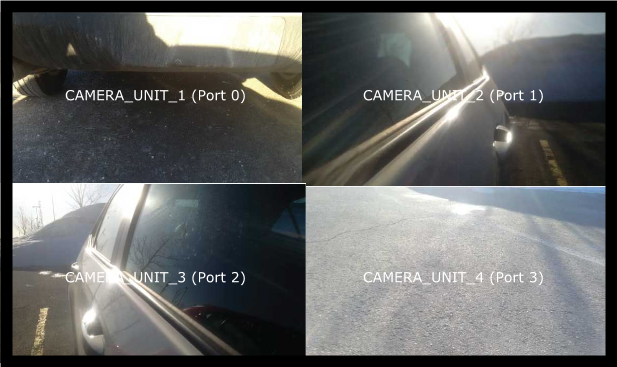
This application can show a grid of video from four cameras.
With default settings, the application requires that the target system has four cameras connected and configured as CAMERA_UNIT_1, CAMERA_UNIT_2, CAMERA_UNIT_3, and CAMERA_UNIT_4. But you can run it with fewer than four cameras, by using the -n parameter.
You can run the Camera MUX application with these parameters (all of which are optional):
- -n numberofcameras
- Run the application using 1–3 cameras. When this parameter isn't specified, four cameras are required for this application to run; otherwise it exits. For example, if you want to run this application with one camera, use this command: camera_mux -n 1
- -w width
- The width of the video feed, in pixels.
- -h height
- The height of the video feed, in lines.
- -f framerate
- The framerate, in frames per second (fps) as a floating point number.
- -x window_width
- The width, in pixels, of the window in which the frame appears.
- -y window_height
- The height, in lines, of the window in which the frame appears.
- -u enum_of_camera
- Run the application using the specified camera. For example, -u 3 matches the camera configured as CAMERA_UNIT_2 in the sensor configuration file.
The grid shows an image buffer from each streaming camera.
The video streams from the cameras are arranged in the following manner:
- in the top-left corner is CAMERA_UNIT_1, the camera connected to port 0
- in the top-right corner is CAMERA_UNIT_2, the camera connected to port 1
- in the bottom-left corner is CAMERA_UNIT_3, the camera connected to port 2
- in the bottom-right corner is CAMERA_UNIT_4, the camera connected to port 3
Here's what the screen looks like:

Figure 1. Camera MUX application

Figure 1. Camera MUX application
Note:
If you want to show four video streams but don't have four physical cameras, you can instead use file cameras,
which are virtual cameras that play video files to simulate video streams, as if they came from physical cameras.
For more information, see
“Example: Sensor configuration file for file camera” in the Sensor Framework Services guide.
Run the application
By default, Camera MUX is configured to show four cameras. If you do not have four cameras and have not used
the -n option to set fewer cameras, the application exits. To run the application, do the following:
- Connect to your target system using ssh.
- If another example application is running, type slmctl "stop example_app"
in your ssh session to stop it; for instance:
# slmctl "stop adas_example"
The application should stop running and you should see a blank display. - Type the camera_mux command with the -n 1 option to run the application
using one camera:
# camera_mux -n 1
Build the Camera MUX application
On your host computer, the source code is provided for the Camera MUX application. You can build the source code and deploy the resulting binary onto your target.
- A ZIP file installed with the QNX SDP 7.1 Sensor Framework Base package is located at installation_directory/source/sf-camera-examples-version.zip. You must extract it to get the ZIP file for the camera examples.
- In the extraction_directory/source_package_sf_camera directory, there's a README.txt that you can follow to build the application.
- Create a backup of the original camera_mux file on your target. This file is found in the target's /usr/bin/ directory.
- Deploy your newly built version of the Camera MUX application, by navigating to extraction_directory/source_package_sf_camera/apps/sensor/camera_mux/nto/aarch64/o/so.le on your host and transferring the camera_mux file to the /usr/bin/ directory on the target. You can use the QNX Momentics IDE to transfer the file.
- Connect to your target through a terminal connection and run the Camera MUX application.