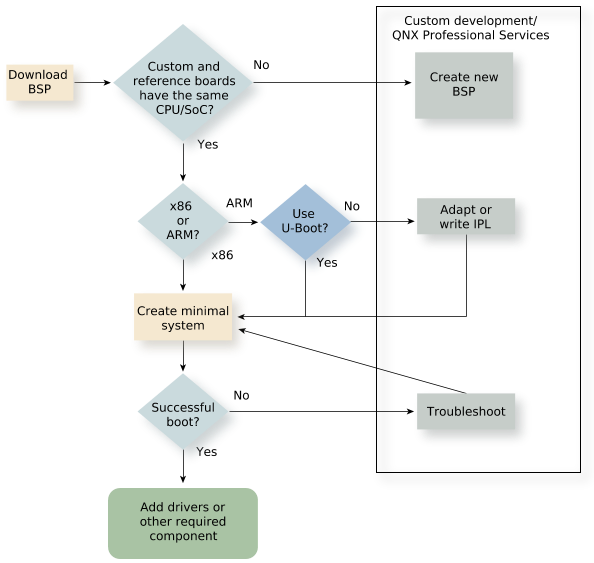
BSP development begins with a reference BSP from QNX.
The availability of compatible BSP components and your board’s specifications determine which options you select for loading and booting the OS. Generally speaking, the goal is to successfully complete a step of the boot process before proceeding to the next step.
An alternative to developing custom BSP components yourself is QNX Professional Services, which is available to create custom BSP content, including drivers.
Reference BSP
Before you attempt to customize an existing BSP, familiarize yourself with the overall process of booting a QNX system on a target platform. This process includes obtaining a BSP and using it to build a bootable image that you transfer from your host system to your target board.
You can then select a BSP to use as a starting point for your custom BSP.
For information about obtaining a BSP, its structure, and the Makefile instructions that build a target image, see “Working with QNX BSPs” in the Building Embedded Systems guide.
x86 vs. ARM platforms
Traditionally, when an x86 system boots, it provides some sort of first-stage OS loader. In older systems, this first-stage loader was the BIOS. Newer systems replace the x86 BIOS with a UEFI (Unified Extensible Firmware Interface), which provides a method for loading the OS image from the boot device and enhanced features that the system can use at runtime. In general, x86 systems allow you to load the QNX boot image using whatever boot method the hardware provides (that is, the same loader you would use to load an operating system such as Windows or Linux).
ARM-based platforms also traditionally provide a bootloader with the reference hardware. In newer systems, the U-Boot loader is the most common bootloader that ARM targets provide. You can use U-Boot to load a QNX OS image into the target’s memory, the same as you would any other OS. In addition, QNX often provides a native bootloader, known as the Initial Program Loader (IPL). You normally use the IPL instead of U-Boot to accelerate the boot process or for boot operation configuration that cannot be performed using U-Boot. When you migrate an existing BSP to a new target board, QNX recommends that you use U-Boot as the bootloader for the new target board until you have completed porting all the BSP components.
- Initialize the hardware
- Set up a stack for the C-language environment
- Load the OS image into memory
- Initiate the QNX startup code
The IPL has to be customized for the hardware to correctly configure the memory controller, set the clocks, and perform other hardware initializations.
Full information about the IPLs for each type of board, see Initial Program Loaders (IPLs)in the Building Embedded Systems guide.
Using U-Boot
During the development process, it can be helpful to use U-Boot to manually boot the hardware and load the OS, even if your board supports the QNX IPL. For example, using U-Boot allows you to eliminate the IPL as a possible source of a booting problem.
In most cases, the final BSP uses an IPL because it is faster and is designed specifically to bring up with QNX OS.
CPU vs SoC
On older embedded systems, the CPU was usually a stand-alone device and all other functionality was implemented via external Integrated Circuits (ICs). For example, a board with a CPU, a network interface IC, a USB Host Controller IC, a serial UART, an external host/PCI bridge device, and so on. For this type of board architecture, it was often not feasible to try to adapt the QNX BSP for a reference design to a different board with the same CPU because the new board could have different external peripherals and require you to update or replace all of the device drivers for peripheral devices.
Newer embedded systems are increasingly using System on a Chip (SoC) processors, where the CPU core is coupled with a variety of different peripheral interfaces within the same IC package. With an SoC, when you port a BSP from a reference board to a new board using the same IC, you can re-use all of the device drivers in the BSP (or at least all the ones for peripherals contained within the SoC), with minimal changes. In this document, discussions about customizing BSPs assume that the target embedded system you are porting the BSP to uses the same SoC as the hardware that the reference BSP was developed for.
Minimal bootable system
Attempting to boot QNX Neutrino on your board with the bare minimum number of services allows you to isolate any problems. To create a minimal system, edit the OS image buildfile to exclude any services or other components that are not necessary for a baseline, functioning OS.
- Serial driver (to allow you to long in and observe the OS start up)
- The startup script
- slog2info (to allow you to get debugging information)
- Come commands such as ls, pwd, cd, cat (to allow you to view files and configuration, if you need to troubleshoot a service)
The primary module you need to adapt to get a minimal QNX system working on a new target is the QNX startup module. This module takes over after the first-stage bootloader (BIOS, UEFI, U-boot, or IPL) has finished executing. The startup code executes after it has been copied from the boot device into the system’s DRAM. The startup code sets up a number of in-memory data structures by populating them with information about the hardware, so that the QNX kernel and other device drivers can run. Collectively, these data structures are known as the QNX system page (syspage).
When you adapt startup code from an existing BSP to a new target board, ensure your investigation includes the following system elements:
- DRAM memory size
-
The startup code usually has a routine that determines how much DRAM is installed in the system based on information that U-Boot or the IPL passes to it. However, in some cases, you need to manually specify how much DRAM is present in the system.
For example, the target system that the original BSP was written for has 2 gigabytes of DRAM, but your custom target has only 1 gigabyte of DRAM. To ensure that the startup code doesn’t populate the system page with incorrect information, update it to specify the correct DRAM size. (If the QNX kernel thinks there is 2 gigabytes of DRAM present when there is actually only 1 gigabyte present, the kernel crashes as soon as you try to boot the system.)
- CPU Frequency and clocks
-
As with DRAM memory size, it is important to go through the startup code to ensure that the clock initialization is correct for your target board, if the CPU core frequency or any of the peripheral clocks differ from the reference BSP.
- Pinmux and GPIO configuration
-
Although a variety of common peripherals can be built into the SoC, the method that internally connects these peripheral blocks to the CPU core can sometimes be configurable by the software.
For example, a peripheral such as a UART interface can have the option of using two or three different sets of multiplexed pins that transmit UARTsignals from the SoC to external devices. Unless the custom board you are porting to uses exactly the same pin configuration as the reference board, you need to modify the startup code’s init_pinmux() routine to ensure that each peripheral’s signals are routed to the correct sets of external pins on the SoC.
Similarly, some peripherals utilize GPIO (general purpose input/output) pins on the SoC for particular functionality. To accommodate any differences in GPIO pin utilization between the reference hardware and the custom hardware, ensure that you examine the portion of the startup code that initializes the GPIO pins and modify it if necessary.
For information about building an OS image, see OS Images and OS Image Buildfiles in Building Embedded Systems.
Drivers
Each QNX BSP provides a variety of device drivers for the various peripherals found on the target hardware that the BSP is intended for. In general, you can re-use all device drivers for peripherals that are internal to the SoC without any modification if that the pinmux and GPIO configuration for those peripherals is properly addressed in the startup code.

In many cases, only minor modifications to the device driver’s command line are necessary to enable a driver from a reference BSP to operate properly on the new target board. You can specify all parameters such as IRQ, I/O port, clock speed, and so on, on the command line. Use the command line examples from the reference BSP to determine what changes (if any) you need to make for your custom hardware.
For more information about drivers and instructions for writing one and adding it to your BSP, see Writing a Resource Manager.