You can connect other cameras to your S32V board.
You can use CSI2, file, or GigE cameras to run with the image. After you connect your cameras to the S32V board, you must make configuration changes. Depending on the cameras you connect, custom SLM and sensor configuration files may need to be created. For more information, see the “Configure cameras on the reference image” section. in this chapter.
CSI2 cameras
To connect 4 CSI2 cameras to your S32V, you need the following:
- a gigabit multimedia serial link deserializer to connect the 4 cameras (e.g., MAX9286)
- 4 CSI2 cameras
- a wire to supply power to the deserializer
- Remove the main power supply (12V DC adapter) from the S32V.
-
Remove the appropriate jumpers from your board.
- For the board revision EVB:
-
Remove the jumper from either J10 or J9, depending on which MIPI CAMERA slot (A or B respectively) you are using to connect the deserializer.
 Note: We recommend to use CAMERA B slot because you need to reconfigure the hardware to be able to use CAMERA A.
 - For the board revision EVB2:
-
Remove the jumper from either J4 or J6, depending on which MIPI CAMERA slot (1 or 2 respectively) you are using to connect the deserializer.
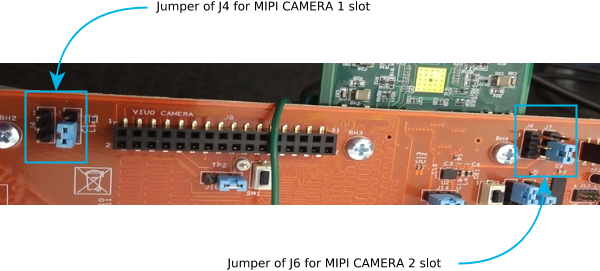 Note:
Note:Keep jumpers on J5 and J7 pins 2 and 3 (as shown).
We recommend to use CAMERA 2 slot because you need to reconfigure the hardware to be able to use CAMERA 1.
- Connect your deserializer to the S32V.
-
Connect a wire to supply power to the deserializer.
- For the board revision EVB:
-
Using a wire, connect the middle pin of JU4 of the MAX9286 deserializer to the bottom pin of J77 of the S32V.

- For the board revision EVB2:
-
Using a wire, connect the middle pin of JU4 of the MAX9286 deserializer to the pin of J102 of the S32V.

- Connect the 4 CSI2 cameras to the deserializer.
- Reconnect the power supply to the S32V. You can now flip power switch (beside the power connector) to power on your S32V board when you're ready to use the cameras.
GigE cameras
You can connect GigE cameras (also known as network cameras and IP cameras) that are compliant to the GigE Vision standard. The camera doesn't need to be connected to your target, but it must be connected to the same network as your target.
File cameras
You can use file cameras. However the S32V has no decoder, and therefore, supports only uncompressed formats of MOV and UCV. Videos must be recorded in the CbYCrY (uyvy) pixel format for playback.