Operating systems, development tools, and professional services
for connected embedded systems

Getting Started

Getting Started

In this chapter:

Starting the IDE

Depending on which host you're using, after you install the QNX Software Development Platform, you'll see a desktop icon and/or a menu item labeled “Integrated Development Environment” in the start or launch menu. To start the IDE, click the icon or select the menu item.

Starting the IDE for the first time

The first time you start the IDE on Windows, the Workspace Launcher dialog prompts you for a location to store your workspace. All of your IDE projects are stored in this directory.


Workspace Launcher


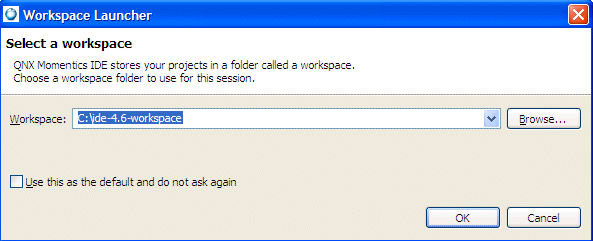
Selecting a workspace directory.

By default, the IDE offers to put your workspace in home_directory/ide-4.6-workspace on Linux, and C:\ide-4.6-workspace on Windows.

To store your workspace in another location:
Click Browse… and select a directory for your workspace.

To continue loading the IDE, click OK.


Note: Check the Use this as the default and do not ask again box to always use the selected workspace when launching the IDE.

To change the default workspace location on Linux, launch qde with the -data workspace_path option, where workspace_path is the location to your working directory.

For information about redirecting the IDE to reference a different workspace, see the topic Specifying a workspace location in the IDE Concepts chapter.

The IDE welcomes you

After you choose a workspace location, the IDE shows a Welcome window with several options that help introduce you to the QNX Momentics IDE:

Icon Description
Overview Information: Provides links to overviews within the IDE, including the Documentation Roadmap, Team Support (an important topic if you use CVS or Subversion), Workbench Basics, and the C/C++ Online Documentation.
Tutorials Tutorials: Provides links to the tutorials for building your first QNX applications.
Workbench Samples: Provides links to samples to help you explore QNX Momentics IDE by installing various prefabricated samples.
What's New What's New: Provides links to documents describing the new features in this release, and information about migrating from a previous release.
Workbench Open Workbench: Opens the workbench window and minimizes the Welcome page.

You can return to this Welcome window at any time by choosing Help-->Welcome.

Starting the IDE from the command line

You can start the IDE by running the qde command:

  1. For Windows, navigate to the directory where the qde.exe executable is located (for example, for Windows hosts, C:/QNX641/host/win32/x86/usr/qde/eclipse), and run the following command:
    qde
  2. For Linux, navigate to the directory where the qde script resides, and run this command:
    ./qde

Note: Don't run the eclipse command, even though it may seem to work. Always use qde instead, because it configures the proper QNX-specific environment.

For details about directing the IDE at a particular workspace location, see the topic Specifying a workspace location in the IDE Concepts chapter.

For more information about starting the IDE, including advanced execution options for developing or debugging parts of Eclipse itself, see Tasks-->Running Eclipse in the Workbench User Guide.

Using the workbench

When you first start the QNX Momentics IDE, it shows the Welcome window. To advance directly to the workbench, choose the workbench icon at the right.


Workbench


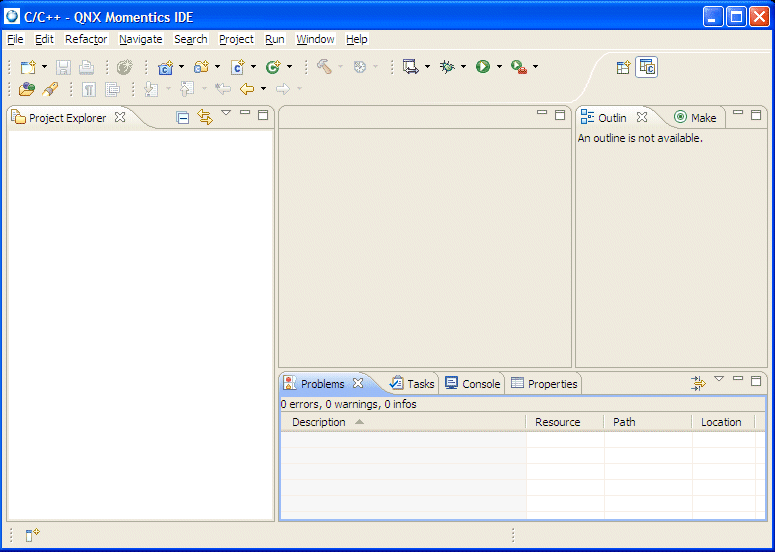
The Workbench window.

For details about the Workbench menu, see Reference-->User interface information-->Workbench menus in the Workbench User Guide. For a basic tutorial about using the workbench UI, see Getting Started-->Basic tutorial-->The Workbench in the Workbench User Guide.

Using the QNX help system

The IDE includes a help system, an HTML server that runs in its own window, separate from the workbench. This means that the help system isn't a perspective or a view.

To open the IDE Help:
From the main menu, select Help-->Help Contents.

If you're using an external web browser, the IDE starts a web server running on a random port (alternatively, you can specify a port in the Preferences window using Window-->Preferences…-->Help-->Content). You can access the help system through this port using any web browser; you aren't limited to the browser launched by the IDE.


Note: If your help system uses a random port, opening and closing the help several times can confuse some anti-spyware programs, and they may conclude that the help system is a malignant program trying to do nefarious activities with your computer. At this point, the anti-spyware program will either block the program from opening ports (which will disable the online help), or warn you about the strange activity.

Unless you're extremely low on RAM, keep the online help system open until you're finished using the IDE. This prevents any anti-spyware programs from confusing the IDE with a virus, and also lets you refer to the online documentation quickly whenever you need to.


Navigating the help

The left pane of the Help window is the bookshelf, which has links to the various documentation sets. Click one of the links to view a document. You can return to the bookshelf at any time by clicking the Table of Contents button (Icon: Help Window; Home button).

The Contents pane includes at least the following titles:

Workbench User Guide
Written by Eclipse.org, the book explains Eclipse concepts and core IDE functionality, and includes tutorials about using the workbench. Although some of the workbench topics are covered briefly here in this IDE User's Guide, you can find complete documentation about using the workbench in the Eclipse Workbench User Guide.
QNX Momentics
The QNX documentation set includes the following titles:
  • A Roadmap to QNX Momentics Software Development Platform
  • Dinkum library documentation
  • Getting Started with QNX Neutrino
  • QNX High Availability Framework
  • Phindows for QNX Neutrino
  • QNX Momentics Phindows Connectivity
  • QNX Neutrino Photon Multilingual Input
  • QNX Photon microGUI Windowing System
  • QNX Neutrino Adaptive Partitioning
  • QNX Neutrino Advanced Graphics
  • QNX Neutrino Core Networking
  • QNX Neutrino Multicore Processing
  • QNX Neutrino Instant Device Activation
  • QNX Neutrino Realtime Operating System (featuring the System Architecture Guide, User's Guide, Utilities Reference, and Library Reference)
  • QNX System Analysis Toolkit
  • QNX Neutrino Driver Development Kits (DDKs), and much, much more
QNX Momentics IDE User's Guide
Featuring this User's Guide. Describes the QNX Integrated Development Environment, how to set up and start using the tools to build QNX-based target systems, etc.
QNX Momentics IDE Cheat Sheets

Note: Some title pages have content on them, some don't. If you click a title, and the right side of the window remains blank, you've selected a “placeholder” title page. Simply expand the title entry to see its contents.

Help bookmarks

To create a bookmark for any help page:

  1. On the Help browser's toolbar, click the Bookmark Document button (Icon: Help Window; add bookmark button).
  2. To see your bookmarks, click the Bookmarks (Icon: Help Window; bookmarks view button) tab at the bottom of the Contents pane.

To learn more about the IDE's Help system, follow these links in the Eclipse Workbench User Guide: Concepts-->Help system.

Tips and tricks

When you select the Tips and Tricks item from the Help menu, you'll see a list of tips and tricks pages. Select the page for the Eclipse platform, which covers several topics:

Creating a project

In order to develop applications, you first need to create a project that will contain your source code and related files. (The project will have an associated builder that incrementally compiles source files as they change.)

To create a project:

  1. Select File-->New-->Project….
  2. Select the type of project you want to create. For example, expand C++ and select C++ Project, then click Next.

    By default, the CDT filters the Toolchain and Project types that show in the resulting lists based on the language support for the project type you selected.

    New Project wizard

  3. In the Project name field, type a name for your project.
  4. Optional: If you want to tell the IDE where the resources reside in the filesystem (if they don't reside in your workspace), disable the Use Default Location option.
  5. Required (when Use Default Location is not selected): In the Location field, type the path to your source (or click Browse…).
  6. Click Next.

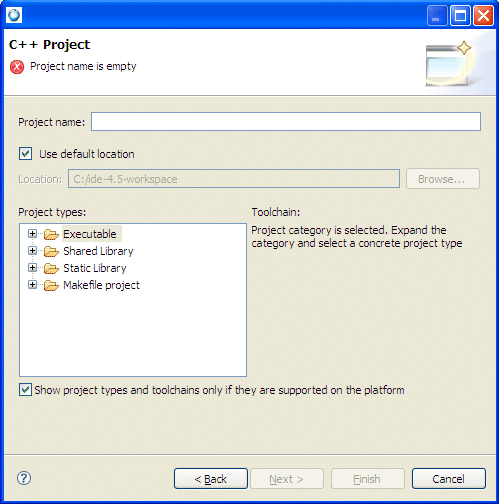
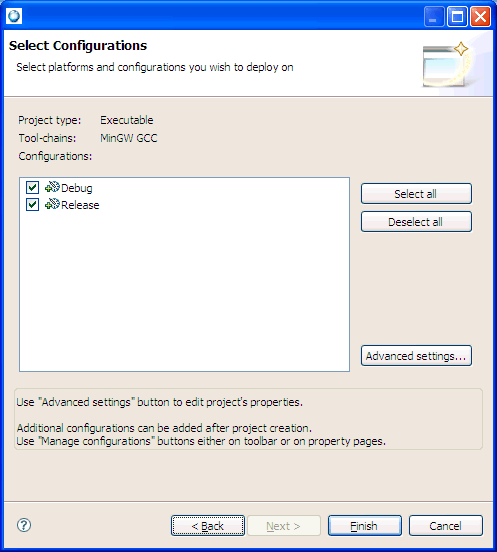
    You want to select a type for your project from the following:

    • Executable — Provides an executable application. This project type folder contains the following templates.
      • Hello World C++ Project — a simple C++ application with main().
      • Hello World ANSI C Project — a simple C application with main().
      • Empty Project — a single source project folder that doesn't contain any files.

      After specifying an Executable template, the workbench creates a project with only the metadata files required for your project type. Now, you can modify these source files, as required, and provide the source files for the project's target. Note that for an Executable project type, a makefile is automatically created for you.

    • Shared Library — An executable module compiled and linked separately. When you create a project that uses a shared library (libxx.so), you define your shared library's project as a Project Reference for your application. For this project type, the CDT combines object files together and joins them so they're relocatable and can be shared by many processes. Shared libraries are named using the format libxx.so.version, where version is a number with a default of 1. The libxx.so file usually is a symbolic link to the latest version. The makefile for this project type is automatically created by the CDT.
    • Static Library — A collection of object files that you can link into another application (libxx.a). The CDT combines object files (i.e. *.o) into an archive (*.a) that is directly linked into an executable. The makefile for this project type is automatically created by the CDT.
    • Makefile Project — Creates an empty project without any metadata files. This template type is useful for importing and modifying existing makefile-based projects; a new makefile isn't created for this project type.

    By default, the Toolchain and template types that are currently shown in the lists are based on the language support for the project type that you selected.

  7. From the Project types list, expand Executable and select a project type. For example, if you selected Hello World C++ Project, the IDE provides you with a simple Hello World application in C++ format, and the CDT automatically creates a corresponding makefile.

    Select a template for a project type

  8. Select a required toolchain from the Toolchain list.

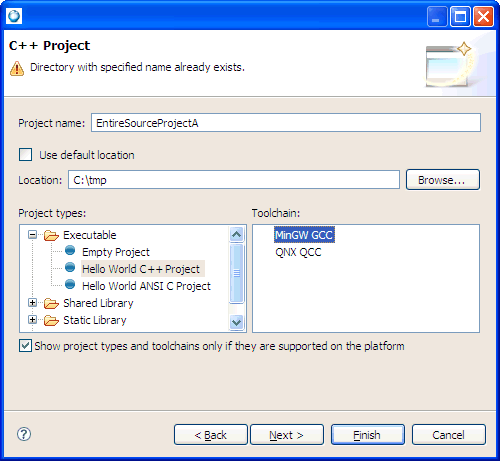
    A toolchain represents the specific tools (such as a compiler, linker, and assembler) used to build your project. Additional tools, such as a debugger, can also be associated with a toolchain. Depending on the compilers installed on your system, there might be several toolchains available to select from.

  9. Click Next.
  10. Select the types of platforms and configurations you want to use for this project.

    Select platforms and configurations

  11. Click Advanced Settings.
  12. Expand C/C++ Build and select Settings.
  13. Click the Binary Parsers tab.
  14. Select a parser.

    To ensure the accuracy of the Project Explorer view and the ability to successfully run and debug your programs, selecting the correct parser is important. After you select the correct parser for your development environment and build your project, you can view the components of the .o file in the Project Explorer view. You can also view the contents of the .o file in the C/C++ editor.

  15. Click OK.
  16. Click Finish.

    If a message box prompts you to change perspectives, click Yes.

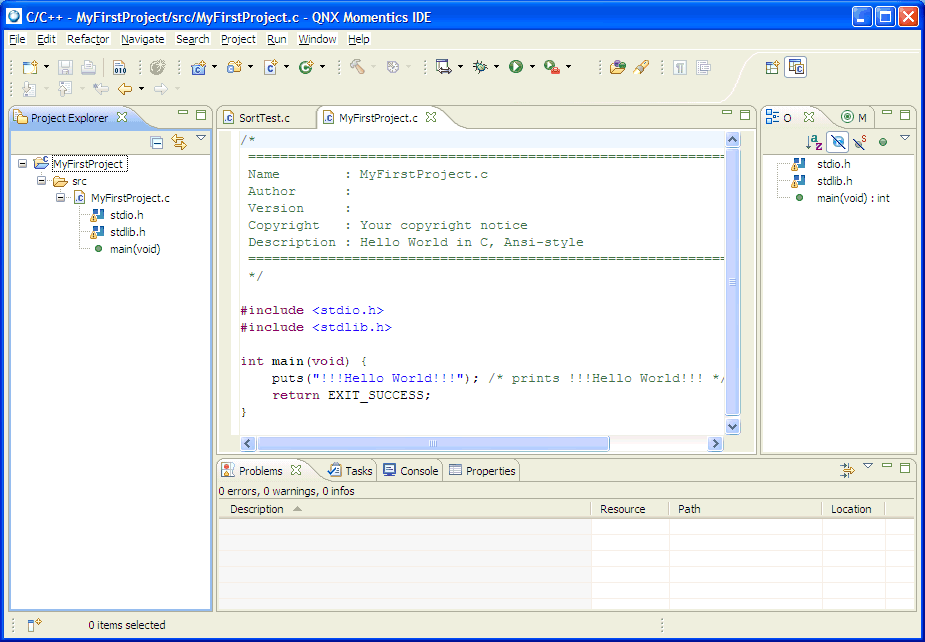
    Your new project is displayed in the Project Explorer view, and in the Navigator view. You should now have a project that looks something like this in the Project Explorer view:

    Entire source project example

Creating a C Makefile project

Assuming that the working directory of the make is the root folder of the project, to create a C Makefile project:

  1. Select File-->New-->Project, select C-->C Project, and then click Next.
  2. In the Project name field, type a name for your project.
  3. In the Project Types area, expand Makefile and select Empty project.
  4. In the Toolchain list, select QNX QCC.
  5. Click Finish.

    Next, you'll change the project properties.

  6. In the Target Navigator, select the new project you created, right-click and select Properties.
  7. On the left, select C/C++ Build.
  8. On the right, select the Builder settings tab and deselect the option Use default build command.
  9. In the make field, add the command line (without the target to build) that calls your make (e.g. >c:\make\make -f makefile.mak -k).
  10. Click the Behavior tab, then add your targets for running an incremental build, the clean build, and the compile build.
  11. Ensure that the option Build (Incremental Build) is selected; otherwise, the build can't be started.
  12. Specify any other desirable options for properties on the other panels.
  13. Click OK.
  14. When everything is properly configured, from the toolbar menu select Project-->Build Project to run the make project.

Renaming a project

You can rename a project, and have all references changed using the refactoring engine.

To rename a project: In the Project Explorer view, right-click a project, and select Rename.

Preferences

The Preferences dialog (in the Window menu) lets you customize the behavior of your environment, such as when to build your projects, which target processors to build for, and how to open new perspectives.


Preferences menu


The Preferences main menu.


Note: Besides global preferences, you can also set preferences on a per-project basis using the Properties item in right-click menus.

Importing preferences

You can import an existing preference file to the Workbench that will let you easily share individual or group preferences. You use the Import wizard to import preferences from the local filesystem to the IDE Workbench.

To import a preference file:

  1. Select File-->Import.
  2. In the Import wizard select General-->Preferences and click Next.
  3. Click Browse and locate the preferences file on the local filesystem.
  4. Select one of the following:
    • Import all to accept all of the preferences defined in the file.
    • Choose specific preferences to import to select only specified preferences defined in the file.
  5. Click Finish.

Exporting preferences

Use the Export wizard to export preferences from the Workbench to the local filesystem. Exporting an existing preference file from the IDE Workbench lets you easily share preferences with other individuals or a group.

To export a preference file:

  1. Select File-->Export.
  2. In the Export wizard, select General-->Preferences, and then click Next.
  3. Select one of the following:
    • Export all to add all of the preferences to the file.
    • Choose specific preferences to export only the specified preferences to the file.
  4. Click Browse and locate the preferences file on the local filesystem.
  5. Click Finish.

Note: If there were no changes to the original preference settings in the IDE, the exported preferences file will be empty.

Setting export options for a BSP

To configure the options to export a BSP:

  1. Click File-->Export….
  2. Expand General, select Archive File, and then click Next.
  3. For the BSP project, you'll need to deselect the top level folder.
  4. Expand the folder, and then select all of the files and folders under the top level folder that you deselected earlier.
  5. In the To Archive File field, type a name for the archive file.
  6. Select the Create only selected directories option, and then click Finish.

Now, the IDE exports the BSP project to an archive zip file, and other users can then import the BSP project into their IDE.

Updating the IDE using the Software Updates Manager

The IDE includes a Software Updates Manager that you can use to find and install new features for the IDE.

To update the IDE using the Software Updates manager:

  1. Log in as a root on Linux, or as a user who has system-administrator privileges on Windows.
  2. Start the QNX Momentics IDE.
  3. Do one of the following:
    • For updates to currently installed features:
      1. Click Help-->Software Updates-->Find and install.
      2. Select Search for updates of the currently installed features.
      3. Click Finish.
      4. If prompted for an update site, click OK to select the default update site, or choose another mirror site from the list.
      5. When prompted, log into your myQNX account with a valid user name and password, and then click OK.
      6. Select a QNX Momentics Update Site from the list.

        You can expand the selected item to see the selection of QNX Momentics IDE features for installation.

      7. Click Next.
      8. Carefully review the license agreements for the update. If the terms of all these licenses are acceptable, select I accept the terms in the license agreements. Don't proceed to download the features if the license terms aren't acceptable. If a selected feature for installing includes optional features, another page lets you select whether you want to continue.
      9. Click Next.
      10. Click Finish.
      11. Click Install All to allow the installation process to proceed.
      12. After the new feature and plugins are downloaded successfully, and their files are installed into the IDE on the local computer, a new configuration is formulated.
      13. When prompted, click Yes to exit and restart the workbench for this update to take effect.
    • For updates to new features:
      1. From within the IDE, click Help-->Software Updates-->Find and install.
      2. Select Search for new features to install.
      3. Click Next.
      4. Select a site from the list, or click one of the following:
        • New Remote Site and then specify a name and a URL for the update site, and then click OK.
        • New Local Site and browse to the location where you downloaded the update package file, select the file, and click OK.
      5. Click Finish.
      6. When prompted, log into your myQNX account, and then click OK.
      7. Expand update site items and view the features included in installation package.
      8. Select the features you want installed.
      9. Click Next.
      10. Carefully review the license agreements for the update. If the terms of all these licenses are acceptable, select I accept the terms in the license agreements. Don't proceed to download the features if the license terms aren't acceptable. If a selected feature for installing includes optional features, another page lets you select whether you want to continue.
      11. Click Next.
      12. Click Finish.
      13. Click Install All to allow the installation process to proceed.
      14. When prompted, click Yes to exit and restart the workbench for this update to take effect.

    Note:

    If you install software updates (via Help-->Software Updates), the wizard may list some secondary update sites. You install updates from such sites at your own risk.

    After you perform a software update, you will need to update qconn.


Updating qconn on a development system

To update qconn on your development system:

  1. In the IDE, select Help-->Software Updates-->Qconn Updates….
  2. Click OK to let the IDE update qconn on your host.

Note: If you already have the latest version of qconn, or if you choose Software Updates-->Qconn Updates… from the Help menu again, the IDE offers to uninstall the qconn update.

After you update qconn on your development system, you then need to update the version of qconn on your target system. How you do this depends on your target system; you might have to build a new image, or you might simply have to copy the new version to your target.

Copying a new version of qconn to a target system

To copy a new version of qconn to a target system:

  1. Use slay qconn on the target to stop any existing running qconn.
  2. Copy $QNX_TARGET/target/usr/sbin/qconn to your target system's /usr/sbin directory.
  3. Ensure that the qconn in the target's /usr/sbin directory is executable; if it isn't, use chmod +x to make it executable.
  4. On the target, launch the new qconn.